开发背景
博主正在担任一款电商app的全栈开发,其中涉及到一个视频通话功能。但是由于业务需求及成本考虑,不能使用第三方提供的SDK进行开发。所以博主选择使用PeerJs+WebSocket来实现这个功能。
专业名词、术语解释
WebSocket
WebSocket是一种在单个TCP连接上进行全双工通信的协议。WebSocket通信协议于2011年被IETF定为标准RFC 6455,并由RFC7936补充规范。WebSocket API也被W3C定为标准。
WebSocket使得客户端和服务器之间的数据交换变得更加简单,允许服务端主动向客户端推送数据。在WebSocket API中,浏览器和服务器只需要完成一次握手,两者之间就直接可以创建持久性的连接,并进行双向数据传输。
WebRTC
WebRTC(Web Real-Time Communications) 是一项实时通讯技术,它允许网络应用或者站点,在不借助中间媒介的情况下,建立浏览器之间点对点(Peer-to-Peer)的连接,实现视频流和(或)音频流或者其他任意数据的传输。WebRTC 包含的这些标准使用户在无需安装任何插件或者第三方的软件的情况下,创建点对点(Peer-to-Peer)的数据分享和电话会议成为可能
PeerJs
PeerJS simplifies WebRTC peer-to-peer data, video, and audio calls.
PeerJS wraps the browser’s WebRTC implementation to provide a complete, configurable, and easy-to-use peer-to-peer connection API. Equipped with nothing but an ID, a peer can create a P2P data or media stream connection to a remote peer.
以上内容来源于PeerJs官网介绍,大概的意思如下(仅供参考,博主英语不好):
PeerJS简化了WebRTC点对点数据、视频和音频呼叫。
PeerJS封装了浏览器的WebRTC实现 提供一个完整 可配置且易于使用的点对点连接API,只需要一个id就能创建到远程的P2P数据或媒体流连接。
PeerJs官网:https://peerjs.com
PeerJs官方文档:https://peerjs.com/docs/
技术应用场景及分析
WebSocket
主要用于即使通讯,辅助建立P2P视频通话,WebSocket即时通讯不是本文探讨的重点,有关WebSocket即时通讯的相关内容可以参考博主的另一篇WebSocket即时通讯的博客:https://blog.csdn.net/daiyi666/article/details/124824543?spm=1001.2014.3001.5501
WebRTC
经过上面对WebRTC的官方解释,估计很多小伙伴还是有点懵的状态。简而言之呢,WebRTC就是用于实现端到端这样的一个即时通讯的技术,也就是说无需经过服务器中转(建立连接以后)。相信很多了解过IPV4技术的小伙伴都知道,如果两个终端处在不同的网络下,是无法直接进行通信的,因为经过了NAT,而WebRTC可以借助一个公网的服务器,我们称之为“信令服务器”,以及一个“ICE”服务器进行身份信息交换和打洞,打洞完成之后即可进行P2P通信,且不再需要服务器进行中转
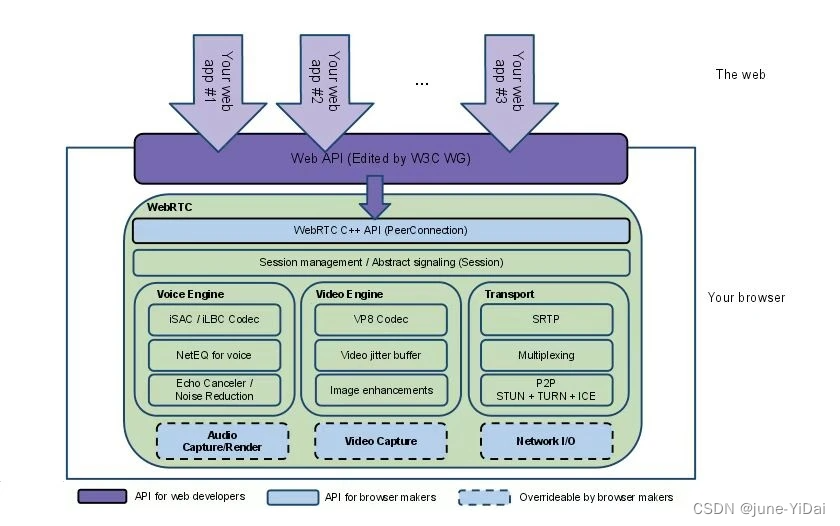
WebRTC架构图
WebRTC常用API
| API | 用途 |
|---|---|
| getUserMedia() | 获取用户的摄像头以及麦克风 |
| RTCPeerConnection() | 端到端连接之间建立音视频通信及 NAT 穿透 |
| RTCDataChannel() | 端到端之间数据共享 |
编码实现
前端(关键代码)
打开摄像头和麦克风
要实现视频通话,首先应该要能够打开摄像头和麦克风,那么如何在浏览器中打开摄像头和麦克风,还有如何解决浏览器兼容问题呢,请参考以下代码:
function getUserMedia(constrains) {


    if (window.navigator.mediaDevices.getUserMedia) {


        return window.navigator.mediaDevices.getUserMedia(constrains);
    } else if (window.navigator.webkitGetUserMedia) {


        return window.navigator.webkitGetUserMedia(constrains);
    } else if (window.navigator.mozGetUserMedia) {


        return window.navigator.mozGetUserMedia(constrains);
    } else if (window.navigator.getUserMedia) {


        return window.navigator.getUserMedia(constrains);
    }
}
getUserMedia函数将会返回一个Promise对象,这个Promise对象就封装了摄像头和麦克风的流媒体,而参数constrains是作为一个约束出现,通过这个约束对象,可以设置获取到的视频或音频的一些参数,如视频宽高,消除回音等,具体请参考https://developer.mozilla.org/en-US/docs/Web/API/MediaDevices/getUserMedia传送门
预览摄像头画面(vue3环境)
模板
<template>
	<video ref="localCameraVideo"></video>
	<video ref="remoteCameraVideo"></video>
</template>
script(setup 语法糖)
import {

     onMounted, ref } from "vue";
const localCameraVideo = ref();
const remoteCameraVideo = ref();

onMounted(() => {


    getUserMedia().then(userMedia => {


    	//通过video对象的srcObject 赋值userMedia 就能预览到画面
	    localCameraVideo.value.srcObject = userMedia;
	    localCameraVideo.value.play();
	});
});
注意事项
- video标签需要有宽高,不然会显示不出来
getUserMedia需要在localhost或者https环境中才能打开摄像头,否则将会报错,如果要部署测试,又没有https证书,那么可以通过设置谷歌浏览器参数绕过安全检测,具体操作是,右键谷歌浏览器图标->属性->目标
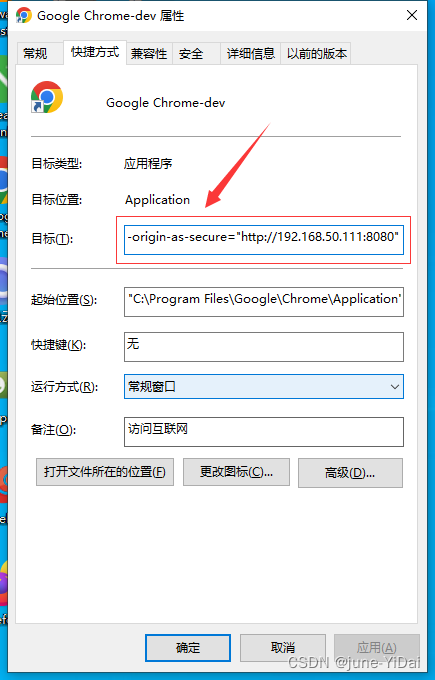
在路径后面添加以下参数:--unsafely-treat-insecure-origin-as-secure="你的服务器地址",示例:"C:\Program Files\Google\Chrome\Application\chrome.exe" --unsafely-treat-insecure-origin-as-secure="http://192.168.50.111:8080"
建立WebSocket连接
博主使用了reconnecting-websocket库进行WebSocket连接,可根据实际情况选择其他库或者用原生WebSocket进行编码,有关WebSocket即时通讯的相关内容可以参考博主的另一篇WebSocket即时通讯的博客:https://blog.csdn.net/daiyi666/article/details/124824543?spm=1001.2014.3001.5501
function establishWebSocketConnection() {


	const webSocketConnection = new ReconnectingWebSocket("你的WebSocket服务器地址");

	webSocketConnection.onopen = () => {


		//do something
	};

	webSocketConnection.onmessage = event => {


		//do something
	};

	return webSocketConnection;
}
可能有的小伙伴困惑为什么要用WebSocket,这是因为后面创建了Peer对象之后会有一个ID,这个ID是全局唯一的,代表着一个Peer客户端,我们需要用WebSocket把这个ID发送给服务器,以及客户端离线之后从服务器上移除这个ID,还有从服务器即使更新在线的客户端等,当然也可以用ajax,只是WebSocket更具备即时性
创建Peer对象,并将ID通过WebSocket发送到服务器
function createPeerSendToWebSocketServer(webSocketConnection) {


	const peer = new Peer();
	//当peer被打开时被执行,peerId是全局唯一的
	peer.on("open", peerId => {


		console.log("peer opend, the peerId is:", peerId);

		peer.on("close", () => {


			console.log("peer close....");
			//(呼叫方和接收方的ID都应该保存到服务器)
			//此处应该发送一个JSON对象给服务器,方便判断,以下是伪代码,用于演示
			webSocketConnection.send(peerId);
		});

		//(呼叫方和接收方的ID都应该保存到服务器)
		//此处应该发送一个JSON对象给服务器,方便判断,以下是伪代码,用于演示
		webSocketConnection.send(peerId);
	});

	return peer;
}
呼叫对方
//peerId是对方的peer id,localUserMedia是上面通过getUserMedia获取到的(promise调then)
const call = peer.call(peerId, localUserMedia);

//当得到流时调用,remoteUserMedia 是对方的流媒体,直接赋值给video的srcObject 属性,就可以看到对方的画面了
call.on("stream", remoteUserMedia => {


      remoteCameraVideo.value.srcObject = remoteUserMedia;
      remoteCameraVideo.value.play();
  });
});
接受方
//当收到对方的呼叫时调用,mediaConnection 封装了媒体连接
peer.on("call", mediaConnection => {


	//通过mediaConnection相应给对方自己的媒体信息
	mediaConnection.answer(localUserMedia);

	//当得到流时调用,remoteUserMedia 是对方的流媒体
	mediaConnection.on("stream", remoteCameraStream => {


	   remoteCameraVideo.value.srcObject = remoteCameraStream;
	   remoteCameraVideo.value.play();
	});
});
后端(关键代码)
pom依赖
<?xml version="1.0" encoding="UTF-8"?>
<project xmlns="http://maven.apache.org/POM/4.0.0" xmlns:xsi="http://www.w3.org/2001/XMLSchema-instance"
         xsi:schemaLocation="http://maven.apache.org/POM/4.0.0 https://maven.apache.org/xsd/maven-4.0.0.xsd">
    <modelVersion>4.0.0</modelVersion>

    <parent>
        <groupId>org.springframework.boot</groupId>
        <artifactId>spring-boot-starter-parent</artifactId>
        <version>2.7.3</version>
        <relativePath/> <!-- lookup parent from repository -->
    </parent>

    <groupId>com.fenzhimedia</groupId>
    <artifactId>video-call</artifactId>
    <version>0.0.1-SNAPSHOT</version>
    <name>video-call</name>
    <description>video-call</description>

    <properties>
        <java.version>17</java.version>
    </properties>

    <dependencies>
        <dependency>
            <groupId>org.springframework.boot</groupId>
            <artifactId>spring-boot-starter-web</artifactId>
        </dependency>

        <dependency>
            <groupId>org.springframework.boot</groupId>
            <artifactId>spring-boot-starter-websocket</artifactId>
        </dependency>

        <dependency>
            <groupId>org.springframework.boot</groupId>
            <artifactId>spring-boot-configuration-processor</artifactId>
            <optional>true</optional>
        </dependency>

        <dependency>
            <groupId>org.projectlombok</groupId>
            <artifactId>lombok</artifactId>
            <optional>true</optional>
        </dependency>

        <dependency>
            <groupId>org.springframework.boot</groupId>
            <artifactId>spring-boot-starter-test</artifactId>
            <scope>test</scope>
        </dependency>
    </dependencies>

    <build>
        <plugins>
            <plugin>
                <groupId>org.springframework.boot</groupId>
                <artifactId>spring-boot-maven-plugin</artifactId>
                <configuration>
                    <excludes>
                        <exclude>
                            <groupId>org.projectlombok</groupId>
                            <artifactId>lombok</artifactId>
                        </exclude>
                    </excludes>
                </configuration>
            </plugin>
        </plugins>
    </build>

</project>
注入serverEndpointExporter
package com.fenzhimedia.configuration;

import org.springframework.context.annotation.Bean;
import org.springframework.context.annotation.Configuration;
import org.springframework.web.socket.server.standard.ServerEndpointExporter;

/**
 * @author Yi Dai [email protected]
 * @since 2022/10/18 10:07
 */

@Configuration
public class WebsocketConfiguration {


    @Bean
    public ServerEndpointExporter serverEndpointExporter() {


        return new ServerEndpointExporter();
    }

}
监听websocket事件
package com.fenzhimedia.websocket;

import lombok.extern.slf4j.Slf4j;
import org.springframework.stereotype.Component;

import javax.websocket.OnClose;
import javax.websocket.OnError;
import javax.websocket.OnMessage;
import javax.websocket.Session;
import javax.websocket.server.ServerEndpoint;

/**
 * @author Yi Dai [email protected]
 * @since 2022/3/7 15:47
 */

@Slf4j
@Component
@ServerEndpoint("/videoCallServerEndpoint")
public class VideoCallServerEndpoint {


    @OnMessage
    public void onMessage(Session session, String stringMessage) {


        log.info("onMessage:the session is:{},the stringMessage is:{}", session, stringMessage);
    }

    @OnClose
    public void onClose(Session session) {


        log.info("onClose:the session is:{}", session);
    }

    @OnError
    public void onError(Session session, Throwable e) {


        log.info("onError:the session is:{},e:{}", session, e);
        e.printStackTrace();
    }

}
优化建议
以上代码为伪代码,用于演示,有很多可以优化的地方;如在vue挂在完成之后立即创建websocket连接,然后创建peer对象注册到服务器中,这样才能保证在线状态
演示demo
前端
https://gitee.com/daiyi-personal/video-call-web.git
后台(Java)
https://gitee.com/daiyi-personal/video-call-java.git