系统初识
作者介绍
张伟伟,男,西安工程大学电子信息学院,2019级硕士研究生,张宏伟人工智能课题组。
微信公众号:可随时查阅,搜索—张二牛的笔记,内容会分类上传。
研究方向:机器视觉与人工智能。
电子邮件:[email protected]
电子邮件:[email protected]
- 课题组CSDN官方账号,欢迎一键三连: https://blog.csdn.net/m0_37758063/article/details/113527955?spm=1001.2014.3001.5501.
1.课程内容简介
Linux基础,GPIO, PWM, wifi, ap创建和socket通信,
1.1 鸿蒙简介
操作系统 = 内核 + 功能组件
harmonyos和openharmonyos区别?
OpenHarmony 华为开源的是OpenHarmony,OpenHarmony相当于Android的AOSP(Android Open Source Project),即Android开源项目。所以OpenHarmony是一个开源项目,具有最基础的操作系统能力,任何组织机构和个人都可以下载使用,也可以贡献代码。
Openmonyos打包HMS形成HarmonyOS商业版操作系统。
1.2 应用场景
- 1+8+N
- 生态
上下游厂商共建的体系。
1.3 技术架构**
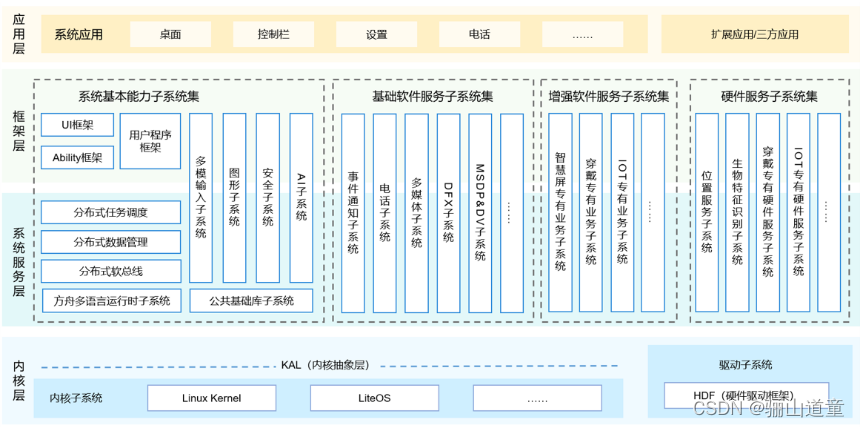
- 微内核和宏内核
微内核更安全
宏内核效率更高
微内核模块化、耦合性更低
Kernel mode
User Mode
1.3 鸿蒙系统的不同,创新
纵向分模块&横向分层
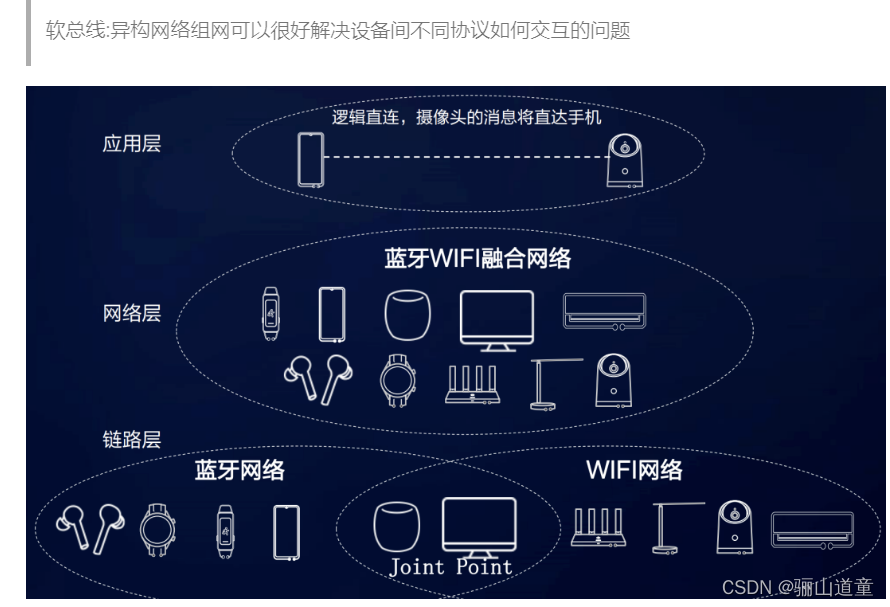
软总线和分布式调度
传统总线
总线是一种内部结构,它是cpu、内存、输入、输出设备传递信息的公用通道,主机的各个部件通过总线相连接,外部设备通过相应的接口电路再与总线相连接,从而形成了计算机硬件系统。
app场景开发 hap功能
1.4 鸿蒙的开发方向(南向开发和北向开发)–(上北下南)
北向 是纯软件开发,一般用java、js、C++等语言,注重业务逻辑,目标是实现应用功能,满足客户需求
南向 是软硬件结合的嵌入式开发,一般用C、C++,注重硬件操作和 能力封装,目标是提供北向API的内部实现
1.5 学习方法
盲人摸象:整体了解,再了解某些模块
2 C语言简介
2.1 硬件平台
购买链接:小熊派鸿蒙季BearPi-HM_Nano HarmonyOS 鸿蒙系统Hi3861开发板NFC.
BearPi-HM Nano(小熊牌开发板 RAM352kB,ROM288KB,2M Flash)
MCU:Hi3861RNIV100
E53 Inface
Reset Key
User’s Key
NFC:NT3H1201W0FHKH
NFC天线
USB Type-C Power-C supply
CH340E
2.2 编码开发环境搭建
- 使用mingw + Clion开发:
http://www.javashuo.com/article/p-pathshht-dp.html
1.安装mingw
2.安装Clion
---激活方法:https://www.yuque.com/docs/share/51f8cb83-f8c4-4b95-9f4f-d5f5ef66db7e
- 使用QT开发:
利用cmake构建:QT使用Cmake编译和构建项目.
cmake添加环境变量:
https://www.cnblogs.com/pscly/p/12837561.html
2.3 鸿蒙核心开发板开发环境搭建(day03)
鸿蒙的代码在Windows编写,Linux上编译,samba和ssh传递文件,windows上烧录。
Linux系统开发环境搭建
https://robot.czxy.com/ohos/day04/harmony_linux_env.html
未做:
sudo update-alternatives --install /usr/bin/python python /usr/bin/python3.8 1
sudo update-alternatives --install /usr/bin/python3 python3 /usr/bin/python3.8 1
2 设置python和python3软链接为python3.8
**hb安装出问题时0.4.6版本有问题:reaises …
采用0.4.3版本。**下载whl:https://pypi.org/project/ohos-build/0.4.3/#files
pip install ohos_build-0.4.3-py3-none-any.whl
https://pypi.org/project/ohos-build/#modal-close
2.4 元气派开发环境
pycrytodome安装太慢,同样使用离线安装方式。下载软件地址,得到whl:
https://pypi.org/project/pycryptodome/3.11.0/#files

samba环境搭建成功!
虚拟机开服务端
windows开客户端
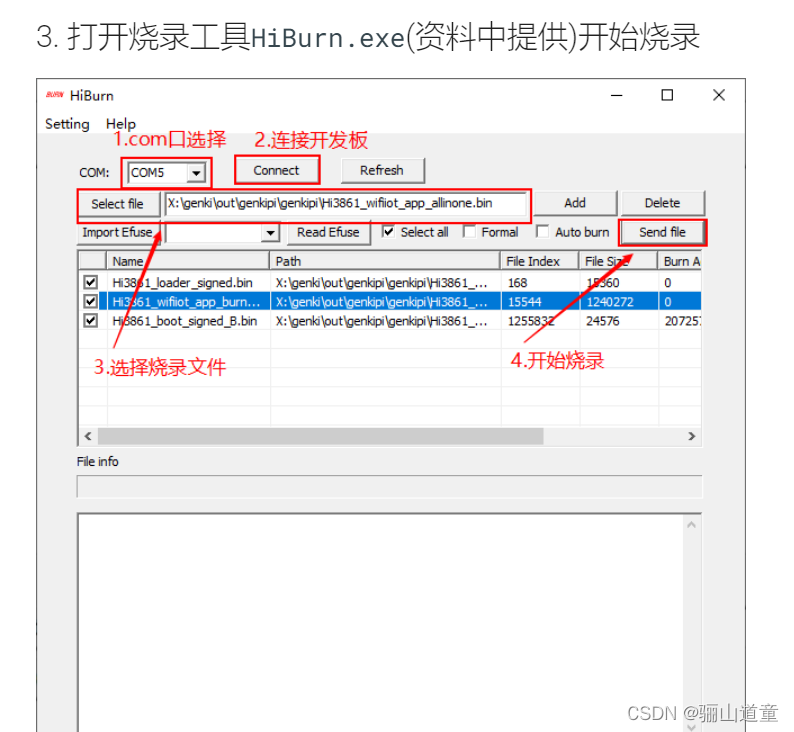
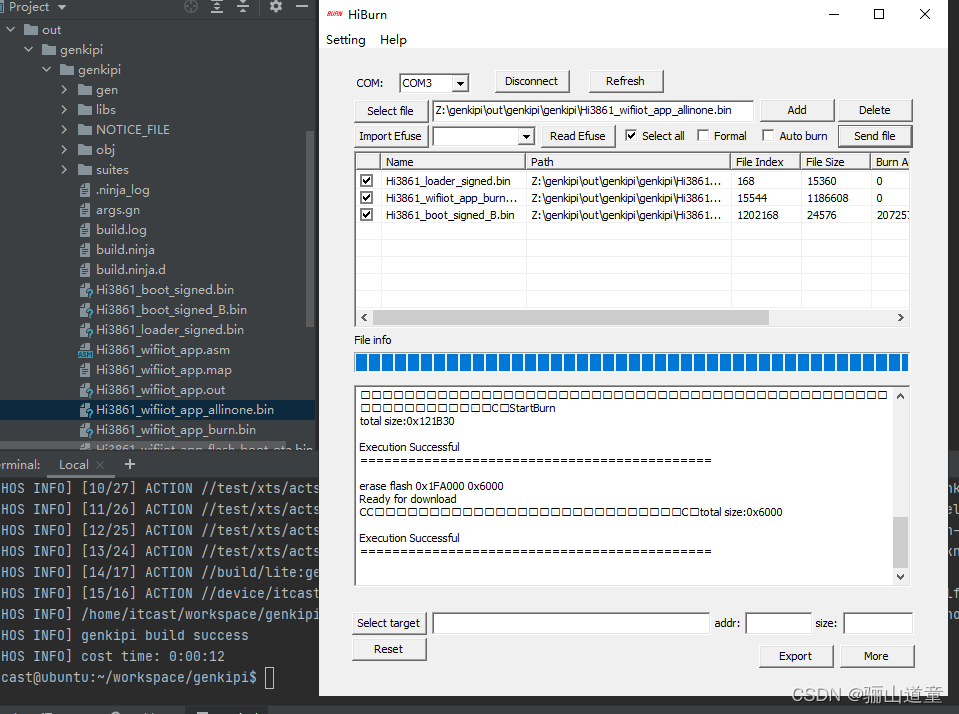
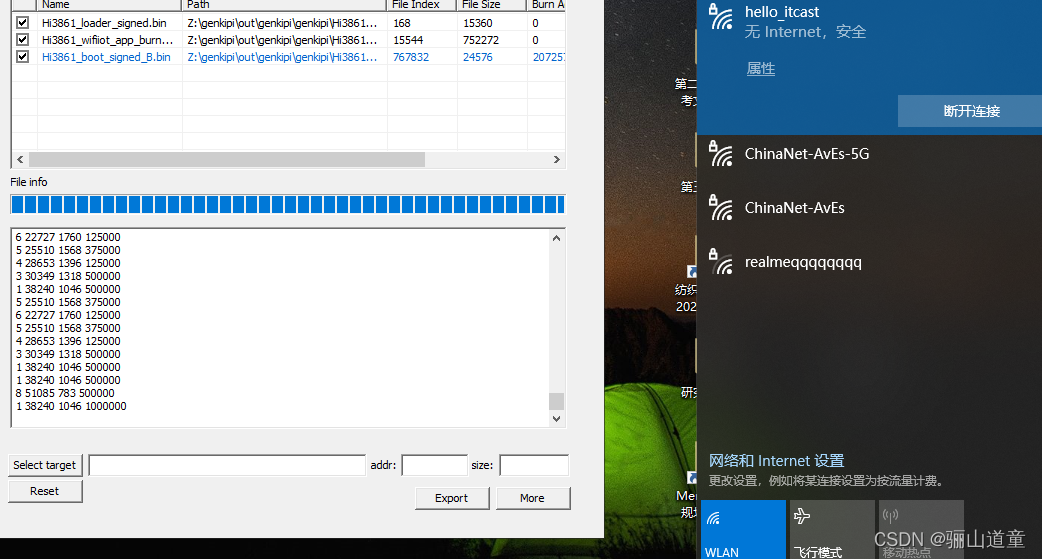
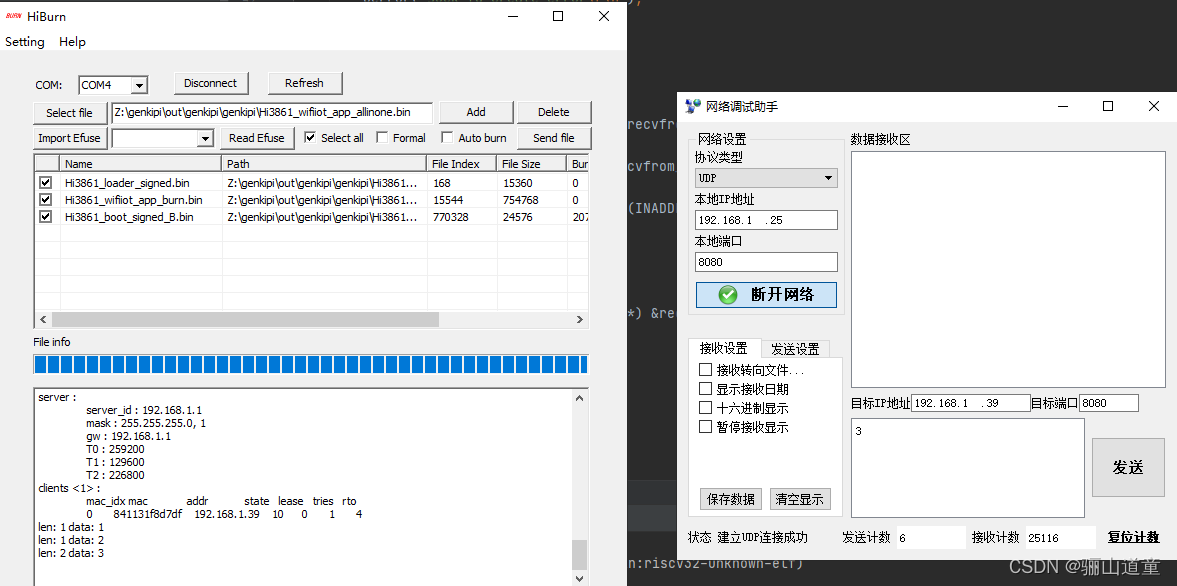
1.烧录流程
注意,先1.com选择,2.连接,再断开连接
3.select file 4.再次点击Connect (在开发板再按reset) 5.send file烧录
否则会烧录失败。
2.wifi烧录成功的截图
3. WIFI联网测试
AT测试(路由器)
1.启动STA模式
AT+STARTSTA
扫描周边的网络
AT+SCAN
查看扫描结果
AT+SCANRESULT
4. 多线程
5. 定时器
执行结果
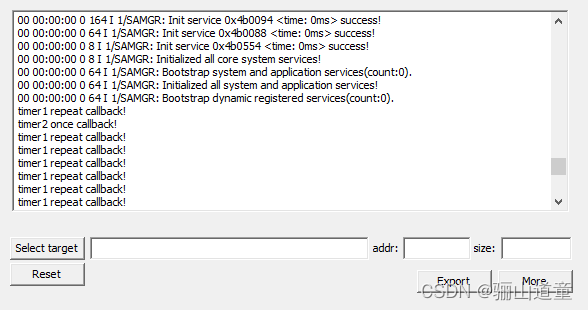
id1 = osTimerNew(timer_repeat_callback, osTimerPeriodic, NULL, NULL);
if (id1 != NULL)
{


	status = osTimerStart(id1, timerDelay);

	if (status != osOK)
	        {


	            // Timer could not be started
	            //执行体
	        }
}
附加:小熊牌下载源码并编译的方法:
方法一:依靠hpm从华为仓库下载源码并编译;
再执行:
hpm dist

方法二:
git clone 源码地址
然后cd到含有build.py的代码目录(代码主目录),执行–
python build.py BearPi-HM_Nano
自己已经在家目录写好一个bb.sh脚本,直接sh 编译。
5. 点亮第一盏灯
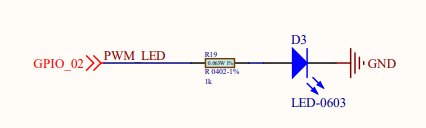
5.1 内置的LED gpio2(高电平点亮)
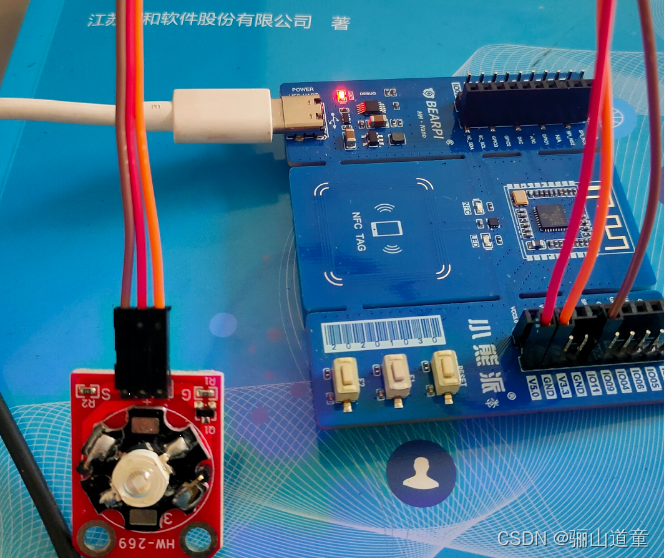
5.2 自己外接的LED
(G接gnd,S接信号,就是gpio管脚,+接+5V或者3.3V引脚)
// 外接引脚,gpio11,0.1秒闪烁
// Created by 24302 on 2022/2/18.
//
#include<stdio.h>
#include<string.h>
#include<unistd.h>

#include<ohos_init.h>
#include<cmsis_os2.h>

//操作GPIO引脚的头文件
#include "iot_gpio.h"
#include "iot_io.h"
#include "genki_pin.h"

static void led_task()
{


    //初始化GPIO口
    IoTGpioInit(IOT_IO_NAME_11);
    //设置IO口功能为GPIO
    IoTIoSetFunc(IOT_IO_NAME_11, IOT_IO_FUNC_11_GPIO);
    //设置IO口输出方向:输出
    IoTGpioSetDir(IOT_IO_NAME_11,IOT_GPIO_DIR_OUT);
    //不断输出高低电压
    while (1){


        IoTGpioSetOutputVal(IOT_IO_NAME_11,IOT_GPIO_VALUE1);//引脚编号,输出电平值的指针
        usleep(0.1*1000*1000);


        IoTGpioSetOutputVal(IOT_IO_NAME_11,IOT_GPIO_VALUE0);
        usleep(0.1*1000*1000);
    }

}

/*typedef struct {
    const char                   *name;   ///< name of the thread
    uint32_t                 attr_bits;   ///< attribute bits
    void                      *cb_mem;    ///< memory for control block
    uint32_t                   cb_size;   ///< size of provided memory for control block
    void                   *stack_mem;    ///< memory for stack
    uint32_t                stack_size;   ///< size of stack
    osPriority_t              priority;   ///< initial thread priority (default: osPriorityNormal)
    TZ_ModuleId_t            tz_module;   ///< TrustZone module identifier
    uint32_t                  reserved;   ///< reserved (must be 0)
} osThreadAttr_t;*/
static void start(void)
{


    osThreadAttr_t attr;

    attr.name = "thread_1"; //线程名
    attr.attr_bits = 0U;
    attr.cb_mem = NULL;
    attr.cb_size = 0U;
    attr.stack_mem = NULL;
    attr.stack_size = 1024 * 4;  //占的內存大小
    attr.priority = 25;
    //回调函数强转,(强转)函数,参数
    if (osThreadNew((osThreadFunc_t) led_task, NULL, &attr) == NULL) {


        printf("Falied to create task_1!\r\n");
    }

}
APP_FEATURE_INIT(start);
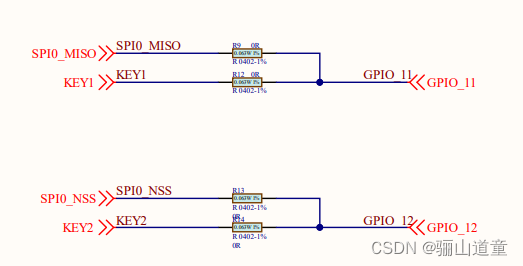
5.3 开关控制Led灯的亮灭
bearpi自带的key1和key2开关,对应的管脚如下:
//
// Created by 24302 on 2022/2/18.
//
#include<stdio.h>
#include<string.h>
#include<unistd.h>

#include<ohos_init.h>
#include<cmsis_os2.h>

//操作GPIO引脚的头文件
#include "iot_gpio.h"
#include "iot_io.h"
#include "genki_pin.h"

static void led_task()
{


//    //初始化GPIO口
    IoTGpioInit(IOT_IO_NAME_12);//开关
    IoTGpioInit(IOT_IO_NAME_1);//LED0
    // 设置IO口功能为GPIO
    IoTIoSetFunc(IOT_IO_NAME_12, IOT_IO_FUNC_12_GPIO);
    IoTIoSetFunc(IOT_IO_NAME_1, IOT_IO_FUNC_1_GPIO);
    //设置IO口输出方向:开关为输入,LED接受输出
    IoTGpioSetDir(IOT_IO_NAME_12,IOT_GPIO_DIR_IN);
    IoTGpioSetDir(IOT_IO_NAME_1,IOT_GPIO_DIR_OUT);
    //打开 方开始为0
    IoTGpioSetOutputVal(IOT_IO_NAME_1,IOT_GPIO_VALUE1);
    //不断输出高低电压
    //led是否已经打开标志
    int flag = 0;
    //状态
    int status = 0;
    //读取开关数据
    while (1){


        int val = -1;
        IoTGpioGetInputVal(IOT_IO_NAME_12,&val);

        if(val==0){


            //改变状态
            status=1;
            continue;
        } else{


            printf("val值:%d \r\n",val);
        }
        if(status!=1){


            continue;
        }
        status = 0;
        if (flag==0){


            //打开 方开始为0
            IoTGpioSetOutputVal(IOT_IO_NAME_1,IOT_GPIO_VALUE1);
            flag = 1;//下一次跑下面的代码
        } else{


            //关闭
            IoTGpioSetOutputVal(IOT_IO_NAME_1,IOT_GPIO_VALUE0);
            flag = 0;
        }
    }
}

/*typedef struct {
    const char                   *name;   ///< name of the thread
    uint32_t                 attr_bits;   ///< attribute bits
    void                      *cb_mem;    ///< memory for control block
    uint32_t                   cb_size;   ///< size of provided memory for control block
    void                   *stack_mem;    ///< memory for stack
    uint32_t                stack_size;   ///< size of stack
    osPriority_t              priority;   ///< initial thread priority (default: osPriorityNormal)
    TZ_ModuleId_t            tz_module;   ///< TrustZone module identifier
    uint32_t                  reserved;   ///< reserved (must be 0)
} osThreadAttr_t;*/
static void start(void)
{


    osThreadAttr_t attr;

    attr.name = "thread_1"; //线程名
    attr.attr_bits = 0U;
    attr.cb_mem = NULL;
    attr.cb_size = 0U;
    attr.stack_mem = NULL;
    attr.stack_size = 1024 * 4;  //占的內存大小
    attr.priority = 25;
    //回调函数强转,(强转)函数,参数
    if (osThreadNew((osThreadFunc_t) led_task, NULL, &attr) == NULL) {


        printf("Falied to create task_1!\r\n");
    }

}
APP_FEATURE_INIT(start);
6.PWM-呼吸灯
呼吸灯
//
// Created by 24302 on 2022/2/20.
//
#include <stdio.h>
#include <string.h>
#include <unistd.h>

#include "ohos_init.h"
#include "cmsis_os2.h"

#include "iot_gpio.h"
#include "iot_pwm.h"
#include "iot_io.h"
#include "genki_pin.h"


static void start(void) {


    //初始化GPIO口
    IoTGpioInit(IOT_IO_NAME_2);
    //设置IO口功能为GPIO
    IoTIoSetFunc(IOT_IO_NAME_2, IOT_IO_FUNC_2_PWM2_OUT);
    //设置IO口输出方向:输出
    IoTGpioSetDir(IOT_IO_NAME_2, IOT_GPIO_DIR_OUT);
    //初始化PWM功能
    IoTPwmInit(IOT_IO_NAME_2);
    //不断输出pwm方波
    while (1) {


        for (int i = 0; i < 20; i++) {


            IoTPwmStart(IOT_IO_NAME_2, i, 10000);

            usleep(0.05 * 1000 * 1000);
        }

        for (int i = 20; i > 0; i--) {


            IoTPwmStart(IOT_IO_NAME_2, i, 10000);

            usleep(0.05 * 1000 * 1000);
        }

    }
}

APP_FEATURE_INIT(start);
文件夹pwd_led内的BUILD.gn
static_library("pwm_led") {


    sources = [
        "main.c"
    ]

    include_dirs = [
        "//utils/native/lite/include",
        "//base/iot_hardware/peripheral/interfaces/kits",
        "//device/itcast/genkipi/interfaces/kits"
    ]
}
项目的BUILD.gn
import("//build/lite/config/component/lite_component.gni")

lite_component("app") {


    features = [
        "pwm_led"
    ]
}
7.PWM控制频率播放曲目
//
// Created by 24302 on 2021/12/18.
//
#include <stdio.h>
#include <string.h>
#include <unistd.h>

#include "ohos_init.h"
#include "cmsis_os2.h"

#include "iot_gpio.h"
#include "iot_pwm.h"
#include "iot_io.h"
#include "genki_pin.h"
#include <math.h>

static const uint16_t g_tuneFreqs[] = {


        0,
        1046.5, // 1046.5
        1174.7, // 1174.7
        1318.5, // 1318.5
        1396.9, // 1396.9
        1568, // 1568
        1760, // 1760
        1975.5, // 1975.5
        783.99 // 5_ 783.99 // 第一个八度的 5
};

// 曲谱音符
static const uint8_t g_scoreNotes[] = {


        // 《两只老虎》简谱:http://www.jianpu.cn/pu/33/33945.htm
        1, 2, 3, 1,        1, 2, 3, 1,        3, 4, 5,  3, 4, 5,
        5, 6, 5, 4, 3, 1,  5, 6, 5, 4, 3, 1,  1, 8, 1,  1, 8, 1, // 最后两个 5 应该是低八度的
};


// 曲谱时值
static const uint8_t g_scoreDurations[] = {


        4, 4, 4, 4,        4, 4, 4, 4,        4, 4, 8,  4, 4, 8,
        3, 1, 3, 1, 4, 4,  3, 1, 3, 1, 4, 4,  4, 4, 8,  4, 4, 8,
};

static void music(void*arg) {


    //初始化GPIO口
    IoTGpioInit(IOT_IO_NAME_14);
    //设置IO口功能为GPIO
    IoTIoSetFunc(IOT_IO_NAME_14, IOT_IO_FUNC_14_PWM5_OUT);
    //设置IO口输出方向:输出
    IoTGpioSetDir(IOT_IO_NAME_14, IOT_GPIO_DIR_OUT);
    //初始化PWM功能
    IoTPwmInit(IOT_PWM_NAME_5);

    while (1){


        for (size_t i = 0; i < sizeof(g_scoreNotes)/sizeof(g_scoreNotes[0]); i++) {


            uint32_t tune = g_scoreNotes[i]; // 音符
            uint16_t freqDivisor = g_tuneFreqs[tune];//找到音符对应的频率
            uint32_t tuneInterval = g_scoreDurations[i] * (125*1000); // 音符时间
            printf("%d %d %d %d\r\n", tune, (40*1000*1000) / freqDivisor, freqDivisor, tuneInterval);
            IoTPwmStart(IOT_PWM_NAME_5, 50, freqDivisor*2);
            usleep(tuneInterval);
            IoTPwmStop(IOT_PWM_NAME_5);
        }
    }
}


static void start(void) {


    osThreadAttr_t attr;

    attr.name = "thread_1";
    attr.attr_bits = 0U;
    attr.cb_mem = NULL;
    attr.cb_size = 0U;
    attr.stack_mem = NULL;
    attr.stack_size = 1024 * 4;
    attr.priority = 25;

    if (osThreadNew(music, NULL, &attr) == NULL) {


        printf("Falied to create music!\r\n");
    }

}

APP_FEATURE_INIT(start);
8. WIFI
8.1 wifi的AP模式(路由器的效果,创建网络)
#include<stdio.h>
#include<string.h>
#include<unistd.h>

#include<ohos_init.h>
#include<cmsis_os2.h>
#include "genki_wifi_ap.h"

#define WIFI_SSID "hello_itcast"
#define WIFI_PASSWORD "12345678"

static void wifi_ap(void)
{


    //int wifi_ap_start(const char* ssid, const char* password);
    wifi_ap_start(WIFI_SSID, WIFI_PASSWORD);
}

static void start(void)
{


    osThreadAttr_t attr;

    attr.name = "thread_1"; //线程名
    attr.attr_bits = 0U;
    attr.cb_mem = NULL;
    attr.cb_size = 0U;
    attr.stack_mem = NULL;
    attr.stack_size = 1024 * 4;  //占的內存大小
    attr.priority = 25;
    //回调函数强转,(强转)函数,参数
    if (osThreadNew((osThreadFunc_t) wifi_ap, NULL, &attr) == NULL) {


        printf("Falied to create task_1!\r\n");
    }
}

APP_FEATURE_INIT(start);
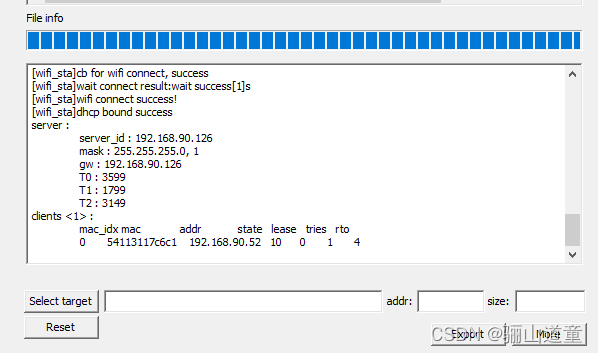
8.2 wifi的STA模式(连接网络)
8.3 TCP客户端(服务器端与Linux网络编程都类似)
8.3.1 结果
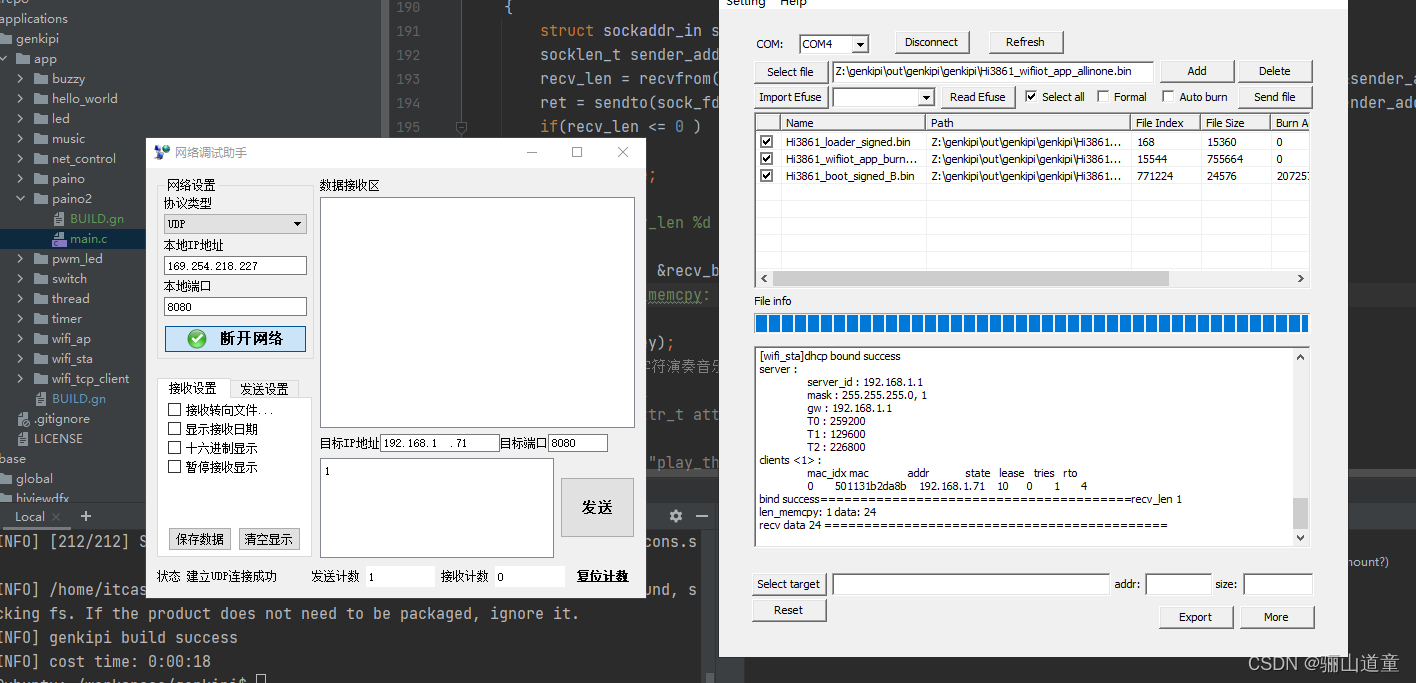
-使用网络调试助手模拟服务器,每隔一秒发送Hello word到服务器,运行结果截图。
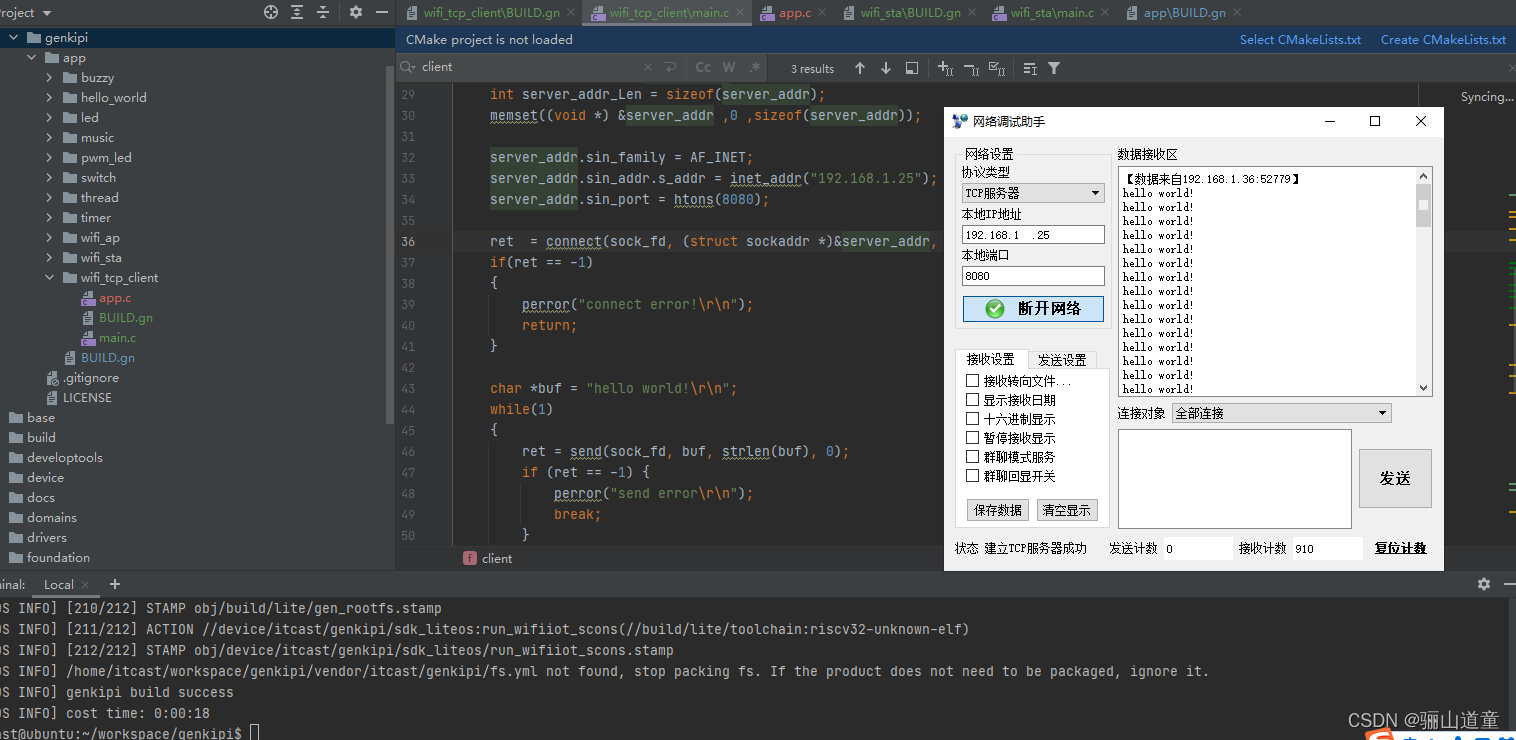
8.3.2 代码
#include<stdio.h>
#include<string.h>
#include<unistd.h>

#include<ohos_init.h>
#include<cmsis_os2.h>

#include "genki_wifi_sta.h"
#include "lwip/sockets.h"

//依据自己连接的网络情况进行修改
#define WIFI_SSID "ChinaNet-AvEs"
#define WIFI_PASSWORD "qgk4xcet"
#define HOSTNAME "itcast"

static void client(void *arg)
{


    //int wifi_sta_connect(const char* ssid, const char* password, const char* hostname);
    int wifi_status = wifi_sta_connect(WIFI_SSID, WIFI_PASSWORD, HOSTNAME);
    printf("%d", wifi_status);
    int sock_fd, ret;
    sock_fd = socket(AF_INET, SOCK_STREAM, 0);
    if (sock_fd < 0) {


        perror("[actuator_service]sock_fd create error\r\n");
        return;
    }

    struct sockaddr_in server_addr;
    int server_addr_Len = sizeof(server_addr);
    memset((void *) &server_addr ,0 ,sizeof(server_addr));

    server_addr.sin_family = AF_INET;
    server_addr.sin_addr.s_addr = inet_addr("192.168.1.25");
    server_addr.sin_port = htons(8080);

    ret  = connect(sock_fd, (struct sockaddr *)&server_addr, server_addr_Len);
    if(ret == -1)
    {


        perror("connect error!\r\n");
        return;
    }

    char *buf = "hello world!\r\n";
    while(1)
    {


        ret = send(sock_fd, buf, strlen(buf), 0);
        if (ret == -1) {


            perror("send error\r\n");
            break;
        }
        usleep(1*1000*1000);
    }
}

static void start(void)
{


    osThreadAttr_t attr;

    attr.name = "thread_1"; //线程名
    attr.attr_bits = 0U;
    attr.cb_mem = NULL;
    attr.cb_size = 0U;
    attr.stack_mem = NULL;
    attr.stack_size = 1024 * 4;  //占的內存大小
    attr.priority = 25;
    //回调函数强转,(强转)函数,参数
    if (osThreadNew((osThreadFunc_t) client, NULL, &attr) == NULL) {


        printf("Falied to create client!\r\n");
    }
}

APP_FEATURE_INIT(start);
9 案例:使用电脑控制开发板io口
点亮一盏灯,远程wifi控制家庭设备应用场景。
10 案例:

鸿蒙电子琴应用的通信部分,wifi连接我通信正常,蜂鸣器测试正常,通信测试可发送信息,目前发送时char类型,开发板需要uint_8类型,ASII码转换“”“1”为24
#include<stdio.h>
#include<string.h>
#include<unistd.h>

#include<ohos_init.h>
#include<cmsis_os2.h>

#include "iot_gpio.h"
#include "iot_pwm.h"
#include "iot_io.h"
#include "genki_pin.h"
#include <math.h>

#include "genki_wifi_sta.h"
#include "lwip/sockets.h"

#define WIFI_SSID "ChinaNet-AvEs"
#define WIFI_PASSWORD "qgk4xcet"
#define HOSTNAME "itcast"

//初始化gpio
static void init_gpio(void)
{


    //初始化GPIO口
    IoTGpioInit(IOT_IO_NAME_13);
    //设置IO口功能为GPIO
    IoTIoSetFunc(IOT_IO_NAME_13, IOT_IO_FUNC_13_PWM4_OUT);
    //设置IO口输出方向:输出
    IoTGpioSetDir(IOT_IO_NAME_13, IOT_GPIO_DIR_OUT);
    //初始化PWM功能
    IoTPwmInit(IOT_PWM_NAME_4);
    /*for (int i = 0; i < 20; i++) {

        IoTPwmStart(IOT_PWM_NAME_4, i, 10000);

        usleep(0.05 * 1000 * 1000);
    }

    for (int i = 20; i > 0; i--) {
        IoTPwmStart(IOT_PWM_NAME_4, i, 10000);

        usleep(0.05 * 1000 * 1000);
    }*/
}
//钢琴键对应的频率
static const uint16_t g_piano[] = {


        0,
        27.5,
        29.135,
        30.868,
        32.703,
        34.648,
        36.708,
        38.891,
        41.203,
        43.654,
        46.249,
        48.999,
        51.913,

        55.000,
        58.270,
        61.735,
        65.406,
        69.296,
        73.416,
        77.782,
        82.407,
        87.307,
        92.499,
        97.999,
        103.826,

        110.000,
        116.541,
        123.471,
        130.813,
        138.591,
        146.832,
        155.563,
        164.814,
        174.614,
        184.997,
        195.998,
        207.652,

        220.000,
        233.082,
        246.942,
        261.626,
        277.183,
        293.665,
        311.127,
        329.628,
        349.228,
        369.994,
        391.995,
        415.305,

        440.000,
        466.164,
        493.883,
        523.251,
        554.365,
        587.330,
        622.254,
        659.255,
        698.456,
        739.989,
        783.991,
        830.609,

        880.000,
        932.328,
        987.767,
        1046.502,
        1108.731,
        1174.659,
        1244.508,
        1318.510,
        1396.913,
        1479.978,
        1567.982,
        1661.219,

        1760.000,
        1864.655,
        1975.533,
        2093.005,
        2217.461,
        2349.318,
        2489.016,
        2637.020,
        2793.826,
        2959.955,
        3135.963,
        3322.438,

        3520.000,
        3729.310,
        3951.066,
        4186.009
};
//IoTPwmStart(IOT_PWM_NAME_4, i, 10000);
static void play_task(uint8_t key) {


    printf("recv data %u ===========================================\n",key);
    uint16_t freqDivisor = g_piano[key];//放大频率
    uint32_t tuneInterval = 4 * (125*1000); // 音符时间
    IoTPwmStart(IOT_PWM_NAME_4, 50, 4*freqDivisor);
    usleep(tuneInterval);
    IoTPwmStop(IOT_PWM_NAME_4);
}
static void paino2(void)
{


    //1.初始化gpio
    init_gpio();
    /*while(1)
    {
        play_task(80);//测试蜂鸣器

    }
*/
    //2.创建socket通信
    wifi_sta_connect(WIFI_SSID, WIFI_PASSWORD, HOSTNAME);
    //2.创建socket
    int sock_fd;
    int ret;
    sock_fd = socket(AF_INET, SOCK_DGRAM, 0);
    if (sock_fd < 0) {


        perror("sock_fd create error\r\n");
        return;
    }
    //绑定
    struct sockaddr_in recvfrom_addr;
    socklen_t recvfrom_addr_len = sizeof(recvfrom_addr);
    memset((void *) &recvfrom_addr, 0, recvfrom_addr_len);
    recvfrom_addr.sin_family = AF_INET;
    recvfrom_addr.sin_addr.s_addr = htonl(INADDR_ANY);
    recvfrom_addr.sin_port = htons(8080);
    ret = bind(sock_fd, (struct sockaddr *) &recvfrom_addr, recvfrom_addr_len);
        if(ret == -1)
    {


        perror("bind error!-----------");
    }
    printf("bind success=======================================");

    char recv_buf[4];
    int recv_len;
    while(1)
    {


        struct sockaddr_in sender_addr;
        socklen_t sender_addr_len;
        recv_len = recvfrom(sock_fd,recv_buf,sizeof(recv_buf),0,(struct sockaddr *) &sender_addr,&sender_addr_len);
        ret = sendto(sock_fd, recv_buf, strlen(recv_buf), 0, (struct sockaddr *) &sender_addr, &sender_addr_len);
        if(recv_len <= 0 )
        {


            continue;
        }
        printf("recv_len %d \n",recv_len);
        uint8_t key;
        memcpy(&key, &recv_buf[3], 1);
        printf("len_memcpy: %d data: %u \r\n", recv_len,key); //注意此处的类型,用串口为字符串了类型

        play_task(key);
        //3.接受手机字符演奏音乐
        //开启新的线程
        /*osThreadAttr_t attr;

        attr.name = "play_thread";
        attr.attr_bits = 0U;
        attr.cb_mem = NULL;
        attr.cb_size = 0U;
        attr.stack_mem = NULL;
        attr.stack_size = 1024;
        attr.priority = 25;

        if (osThreadNew((osThreadFunc_t) play_task,key, &attr) == NULL) {
            printf("Create show task Failed!\r\n");
        }*/
    }

}
static void start(void)
{


    osThreadAttr_t attr;

    attr.name = "thread_1"; //线程名
    attr.attr_bits = 0U;
    attr.cb_mem = NULL;
    attr.cb_size = 0U;
    attr.stack_mem = NULL;
    attr.stack_size = 1024 * 4;  //占的內存大小
    attr.priority = 25;
    //回调函数强转,(强转)函数,参数
    if (osThreadNew((osThreadFunc_t) paino2, NULL, &attr) == NULL) {


        printf("Falied to create task_1!\r\n");
    }

}

APP_FEATURE_INIT(start);