这篇文章将从源码的角度向大家展示Spark是如何提交任务到Yarn上执行的,如有错误,还请各位指出。(基于Spark 3.0.0)
Spark On Yarn有两种模式:Yarn Client和Yarn Cluster
在这篇文章中,我们这里先讲Yarn Cluster
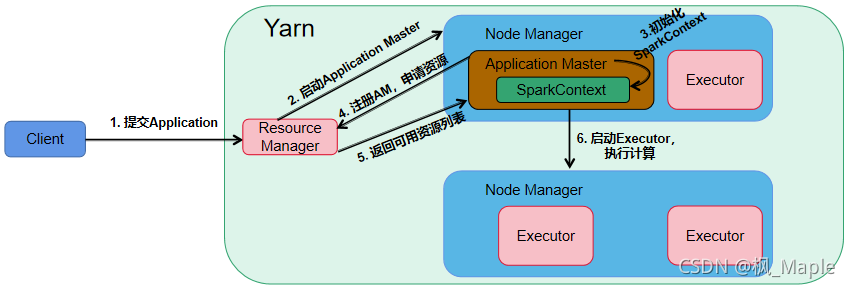
Yarn Cluster模式主要流程如上图所示,下面结合源码对这个过程进行详细的分析
1. 提交Application
当用spark-submit命令提交一个spark程序时,可以在spark-class文件最后加一行![]()
这样就可以在控制台上看到最后执行的命令是什么样了
[root@cdh6029 usr]# sudo -u hdfs spark-submit --class org.apache.spark.examples.SparkPi --master yarn --deploy-mode cluster ./spark-examples_2.11-2.4.7.jar
/usr/java/jdk1.8.0_171/bin/java -cp XXXX(一大堆依赖文件) org.apache.spark.deploy.SparkSubmit --master yarn --deploy-mode cluster --class org.apache.spark.examples.SparkPi ./spark-examples_2.11-2.4.7.jar
实际上会启动一个Java进程,主类是org.apache.spark.deploy.SparkSubmit,找到SparkSubmit的main方法,然后进入submit方法。我个人比较讨厌将大段的代码贴出来,因此这里只对重要的那几行代码进行说明。
//SparkSubmit.runMain()
val (childArgs, childClasspath, sparkConf, childMainClass) = prepareSubmitEnvironment(args)  //line 871
prepareSubmitEnvironment方法会对相关的参数和进行解析,同时会返回childMainClass,如果是Yarn Master模式下,childMainClass=org.apache.spark.deploy.yarn.YarnClusterApplication,然后通过反射创建YarnClusterApplication实例,并调用他的start方法
//SparkSubmit.runMain()
app.start(childArgs.toArray, sparkConf) //line 928
YarnClusterApplication.start()会调用Client.run(),然后调用submitApplication()
//Client.run()
this.appId = submitApplication() //line1177
这个appId就是向Yarn注册后得到的全局唯一id,submitApplication()就是Yarn Client向ResourceManager提交Application的过程。这个方法的逻辑很清晰,一些重要的步骤也做了注释说明
//Client.submitApplication()
def submitApplication(): ApplicationId = {
    ResourceRequestHelper.validateResources(sparkConf)

    var appId: ApplicationId = null
    try {
      launcherBackend.connect()  //与Launcher server建立连接
      yarnClient.init(hadoopConf)  //向hadoop初始化YarnClient服务
      yarnClient.start()           //启动服务
      //关于Hadoop service registry这一块可以去看官方文档,http://hadoop.apache.org/docs/current/hadoop-project-dist/hadoop-common/registry/index.html


      logInfo("Requesting a new application from cluster with %d NodeManagers"
        .format(yarnClient.getYarnClusterMetrics.getNumNodeManagers))

      // Get a new application from our RM
      val newApp = yarnClient.createApplication()
      val newAppResponse = newApp.getNewApplicationResponse()
      appId = newAppResponse.getApplicationId()

      // The app staging dir based on the STAGING_DIR configuration if configured
      // otherwise based on the users home directory.
      val appStagingBaseDir = sparkConf.get(STAGING_DIR)
        .map { new Path(_, UserGroupInformation.getCurrentUser.getShortUserName) }
        .getOrElse(FileSystem.get(hadoopConf).getHomeDirectory())
      stagingDirPath = new Path(appStagingBaseDir, getAppStagingDir(appId))

      new CallerContext("CLIENT", sparkConf.get(APP_CALLER_CONTEXT),
        Option(appId.toString)).setCurrentContext()

      // Verify whether the cluster has enough resources for our AM
      verifyClusterResources(newAppResponse)

      // Set up the appropriate contexts to launch our AM
      val containerContext = createContainerLaunchContext(newAppResponse)
      val appContext = createApplicationSubmissionContext(newApp, containerContext)

      // Finally, submit and monitor the application
      logInfo(s"Submitting application $appId to ResourceManager")
      yarnClient.submitApplication(appContext)
      launcherBackend.setAppId(appId.toString)
      reportLauncherState(SparkAppHandle.State.SUBMITTED)

      appId
    } catch {
      case e: Throwable =>
        if (stagingDirPath != null) {
          cleanupStagingDir()
        }
        throw e
    }
  }
client向RM提交新建一个Applicaiton的申请后,RM会返回一个AppID,client拿到这个ID后会进行一系列的容器初始化操作,createContainerLaunchContext(newAppResponse)方法主要是拼接ApplicationMaster的JVM启动命令,这个命令会提交到RM,RM会让某一个NodeManager运行这个命令来启动ApplicationMaster,createApplicationSubmissionContext(newApp, containerContext)方法创建应用提交环境,这个环境除了保存了上一步创建的ContainerLaunchContext之外,主要保存了一些spark yarn相关的配置信息,spark.app.name,spark.yarn.queue,spark.yarn.am.nodeLabelExpression等。最后client将应用提交环境(appContext)打包为一个request提交给RM。
createContainerLaunchContext(newAppResponse)方法最重要的就是指定他所构建的JVM启动命令的主类,进入到该方法
//Client.createContainerLaunchContext()
//line 978-983
val amClass =
      if (isClusterMode) {
        Utils.classForName("org.apache.spark.deploy.yarn.ApplicationMaster").getName
      } else {
        Utils.classForName("org.apache.spark.deploy.yarn.ExecutorLauncher").getName
      }
显然我们用的是集群模式,因此ApplicationMaster的启动主类为
org.apache.spark.deploy.yarn.ApplicationMaster
2. 启动Application Master
RM接收到Client启动Application的Request后,会启动一个ApplicationMaster,直接找到org.apache.spark.deploy.yarn.ApplicationMaster 这个类并进入他的main方法。
//ApplicationMaster.main()
//line 840-892
def main(args: Array[String]): Unit = {
    SignalUtils.registerLogger(log)
    val amArgs = new ApplicationMasterArguments(args)
    val sparkConf = new SparkConf()
    if (amArgs.propertiesFile != null) {
      Utils.getPropertiesFromFile(amArgs.propertiesFile).foreach { case (k, v) =>
        sparkConf.set(k, v)
      }
    }
    // Set system properties for each config entry. This covers two use cases:
    // - The default configuration stored by the SparkHadoopUtil class
    // - The user application creating a new SparkConf in cluster mode
    //
    // Both cases create a new SparkConf object which reads these configs from system properties.
    sparkConf.getAll.foreach { case (k, v) =>
      sys.props(k) = v
    }

    val yarnConf = new YarnConfiguration(SparkHadoopUtil.newConfiguration(sparkConf))
    master = new ApplicationMaster(amArgs, sparkConf, yarnConf)

    val ugi = sparkConf.get(PRINCIPAL) match {
      // We only need to log in with the keytab in cluster mode. In client mode, the driver
      // handles the user keytab.
      case Some(principal) if master.isClusterMode =>
        val originalCreds = UserGroupInformation.getCurrentUser().getCredentials()
        SparkHadoopUtil.get.loginUserFromKeytab(principal, sparkConf.get(KEYTAB).orNull)
        val newUGI = UserGroupInformation.getCurrentUser()

        if (master.appAttemptId == null || master.appAttemptId.getAttemptId > 1) {
          // Re-obtain delegation tokens if this is not a first attempt, as they might be outdated
          // as of now. Add the fresh tokens on top of the original user's credentials (overwrite).
          // Set the context class loader so that the token manager has access to jars
          // distributed by the user.
          Utils.withContextClassLoader(master.userClassLoader) {
            val credentialManager = new HadoopDelegationTokenManager(sparkConf, yarnConf, null)
            credentialManager.obtainDelegationTokens(originalCreds)
          }
        }

        // Transfer the original user's tokens to the new user, since it may contain needed tokens
        // (such as those user to connect to YARN).
        newUGI.addCredentials(originalCreds)
        newUGI

      case _ =>
        SparkHadoopUtil.get.createSparkUser()
    }

    ugi.doAs(new PrivilegedExceptionAction[Unit]() {
      override def run(): Unit = System.exit(master.run())
    })
  }
main方法中主要做了这么几件事情:
- 接收YarnClient传过来的参数并做解析,其中一个重要的参数就是--class,这个参数其实就是一开始用spark-submit提交spark程序时指定的--class org.apache.spark.examples.SparkPi
- 初始化ApplicationMaster
- 运行ApplicationMaster.run()
run()方法中主要做了三件事
- 注册一些系统变量
// Set the web ui port to be ephemeral for yarn so we don't conflict with // other spark processes running on the same box System.setProperty(UI_PORT.key, "0") // Set the master and deploy mode property to match the requested mode. System.setProperty("spark.master", "yarn") System.setProperty(SUBMIT_DEPLOY_MODE.key, "cluster") // Set this internal configuration if it is running on cluster mode, this // configuration will be checked in SparkContext to avoid misuse of yarn cluster mode. System.setProperty("spark.yarn.app.id", appAttemptId.getApplicationId().toString()) - 注册一个shutdown hook方法,顾名思义,这个钩子方法会在SparkContext关闭后被调用,向RM注销自己,删除staging目录,staging目录是spark任务的依赖文件所在目录
- 运行runDriver方法()。
3. 初始化SparkContext
进入runDriver()方法,AM会在startUserApplication()方法中新启动一个线程来初始化SparkContext,该过程实际上就是利用反射来调用userClass这个类的main方法,而这个userClass其实就是一开始用spark-submit命令传递进来的--class参数,而这个新启动的线程就是Driver线程,到这里终于开始运行我们自己写的Spark程序的代码了。
//ApplicationMaster.startUserApplication()
//line 718-719
val mainMethod = userClassLoader.loadClass(args.userClass)
      .getMethod("main", classOf[Array[String]])
//line 728
mainMethod.invoke(null, userArgs.toArray)//line 758
userThread.setName("Driver")在我们自己写的spark程序的main 方法中,肯定会new一个SparkContext,例如:
val sc = new SparkContext(sparConf)
继续回到runDriver()方法,在新启动一个线程用来初始化SparkContext后,AM会一直等待直到SparkContext初始化完成,然后再继续执行runDriver()方法后面的代码。
//ApplicationMaster.scala
//line 499-500
val sc = ThreadUtils.awaitResult(sparkContextPromise.future,
        Duration(totalWaitTime, TimeUnit.MILLISECONDS))
那么很明显,初始化SparkContext后(或者说在初始化SparkContext的这个过程中),肯定在某个地方修改了这个sparkContextPromise,使得runDriver()方法得以继续执行下去,且这个地方肯定是在SparkContext的构造方法中。在SparkContext.scala的第608行中:
//SparkContext.scala
//line 608
_taskScheduler.postStartHook()
进入 _taskScheduler.postStartHook()
//YarnClusterScheduler.scala
//line 31-35
override def postStartHook(): Unit = {
    ApplicationMaster.sparkContextInitialized(sc)
    super.postStartHook()
    logInfo("YarnClusterScheduler.postStartHook done")
  }
//ApplicationMaster.scala
//line 401-408
private def sparkContextInitialized(sc: SparkContext) = {
sparkContextPromise.synchronized {
// Notify runDriver function that SparkContext is available
sparkContextPromise.success(sc)
// Pause the user class thread in order to make proper initialization in runDriver function.
sparkContextPromise.wait()
}
}//TaskSchedulerImpl.scala
//line 211-213
override def postStartHook(): Unit = {
waitBackendReady()
}
//line 891-912
private def waitBackendReady(): Unit = {
if (backend.isReady) {
return
}
while (!backend.isReady) {
// Might take a while for backend to be ready if it is waiting on resources.
if (sc.stopped.get) {
// For example: the master removes the application for some reason
throw new IllegalStateException("Spark context stopped while waiting for backend")
}
synchronized {
this.wait(100)
}
}
}
显然,sparkContextInitialized方法中调用了sparkContextPromise.success(sc),这样,AM就可以继续运行runDriver方法了,同时该方法中还调用了sparkContextPromise.wait(),这样初始化SparkContext的线程(即Driver线程)会一直等待,直到runDriver将其唤醒。我们再回到runDriver()方法中,在518行中,会调用resumeDriver()方法,就是在这里将Driver线程唤醒,而紧接着在519行中,调用了Driver线程的join()方法,也就是runDriver会一直等待Driver线程运行完毕(即我们的整个Spark程序已经全部完成了)。
//ApplicationMaster.scala
//line 518-519
resumeDriver()
userClassThread.join()此外,当Driver线程被唤醒后,还会进入 waitBackenReady()方法等待backend准备好,这个backend就是YarnClusterSchedulerBackend,是用来后续与Executor进行通信的后台终端,只要SparkContext是正常初始化的,那么这里backend.isReady就是true。
//TaskSchedulerImpl.scala

//line 211-213
override def postStartHook(): Unit = {
    waitBackendReady()
  }

//line 891-912
private def waitBackendReady(): Unit = {
    if (backend.isReady) {
      return
    }
    while (!backend.isReady) {
      // Might take a while for backend to be ready if it is waiting on resources.
      if (sc.stopped.get) {
        // For example: the master removes the application for some reason
        throw new IllegalStateException("Spark context stopped while waiting for backend")
      }
      synchronized {
        this.wait(100)
      }
    }
  }
到这里先做一个小小的总结。
当我们进入到启动AM这一步时,AM进程中有两个主要的线程:
- 主线程,调用runDriver()方法
- Driver线程,进行SparkContext的初始化
虽然是两个不同的线程,但这两个线程的工作几乎是处于一种互相同步(synchronized)的状态,一个线程在工作时,另一个线程会等待其工作完成,再继续工作。

4. 注册AM,申请资源 + 5. 返回可用资源列表
在上一步中我们说到,主线程在执行runDriver()方法的过程中会等待Driver线程完成SparkContext的初始化,然后进行一系列的准备工作,这些准备工作的步骤非常的复杂,也是这篇文章的重点。我们先讲第四步和第五步。
回到runDriver()方法,在startUserApplication()和resumeDriver()这两行代码之间,就是完成这一系列准备工作的代码。
//ApplicationMaster.scala
//line 499-517
val sc = ThreadUtils.awaitResult(sparkContextPromise.future,
Duration(totalWaitTime, TimeUnit.MILLISECONDS))
if (sc != null) {
    val rpcEnv = sc.env.rpcEnv

    val userConf = sc.getConf
    val host = userConf.get(DRIVER_HOST_ADDRESS)
    val port = userConf.get(DRIVER_PORT)
    registerAM(host, port, userConf, sc.ui.map(_.webUrl), appAttemptId)

    val driverRef = rpcEnv.setupEndpointRef(
    RpcAddress(host, port),
    YarnSchedulerBackend.ENDPOINT_NAME)
    createAllocator(driverRef, userConf, rpcEnv, appAttemptId, distCacheConf)
} else {
    // Sanity check; should never happen in normal operation, since sc should only be null
    // if the user app did not create a SparkContext.
    throw new IllegalStateException("User did not initialize spark context!")
}
AM会调用registerAM()方法向RM注册自己,这个过程是通过一个YarnRMClient来完成的,YarnRMClient就是AM与RM通信的一个客户端实例,后续与RM的通信都是通过YarnRMClient来完成的。
//ApplicationMaster.scala
//line 417-430
private def registerAM(
      host: String,
      port: Int,
      _sparkConf: SparkConf,
      uiAddress: Option[String],
      appAttempt: ApplicationAttemptId): Unit = {
    val appId = appAttempt.getApplicationId().toString()
    val attemptId = appAttempt.getAttemptId().toString()
    val historyAddress = ApplicationMaster
      .getHistoryServerAddress(_sparkConf, yarnConf, appId, attemptId)

    client.register(host, port, yarnConf, _sparkConf, uiAddress, historyAddress)
    registered = true
}
注册完成后,进入createAllocator()方法。
//ApplicationMaster.createAllocator()
//line 465-472

allocator = client.createAllocator(
    yarnConf,
    _sparkConf,
    appAttemptId,
    driverUrl,
    driverRef,
    securityMgr,
    localResources)
//ApplicationMaster.createAllocator()
//line 479
allocator.allocateResources()
该方法中,YarnRMClient会创建一个分配器,为向RM申请资源和分配资源做准备。然后调用allocator.allocateResources()来向RM申请资源。
//YarnAllocator.scala
//line 254-284
def allocateResources(): Unit = synchronized {
    updateResourceRequests()

    val progressIndicator = 0.1f
    // Poll the ResourceManager. This doubles as a heartbeat if there are no pending container
    // requests.
    val allocateResponse = amClient.allocate(progressIndicator)

    val allocatedContainers = allocateResponse.getAllocatedContainers()
    allocatorBlacklistTracker.setNumClusterNodes(allocateResponse.getNumClusterNodes)

    if (allocatedContainers.size > 0) {
      logDebug(("Allocated containers: %d. Current executor count: %d. " +
        "Launching executor count: %d. Cluster resources: %s.")
        .format(
          allocatedContainers.size,
          runningExecutors.size,
          numExecutorsStarting.get,
          allocateResponse.getAvailableResources))

      handleAllocatedContainers(allocatedContainers.asScala)
    }

    val completedContainers = allocateResponse.getCompletedContainersStatuses()
    if (completedContainers.size > 0) {
      logDebug("Completed %d containers".format(completedContainers.size))
      processCompletedContainers(completedContainers.asScala)
      logDebug("Finished processing %d completed containers. Current running executor count: %d."
        .format(completedContainers.size, runningExecutors.size))
    }
  }
amClient向AM申请资源,AM会将当前可用资源的列表作为Response返回,如果可用资源(allocatedContainers)数量大于0,则对这些资源进行处理
handleAllocatedContainers(allocatedContainers.asScala)
6. 启动Executor执行计算
继续上一步,我们进入handleAllocatedContainers(allocatedContainers.asScala)方法。
//YarnAllocator.scala
def handleAllocatedContainers(allocatedContainers: Seq[Container]): Unit = {
    val containersToUse = new ArrayBuffer[Container](allocatedContainers.size)

    // Match incoming requests by host
    val remainingAfterHostMatches = new ArrayBuffer[Container]
    for (allocatedContainer <- allocatedContainers) {
      matchContainerToRequest(allocatedContainer, allocatedContainer.getNodeId.getHost,
        containersToUse, remainingAfterHostMatches)
    }

    // Match remaining by rack. Because YARN's RackResolver swallows thread interrupts
    // (see SPARK-27094), which can cause this code to miss interrupts from the AM, use
    // a separate thread to perform the operation.
    val remainingAfterRackMatches = new ArrayBuffer[Container]
    if (remainingAfterHostMatches.nonEmpty) {
      var exception: Option[Throwable] = None
      val thread = new Thread("spark-rack-resolver") {
        override def run(): Unit = {
          try {
            for (allocatedContainer <- remainingAfterHostMatches) {
              val rack = resolver.resolve(allocatedContainer.getNodeId.getHost)
              matchContainerToRequest(allocatedContainer, rack, containersToUse,
                remainingAfterRackMatches)
            }
          } catch {
            case e: Throwable =>
              exception = Some(e)
          }
        }
      }
      thread.setDaemon(true)
      thread.start()

      try {
        thread.join()
      } catch {
        case e: InterruptedException =>
          thread.interrupt()
          throw e
      }

      if (exception.isDefined) {
        throw exception.get
      }
    }

    // Assign remaining that are neither node-local nor rack-local
    val remainingAfterOffRackMatches = new ArrayBuffer[Container]
    for (allocatedContainer <- remainingAfterRackMatches) {
      matchContainerToRequest(allocatedContainer, ANY_HOST, containersToUse,
        remainingAfterOffRackMatches)
    }

    if (remainingAfterOffRackMatches.nonEmpty) {
      logDebug(s"Releasing ${remainingAfterOffRackMatches.size} unneeded containers that were " +
        s"allocated to us")
      for (container <- remainingAfterOffRackMatches) {
        internalReleaseContainer(container)
      }
    }

    runAllocatedContainers(containersToUse)

    logInfo("Received %d containers from YARN, launching executors on %d of them."
      .format(allocatedContainers.size, containersToUse.size))
}拿到了AM返回的可用资源列表(allocatedContainers),AM并不是从可用容器中任意选择,而是会有一个选择策略,关于spark对container资源的选择的策略,详细的情况可以看:Spark源码——Spark on YARN Container资源申请分配、Executor的启动_aof-CSDN博客
这里就不再多做赘述。
得到要使用的容器(containersToUse)后,进入runAllocatedContainers(containersToUse)方法。YarnAllocator会用一个线程池来启动这些容器
//YarnAllocator.scala
//line 553-590
if (runningExecutors.size() < targetNumExecutors) {
        numExecutorsStarting.incrementAndGet()
        if (launchContainers) {
          launcherPool.execute(() => {
            try {
              new ExecutorRunnable(
                Some(container),
                conf,
                sparkConf,
                driverUrl,
                executorId,
                executorHostname,
                executorMemory,
                executorCores,
                appAttemptId.getApplicationId.toString,
                securityMgr,
                localResources,
                ResourceProfile.DEFAULT_RESOURCE_PROFILE_ID // use until fully supported
              ).run()
              updateInternalState()
            } catch {
              case e: Throwable =>
                numExecutorsStarting.decrementAndGet()
                if (NonFatal(e)) {
                  logError(s"Failed to launch executor $executorId on container $containerId", e)
                  // Assigned container should be released immediately
                  // to avoid unnecessary resource occupation.
                  amClient.releaseAssignedContainer(containerId)
                } else {
                  throw e
                }
            }
          })
        } else {
          // For test only
          updateInternalState()
        }
      }
进入ExecutorRunnable.run()方法中,
//ExecutorRunnable.scala
//line 63-69
def run(): Unit = {
  logDebug("Starting Executor Container")
  nmClient = NMClient.createNMClient()
  nmClient.init(conf)
  nmClient.start()
  startContainer()
}
首先会新建一个NoneManagerClient,后续会通过NMClient来通知NM启动Executor。再进入startContainer()方法,
//ExecutorRunnable.scala
//line 88-131
def startContainer(): java.util.Map[String, ByteBuffer] = {
  val ctx = Records.newRecord(classOf[ContainerLaunchContext])
    .asInstanceOf[ContainerLaunchContext]
  val env = prepareEnvironment().asJava

  ctx.setLocalResources(localResources.asJava)
  ctx.setEnvironment(env)

  val credentials = UserGroupInformation.getCurrentUser().getCredentials()
  val dob = new DataOutputBuffer()
  credentials.writeTokenStorageToStream(dob)
  ctx.setTokens(ByteBuffer.wrap(dob.getData()))

  val commands = prepareCommand()

  ctx.setCommands(commands.asJava)
  ctx.setApplicationACLs(
    YarnSparkHadoopUtil.getApplicationAclsForYarn(securityMgr).asJava)

  // If external shuffle service is enabled, register with the Yarn shuffle service already
  // started on the NodeManager and, if authentication is enabled, provide it with our secret
  // key for fetching shuffle files later
  if (sparkConf.get(SHUFFLE_SERVICE_ENABLED)) {
    val secretString = securityMgr.getSecretKey()
    val secretBytes =
      if (secretString != null) {
        // This conversion must match how the YarnShuffleService decodes our secret
        JavaUtils.stringToBytes(secretString)
      } else {
        // Authentication is not enabled, so just provide dummy metadata
        ByteBuffer.allocate(0)
      }
    ctx.setServiceData(Collections.singletonMap("spark_shuffle", secretBytes))
  }

  // Send the start request to the ContainerManager
  try {
    nmClient.startContainer(container.get, ctx)
  } catch {
    case ex: Exception =>
      throw new SparkException(s"Exception while starting container ${container.get.getId}" +
        s" on host $hostname", ex)
  }
}
这个方法中会创建一个ContainerLaunchContext,设置环境(env)、设置本地资源(localResources)、设置启动指令(commands),然后判断spark.shuffle.service.enable参数,如果是true则会额外开启一个辅助NM进行Shuffle的服务,关于shuffle详细过程我后续也会写一篇文章专门进行详解。这里我们主要关注一下commands,因为AM想要NM启动Executor,必然要给NM一个形如/bin/java [mainClass] 的一个启动指令。进入prepareCommand()方法,
//ExecutorRunnable.scala
//line 204-217

val commands = prefixEnv ++
  Seq(Environment.JAVA_HOME.$$() + "/bin/java", "-server") ++
  javaOpts ++
  Seq("org.apache.spark.executor.YarnCoarseGrainedExecutorBackend",
    "--driver-url", masterAddress,
    "--executor-id", executorId,
    "--hostname", hostname,
    "--cores", executorCores.toString,
    "--app-id", appId,
    "--resourceProfileId", resourceProfileId.toString) ++
  userClassPath ++
  Seq(
    s"1>${ApplicationConstants.LOG_DIR_EXPANSION_VAR}/stdout",
    s"2>${ApplicationConstants.LOG_DIR_EXPANSION_VAR}/stderr")
这里我们找到了启动Executor的启动主类为org.apache.spark.executor.YarnCoarseGrainedExecutorBackend,找到main方法
//YarnCoarseGrainedExecutorBackend.scala
//line 72-83
def main(args: Array[String]): Unit = {
    val createFn: (RpcEnv, CoarseGrainedExecutorBackend.Arguments, SparkEnv, ResourceProfile) =>
      CoarseGrainedExecutorBackend = { case (rpcEnv, arguments, env, resourceProfile) =>
      new YarnCoarseGrainedExecutorBackend(rpcEnv, arguments.driverUrl, arguments.executorId,
        arguments.bindAddress, arguments.hostname, arguments.cores, arguments.userClassPath, env,
        arguments.resourcesFileOpt, resourceProfile)
    }
    val backendArgs = CoarseGrainedExecutorBackend.parseArguments(args,
      this.getClass.getCanonicalName.stripSuffix("$"))
    CoarseGrainedExecutorBackend.run(backendArgs, createFn)
    System.exit(0)
  }
调用了CoarseGrainedExecutorBackend.run(backendArgs, createFn),首先通过远端的driver获取配置信息,然后初始化sparkEnv和rpcEnv,然后向rpcEnv注册了两个endpoint——“Executor”和“WorkerWatcher”,“WorkerWatcher”用来做Worker之间的通信,“Executor”用来做executor和driver之间的通信,我们重点关注executor和driver之间的通信过程。
CoarseGrainedExecutorBackend.scala
//line 331-337
val env = SparkEnv.createExecutorEnv(driverConf, arguments.executorId, arguments.bindAddress,
        arguments.hostname, arguments.cores, cfg.ioEncryptionKey, isLocal = false)
env.rpcEnv.setupEndpoint("Executor",
        backendCreateFn(env.rpcEnv, arguments, env, cfg.resourceProfile))
arguments.workerUrl.foreach { url =>
        env.rpcEnv.setupEndpoint("WorkerWatcher", new WorkerWatcher(env.rpcEnv, url))
进入env.rpcEnv.setupEndpoint("Executor",backendCreateFn(env.rpcEnv, arguments, env, cfg.resourceProfile))方法。
//NettyEnv.scala
//line 135-137
override def setupEndpoint(name: String, endpoint: RpcEndpoint): RpcEndpointRef = {
    dispatcher.registerRpcEndpoint(name, endpoint)
}
进入dispatcher.registerRpcEndpoint(name, endpoint),dispatcher内部有两个hashMap,分别用来保存在其上面注册的endpoint和相应的endpointRef,当一个新的endpoint向dispatcher注册时,dispatcher会为其新建一个messageLoop,messageLoop就是一个线程池,里面的线程会在一个死循环中不停的处理这个endpoint所接收到的数据,而endpointRef其实就是endpoint自身的一个引用,只不过endpoint用来做数据的接收,endpointRef用来做数据的发送。
//Dispatcher.scala
//line 55-88
def registerRpcEndpoint(name: String, endpoint: RpcEndpoint): NettyRpcEndpointRef = {
    val addr = RpcEndpointAddress(nettyEnv.address, name)
    val endpointRef = new NettyRpcEndpointRef(nettyEnv.conf, addr, nettyEnv)
    synchronized {
      if (stopped) {
        throw new IllegalStateException("RpcEnv has been stopped")
      }
      if (endpoints.containsKey(name)) {
        throw new IllegalArgumentException(s"There is already an RpcEndpoint called $name")
      }

      // This must be done before assigning RpcEndpoint to MessageLoop, as MessageLoop sets Inbox be
      // active when registering, and endpointRef must be put into endpointRefs before onStart is
      // called.
      endpointRefs.put(endpoint, endpointRef)

      var messageLoop: MessageLoop = null
      try {
        messageLoop = endpoint match {
          case e: IsolatedRpcEndpoint =>
            new DedicatedMessageLoop(name, e, this)
          case _ =>
            sharedLoop.register(name, endpoint)
            sharedLoop
        }
        endpoints.put(name, messageLoop)
      } catch {
        case NonFatal(e) =>
          endpointRefs.remove(endpoint)
          throw e
      }
    }
    endpointRef
  }
进入new DedicatedMessageLoop(name, e, this),在DedicatedMessageLoop构造方法中,new了一个Inbox和一个线程池threadpool,然后向线程池中提交一个receiveLoopRunnable任务。
//MessageLoop.scala
//line 165-178
  private val inbox = new Inbox(name, endpoint)

  override protected val threadpool = if (endpoint.threadCount() > 1) {
    ThreadUtils.newDaemonCachedThreadPool(s"dispatcher-$name", endpoint.threadCount())
  } else {
    ThreadUtils.newDaemonSingleThreadExecutor(s"dispatcher-$name")
  }

  (1 to endpoint.threadCount()).foreach { _ =>
    threadpool.submit(receiveLoopRunnable)
  }

  // Mark active to handle the OnStart message.
  setActive(inbox)
receiveLoopRunnable其实就是上面所说的死循环,他会一直从inbox队列中(active)取inbox,也就是endpoint就受到的消息,然后根据消息的类型,调用endpoint的相应的方法。
//MessageLoop.scala
//line 40-42
  protected val receiveLoopRunnable = new Runnable() {
    override def run(): Unit = receiveLoop()
  }
//MessageLoop.scala
//line 65-91
private def receiveLoop(): Unit = {
try {
while (true) {
try {
val inbox = active.take()
if (inbox == MessageLoop.PoisonPill) {
// Put PoisonPill back so that other threads can see it.
setActive(MessageLoop.PoisonPill)
return
}
inbox.process(dispatcher)
} catch {
case NonFatal(e) => logError(e.getMessage, e)
}
}
} catch {
case _: InterruptedException => // exit
case t: Throwable =>
try {
// Re-submit a receive task so that message delivery will still work if
// UncaughtExceptionHandler decides to not kill JVM.
threadpool.execute(receiveLoopRunnable)
} finally {
throw t
}
}
}在receiveLoopRunnable 被启动后,他所处理的第一条消息一定是一个OnStart类型的消息,因为在inbox的构造方法中,会向自己的消息队列中添加一个OnStart类型的消息。
//Inbox.scala
//line 78-80
inbox.synchronized {
    messages.add(OnStart)
}
这样,receiveLoopRunnable就会相应地调用endpoint的onStart()方法。这个endpoint就是一开始的main方法中createFn函数中new出来的YarnCoarseGrainedExecutorBackend,找到YarnCoarseGrainedExecutorBackend的onStart()方法,继承自CoarseGrainedExecutorBackend
onStart()方法中,首先会通过driverUrl获取远端driver的endpointRef,该endpointRef用于向driver发送消息, 这里调用ask方法发送了一个类型为RegisterExecutor的消息。
//CoarseGrainedExecutorBackend.scala
//line 82-101
override def onStart(): Unit = {
    logInfo("Connecting to driver: " + driverUrl)
    try {
      _resources = parseOrFindResources(resourcesFileOpt)
    } catch {
      case NonFatal(e) =>
        exitExecutor(1, "Unable to create executor due to " + e.getMessage, e)
    }
    rpcEnv.asyncSetupEndpointRefByURI(driverUrl).flatMap { ref =>
      // This is a very fast action so we can use "ThreadUtils.sameThread"
      driver = Some(ref)
      ref.ask[Boolean](RegisterExecutor(executorId, self, hostname, cores, extractLogUrls,
        extractAttributes, _resources, resourceProfile.id))
    }(ThreadUtils.sameThread).onComplete {
      case Success(_) =>
        self.send(RegisteredExecutor)
      case Failure(e) =>
        exitExecutor(1, s"Cannot register with driver: $driverUrl", e, notifyDriver = false)
    }(ThreadUtils.sameThread)
  }
那么我们再回到driver线程中,driver线程中必然也有一个形如XXXBackend的endpoint用于与executor进行通信,这个Backend就是前面提到的SparkContex初始化里的SchedulerBackend。
找到SchedulerBackend的实现类
org.apache.spark.scheduler.cluster.CoarseGrainedSchedulerBackend
找到他的receiveAndReply方法,显然CoarseGrainedSchedulerBackend接收到的是Executor发过来的类型为RegisterExecutor的消息。这个方法很长,主要就是做一些Executor的注册工作,最后给Executor回复一个true。
context.reply(true)
//CoarseGrainedSchedulerBackend.scala
//line 207-256
case RegisterExecutor(executorId, executorRef, hostname, cores, logUrls,
          attributes, resources, resourceProfileId) =>
        if (executorDataMap.contains(executorId)) {
          context.sendFailure(new IllegalStateException(s"Duplicate executor ID: $executorId"))
        } else if (scheduler.nodeBlacklist.contains(hostname) ||
            isBlacklisted(executorId, hostname)) {
          // If the cluster manager gives us an executor on a blacklisted node (because it
          // already started allocating those resources before we informed it of our blacklist,
          // or if it ignored our blacklist), then we reject that executor immediately.
          logInfo(s"Rejecting $executorId as it has been blacklisted.")
          context.sendFailure(new IllegalStateException(s"Executor is blacklisted: $executorId"))
        } else {
          // If the executor's rpc env is not listening for incoming connections, `hostPort`
          // will be null, and the client connection should be used to contact the executor.
          val executorAddress = if (executorRef.address != null) {
              executorRef.address
            } else {
              context.senderAddress
            }
          logInfo(s"Registered executor $executorRef ($executorAddress) with ID $executorId")
          addressToExecutorId(executorAddress) = executorId
          totalCoreCount.addAndGet(cores)
          totalRegisteredExecutors.addAndGet(1)
          val resourcesInfo = resources.map{ case (k, v) =>
            (v.name,
             new ExecutorResourceInfo(v.name, v.addresses,
               // tell the executor it can schedule resources up to numParts times,
               // as configured by the user, or set to 1 as that is the default (1 task/resource)
               taskResourceNumParts.getOrElse(v.name, 1)))
          }
          val data = new ExecutorData(executorRef, executorAddress, hostname,
            0, cores, logUrlHandler.applyPattern(logUrls, attributes), attributes,
            resourcesInfo, resourceProfileId)
          // This must be synchronized because variables mutated
          // in this block are read when requesting executors
          CoarseGrainedSchedulerBackend.this.synchronized {
            executorDataMap.put(executorId, data)
            if (currentExecutorIdCounter < executorId.toInt) {
              currentExecutorIdCounter = executorId.toInt
            }
            if (numPendingExecutors > 0) {
              numPendingExecutors -= 1
              logDebug(s"Decremented number of pending executors ($numPendingExecutors left)")
            }
          }
          listenerBus.post(
            SparkListenerExecutorAdded(System.currentTimeMillis(), executorId, data))
          // Note: some tests expect the reply to come after we put the executor in the map
          context.reply(true)
        }
继续回到Executor那边的endpoint的onStart()方法,driver回复Executor已注册成功,那么Executor就会向自己发送一个类型为RegisteredExecutor的消息
case Success(_) =>
  self.send(RegisteredExecutor)
case Failure(e) =>
  exitExecutor(1, s"Cannot register with driver: $driverUrl", e, notifyDriver = false)
也就是说,调用
self.send(RegisteredExecutor)
方法,会向inbox中增加一条类型为RegisteredExecutor的消息,然后messageLoop在循环处理消息的过程中会处理到这条消息,然后调用相应的endpoint的receive()方法。直到这里,才真正将Executor给new了出来(前面所说的Executor是指类型为CoarseGrainedExecutorBackend,名为“Executor”的endpoint,他的作用是与driver进行通信,这里new出来的Executor实例才是真正用来执行计算任务的),然后又向driver发送了一条类型为LaunchedExecutor的消息。
//CoarseGrainedExecutorBackend.scala
//line 148-157
  case RegisteredExecutor =>
    logInfo("Successfully registered with driver")
    try {
      executor = new Executor(executorId, hostname, env, userClassPath, isLocal = false,
        resources = _resources)
      driver.get.send(LaunchedExecutor(executorId))
    } catch {
      case NonFatal(e) =>
        exitExecutor(1, "Unable to create executor due to " + e.getMessage, e)
    }
driver接收到Executor发过来的类型为LaunchedExecutor消息,后面就是进行任务的切分、调度和执行过程了,我们留在下一篇文章中再讲。
到此为止,driver和executor的环境已经完全建立起来了。我们做一个总结。在最开始的那张图中,我们将Spark On Yarn Cluster的过程分为了6步
第6步启动Executor,执行计算从YarnCoarseGrainedExecutorBackend的main方法开始,又分为这么几个小步骤:
- Executor进程启动,初始化环境sparkEnv和rpcEnv
- 向rpcEnv注册一个名为“Executor”的endpoint和一个名为“WorkerWatcher”的endpoint,“Executor”用于与SparkContext(driver线程)通信,“WorkerWatcher”用于Worker之间相互通信
- “Executor”调用onStart()方法,向driver发送一个类型为RegisterExecutor的消息,向driver提出注册
- driver完成Executor的注册,向Executor回复注册成功
- “Executor”向自己发送一个类型为RegisteredExecutor的消息,然后receive()方法被调用
- Executor进程创建Executor计算对象,向driver发送一个类型为LaunchedExecutor的消息
- driver进行任务的切分、调度和执行
rpc通信过程的UML时序图如下

Executor接收消息的流程:当rpcEnv接收到一条消息后,会进入NettyRpcEnv.receive()方法,rpcEnv首先会将这条消息进行简单的解析和封装,然后交由dispatcher处理,dispatcher会根据消息中的endpoint name,从endpoints中找到相应的messageLoop,每一个messageLoop中绑定有一个消息队列linkedBlockingQueue,dispatcher会将消息封装为一个inbox并放入这个linkedBlockingQueue,同时messageLoop会不断地从linkedBlockingQueue中取inbox,然后根据inbox中的消息的类型调用endpoint的相应的方法。

Executor发送消息的流程:当一个endpointRef需要发送消息时,会调用rpcEnv.send()方法,rpcEnv会根据消息的目的地是本地还是远程分开处理,如果是本地消息,即endpointRef所对应的endpoint就在本地,那么直接让dispatcher去处理,因为本地所有的endpoint都在dispatcher的endpoints中,那么dispatcher会将这条消息直接放入相应的inbox队列中就可以了;如果不是本地消息,那么会根据消息的目的地找到相应的outbox,outbox中保存了与远程endpoint进行通信的transportClient,然后transportClient将消息发送出去。

个人对rpc通信过程的一些通信组件的理解
1. rpcEnv:rpc通信环境,底层是一个netty服务器,用来接收和发送数据。
2. endpoint:通信的终端,一个endpoint在一个Executor进程中具有一个唯一的endpoint name,里面封装了接收数据后的处理逻辑(receive方法)。每个endpoint都有一个相应的endpointRef,这个endpointRef在本地是由dispatcher来维护的。endpoint的生命周期为
constructor -> onStart -> receive* -> onStop
3. endpointRef:对远程(或本地)的endpoint的引用,可以通过endpointRef向远程(或本地)的endpoint发送消息
4. messageLoop:本地的每一个endpoint都有自己对应的一个messageLoop(也可以多个endpoint共享一个messageLoop),messageLoop中有一个inbox的阻塞队列和一个线程池,线程池中的线程会作为消费者不断地去消费阻塞队列中的inbox
5. inbox:用于保存消息的收件箱,messageLoop消费一个inbox,其实就是让该inbox去根据消息的类型调用endpoint相应的方法(onStart,reveive,onStop)
6. dispatcher:相当于一个调度器,他保存了两个HashMap,一个是endpoints,key=endpoint name,value=messageLoop,另一个是endpointRefs,key=endpoint,value=相应的endpoint的endpointRef。当rpcEnv接收到消息时,会交由dispatcher来处理,dispatcher能根据endpoints找到处理这个消息的messageLoop,从而对该消息进行处理。
结尾
这篇文章写到这里终于写完了,在下一篇文章中,我会解析Driver (SparkContext) 是如何对任务进行切分、调度以及Executor是如何对任务进行接收和执行。
如有错误,希望各位指正~