一、配置bond 网络接口
1.bond接口
- Red Hat Enterprise Linux 允许管理员使用 bonding 内核模块和称为通道绑定接口的特殊网络接口将多个网络接口绑定
到一个通道。根据选择的绑定模式 , 通道绑定使两个或更多个网络接口作为一个网络接口 , 从而增加带宽和 / 提供冗余性
2.选择 Linux 以太网绑定模式
模式 0 balance-rr ( 平衡轮循 ) - 轮循策略 , 所有接口都使用采用轮循方式在所有 Slave 中传输封包 ; 任何 Slave 都可以接收
模式 1 active-backup ( 主动备份 ) - 容错。一次只能使用一个 Slave 接口, 但是如果该接口出现故障 , 另一个 Slave 将 接替它
模式 3 broadcast ( 广播 ) - 容错。所有封包都通过所有 Slave 接口广播
3.利用nmcli命令管理bond
<1>添加一块新的网卡

此时共有两块网卡

<2>删除原有网卡的配置文件
[root@localhost ~]# nmcli connection delete eth0<3>添加bond网络接口、选择主备模式
[root@localhost ~]#nmcli connection add con-name bond0 ifname bond0 type bond mode active-backup ip4 172.25.254.105/24<4>添加bond接口的设备
[root@localhost ~]#nmcli connection add con-name eth0 ifname eth0 type bond-slave master bond0
[root@localhost ~]#nmcli connection add con-name eth1 ifname eth1 type bond-slave master bond0
<5>监控命令
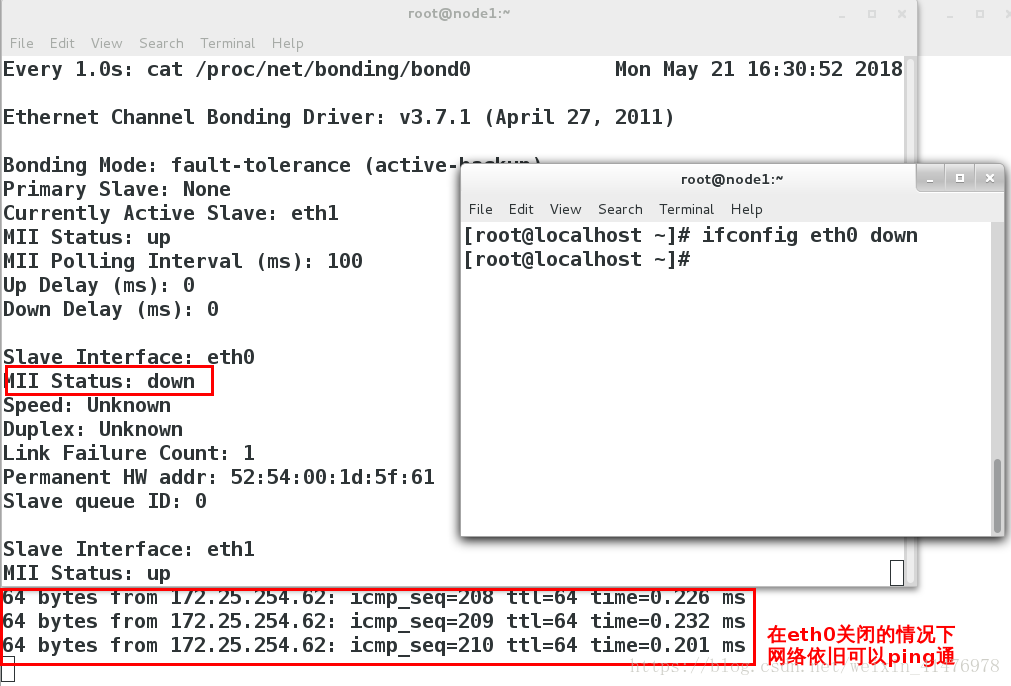
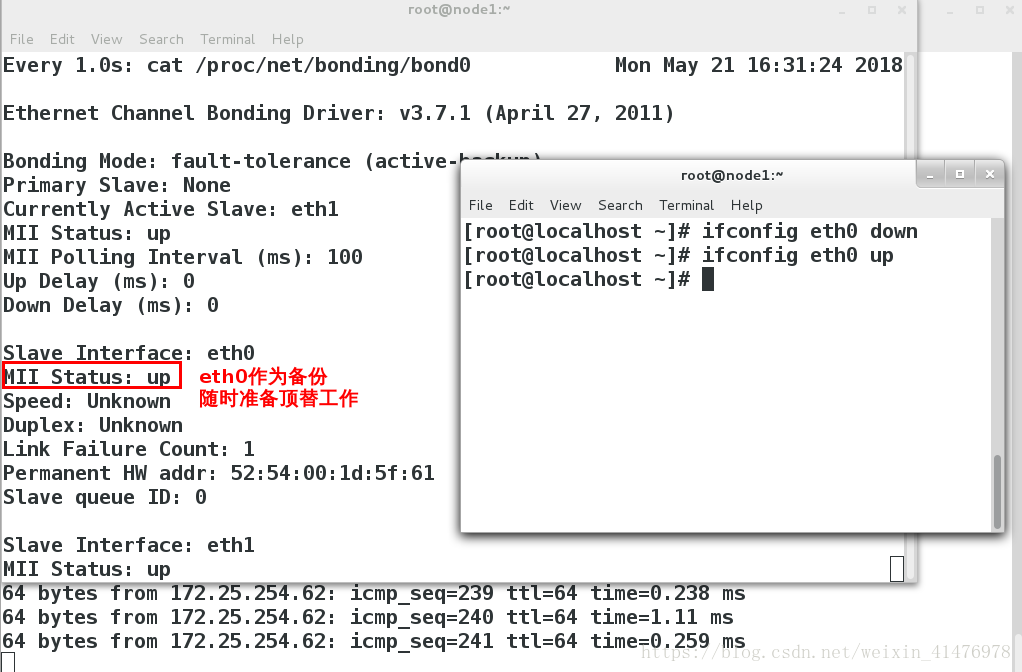
[root@localhost ~]#watch -n 1 cat /proc/net/bonding/bond0
实验:
ifconfig etho down
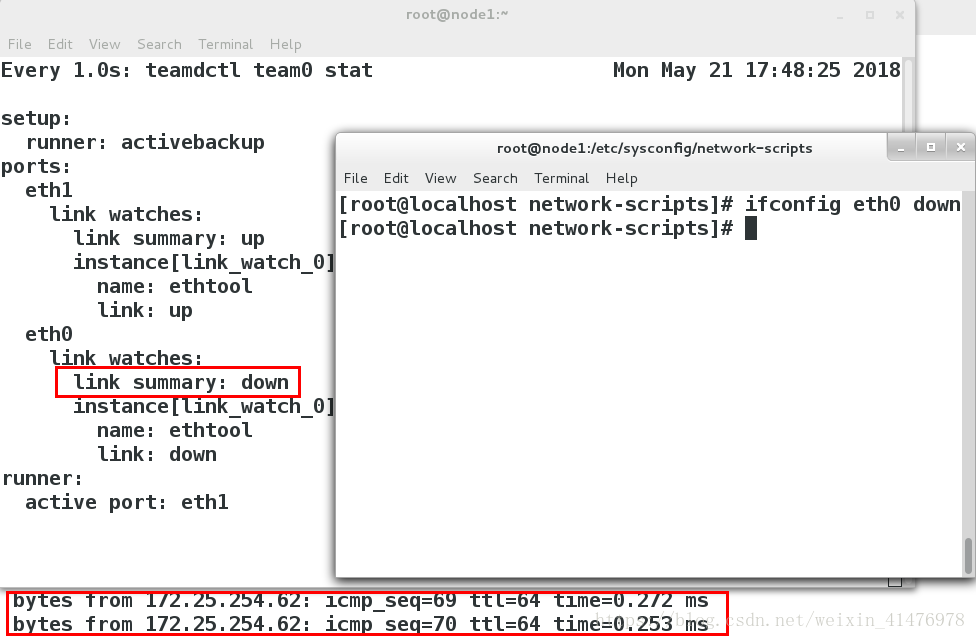
网依旧可以ping通,eth1顶替eht0工作
ifconfig eth0 up
eth0作为eth1的备份
<6>删除bond接口
[root@localhost ~]#nmcli connetction deletet bond0
[root@localhost ~]#nmcli connetction deletet eth0
[root@localhost ~]#nmcli connetction deletet eth1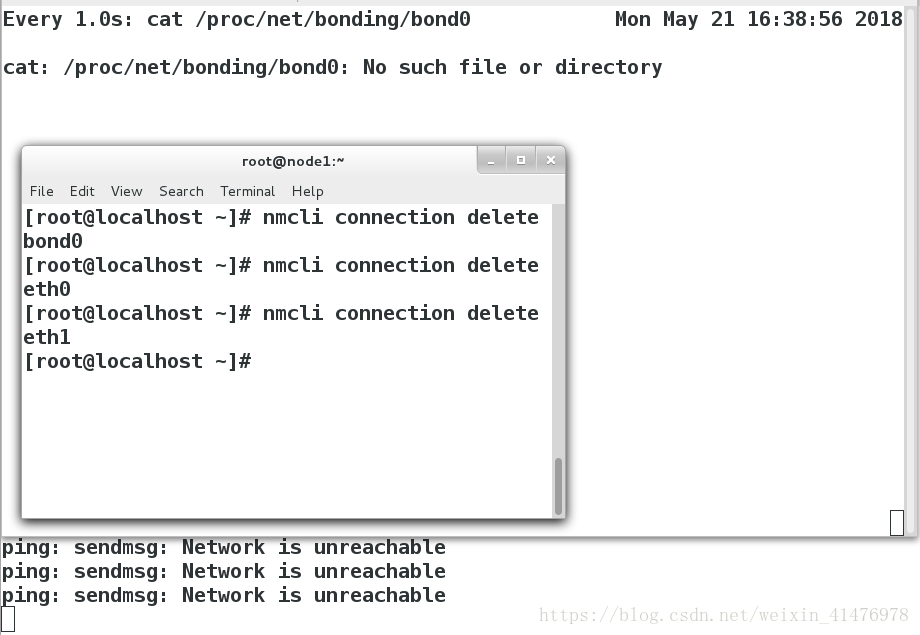
4.用文件配置bond网络
vim /etc/sysconfig/network-scripts/ifcfg-bond0  ##编写bond接口文件
DEVICE=bond0
BONDING_OPTS=mode=active-backup
TYPE=Bond
BONDING_MASTER=yes
BOOTPROTO=none
IPADDR0=172.25.254.105
PREFIX0=24
NAME=bond0
ONBOOT=yes
~
vim /etc/sysconfig/network-scripts/ifcfg-eth0 ##编写bond接口的slave文件,eth1与eth0相同,不再赘述
YPE=Ethernet
NAME=eth0
UUID=680d1066-8c74-4d6f-9c6f-f8d1d1f02810
DEVICE=eth0
ONBOOT=yes
MASTER=bond0
SLAVE=yes
二、配置team网络接口
1.team接口
Team和 bond0 功能类似
Team不需要手动加载相应内核模块
Team有更强的拓展性
支持 8块网卡
2.team的种类
broadcast 广播容错
roundrobin 平衡轮叫
activebackup 主备
loadbalance 负载均衡
3.通过nmcli命令设定team
<1>创建team接口、slave接口
[root@localhost Desktop]#nmcli connection add con-name team0 ifname team0 type team config '{"runner":{"name":"activebackup"}}' ip4 172.25.254.105/24
[root@localhost Desktop]#nmcli connection add con-name eth0 type team-slave ifname eth1 master team0
[root@localhost Desktop]#nmcli connection add con-name eth1 type team-slave ifname eth0 master team0
<2>监控命令
[root@localhost Desktop]#watch -n 1 teamdctl team0 stat<3>关闭eth0
[root@localhost Desktop]#ifconfig eth0 down实验如图所示:
<4>删除team接口
[root@localhost Desktop]#nmcli connetction deltet team0
[root@localhost Desktop]#nmcli connetction deltet eth0
[root@localhost Desktop]#nmcli connetction deltet eth1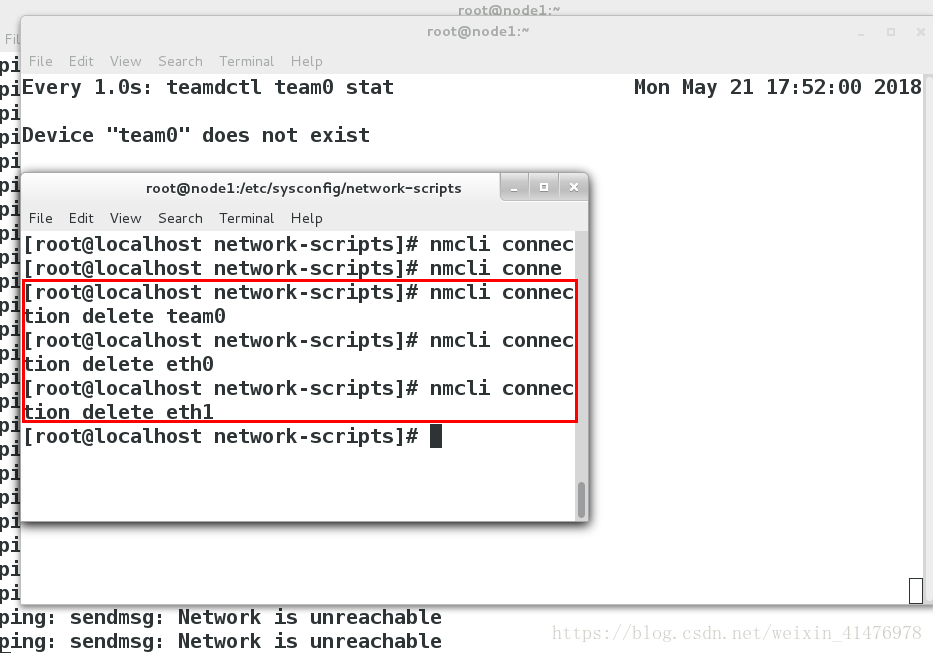
三、网络桥接
实验环境:真机
【1】网桥的搭建
1.备份原网卡、桥接文件
[root@foundation5 ~]# cd /etc/sysconfig/network-scripts/
[root@foundation5 network-scripts]# mv ifcfg-br0  ifcfg-enp0s25 /opt/
2.打开网络图形管理删除网络 只留下vb1 vb0
3.编写/etc/sysconfig/network-scripts/ifcfg-br0和ifcfg-enp0s25建立网桥
[root@foundation5 network-scripts]# vim ifcfg-enp0s25
DEVICE=enp0s25
ONBOOT=yes
BOOTPROTO=none
BRIDGE=br0      ##控制设备的网卡enp0s25开启br0接口

[root@foundation5 network-scripts]#vim ifcfg-br0
DEVICE=br0
ONBOOT=yes
BOOTOPOTO=none
IPADDR=172.25.254.5
PREFIX=24
TYPE=Bridge  ##类型为桥接
~
3.重启网络
[root@foundation5 network-scripts]#systemctl restart network也可以尝试reboot
4,网桥的查看
网桥的查看
[root@foundation5 network-scripts]# brctl show
bridge name    bridge id        STP enabled     interfaces
br0         8000.0021ccc1010e   no              enp0s25
virbr0      8000.525400a676d2   yes             virbr0-nic
virbr1      8000.525400c0bf57   yes             virbr1-nic
5.将备份还原
[root@foundation5 network-scripts]#rm -fr ifcfg-br0 ifcfg-enp0s25
[root@foundation5 network-scripts]#mv /opt/ifcfg-* .
[root@foundation5 network-scripts]#systemctl restart network
【2】网络桥接的管理命令
实验环境:虚拟机
| 命令 | 含义 |
|---|---|
| brctl show | 显示网桥 |
| brctl addbr | 添加网桥 |
| brctl delbr | 删除网桥 |
| brctl addif | 添加网桥连接 |
| brctl delif | 删除网桥连接 |
实验:网卡的桥接
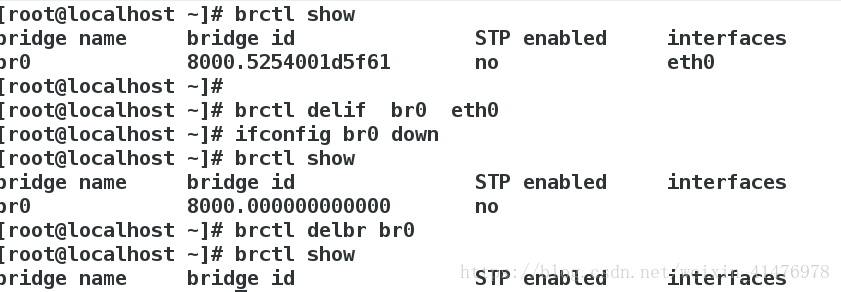
[root@localhost Desktop]#brctl addbr br0
[root@localhost Desktop]#brctl show ##此时的桥接没有网卡不可用
[root@localhost Desktop]#ifconfig br0 172.25.254.105/24
[root@localhost Desktop]#ping 172.25.254.62 ##ping不通
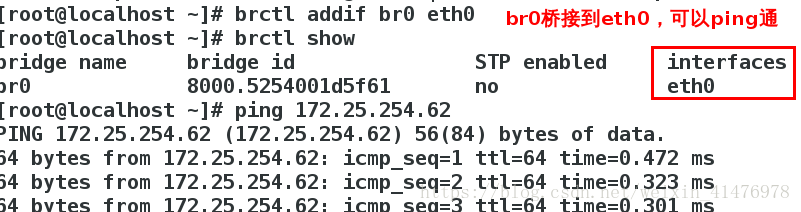
[root@localhost Desktop]#brctl addif br0 eth0 ##桥接一个网卡
[root@localhost Desktop]#ping 172.25.254.62 ##ping通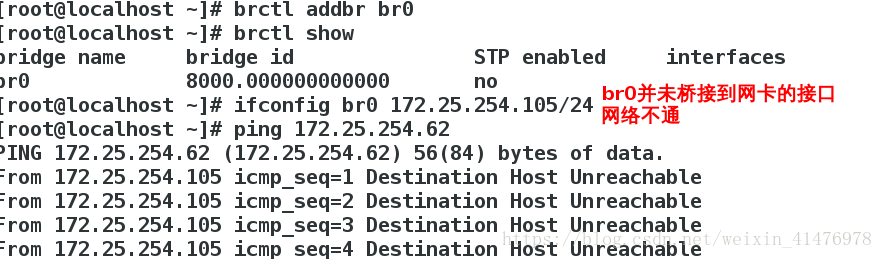
实验:桥接的删除
[root@localhost Desktop]#brctl delif bro eth0 ##把eth0从br0移除
[root@localhost Desktop]#ifconfig bro down ##关掉br0
[root@localhost Desktop]#brctl delbr br0   ##删除br0