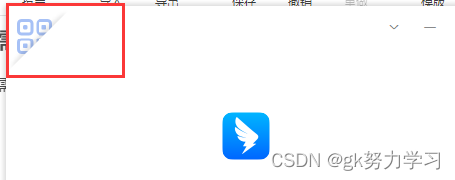
需求
需要使用flutter创建类似钉钉登录页右上角图表样式
过程
图标
图标直接从阿里巴巴图标库中下载png文件,并设置相应颜色
三角形阴影
样式的主要难点在三角形及三角形阴影这里
1、三角形的裁剪有两种方法:
-
第一种是 使用边框实现三角形
参考博客:使用边框设置三角形
效果:可以看到明显的白色分割线,所以这个方法 pass

实现代码:
Container(
            width: 0,
            height: 0,
            margin: EdgeInsets.all(100),
            decoration: const BoxDecoration(
              border: Border(
                // 四个值 top right bottom left
                bottom: BorderSide(
                    color: Colors.transparent, // 朝上; 其他的全部透明transparent或者不设置
                    width: 100,
                    style: BorderStyle.solid),
                right: BorderSide(
                    color: Colors.transparent, // 朝左;  把颜色改为目标色就可以了;其他的透明
                    width: 100,
                    style: BorderStyle.solid),
                left: BorderSide(
                    color: Colors.blue, // 朝右;把颜色改为目标色就可以了;其他的透明
                    width: 100,
                    style: BorderStyle.solid),
                top: BorderSide(
                    color: Colors.blue, // 朝下;  把颜色改为目标色就可以了;其他的透明
                    width: 100,
                    style: BorderStyle.solid),
              ),
            ),
          ),
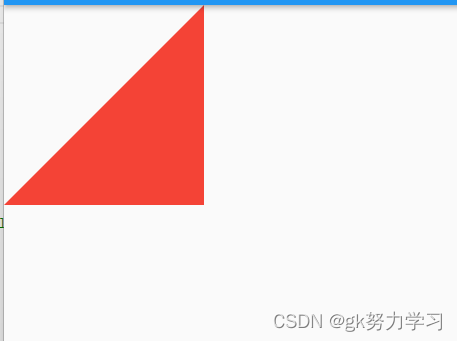
- 第二种方法:使用ClipPath 按照自定义的路径剪裁
参考博客:flutter-剪裁(Clip)
效果:可以看到,一个完整的三角形就出现了
代码:
//绘制三角形
class __MyPathClipper extends CustomClipper<Path> {
Path getClip(Size size) {
var path = Path();
path.moveTo(size.width, 0);
path.lineTo(0, size.height); //图片的左下角坐标
path.lineTo(size.width, size.height); //图片的右下角左边
path.close();
return path;
}
bool shouldReclip(CustomClipper<Path> oldClipper) {
return false;
}
}
//使用
ClipPath(
clipper: __MyPathClipper(),
child: Container(
color: Colors.red,
width: 200,
height: 200,
)),
2、阴影效果
在阴影效果这方面,我尝试了很多
首先,直接使用Container自带的decoration属性设置阴影,但是效果并不明显,无论怎样尝试,阴影都是一条直线,没有渐变效果
代码:
ClipPath(
 clipper: __MyPathClipper(),
 child: Container(
    width: 60,
    height: 60,
    decoration: const BoxDecoration(
    color: Color.fromRGBO(250, 250, 250, 1),
    boxShadow: [
    BoxShadow(
      color: Colors.grey,
      offset:Offset(-3, -3),
      blurRadius: 2),
 ])))
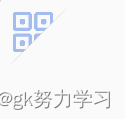
后来,想到可以使用渐变色来模拟阴影效果
得到了最终的样式

代码:
ClipPath(
  clipper: __MyPathClipper(),
  child: Container(
     width: 60,
     height: 60,
     decoration: const BoxDecoration(
     gradient: LinearGradient(
         begin: Alignment.topLeft,
         end: Alignment.bottomRight,
         stops: [0.0, 0.495 ],//渐变的位置  起始位置 到 终止位置
         colors: [//渐变的颜色,从颜色1 到 颜色2
           Color.fromARGB(255, 3, 3, 3),
           Color.fromRGBO(250, 250, 250, 1),
 ]))))
全部代码
Stack(
                                  children: <Widget>[
                                    const Positioned(
                                      top: 5,
                                      left: 5,
                                      child: Image(
                                        image: AssetImage('images/code.png'),
                                        width: 40,
                                        height: 40,
                                      ),
                                    ),
                                    Positioned(
                                        bottom: 0,
                                        right: 0,
                                        child: ClipPath(
                                            clipper: __MyPathClipper(),
                                            child: Container(
                                                width: 60,
                                                height: 60,
                                                decoration: const BoxDecoration(
                                                    gradient: LinearGradient(
                                                        begin: Alignment
                                                            .topLeft, //右上
                                                        end: Alignment
                                                            .bottomRight,
                                                        stops: [
                                                      0.0,
                                                      0.495
                                                    ],
                                                        colors: [
                                                      Color.fromARGB(
                                                          255, 3, 3, 3),
                                                      Color.fromRGBO(
                                                          250, 250, 250, 1),
                                                    ]))))),
                                  ],
                                ),