本文目录
Map实现原理
1、概述
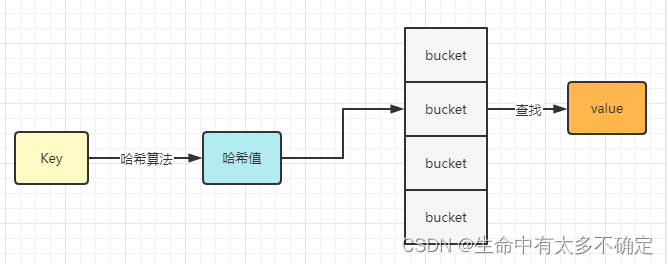
Map这一数据结构在很多语言中都存在,其查询的效率非常高,时间复杂度在O(1)的级别,其底层原理使用的是哈希表,通过计算key的hash值,找到其所在的bucket,然后再通过bucket寻找其value, 流程如下图所示
2、哈希碰撞
由于bucket的数量有限,而k-v对的数量会越来越多,因此,在通过哈希值查找对应的bucket的时候可能出现多个哈希值对应一个bucket的情况,这就是hash碰撞。为解决这个问题,可以通过拉链法或开放地址法来解决此类问题
2.1、拉链法

如果多个元素被放在一个bucket中,则会将他们以链表的形式组织起来,在查找到对应的bucket后,只需要对其进行遍历即可。
缺点:由于使用链表组织数据,因此需要额外的指针,并且也无法高效利用CPU高速缓存
2.2、开放地址法
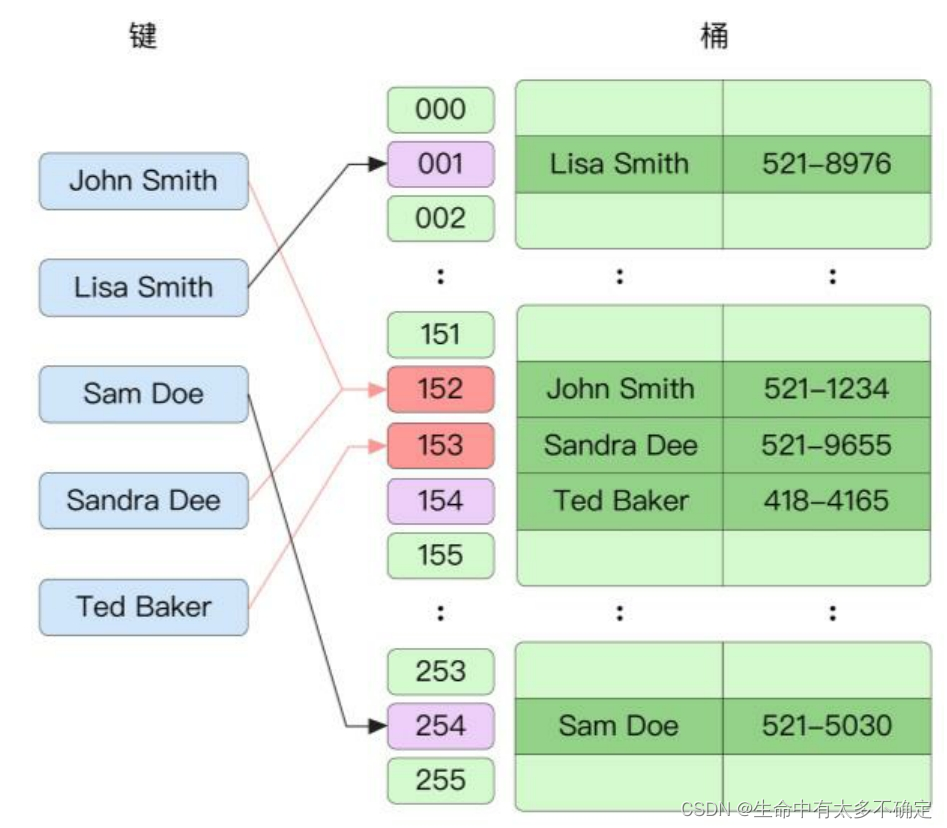
和拉链发不一样的是,对于同一个bucket中的元素,采用的是数组的形式进行保存的,Go语言采用的正式这种方式来解决哈希冲突,在查找元素时是按顺遍历的,此方式能够较好的利用CPU的高速缓存。
3、常用操作
3.1、声明与创建
var m1 map[int]string      // m1为nil,不能进行操作
var m2 = make(map[int]int) // m2不为nil,默认长度为0
3.2、获取值
var m = make(map[int]int)
v1 := m[1]
fmt.Println(v1) // 0
v2, ok := m[2]
fmt.Println(v2, ok) // 0 false
通过上面例子不难看出,如果获取一个不存在的元素,将会得到此类型的”零值“,因此,更推荐使用第二种方法来从map中获取元素,通过第二个参数就可以判断是否存期望的值
3.3、赋值操作
var m = make(map[int]int)
// 赋值:map[key] = value
m[1] = 666
fmt.Println(m[1]) // 666
// 删除:delete(map,key)
delete(m, 1)
fmt.Println(m[1]) // 0
3.4、key的比较性
在Go语言中,map的key必须要具备可比较性。除了切片、函数、map, 不具备可比较性,其他类型几乎都具备可比较性。值得一提的是,结构体的可比较性,取决于其所有属性,如果所有则字段都是可比较的,则该结构体具有可比较性,反之则不具备可比较性。
3.5、并发问题
// 测试并发读写
// 并发读写会报错 fatal error: concurrent map read and map write
func test1() {


	m := make(map[int]int)
	go func() {


		for {


			m[0] = 5
		}
	}()
	go func() {


		for {


			_ = m[1]
		}
	}()
	select {

    }
}

// 测试并发读
func test2() {


	m := make(map[int]int)
	go func() {


		for {


			_ = m[0]
		}
	}()
	go func() {


		for {


			_ = m[1]
		}
	}()
	select {

    }
}

// 测试并发写
// 报错: fatal error: concurrent map writes
func test3() {


	m := make(map[int]int)
	go func() {


		for {


			m[0] = 5
		}
	}()
	go func() {


		for {


			m[1] = 5
		}
	}()
	select {

    }
}
通过上面的案例不难看出,Go语言中的Map只支持并发读,之所以这样设计,是因为在大多数场景下Map都是读多写少的,如果为了那一点点的安全性让每个方法都互斥会有点得不偿失,因此,在性能与并发安全上选择了前者。
4、底层结构
4.1、哈希表结构体
Map结构体
// A header for a Go map.
type hmap struct {


	// Note: the format of the hmap is also encoded in cmd/compile/internal/reflectdata/reflect.go.
	// Make sure this stays in sync with the compiler's definition.
	count     int // # live cells == size of map.  Must be first (used by len() builtin)
	flags     uint8
	B         uint8  // log_2 of # of buckets (can hold up to loadFactor * 2^B items)
	noverflow uint16 // approximate number of overflow buckets; see incrnoverflow for details
	hash0     uint32 // hash seed

	buckets    unsafe.Pointer // array of 2^B Buckets. may be nil if count==0.
	oldbuckets unsafe.Pointer // previous bucket array of half the size, non-nil only when growing
	nevacuate  uintptr        // progress counter for evacuation (buckets less than this have been evacuated)

	extra *mapextra // optional fields
}
借助翻译软件可以得知大部分字段的作用,这里就不重复解释了,这里介绍一下没有英文注释的flag字段,这个字段的作用记录当前map的状态,前面提到的并发问题正是借助了这个字段进行判断的
Bucket结构体
// A bucket for a Go map.
type bmap struct {


	// tophash generally contains the top byte of the **hash** value
	// for each key in this bucket. If tophash[0] < minTopHash,
	// tophash[0] is a bucket evacuation state instead.
	tophash [bucketCnt]uint8
	// Followed by bucketCnt keys and then bucketCnt elems.
	// NOTE: packing all the **keys** together and then all the **elems** together makes the
	// code a bit more complicated than alternating key/elem/key/elem/... but it allows
	// us to eliminate padding which would be needed for, e.g., map[int64]int8.
	// Followed by an overflow pointer.
}
在源码中可以看到bucketCnt在运行时为8,在这个结构体中只有一个tophash属性,它是一个长度为8的数组,通过注释可以得知它存储的是hash值,通过后面的英文解释可以得知,紧跟着的应该是key和value,在获取的时候是通过计算偏移量得到的。因此,在运行时实际的结构应该是下面的样子
// A bucket for a Go map.
type bmap struct {


	tophash [bucketCnt]uint8
	key     [bucketCnt]T
	value   [bucketCnt]T
	......
}
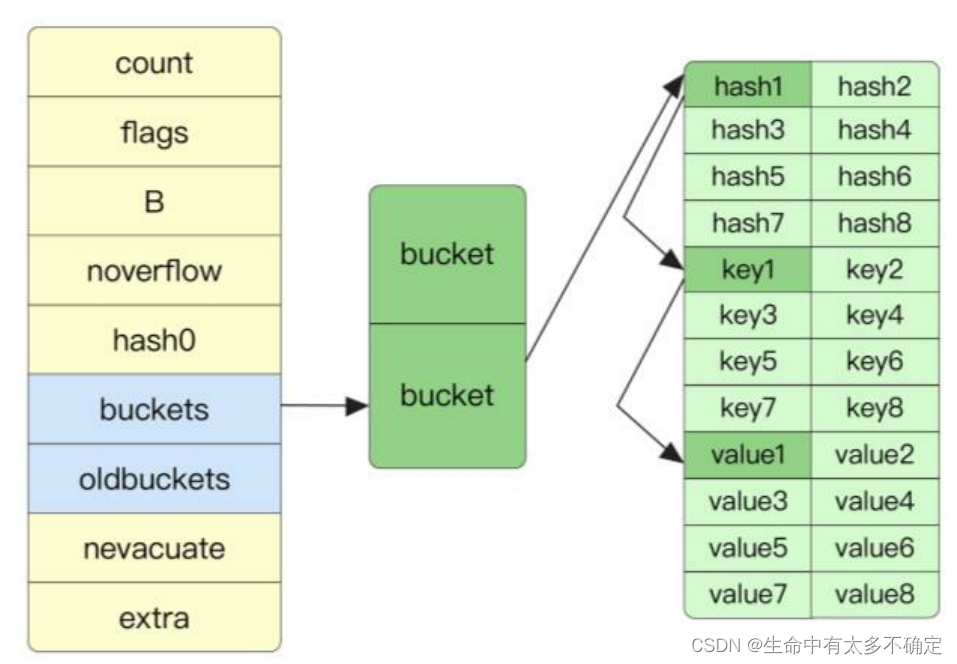
在后面的英文注释部分也解释了,之所以这样组织数据,是为了节省因对其而填充的空间
4.2、溢出桶
通过上面对结构体的分析可以知道,bucket结构体中的数据是存储在数组中的,而数组的长度固定是8,当往map进行存储时,bucket中的数据可能会超过8。对于这种情况,Go语言的做法是创建一个新的bucket,这个新的bucket叫做溢出桶,原bucket,和溢出桶会组织一个链,换句话说,原bucket会有一个指针指向这个溢出桶。
4.3、map重建
在使用key获取value的时候,会先找到对应的bucket,然后回去遍历这里面的元素,如果此bucket没有找到就会检查是否有溢出桶,如果有则会遍历溢出桶。我们知道遍历的效率是非常差的,因此,为了提高性能,需要增加原bucket的数量,由于map中bucket是以数组的方式组织起来的,因此需要在扩容时需要申请一块更大的内存,然后将旧的bucket复制到新的数组中去。
扩容条件
// If we hit the max load factor or we have too many overflow buckets,
// and we're not already in the middle of growing, start growing.
if !h.growing() && (overLoadFactor(h.count+1, h.B) || tooManyOverflowBuckets(h.noverflow, h.B)) {


	hashGrow(t, h)
	goto again // Growing the table invalidates everything, so try again
}
根据英文注释以及方法名称不难看出,当负载因子达到一定阈值或者溢出桶太多的时候(溢出桶和正常的桶数量一样多的时候),便会触发map重建
负载因子
下面是负载因子的计算公式:
负 载 因 子 = 元 素 数 量 / b u c k e t 数 量 负载因子 = 元素数量/bucket数量 负载因子=元素数量/bucket数量
负载因子可以得到目前对空间的大致使用情况,如果当前负载因子很小,说明元素数量远比申请的容量要小,例如:负载因子为1,那么平均每个bucket就只有一个元素,因为每个bucket能存放8个元素,从平均的角度来看,大约只使用到了1/8的空间。
// Maximum average load of a bucket that triggers growth is 6.5.
// Represent as loadFactorNum/loadFactorDen, to allow integer math.
loadFactorNum = 13
loadFactorDen = 2
通过上述源码可以得知,在运行时map的默认最大负载因子为6.5,也就是13÷2的结果,也就是说,当map的负载因子达到6.5的时候会进行扩容操作
扩容策略
func hashGrow(t *maptype, h *hmap) {


	// If we've hit the load factor, get bigger.
	// Otherwise, there are too many overflow buckets,
	// so keep the same number of buckets and "grow" laterally.
	bigger := uint8(1)
	if !overLoadFactor(h.count+1, h.B) {


		bigger = 0
		h.flags |= sameSizeGrow
	}
	oldbuckets := h.buckets
	newbuckets, nextOverflow := makeBucketArray(t, h.B+bigger, nil)
	//......
}
map结构体重的B字段与bucket数量的关系是: 2 B = b u c k e t s 2^B = buckets 2B=buckets,也就是说B每增加1,bucket就会增加一倍
在上述源码中,不难看出,如果是因为负载因子导致的扩容,bigger为1,那么B会增加1,也就是buckets的数量会翻倍,如果是因为溢出桶的数量太多导致的扩容,bigger为0,桶的数量会保持不变,进行横向“增长”。
4.4、删除原理
在使用delete(map,key)删除map中的元素的时候,会将bucket中对应位置上的值设置成emptyOne, 如果该值后面都没有值,则会设置成emptyRest, 这样做的好处是,遇到emptyRest的时候便不会继续向后遍历了。如下图所示