一、LVS-DR集群介绍
LVS-DR(Linux Virtual Server Director Server)工作模式,是生产环境中最常用的一 种工作模式。
1、LVS-DR 工作原理
LVS-DR 模式,Director Server 作为群集的访问入口,不作为网关使用,节点 Director Server 与 Real Server 需要在同一个网络中,返回给客户端的数据不需要经过 Director Server。为了响应对整个群集的访问,Director Server 与 Real Server 都需要配置 VIP 地址。
2、 数据包流向分析
为方便进行原理分析,将Client与群集机器放在同一网络中,数据包流经的路线为 1-2-3-4 四步
第一步:客户端发送请求到 Director Server (负载均衡器),请求的数据报文到达内核空间。
此时请求的数据报文
源 IP —— 客户端的 IP(CIP)
目标 IP —— VIP
源 MAC —— 客户端的 MAC
目的 MAC —— Director Server 的 MAC
第二步:内核空间判断数据包的目标 IP 是本机 VIP,此时 IPVS(IP 虚拟服务器)比对数据包请求的服务是否是集群服务,是集群服务就重新封装数据包。然后将数据包发送给根据 负载均衡算法选择的 Real Server。(Director Server 和 Real Server 在同一个网络中,数据通过二层数据链路层来传输。)
此时请求的数据报文
源 IP —— 客户端的 IP
目标 IP —— VIP
源 MAC —— Director Server 的 MAC
目的 MAC —— Real Server 的 MAC
第三步:到达 Real Server 的请求报文的 MAC 地址是自身的 MAC 地址,就接收此报文。数据包重新封装报文,将响应报文通过 lo 接口传送给物理网卡然后向外发出。
此时请求的数据报文
源 IP —— VIP
目标 IP —— 客户端的 IP(CIP)
源 MAC —— Real Server 的 MAC
目的 MAC —— 客户端的 MAC
第四步:通过交换机和路由器将响应报文传送到客户端。客户端收到回复报文,得到想要的服务,但是不会知道是哪台服务器处理的。
3、LVS-DR 模式的特点
Director Server 和 Real Server 必须在同一个物理网络中。

Real Server 可以使用私有地址,也可以使用公网地址。如果使用公网地址,可以通过 互联网对 RIP 进行直接访问。
所有的请求报文经由 Director Server,但回复响应报文不能经过 Director Server。
Real Server 的网关不允许指向 Director Server IP,即不允许数据包经过 Director S erver。
Real Server 上的 lo 接口配置 VIP 的 IP 地址。
4、LVS-DR中的ARP问题
4.1 问题一
在LVS-DR负载均衡集群中,负载均衡器与节点服务器都要配置相同的VIP地址,在局域网中具有相同的IP地址。势必会造成各服务器ARP通信的紊乱
当ARP广播发送到LVS-DR集群时,因为负载均衡器和节点服务器都是连接到相同的网络上,它们都会接收到ARP广播
只有前端的负载均衡器进行响应,其他节点服务器不应该响应ARP广播
解决方法:对节点服务器进行处理,使其不响应针对VIP的ARP请求
使用虚接口lo:0承载VIP地址
设置内核参数arp_ ignore=1: 系统只响应目的IP为本地IP的ARP请求
4.2问题二
问题说明:RealServer返回报文(源IP是VIP)经路由器转发,重新封装报文时,需要先获取路由器的MAC地址,发送ARP请求时,Linux默认使用IP包的源IP地址(即VIP)作为ARP请求包中的源IP地址,而不使用发送接口的IP地址,路由器收到ARP请求后,将更新ARP表项,原有的VIP对应Director的MAC地址会被更新为VIP对应RealServer的MAC地址。
路由器根据ARP表项,会将新来的请求报文转发给RealServer,导致Director的VIP失效
解决方法:
对节点服务器进行处理,设置内核参数arp_announce=2:系统不使用IP包的源地址来设置ARP请求的源地址,而选择发送接口的IP地址
二、构建LVS-DR集群的步骤
实验环境准备:
DR 服务器:192.168.229.90
Web 服务器1:192.168.229.80
Web 服务器2:192.168.229.70
NFS共享服务器:192.168.229.60
vip:192.168.229.188
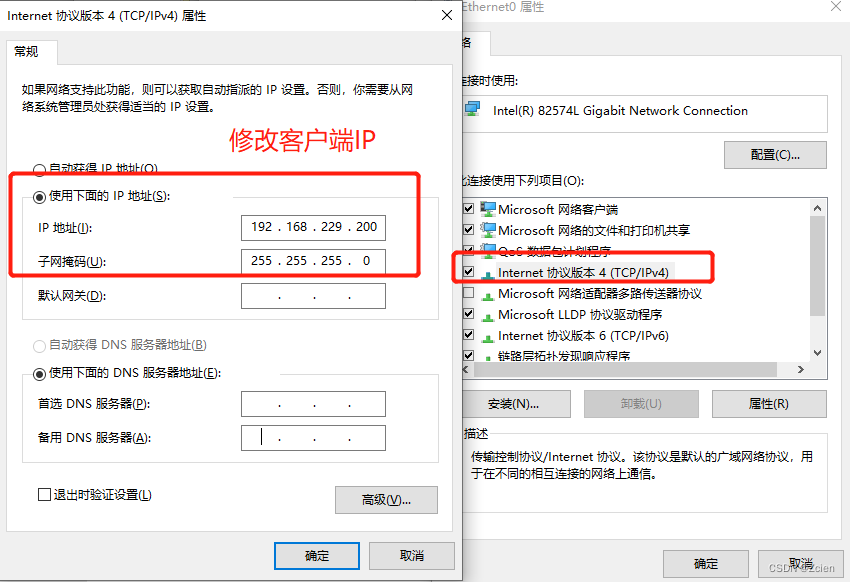
客户端:192.168.229.200
1、配置负载调度器(192.168.229.90)
systemctl stop firewalld.service
setenforce 0
modprobe ip_vs
cat /proc/net/ip_vs
yum -y install ipvsadm
1.1 配置虚拟 IP 地址(VIP:192.168.229.188)
cd /etc/sysconfig/network-scripts/
cp ifcfg-ens33 ifcfg-ens33:0                #若隧道模式,复制为ifcfg-tunl0
vim ifcfg-ens33:0
DEVICE=ens33:0
ONBOOT=yes
IPADDR=192.168.229.188
NETMASK=255.255.255.255

ifup ens33:0
ifconfig ens33:0
route add -host 192.168.229.188 dev ens33:0
1.2 调整 proc 响应参数
由于 LVS 负载调度器和各节点需要共用 VIP 地址,应该关闭Linux 内核的重定向参数响应。
vim /etc/sysctl.conf
net.ipv4.ip_forward = 0
net.ipv4.conf.all.send_redirects = 0
net.ipv4.conf.default.send_redirects = 0
net.ipv4.conf.ens33.send_redirects = 0

sysctl -p
1.3 配置负载分配策略
ipvsadm-save > /etc/sysconfig/ipvsadm
systemctl start ipvsadm

ipvsadm -C
ipvsadm -A -t 192.168.229.188:80 -s rr
ipvsadm -a -t 192.168.229.188:80 -r 192.168.229.80:80 -g            #若隧道模式,-g替换为-i
ipvsadm -a -t 192.168.229.188:80 -r 192.168.229.70:80 -g
ipvsadm

ipvsadm -ln                 #查看节点状态,Route代表 DR模式
2、部署共享存储(NFS服务器:192.168.229.60)
systemctl stop firewalld.service
systemctl disable firewalld.service
setenforce 0

yum install nfs-utils rpcbind -y
systemctl start nfs.service
systemctl start rpcbind.service
systemctl enable nfs.service
systemctl enable rpcbind.service

mkdir /opt/ly /opt/weq
chmod 777 /opt/ly /opt/weq

echo 'this is ly web!' > /opt/ly/index.html
echo 'this is weq web!' > /opt/weq/index.html

vim /etc/exports
/opt/ly 192.168.229.0/24(rw,sync)
/opt/weq 192.168.229.0/24(rw,sync)

--发布共享---
exportfs -rv
3、配置节点服务器(192.168.229.80、192.168.229.70)
systemctl stop firewalld.service
setenforce 0
3.1 配置虚拟 IP 地址(VIP:192.168.229.188)
此地址仅用作发送Web响应数据包的源地址,并不需要监听客户机的访问请求(改由调度器监听并分发)。因此使用虚接口lo:0来承载VIP地址,并为本机添加一条路由记录,将访问VIP的数据限制在本地,以避免通信紊乱。
cd /etc/sysconfig/network-scripts/
cp ifcfg-ens33 ifcfg-lo:0
vim ifcfg-lo:0
DEVICE=lo:0
ONBOOT=yes
IPADDR=192.168.229.188                      #和VIP保持一致
NETMASK=255.255.255.255                     #注意:子网掩码必须全为 1
ifup lo:0
ifconfig lo:0
route add -host 192.168.229.188 dev lo:0        #添加VIP本地访问路由,将访问VIP的数据限制在本地,以避免通信紊乱

vim /etc/rc.local
/sbin/route add -host 192.168.229.188 dev lo:0<br><br>chmod +x /etc/rc.local
3.2 调整内核的ARP响应参数以阻止更新VIP的MAC地址,避免发生冲突
vim /etc/sysctl.conf
......
net.ipv4.conf.lo.arp_ignore = 1         #系统只响应目的IP为本地IP的ARP请求
net.ipv4.conf.lo.arp_announce = 2       #系统不使用IP包的源地址来设置ARP请求的源地址,而选择发送接口的IP地址
net.ipv4.conf.all.arp_ignore = 1
net.ipv4.conf.all.arp_announce = 2

sysctl -p

或者临时添加

echo "1" >/proc/sys/net/ipv4/conf/lo/arp_ignore
echo "2" >/proc/sys/net/ipv4/conf/lo/arp_announce
echo "1" >/proc/sys/net/ipv4/conf/all/arp_ignore
echo "2" >/proc/sys/net/ipv4/conf/all/arp_announce

sysctl -p

yum -y install nfs-utils rpcbind httpd
systemctl start rpcbind
systemctl start httpd
3.3 共享挂载目录
yum -y install nfs-utils rpcbind httpd
systemctl start rpcbind
systemctl start httpd

--192.168.229.80---
mount.nfs 192.168.229.60:/opt/ly /var/www/html

--192.168.229.70---
mount.nfs 192.168.229.70:/opt/weq /var/www/html
4、测试 LVS 群集
在客户端使用浏览器访问 http://192.168.229.188/
三、实例操作:构建LVS-DR集群
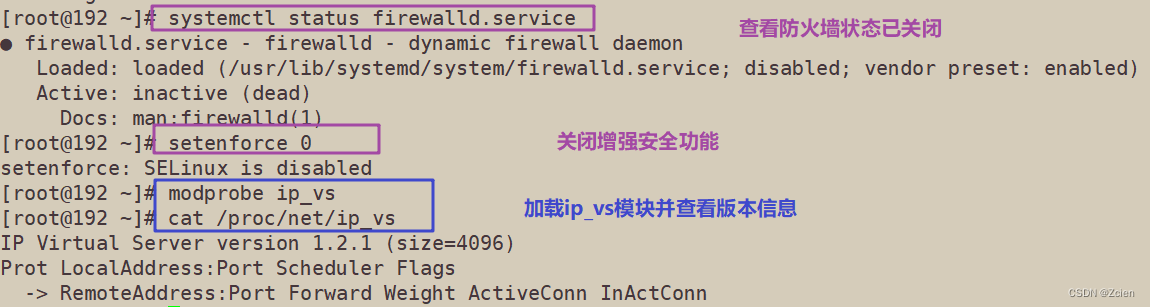
1、配置负载调度器(192.168.229.90)
[root@192 ~]# systemctl status firewalld.service
● firewalld.service - firewalld - dynamic firewall daemon
   Loaded: loaded (/usr/lib/systemd/system/firewalld.service; disabled; vendor preset: enabled)
   Active: inactive (dead)
     Docs: man:firewalld(1)
[root@192 ~]# setenforce 0
setenforce: SELinux is disabled
[root@192 ~]# modprobe ip_vs
[root@192 ~]# cat /proc/net/ip_vs
IP Virtual Server version 1.2.1 (size=4096)
Prot LocalAddress:Port Scheduler Flags
  -> RemoteAddress:Port Forward Weight ActiveConn InActConn
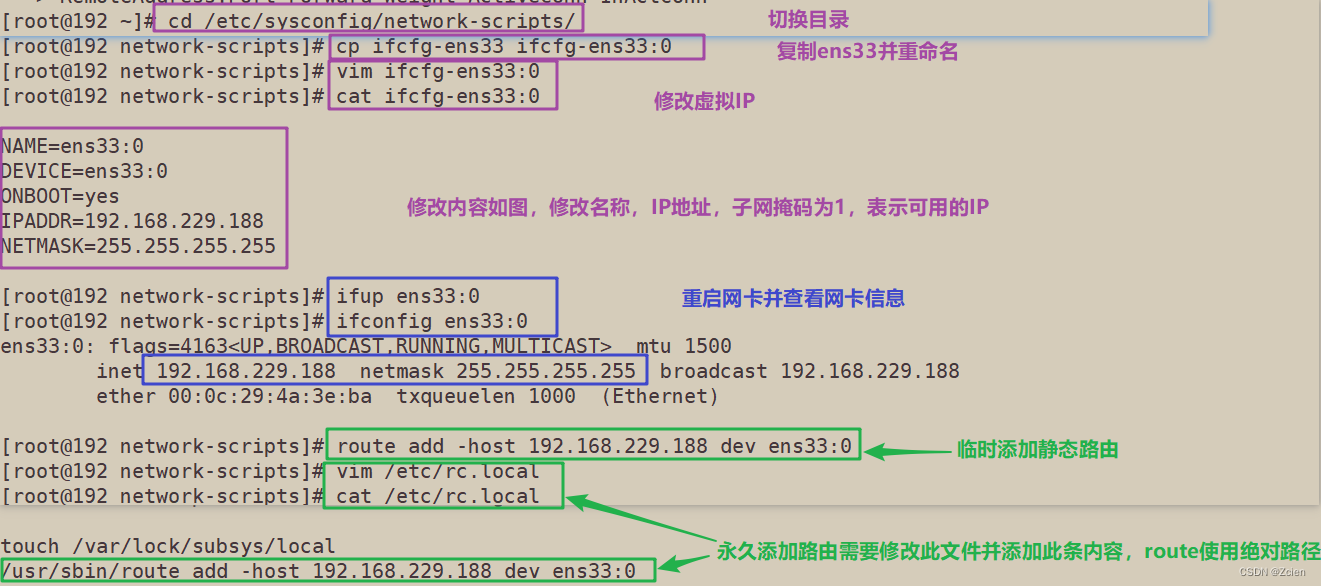
1.1 配置虚拟 IP 地址(VIP:192.168.229.188)
[root@192 ~]# cd /etc/sysconfig/network-scripts/
[root@192 network-scripts]# cp ifcfg-ens33 ifcfg-ens33:0
[root@192 network-scripts]# vim ifcfg-ens33:0
[root@192 network-scripts]# cat ifcfg-ens33:0

NAME=ens33:0
DEVICE=ens33:0
ONBOOT=yes
IPADDR=192.168.229.188
NETMASK=255.255.255.255

[root@192 network-scripts]# ifup ens33:0
[root@192 network-scripts]# ifconfig ens33:0
ens33:0: flags=4163<UP,BROADCAST,RUNNING,MULTICAST>  mtu 1500
        inet 192.168.229.188  netmask 255.255.255.255  broadcast 192.168.229.188
        ether 00:0c:29:4a:3e:ba  txqueuelen 1000  (Ethernet)

[root@192 network-scripts]# route add -host 192.168.229.188 dev ens33:0
[root@192 network-scripts]# vim /etc/rc.local
[root@192 network-scripts]# cat /etc/rc.local

/usr/sbin/route add -host 192.168.229.188 dev ens33:0
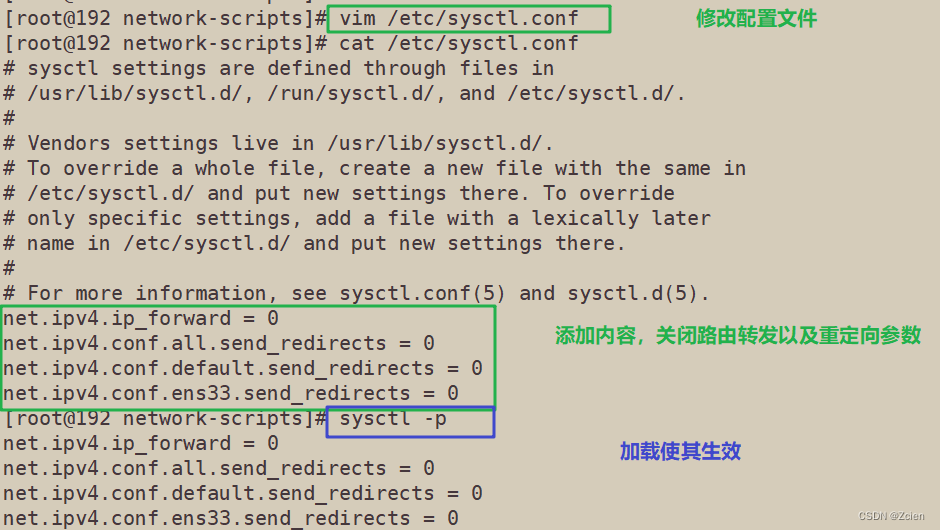
1.2 调整 proc 响应参数
[root@192 network-scripts]# vim /etc/sysctl.conf
[root@192 network-scripts]# cat /etc/sysctl.conf
# sysctl settings are defined through files in
# /usr/lib/sysctl.d/, /run/sysctl.d/, and /etc/sysctl.d/.
#
# Vendors settings live in /usr/lib/sysctl.d/.
# To override a whole file, create a new file with the same in
# /etc/sysctl.d/ and put new settings there. To override
# only specific settings, add a file with a lexically later
# name in /etc/sysctl.d/ and put new settings there.
#
# For more information, see sysctl.conf(5) and sysctl.d(5).
net.ipv4.ip_forward = 0
net.ipv4.conf.all.send_redirects = 0
net.ipv4.conf.default.send_redirects = 0
net.ipv4.conf.ens33.send_redirects = 0
[root@192 network-scripts]# sysctl -p
net.ipv4.ip_forward = 0
net.ipv4.conf.all.send_redirects = 0
net.ipv4.conf.default.send_redirects = 0
net.ipv4.conf.ens33.send_redirects = 0
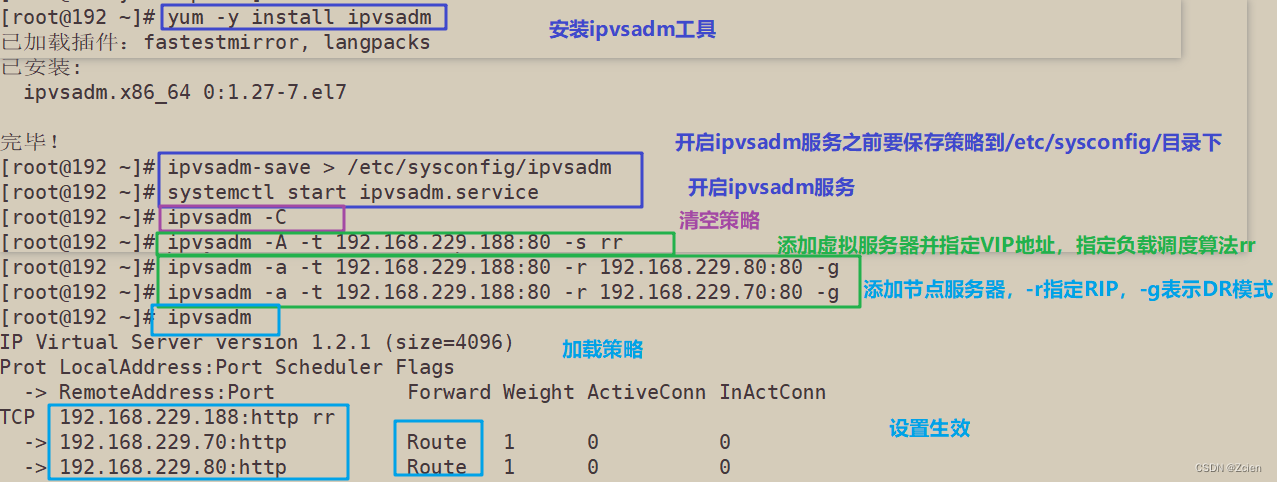
1.3 配置负载分配策略
[root@192 ~]# yum -y install ipvsadm
[root@192 ~]# ipvsadm-save > /etc/sysconfig/ipvsadm
[root@192 ~]# systemctl start ipvsadm.service
[root@192 ~]# ipvsadm -C
[root@192 ~]# ipvsadm -A -t 192.168.229.188:80 -s rr
[root@192 ~]# ipvsadm -a -t 192.168.229.188:80 -r 192.168.229.80:80 -g
[root@192 ~]# ipvsadm -a -t 192.168.229.188:80 -r 192.168.229.70:80 -g
[root@192 ~]# ipvsadm
IP Virtual Server version 1.2.1 (size=4096)
Prot LocalAddress:Port Scheduler Flags
  -> RemoteAddress:Port           Forward Weight ActiveConn InActConn
TCP  192.168.229.188:http rr
  -> 192.168.229.70:http          Route   1      0          0
  -> 192.168.229.80:http          Route   1      0          0
[root@192 ~]# ipvsadm -ln
IP Virtual Server version 1.2.1 (size=4096)
Prot LocalAddress:Port Scheduler Flags
  -> RemoteAddress:Port           Forward Weight ActiveConn InActConn
TCP  192.168.229.188:80 rr
  -> 192.168.229.70:80            Route   1      0          0
  -> 192.168.229.80:80            Route   1      0          0
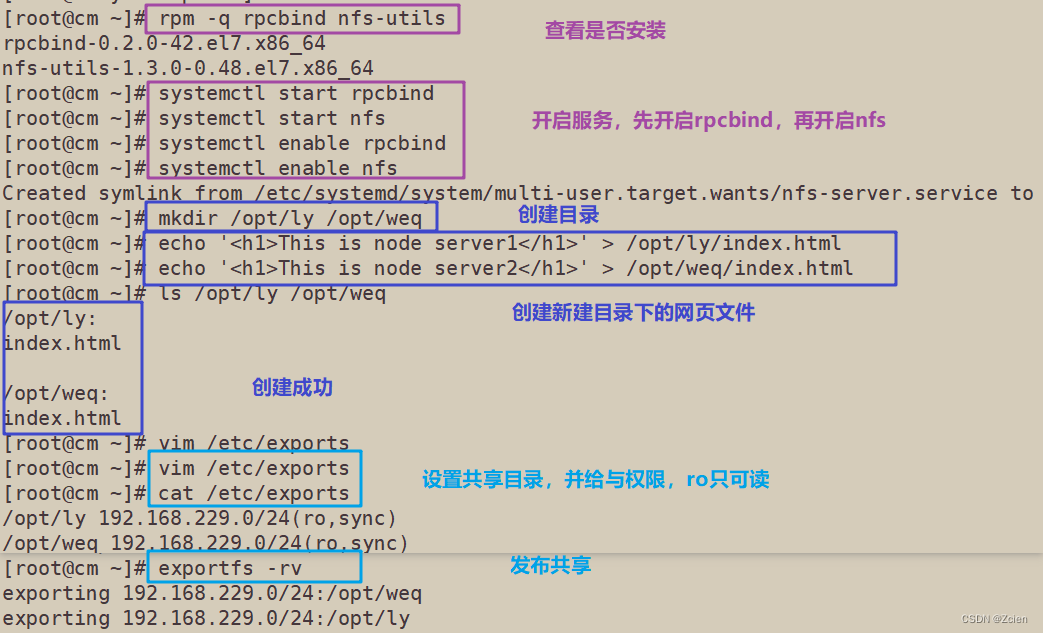
2、部署共享存储(NFS服务器:192.168.229.60)
[root@cm ~]# rpm -q rpcbind nfs-utils
rpcbind-0.2.0-42.el7.x86_64
nfs-utils-1.3.0-0.48.el7.x86_64
[root@cm ~]# systemctl start rpcbind
[root@cm ~]# systemctl start nfs
[root@cm ~]# systemctl enable rpcbind
[root@cm ~]# systemctl enable nfs
Created symlink from /etc/systemd/system/multi-user.target.wants/nfs-server.service to /usr/lib/systemd/system/nfs-server.service.
[root@cm ~]# mkdir /opt/ly /opt/weq
[root@cm ~]# echo '<h1>This is node server1</h1>' > /opt/ly/index.html
[root@cm ~]# echo '<h1>This is node server2</h1>' > /opt/weq/index.html
[root@cm ~]# ls /opt/ly /opt/weq
/opt/ly:
index.html

/opt/weq:
index.html
[root@cm ~]# vim /etc/exports
[root@cm ~]# cat /etc/exports
/opt/ly 192.168.229.0/24(ro,sync)
/opt/weq 192.168.229.0/24(ro,sync)
[root@cm ~]# exportfs -rv
exporting 192.168.229.0/24:/opt/weq
exporting 192.168.229.0/24:/opt/ly
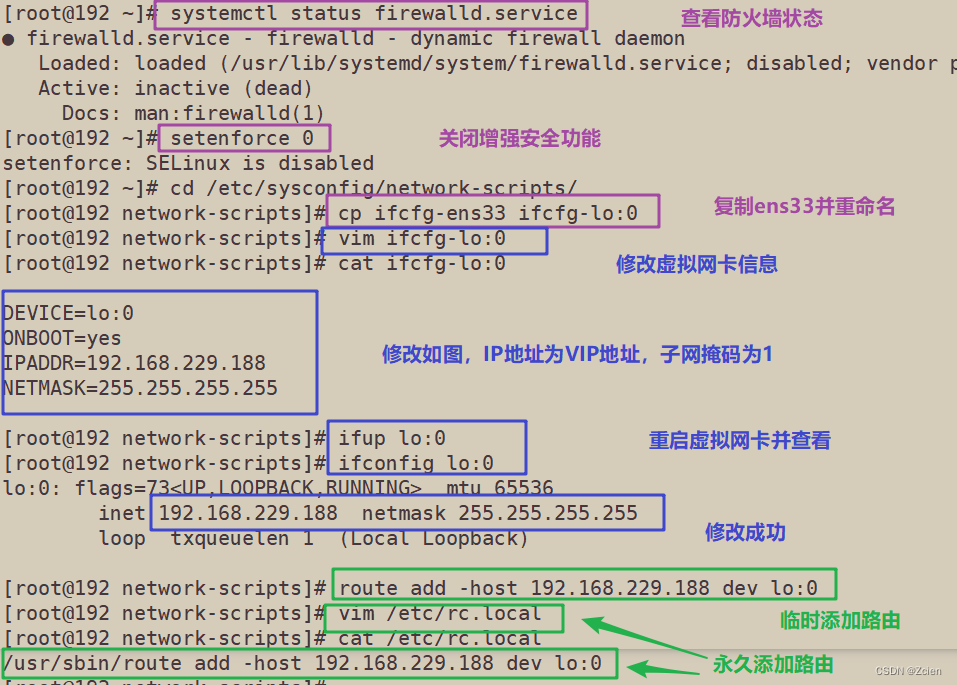
3、配置节点服务器(192.168.229.80、192.168.229.70)
3.1 配置虚拟 IP 地址(VIP:192.168.229.188)
节点服务器1(192.168.229.80)
[root@192 ~]# systemctl status firewalld.service
● firewalld.service - firewalld - dynamic firewall daemon
   Loaded: loaded (/usr/lib/systemd/system/firewalld.service; disabled; vendor preset: enabled)
   Active: inactive (dead)
     Docs: man:firewalld(1)
[root@192 ~]# setenforce 0
setenforce: SELinux is disabled
[root@192 ~]# cd /etc/sysconfig/network-scripts/
[root@192 network-scripts]# cp ifcfg-ens33 ifcfg-lo:0
[root@192 network-scripts]# vim ifcfg-lo:0
[root@192 network-scripts]# cat ifcfg-lo:0

DEVICE=lo:0
ONBOOT=yes
IPADDR=192.168.229.188
NETMASK=255.255.255.255

[root@192 network-scripts]# ifup lo:0
[root@192 network-scripts]# ifconfig lo:0
lo:0: flags=73<UP,LOOPBACK,RUNNING>  mtu 65536
        inet 192.168.229.188  netmask 255.255.255.255
        loop  txqueuelen 1  (Local Loopback)

[root@192 network-scripts]# route add -host 192.168.229.188 dev lo:0
[root@192 network-scripts]# vim /etc/rc.local
[root@192 network-scripts]# cat /etc/rc.local
#!/bin/bash
# THIS FILE IS ADDED FOR COMPATIBILITY PURPOSES
#
# It is highly advisable to create own systemd services or udev rules
# to run scripts during boot instead of using this file.
#
# In contrast to previous versions due to parallel execution during boot
# this script will NOT be run after all other services.
#
# Please note that you must run 'chmod +x /etc/rc.d/rc.local' to ensure
# that this script will be executed during boot.

touch /var/lock/subsys/local
/usr/sbin/route add -host 192.168.229.188 dev lo:0

节点服务器2(192.168.229.70)
[root@192 ~]# systemctl status firewalld.service
● firewalld.service - firewalld - dynamic firewall daemon
   Loaded: loaded (/usr/lib/systemd/system/firewalld.service; disabled; vendor preset: enabled)
   Active: inactive (dead)
     Docs: man:firewalld(1)
[root@192 ~]# setenforce 0
setenforce: SELinux is disabled
[root@192 ~]# cd /etc/sysconfig/network-scripts/
[root@192 network-scripts]# cp ifcfg-ens33 ifcfg-lo:0
[root@192 network-scripts]# vim ifcfg-lo:0
[root@192 network-scripts]# cat ifcfg-lo:0

DEVICE=lo:0
ONBOOT=yes
IPADDR=192.168.229.188
NETMASK=255.255.255.255

[root@192 network-scripts]# ifup lo:0
[root@192 network-scripts]# ifconfig lo:0
lo:0: flags=73<UP,LOOPBACK,RUNNING>  mtu 65536
        inet 192.168.229.188  netmask 255.255.255.255
        loop  txqueuelen 1  (Local Loopback)

[root@192 network-scripts]# route add -host 192.168.229.188 dev lo:0
[root@192 network-scripts]# vim /etc/rc.local
[root@192 network-scripts]# cat /etc/rc.local
#!/bin/bash
# THIS FILE IS ADDED FOR COMPATIBILITY PURPOSES
#
# It is highly advisable to create own systemd services or udev rules
# to run scripts during boot instead of using this file.
#
# In contrast to previous versions due to parallel execution during boot
# this script will NOT be run after all other services.
#
# Please note that you must run 'chmod +x /etc/rc.d/rc.local' to ensure
# that this script will be executed during boot.

touch /var/lock/subsys/local
/usr/sbin/route add -host 192.168.229.188 dev lo:0
3.2 调整内核的ARP响应参数以阻止更新VIP的MAC地址,避免发生冲突
节点服务器1(192.168.229.80)
[root@192 ~]# vim /etc/sysctl.conf
[root@192 ~]# sysctl -p
net.ipv4.conf.lo.arp_ignore = 1
net.ipv4.conf.lo.arp_announce = 2
net.ipv4.conf.all.arp_ignore = 1
net.ipv4.conf.all.arp_announce = 2

节点服务器2(192.168.229.70)
[root@192 ~]# vim /etc/sysctl.conf
[root@192 ~]# sysctl -p
net.ipv4.conf.lo.arp_ignore = 1
net.ipv4.conf.lo.arp_announce = 2
net.ipv4.conf.all.arp_ignore = 1
net.ipv4.conf.all.arp_announce = 2
3.3 共享挂载目录
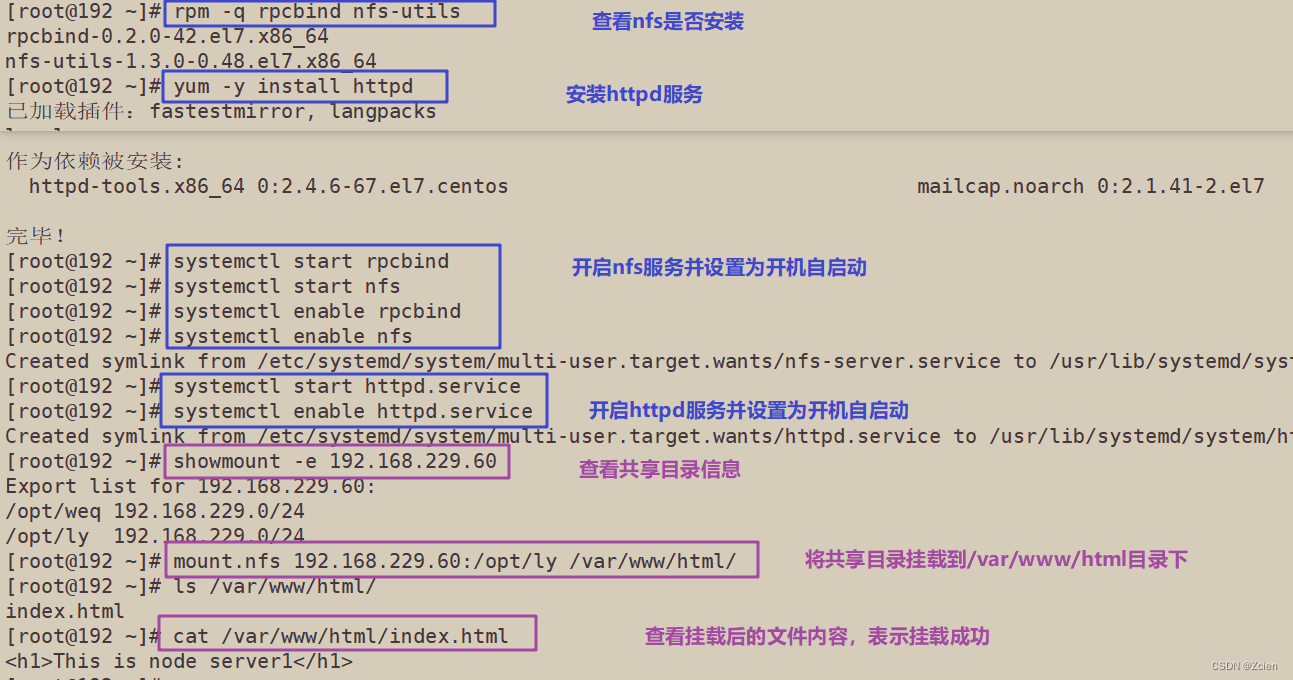
节点服务器1(192.168.229.80)
[root@192 ~]# rpm -q rpcbind nfs-utils
rpcbind-0.2.0-42.el7.x86_64
nfs-utils-1.3.0-0.48.el7.x86_64
[root@192 ~]# yum -y install httpd
[root@192 ~]# systemctl start rpcbind
[root@192 ~]# systemctl start nfs
[root@192 ~]# systemctl enable rpcbind
[root@192 ~]# systemctl enable nfs
Created symlink from /etc/systemd/system/multi-user.target.wants/nfs-server.service to /usr/lib/systemd/system/nfs-server.service.
[root@192 ~]# systemctl start httpd.service
[root@192 ~]# systemctl enable httpd.service
Created symlink from /etc/systemd/system/multi-user.target.wants/httpd.service to /usr/lib/systemd/system/httpd.service.
[root@192 ~]# showmount -e 192.168.229.60
Export list for 192.168.229.60:
/opt/weq 192.168.229.0/24
/opt/ly  192.168.229.0/24
[root@192 ~]# mount.nfs 192.168.229.60:/opt/ly /var/www/html/
[root@192 ~]# ls /var/www/html/
index.html
[root@192 ~]# cat /var/www/html/index.html
<h1>This is node server1</h1>
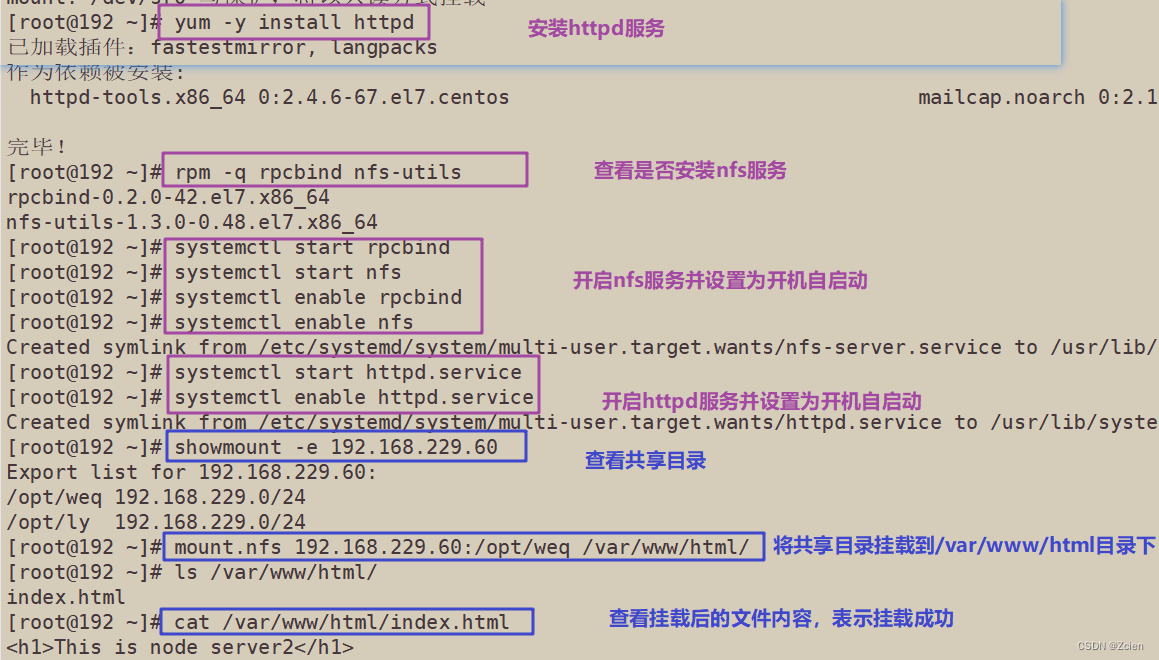
节点服务器2(192.168.229.70)
[root@192 ~]# yum -y install httpd
[root@192 ~]# rpm -q rpcbind nfs-utils
rpcbind-0.2.0-42.el7.x86_64
nfs-utils-1.3.0-0.48.el7.x86_64
[root@192 ~]# systemctl start rpcbind
[root@192 ~]# systemctl start nfs
[root@192 ~]# systemctl enable rpcbind
[root@192 ~]# systemctl enable nfs
Created symlink from /etc/systemd/system/multi-user.target.wants/nfs-server.service to /usr/lib/systemd/system/nfs-server.service.
[root@192 ~]# systemctl start httpd.service
[root@192 ~]# systemctl enable httpd.service
Created symlink from /etc/systemd/system/multi-user.target.wants/httpd.service to /usr/lib/systemd/system/httpd.service.
[root@192 ~]# showmount -e 192.168.229.60
Export list for 192.168.229.60:
/opt/weq 192.168.229.0/24
/opt/ly  192.168.229.0/24
[root@192 ~]# mount.nfs 192.168.229.60:/opt/weq /var/www/html/
[root@192 ~]# ls /var/www/html/
index.html
[root@192 ~]# cat /var/www/html/index.html
<h1>This is node server2</h1>
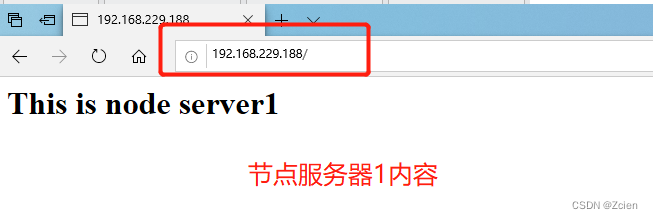
4、测试 LVS 群集
在客户端使用浏览器访问 http://192.168.229.188/