0x0 前言
近日,为解决生产环境热部署问题,决定在服务器中增加一个tomcat组成集群,利用集群解决热部署问题。
这样既能解决高并发瓶颈问题,又能解决热部署(不影响用户使用的情况下平滑更新生产服务器)问题。
因为项目是前后端分离的,所以本以为成本很低,没想到遇到了一系列的坑,解决了2天才搞定,发现了很多不是集群而是项目本身的问题。
我是同一个服务器下配置tomcat和nginx等,本文主要面向有一定基础的读者,基本配置就不在本文累述了(基础问题可以留言或者发邮件)。
- 1
- 2
- 3
- 4
- 5
0x0_1 服务器环境
服务器:  CentOS 6.5
web容器:Tomcat 7.0.25
反向代理:Nginx 1.8
java:   jdk 1.7
- 1
- 2
- 3
- 4
- 5
0x0_2 集群
我是同一个服务器部署两个tomcat,所以地址是127.0.0.1 也可以换成其他服务器的ip
| tomcat文件名 | ip地址 | 端口 | 项目名 |
|---|---|---|---|
| tomcat7-1 | 127.0.0.1 | 8080 | borrow |
| tomcat7-2 | 127.0.0.1 | 8090 | borrow |
0x1 tomcat集群配置
修改tomcat的conf/server.xml 如下
tomcat7-1:
<Server port="8005" shutdown="SHUTDOWN">
<Connector port="8080" protocol="HTTP/1.1"
               connectionTimeout="20000"
               redirectPort="8443"
               URIEncoding="UTF-8"
               compression="on"
               compressionMinSize="2048"
               noCompressionUserAgents="gozilla,traviata"                compressableMimeType="text/html,text/xml,text/javascript,text/css,text/plain" />
<Connector port="8009" protocol="AJP/1.3" redirectPort="8443" />- 1
- 2
- 3
- 4
- 5
- 6
- 7
- 8
- 9
tomcat7-2:
<Server port="8015" shutdown="SHUTDOWN">
<Connector port="8090" protocol="HTTP/1.1"
               connectionTimeout="20000"
               redirectPort="8443"
               URIEncoding="UTF-8"
               compression="on"
               compressionMinSize="2048"
               noCompressionUserAgents="gozilla,traviata"                compressableMimeType="text/html,text/xml,text/javascript,text/css,text/plain" />
<Connector port="8019" protocol="AJP/1.3" redirectPort="8443" />- 1
- 2
- 3
- 4
- 5
- 6
- 7
- 8
- 9
以上配置,只有端口号(port)是必要配置,其他按平常配置即可,多个tomcat以此类推。
创建测试页面
自己分别在tomcat中创建测试页面,可以区分不同的tomcat服务器即可
<table align="centre" border="1">
    <tr>
        <td>Tomcat7_1 Session ID</td>
        <% session.setAttribute("www.zemo.com","www.zemo.com"); %>
        <td><%= session.getId() %></td>
    </tr>
    <tr>
        <td>Created on</td>
        <td><%= session.getCreationTime() %></td>
    </tr>
</table>- 1
- 2
- 3
- 4
- 5
- 6
- 7
- 8
- 9
- 10
- 11
启动2个tomcat,确认都启动了即可。
0x2 nginx均衡负载配置
这里使用ip_hash 集群方式,尽量分流。但是如果是同一个局域网下用户大量访问就没有用了,不过可以再增加其他的措施,比如缓存session,因为这里主要是为了解决热部署问题, 所以都不是问题。
upstream borrow {
   ip_hash;
   server 127.0.0.1:8080 weight=1 max_fails=3 fail_timeout=20s;
   server 127.0.0.1:8090 weight=1 max_fails=3 fail_timeout=20s;
}
server {
    listen       80;
    server_name  www.zemo.com;#这个是随便写的...不用访问了
    access_log  /usr/local/var/log/nginx/borrow_access.log;

    location / {
        proxy_redirect          off;
        proxy_set_header Host $host;
        proxy_set_header X-Forwarded-For $remote_addr;
        client_max_body_size      20m;
        client_body_buffer_size 128k;
        proxy_connect_timeout   600;
        proxy_send_timeout      600;
        proxy_read_timeout      900;
        proxy_buffer_size       4k;
        proxy_buffers           4 32k;
        proxy_busy_buffers_size 64k;
        proxy_temp_file_write_size 64k;

        proxy_pass http://borrow; #这里borrow 指向上面名为borrow的upstream
    }
}- 1
- 2
- 3
- 4
- 5
- 6
- 7
- 8
- 9
- 10
- 11
- 12
- 13
- 14
- 15
- 16
- 17
- 18
- 19
- 20
- 21
- 22
- 23
- 24
- 25
- 26
- 27
- weight 访问权重
- max_fails 最大失败次数
- fail_timeout 最大失败等待时间
测试配置是否正确
zemochen:Program SuperZemo$ sudo nginx -t
nginx: the configuration file /usr/local/etc/nginx/nginx.conf syntax is ok
nginx: configuration file /usr/local/etc/nginx/nginx.conf test is successful- 1
- 2
- 3
重启nginx
zemochen:Program SuperZemo$ sudo nginx -s reload- 1
观察tomcat的session
- 先访问以下www.zemo.com
- 关闭tomcat7_1,只留tomcat7_2观察session id
- 开启tomcat7_1,关闭tomcat7_2观察session id
你会发现两个session id,下面讲解tomcat 的session共享
0x3 tomcat session共享
0x3_1 server.xml配置
tomcat 有自带复制session功能,在server.xml中增加<Cluster> 配置即可,不知道写在哪里的,找到server.xml中的<Cluster>注释样例,写在下面即可。基本上就是写在<Host></Host>里面最后就行了。配置如下:
<Cluster className="org.apache.catalina.ha.tcp.SimpleTcpCluster" channelSendOptions="6">
      <Manager className="org.apache.catalina.ha.session.BackupManager"
               expireSessionsOnShutdown="false"
               notifyListenersOnReplication="true"
               mapSendOptions="6"/>
      <Channel className="org.apache.catalina.tribes.group.GroupChannel">
        <Membership className="org.apache.catalina.tribes.membership.McastService"
                    address="228.0.0.4"
                    port="45564"
                    frequency="500"
                    dropTime="3000"/>
        <Receiver className="org.apache.catalina.tribes.transport.nio.NioReceiver"
                  address="127.0.0.1"    <!--这里写本tomcat的IP地址 -->
                  port="5000"
                  selectorTimeout="100" />
        <Sender className="org.apache.catalina.tribes.transport.ReplicationTransmitter">
          <Transport className="org.apache.catalina.tribes.transport.nio.PooledParallelSender"/>
        </Sender>
        <Interceptor className="org.apache.catalina.tribes.group.interceptors.TcpFailureDetector"/>
        <Interceptor className="org.apache.catalina.tribes.group.interceptors.MessageDispatch15Interceptor"/>
        <Interceptor className="org.apache.catalina.tribes.group.interceptors.ThroughputInterceptor"/>
      </Channel>
      <Valve className="org.apache.catalina.ha.tcp.ReplicationValve"    filter=".*\.gif;.*\.js;.*\.jpg;.*\.png;.*\.htm;.*\.html;.*\.css;.*\.txt;"/>
      <Valve className="org.apache.catalina.ha.session.JvmRouteBinderValve"/>
      <Deployer className="org.apache.catalina.ha.deploy.FarmWarDeployer"
                tempDir="/tmp/war-temp/"
                deployDir="/tmp/war-deploy/"
                watchDir="/tmp/war-listen/"
                watchEnabled="false"/>
      <ClusterListener className="org.apache.catalina.ha.session.JvmRouteSessionIDBinderListener"/>
      <ClusterListener className="org.apache.catalina.ha.session.ClusterSessionListener"/>
</Cluster>- 1
- 2
- 3
- 4
- 5
- 6
- 7
- 8
- 9
- 10
- 11
- 12
- 13
- 14
- 15
- 16
- 17
- 18
- 19
- 20
- 21
- 22
- 23
- 24
- 25
- 26
- 27
- 28
- 29
- 30
- 31
- 32
修改server.xml 中的<Engine> 增加jvmRoute="tomcat7-1",配置如下:
<Engine name="Catalina" defaultHost="localhost" jvmRoute="tomcat7-1">- 1
tomcat7-2同理,配置这两个。
0x3_2 web.xml配置
在conf/web.xml中的<webapp></webapp> 中增加<distributable /> 我的项目是j2ee项目,所以写在了项目的web.xml里,项目中的web.xml优先级高于tomcat本身的。
配置代码块如下:
<web-app>
    <!--其他配置省略,下面mime-mapping 也是与本问无关,为了体现最下面所以带了一部分-->
    <mime-mapping>
        <extension>apk</extension>
        <mime-type>application/vnd.android.package-archive</mime-type>
    </mime-mapping>
    <distributable />
</web-app>- 1
- 2
- 3
- 4
- 5
- 6
- 7
- 8
0x4 注意:
这里要注意,Nginx只需要配置一份,而tomcat有几个节点,server.xml 、web.xml就配置几个:
- shutdown端口都不同
- Connect 的http端口都不同
- Ajp 端口不同
<Cluster>中的<Receiver>属性address指向改tomcat的IP地址<Engine>中的jvmRoute名要与tomcat文件名相同
0x5 结果截图
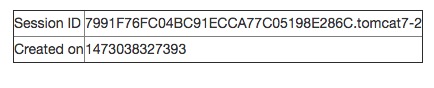
整个环境全都启动后, 访问域名, 可以看到如下截图,我的图可以看出,访问到的是tomcat7-1,注意,我的测试网页并没有写tomcat7-1,而是自己加到session id里的,这里是自动增加jvmRoute的值,说明session复制成功… 
因为刚才确定被代理到了tomcat7-1,我们用的是ip_hash的分配方式,所以我们直接关闭tomcat7-1,再刷新页面,确保代理到另一个tomcat,效果图如下,可以看到只有后缀.tomcat7-2 不同,至此一个均衡负载集群就可以了,既解决了热部署问题,又解决了分担服务器压力,负载均衡问题。