目录
(1)修改路由配置, 主要是router下的index.js中的 path 属性中增加了 :id 这样的占位符
(1)修改路由配置 , 主要在router下的index.js中的路由属性中增加了 props: true 属性
(3)在Profile.vue接收参数为目标组件增加 props 属性
1、参数传递
方法一
(1)修改路由配置, 主要是router下的index.js中的 path 属性中增加了 :id 这样的占位符
{
	path: '/user/profile/:id',
	name:'UserProfile',
	component: UserProfile
}
(2)视图层传递参数
<!--name是组件的名字 params是传的参数 如果要传参数的话就需要用v:bind:来绑定-->
<router-link :to="{name:'UserProfile',params:{id:1}}">个人信息</router-link>
说明:
此时我们在Main.vue中的route-link位置处 to 改为了:to,是为了将这一属性当成对象使用,注意 router-link中的name属性名称一定要和路由中的 name 属性名称 匹配,因为这样 Vue 才能找到对应的路由路径
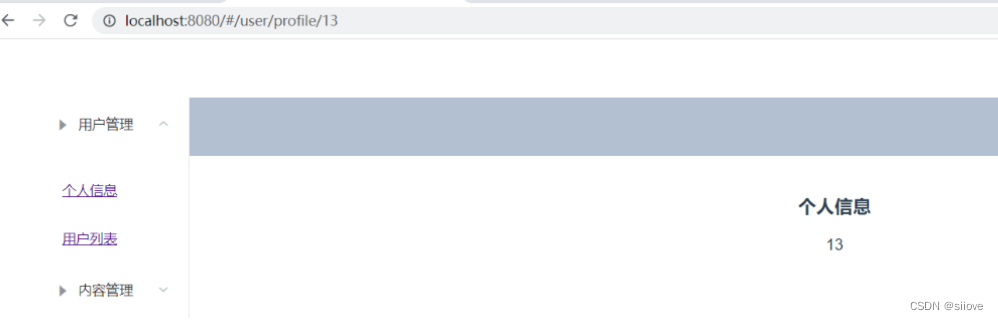
(3)接收参数
<template>
  <!--  所有的元素必须在根节点下-->
  <div>
    <h1>个人信息</h1>
    {

   {$route.params.id}}
  </div>
</template>
说明:
所有的元素必须在根节点下面,否则会报错
(4)测试
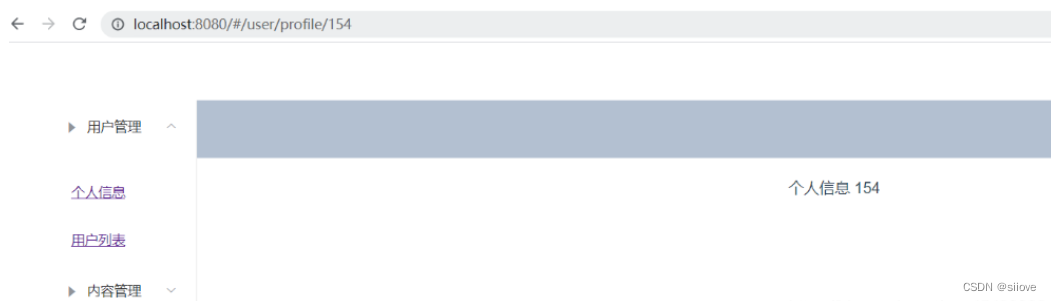
方法二(使用props 减少耦合 )
(1)修改路由配置 , 主要在router下的index.js中的路由属性中增加了 props: true 属性
{
	path: '/user/profile/:id',
	name:'UserProfile',
	component: UserProfile,
	props: true
}
(2)传递参数和之前一样
<!--name是组件的名字 params是传的参数 如果要传参数的话就需要用v:bind:来绑定-->
<router-link :to="{name:'UserProfile',params:{id:1}}">个人信息</router-link>
(3)在Profile.vue接收参数为目标组件增加 props 属性
<template>
  <div>
    个人信息
    {

   { id }}
  </div>
</template>
<script>
    export default {
      props: ['id'],
      name: "UserProfile"
    }
</script>
<style scoped>
</style>
(4)测试
2、重定向
Vue 中的重定向是作用在路径不同但组件相同的情况
(1)在router/index.js配置重定向路径
{
  path: '/main',
  name: 'Main',
  component: Main
},
{
  path: '/goHome',
  redirect: '/main'
}
(2)视图增加
<el-menu-item index="1-3">
    <!--插入的地方-->
    <router-link to="/goHome">返回首页</router-link>
</el-menu-item>