FFmpeg中,设备采集调用一般在接口:av_find_input_format中来获取到AVInputFormat对象,然后通过avformat_open_input来启用采集设备。那么,av_find_input_format到底支持哪几种环境采集呢?
各平台采集方式
视频采集
| 操作系统 |
采集方式 |
设备目录 |
| Windows |
dshow |
video=<camera name> |
| Linux |
v4l2(video4linux2) |
/dev/video0 |
| MacOS |
avfoundation |
0: |
音频采集
| 操作系统 |
采集方式 |
设备目录 |
| Windows |
dshow |
audio=<mic name> |
| Linux |
alsa |
default |
| MacOS |
avfoundation |
:0 |
Linux系统
基于LinuxCentOS的采集应用很少,所以就拿ubuntu来做说明。
Linux采集的核心组件名称叫:v4l2即video4linux2的简称。是Linux中关于视频设备的内核驱动,在Linux中,视频设备是设备文件,可以像访问普通文件一样对其进行读写,摄像头设备文件位置是/dev/video0。
查看相机设备
方法一,直接通过ls查看/dev/目录下设备列表
ls /dev/video*
方法二,通过ffmpeg的ffprobe命令来查看连接到系统中的摄像头设备:
ffprobe /dev/video0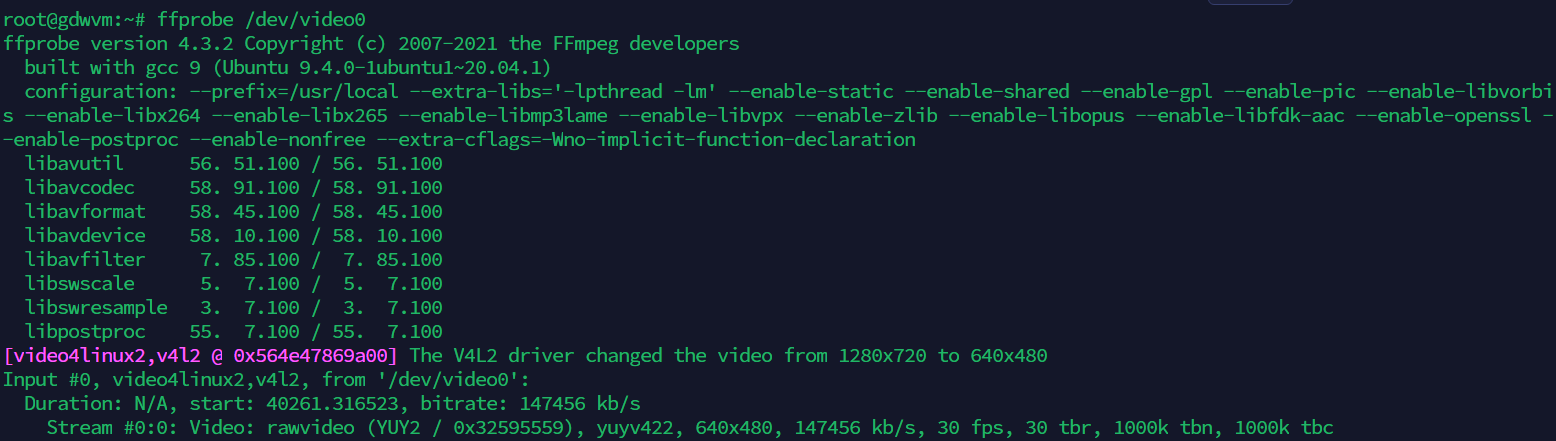
可以看到,video0设备采集出来的裸帧格式是:yuyv422,帧率30fps,分辨率640x480,因此在保存摄像头数据的时候,先对yuyu422的格式进行变化,将其变换为yuv420p的格式,然后再进行编码保存为h264的文件。
ffprobe /dev/video1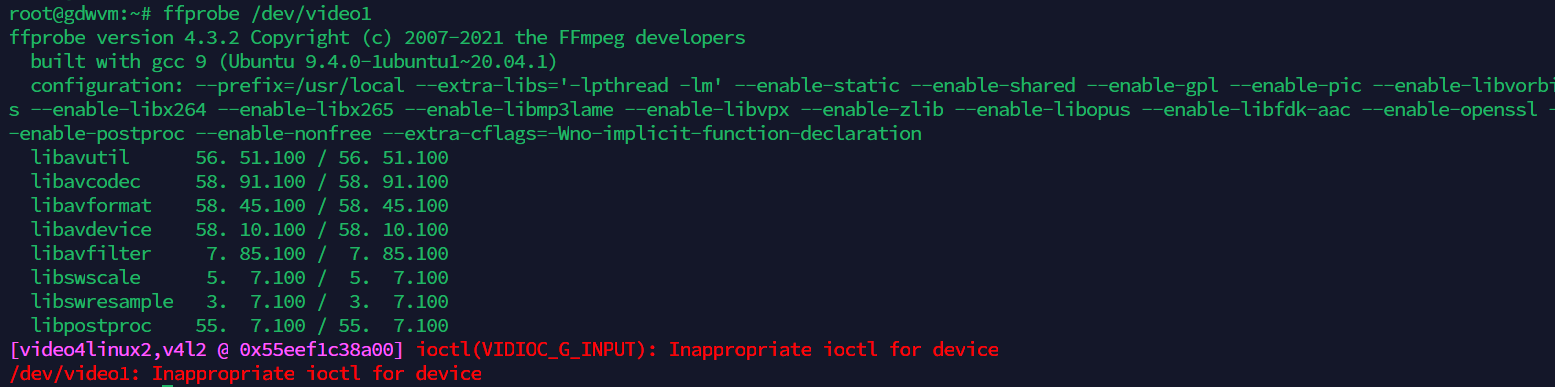
可以看到,video1文件无法采集
v4l2 常用命令
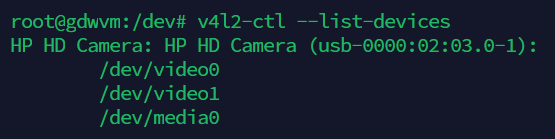
获取设备列表
v4l2-ctl --list-devices查看相机参数
#List supported video formats and resolutions of default video device
v4l2-ctl --list-formats-ext

#List supported video formats and resolutions of a specific video device:
v4l2-ctl --list-formats-ext --device path/to/video_device
#eg:
v4l2-ctl --list-formats-ext --device /dev/video0

#Get all details of a video device:
v4l2-ctl --all --device path/to/video_device
#eg:
v4l2-ctl --all --device /dev/video0

#Capture a JPEG photo with a specific resolution from video device:
v4l2-ctl --device path/to/video_device --set-fmt-video=width=width,height=height,pixelformat=MJPG --stream-mmap --stream-to=path/to/output.jpg --stream-count=1
#eg:
v4l2-ctl --device /dev/video0 --set-fmt-video=width=1280,height=720,pixelformat=MJPG --stream-mmap --stream-to=/home/nvidia/Pictures/video0-output.jpg --stream-count=1

#Capture a raw video stream from video device:
v4l2-ctl --device path/to/video_device --set-fmt-video=width=width,height=height,pixelformat=format --stream-mmap --stream-to=path/to/output --stream-count=number_of_frames_to_capture
#eg:
v4l2-ctl --device /dev/video0 --set-fmt-video=width=1280,height=720,pixelformat=MJPG --stream-mmap --stream-to=/home/nvidia/Pictures --stream-count=10

#List all video device's controls and their values:
v4l2-ctl --list-ctrls --device /path/to/video_device
#eg:
v4l2-ctl --list-ctrls --device /dev/video0
测试相机可用性
cheese -d /dev/video0或者
ffplay -f v4l2 -input_format bayer_bggr16le -video_size 640x480 -i /dev/video0libv4l2依赖

apt-get install libv4l-dev然后重新编译ffmpeg,且在编译configure中添加--enable-libv4l2才能支持
SDL2播放依赖
sudo apt-get install sdl2-dev libx11-dev xorg-dev -y源码开发
重要参数声明
int ret = 0;

// 注册所有的设备
avdevice_register_all();

// 缓存
AVFrame *yuvFrame = nullptr;
AVFrame *srcFrame = nullptr;
AVPacket *inPkt = av_packet_alloc();
AVPacket *outPkt = av_packet_alloc();

// 输入设备的相关参数
AVFormatContext *inFmtCtx = avformat_alloc_context();
AVCodec *inCodec = nullptr;
AVCodecContext *inCodecCtx = nullptr;
int inVideoSteamIndex = -1;

// 输出文件的相关参数
AVFormatContext *outFmtCtx = avformat_alloc_context();
AVCodec *outCodec = nullptr;
AVCodecContext *outCodecCtx = nullptr;
AVStream *outStream = nullptr;
AVOutputFormat *outFmt = nullptr;

// 图像转换
struct SwsContext *img_ctx = nullptr;

// 宏命令av_err2str有报错, 把宏作为参数总是不太靠谱, 改为自定义接口
inline char *err2str(int errnum) {
    char tmp[AV_ERROR_MAX_STRING_SIZE] = {0};
    return av_make_error_string(tmp, AV_ERROR_MAX_STRING_SIZE, errnum);
}
开启输入流通道
int ret;
// 打开v4l2的相机输入
AVInputFormat *inFmt = av_find_input_format("v4l2");
if ((ret = avformat_open_input(&inFmtCtx, "/dev/video0", inFmt, nullptr)) < 0){
    cout << "+ avformat_open_input failed: " << err2str(ret) << endl;
    return -1;
}

// 获取流信息
if ((ret = avformat_find_stream_info(inFmtCtx, nullptr)) < 0){
    cout << "+ avformat_find_stream_info failed: " << err2str(ret) << endl;
    return -1;
}

// 寻找视频流
for (size_t i = 0; i < inFmtCtx->nb_streams; i++) {
    if(inFmtCtx->streams[i]->codecpar->codec_type == AVMEDIA_TYPE_VIDEO){
        inVideoSteamIndex = i;
        break;
    }
}

// 没找到视频流
if (inVideoSteamIndex == -1) {
    cout << "+ find video stream failed: " << endl;
    return -1;
}
设置解码器
// 创建解码器的参数集
AVCodecParameters* inVideoCodecPara = inFmtCtx->streams[inVideoSteamIndex]->codecpar;

// 查找解码器
if (!(inCodec = avcodec_find_decoder(inVideoCodecPara->codec_id))) {
    cout << "+ avcodec_find_decoder failed" << endl;
    return -1;
}

if (!(inCodecCtx = avcodec_alloc_context3(inCodec))) {
    cout << "+ avcodec_alloc_context3 failed" << endl;
    return -1;
}

if (avcodec_parameters_to_context(inCodecCtx,inVideoCodecPara) < 0) {
    fprintf(stderr,"Cannot initialize parameters.\n");
    return -1;
}

// 打开编解码器
if ((ret = avcodec_open2(inCodecCtx, inCodec, nullptr) < 0)){
    cout << "+ avcodec_open2 failed: " << err2str(ret) << endl;
    return -1;
}

// 图像缩放上下文
img_ctx = sws_getContext(
    inCodecCtx->width,
    inCodecCtx->height,
    inCodecCtx->pix_fmt,
    inCodecCtx->width,
    inCodecCtx->height,
    AV_PIX_FMT_YUV420P,
    SWS_BICUBIC,
    nullptr,
    nullptr,
    nullptr
);

// YUYV422原始帧缓存
srcFrame = av_frame_alloc();

// YUV420P目标帧缓存
yuvFrame = av_frame_alloc();
// 获取缓存图像所需的空间
int num_bytes = av_image_get_buffer_size(AV_PIX_FMT_YUV420P, inCodecCtx->width, inCodecCtx->height, 1);
// 创建out_buffer缓冲区
uint8_t *out_buffer = (unsigned char *)av_malloc(num_bytes*sizeof(unsigned char));
// 将yuvFrame和out_buffer进行关联
if ((ret = av_image_fill_arrays(yuvFrame->data, yuvFrame->linesize, out_buffer, AV_PIX_FMT_YUV420P, inCodecCtx->width, inCodecCtx->height,1)) < 0) {
    cout << "+ av_image_fill_arrays() failed: " << err2str(ret) << endl;
    return -1;
}
设置H.264输出文件
// 输出文件,编码器部分
const char* out_file = "output.h264";
if (avformat_alloc_output_context2(&outFmtCtx, nullptr, nullptr, out_file) < 0) {
    fprintf(stderr,"Cannot alloc output file context.\n");
    return -1;
}
outFmt = outFmtCtx->oformat;

// 打开输出文件
if ((ret = avio_open(&outFmtCtx->pb, out_file, AVIO_FLAG_READ_WRITE)) < 0) {
    cout << "+ avio_open() failed: " << err2str(ret) << endl;
    return -1;
}

// 创建保存的H264流,并设置参数
if (!(outStream = avformat_new_stream(outFmtCtx,outCodec))) {
    cout << "+ avformat_new_stream() failed: " << err2str(ret) << endl;
    return -1;
}

// 设置时间基
outStream->time_base.den = 30;
outStream->time_base.num = 1;

// 编码解码器相关的参数集
// 设置分辨率和bit率
AVCodecParameters *outCodecPara = outFmtCtx->streams[outStream->index]->codecpar;
outCodecPara->codec_type = AVMEDIA_TYPE_VIDEO;
outCodecPara->codec_id = outFmt->video_codec;
outCodecPara->width = 640;
outCodecPara->height = 480;
outCodecPara->bit_rate = 92000;

// 查找编码器
if (!(outCodec = avcodec_find_encoder(outFmt->video_codec))) {
    cout << "+ avcodec_find_encoder() failed!" << endl;
    return -1;
}

// 设置编码器内容
if (!(outCodecCtx = avcodec_alloc_context3(outCodec))) {
    cout << "+ avcodec_alloc_context3() failed!" << endl;
    return -1;
}

// 写入上下文
if ((ret = avcodec_parameters_to_context(outCodecCtx, outCodecPara)) < 0) {
    cout << "+ avcodec_parameters_to_context failed: " << err2str(ret) << endl;
    return;
}

outCodecCtx->codec_id = outFmt->video_codec;
outCodecCtx->codec_type = AVMEDIA_TYPE_VIDEO;
outCodecCtx->pix_fmt = AV_PIX_FMT_YUV420P;
outCodecCtx->width = inCodecCtx->width;
outCodecCtx->height = inCodecCtx->height;
outCodecCtx->time_base.num = 1;
outCodecCtx->time_base.den = 30;
outCodecCtx->bit_rate = 92000;
outCodecCtx->gop_size = 10;

// 根据编码器相关类型设置参数
// 设置H264相关的参数,q的参数
if (outCodecCtx->codec_id == AV_CODEC_ID_H264) {
    outCodecCtx->qmin = 10;
    outCodecCtx->qmax = 51;
    outCodecCtx->qcompress = (float)0.6;
} else if(outCodecCtx->codec_id == AV_CODEC_ID_MPEG2VIDEO) {
    outCodecCtx->max_b_frames = 2;
} else if(outCodecCtx->codec_id == AV_CODEC_ID_MPEG1VIDEO) {
    outCodecCtx->mb_decision = 2;
}

// 打开编码器
if ((ret = avcodec_open2(outCodecCtx,outCodec,NULL)) < 0) {
    cout << "+ avcodec_open2 failed: " << err2str(ret) << endl;
    return -1;
}

// 设置yuvframe
yuvFrame->format = outCodecCtx->pix_fmt;
yuvFrame->width = outCodecCtx->width;
yuvFrame->height = outCodecCtx->height;

// 写H264的文件头
ret = avformat_write_header(outFmtCtx,NULL);
刷新编解码缓存区
int flush_encoder(AVFormatContext *fmtCtx, AVCodecContext *codecCtx, int StreamaIndex)
{
    int ret = 0;
    AVPacket enc_pkt;
    enc_pkt.data = NULL;
    enc_pkt.size = 0;
    av_init_packet(&enc_pkt);

    // 进行编码一个Frame
    if (avcodec_send_frame(codecCtx,0) >= 0) {
        while(avcodec_receive_packet(codecCtx, &enc_pkt) >= 0){
            enc_pkt.stream_index = StreamaIndex;
            // 时间基转换
            av_packet_rescale_ts(
                &enc_pkt,
                codecCtx->time_base,
                fmtCtx->streams[StreamaIndex]->time_base
            );
            // 将编码好的写入到H264的文件
            ret = av_interleaved_write_frame(fmtCtx, &enc_pkt);
            if (ret < 0) {
                break;
            }
        }
    }

    return ret;
}
启动编解码
int count = 0;
// 读取一个frame的数据,放入pakcet中
while(av_read_frame(inFmtCtx, inPkt) >= 0 && count < 50){
    // 判断是否是视频流
    if (inPkt->stream_index == inVideoSteamIndex){
        // 解码
        if (avcodec_send_packet(inCodecCtx,inPkt) >= 0){
            // 判断是否解码完成
            while((ret = avcodec_receive_frame(inCodecCtx,srcFrame)) >= 0) {
                if (ret == AVERROR(EAGAIN) || ret == AVERROR_EOF){
                    return -1;
                } else if(ret < 0){
                    fprintf(stderr, "Error during decoding\n");
                    exit(1);
                }
                // 解码完成
                // 进行转换,由于摄像头输入的yuyv422的格式,转换到yuv420p的格式
                sws_scale(img_ctx,
                	(const uint8_t* const*)srcFrame->data,
                    srcFrame->linesize,
                    0,
                    inCodecCtx->height,
                    yuvFrame->data,
                    yuvFrame->linesize
                );
                yuvFrame->pts = srcFrame->pts;
                // 解码完成之后进行编码
                if (avcodec_send_frame(outCodecCtx,yuvFrame) >= 0) {
                    if (avcodec_receive_packet(outCodecCtx,outPkt) >= 0){
                        ++count;
                        outPkt->stream_index = outStream->index;
                        av_packet_rescale_ts(outPkt,outCodecCtx->time_base,
                            outStream->time_base);
                        outPkt->pos = -1;
                        av_interleaved_write_frame(outFmtCtx,outPkt);
                        av_packet_unref(outPkt);
                    }
                }
                // 短暂的延迟
                this_thread::sleep_for(chrono::milliseconds(1));
            }
        }
        av_packet_unref(inPkt);
    }
}

// 将编码器缓存中的数据都取出来编码掉
if ((ret = flush_encoder(outFmtCtx, outCodecCtx, outStream->index)) < 0) {
    cout << "+ flush_encoder() failed: " << err2str(ret) << endl;
    return -1;
}

// 写H264的文件尾
av_write_trailer(outFmtCtx);
收一个尾
// 释放内存
av_packet_free(&inPkt);
avcodec_free_context(&inCodecCtx);
avcodec_close(inCodecCtx);
avformat_close_input(&inFmtCtx);
av_frame_free(&srcFrame);
av_frame_free(&yuvFrame);

av_packet_free(&outPkt);
avcodec_free_context(&outCodecCtx);
avcodec_close(outCodecCtx);
avformat_close_input(&outFmtCtx);
SDL渲染流程
#include "SDL.h"
#include <stdio.h>

int main(int argc, char* argv[]) {

    int flag = 1;

    SDL_Window *window;                    // Declare a pointer
    SDL_Renderer *renderer;

    SDL_Init(SDL_INIT_VIDEO);              // Initialize SDL2

    // Create an application window with the following settings:
    window = SDL_CreateWindow(
        "An SDL2 window",                  // window title
        SDL_WINDOWPOS_UNDEFINED,           // initial x position
        SDL_WINDOWPOS_UNDEFINED,           // initial y position
        640,                               // width, in pixels
        480,                               // height, in pixels
        SDL_WINDOW_SHOWN | SDL_WINDOW_BORDERLESS// flags - see below
    );

    // Check that the window was successfully created
    if (window == NULL) {
        // In the case that the window could not be made...
        printf("Could not create window: %s\n", SDL_GetError());
        return 1;
    }

    /* We must call SDL_CreateRenderer in order for draw calls to affect this window. */
    renderer = SDL_CreateRenderer(window, -1, 0);

    /* Select the color for drawing. It is set to red here. */
    SDL_SetRenderDrawColor(renderer, 255, 0, 0, 255);

    /* Clear the entire screen to our selected color. */
    SDL_RenderClear(renderer);

    /* Up until now everything was drawn behind the scenes.
       This will show the new, red contents of the window. */
    SDL_RenderPresent(renderer);

    // The window is open: could enter program loop here (see SDL_PollEvent())

    SDL_Delay(3000);  // Pause execution for 3000 milliseconds, for example

    //destory renderer
    if (renderer) {
        SDL_DestroyRenderer(renderer);
    }

    // Close and destroy the window
    SDL_DestroyWindow(window);

    // Clean up
    SDL_Quit();
    return 0;
}