参考链接:安卓navigation系列——入门篇
1、组成三要素
-
Navigation graph
一个包含所有导航相关信息的 XML 资源
-
NavHostFragment
一种特殊的Fragment,用于承载导航内容的容器
-
NavController
管理应用导航的对象,实现Fragment之间的跳转等操作
2、基本使用
(1)引入依赖
dependencies {


  // Java
  implementation "androidx.navigation:navigation-fragment:2.3.5"
  implementation "androidx.navigation:navigation-ui:2.3.5"

  // Kotlin
  implementation "androidx.navigation:navigation-fragment-ktx:2.3.5"
  implementation "androidx.navigation:navigation-ui-ktx:2.3.5"
}
(2)创建导航视图
确保AndroidStudio为3.3以上:
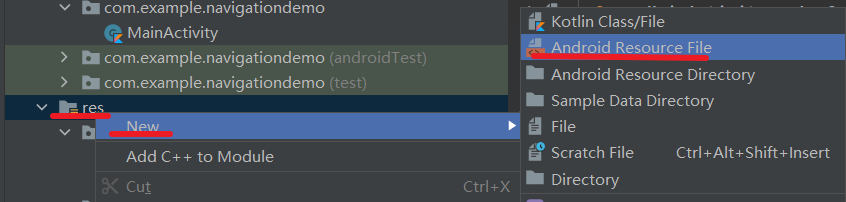
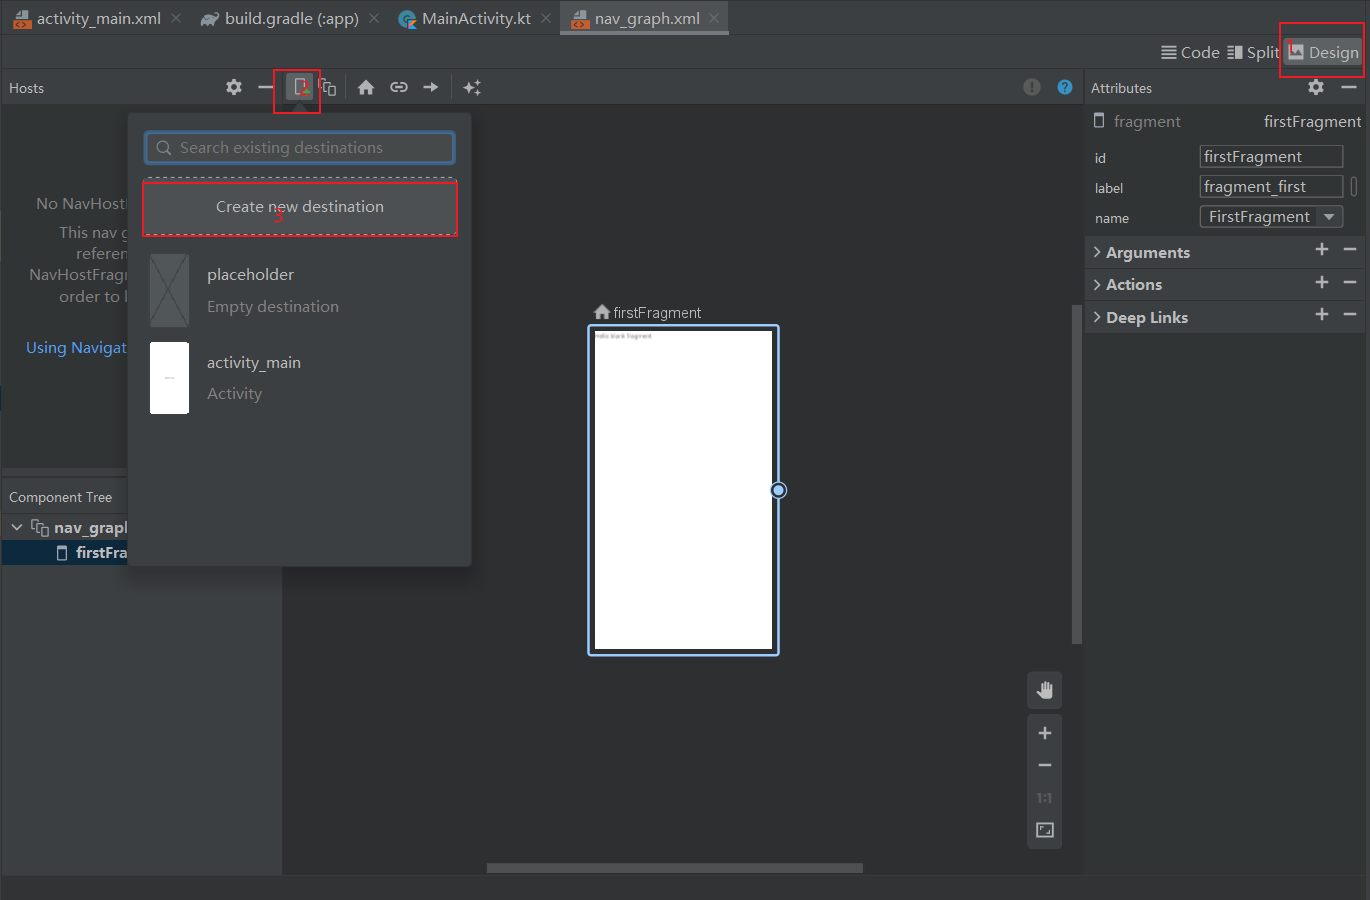
1、右击res,点击new 》 Android Resource File
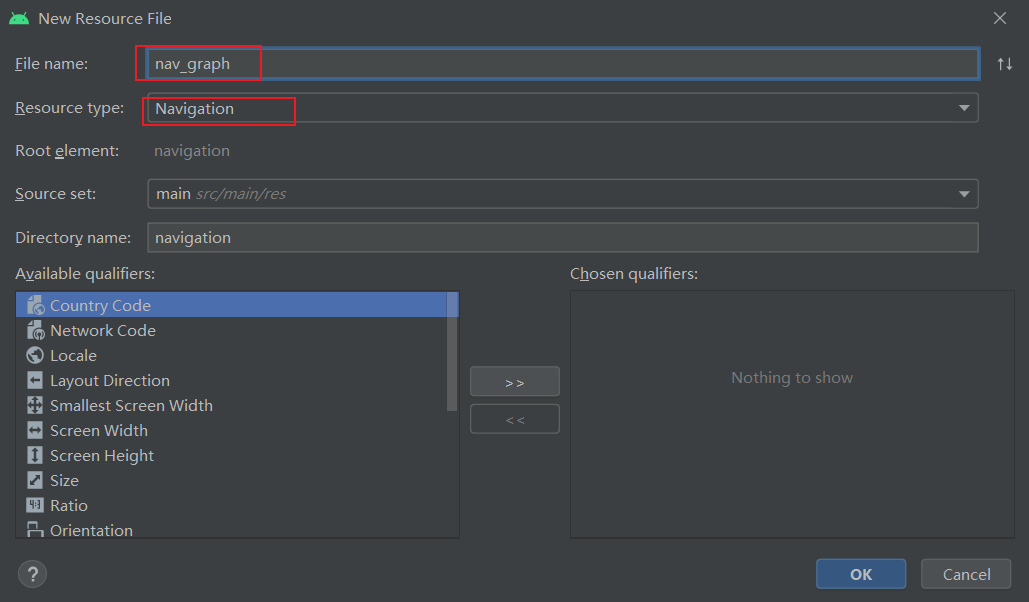
2、新建File Name为nav_graph,Resource type下拉选择Navigation
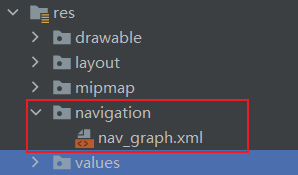
3、res目录下会多出一个navigation的资源目录,目录下有我们新建的文件:
3、配置graph
新建好的nav_graph.xml切换到design模式下,点击2处的加号,选择Create new destination,即可快速创建新的Fragment,这里分别新建了FirstFragment、SecondFragment、ThirdFragment三个fragment
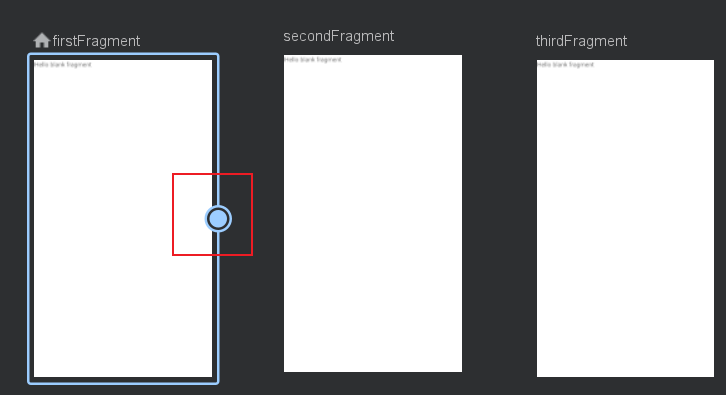
建好后,可通过手动配置页面之间的跳转关系,点击某个页面,右边会出现一个小圆点,拖曳小圆点指向跳转的页面,这里设置跳转的关系为FirstFragment -> SecondFragment -> ThirdFragment。
切换到Code栏,可以看到生成了如下代码
<?xml version="1.0" encoding="utf-8"?>
<navigation xmlns:android="http://schemas.android.com/apk/res/android"
    xmlns:app="http://schemas.android.com/apk/res-auto"
    xmlns:tools="http://schemas.android.com/tools"
    android:id="@+id/nav_graph"
    app:startDestination="@id/firstFragment">

    <fragment
        android:id="@+id/firstFragment"
        android:name="com.example.navigationdemo.FirstFragment"
        android:label="fragment_first"
        tools:layout="@layout/fragment_first" >
        <action
            android:id="@+id/action_firstFragment_to_secondFragment"
            app:destination="@id/secondFragment" />
    </fragment>
    <fragment
        android:id="@+id/secondFragment"
        android:name="com.example.navigationdemo.SecondFragment"
        android:label="fragment_second"
        tools:layout="@layout/fragment_second" >
        <action
            android:id="@+id/action_secondFragment_to_thirdFragment"
            app:destination="@id/thirdFragment" />
    </fragment>
    <fragment
        android:id="@+id/thirdFragment"
        android:name="com.example.navigationdemo.ThirdFragment"
        android:label="fragment_third"
        tools:layout="@layout/fragment_third" />
</navigation>
-
navigation是根标签,通过startDestination配置默认启动的第一个页面,这里配置的是FirstFragment
-
fragment标签代表一个fragment,其实这里不仅可以配置fragment,也可以配置activity,甚至还可以自定义(暂不讨论,后续会讲到)
-
action标签定义了页面跳转的行为,相当于上图中的每条线,destination定义跳转的目标页,还可以定义跳转时的动画等等
4、添加NavHostFragment
在MainActivity的布局文件中配置NavHostFragment
<?xml version="1.0" encoding="utf-8"?>
<androidx.constraintlayout.widget.ConstraintLayout xmlns:android="http://schemas.android.com/apk/res/android"
    xmlns:app="http://schemas.android.com/apk/res-auto"
    xmlns:tools="http://schemas.android.com/tools"
    android:layout_width="match_parent"
    android:layout_height="match_parent"
    tools:context=".MainActivity">

    <fragment
        android:id="@+id/fragment"
        android:name="androidx.navigation.fragment.NavHostFragment"
        android:layout_width="match_parent"
        android:layout_height="match_parent"

        app:defaultNavHost= "true"
        app:navGraph="@navigation/nav_graph"/>

</androidx.constraintlayout.widget.ConstraintLayout>
-
android:name指定NavHostFragment为:androidx.navigation.fragment.NavHostFragment
-
app:navGraph指定导航视图,即建好的nav_graph.xml
-
app:defaultNavHost=true 意思是可以拦截系统的返回键,可以理解为默认给fragment实现了返回键的功能,这样在fragment的跳转过程中,当我们按返回键时,就可以使得fragment跟activity一样可以回到上一个页面了
现在我们运行程序,就可以正常跑起来了,并且看到了FragmentA展示的页面,这是因为MainActivity的布局文件中配置了NavHostFragment,并且给NavHostFragment指定了导航视图,而导航视图中通过startDestination指定了默认展示FragmentA。
5、通过NavController 管理fragment之间的跳转
上面说到三个fragment之间的跳转关系是FristFragment -> FragmentB -> FragmentC,并且已经可以展示了FristFragment,那怎么跳转到SecondFragment呢,这就需要用到NavController 了
打开FristFragment类,给布局中的TextView定义一个点击事件
    override fun onViewCreated(view: View, savedInstanceState: Bundle?) {


        super.onViewCreated(view, savedInstanceState)
        tv.setOnClickListener{


            val navController = Navigation.findNavController(it)
            navController.navigate(R.id.action_firstFragment_to_secondFragment)
        }
    }
<?xml version="1.0" encoding="utf-8"?>
<FrameLayout xmlns:android="http://schemas.android.com/apk/res/android"
    xmlns:tools="http://schemas.android.com/tools"
    android:layout_width="match_parent"
    android:layout_height="match_parent"
    tools:context=".FirstFragment">

    <!-- TODO: Update blank fragment layout -->
    <TextView
        android:id="@+id/tv"
        android:layout_width="match_parent"
        android:layout_height="match_parent"
        android:text="FirstFragment" />

</FrameLayout>
如果不能自动导入布局,要给app.build添加插件‘kotlin-android-extensions’
apply plugin: 'com.android.application'
apply plugin: 'kotlin-android'
apply plugin: 'kotlin-android-extensions'
AndroidStudio4.1以后改成了
plugins {


    id 'com.android.application'
    id 'kotlin-android'
    id 'kotlin-android-extensions'
}
可以看到,通过navController管理fragment的跳转非常简单,首先得到navController对象,然后调用它的navigate方法,传入前面nav_graph中定义的action的id即可。
同样的方法设置SecondFragment到ThirdFragment的跳转。
运行程序,FirstFragment -> SecondFragment -> ThirdFragment,此时按返回键,也是一个一个页面返回,如果把前面activity_main.xml的app:defaultNavHost设置为false,按返回键后会发现直接返回到桌面了,现在能体会到app:defaultNavHost这个属性的含义了吧。
6、更多用法
在编辑nav_graph的时候,action属性除了设置目标页外,还可以设置动画、页面间参数传递、fragment回退栈管理等
1、动画
- enterAnim: 跳转时的目标页面动画
- exitAnim: 跳转时的原页面动画
- popEnterAnim: 回退时的目标页面动画
- popExitAnim:回退时的原页面动画
    <fragment
        android:id="@+id/firstFragment"
        android:name="com.example.navigationdemo.FirstFragment"
        android:label="fragment_first"
        tools:layout="@layout/fragment_first" >
        <action
            android:id="@+id/action_firstFragment_to_secondFragment"
            app:destination="@id/secondFragment"
            <!-- 这里添加动画 -->
            app:enterAnim="@animator/slide_in_right"
            app:exitAnim="@animator/slide_out_left"
            app:popEnterAnim="@animator/slide_in_left"
            app:popExitAnim="@animator/slide_out_right"/>
    </fragment>
动画的创建:右击res,New Resource File
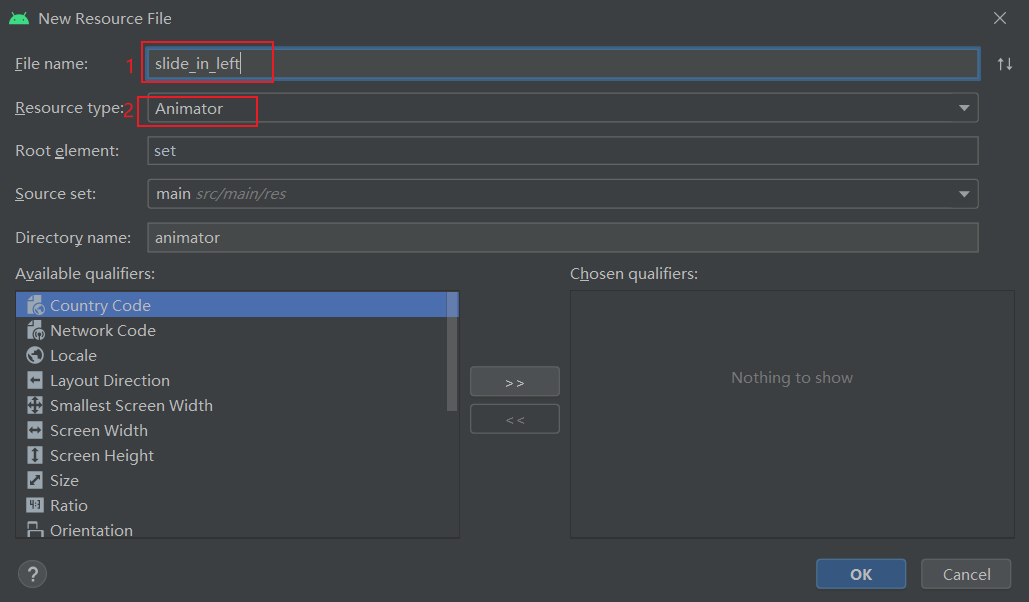
这里把四个动画都贴出来:
slide_in_left.xml:
<?xml version="1.0" encoding="utf-8"?>
<set xmlns:android="http://schemas.android.com/apk/res/android">
    <!-- 从左边进入屏幕,初始x坐标设为负的,到x坐标为0,y坐标不变 -->
    <translate android:fromXDelta="-100%" android:toXDelta="0%"
               android:fromYDelta="0%" android:toYDelta="0%"
               android:duration="700"/>
</set>
slide_in_right.xml:
<?xml version="1.0" encoding="utf-8"?>
<set xmlns:android="http://schemas.android.com/apk/res/android">
	<!-- 从右边进入屏幕,初始x坐标设为100%的,到x坐标为0,y坐标不变 -->
    <translate android:fromXDelta="100%" android:toXDelta="0%"
               android:fromYDelta="0%" android:toYDelta="0%"
               android:duration="700"/>
</set>
slide_out_left.xml:
<?xml version="1.0" encoding="utf-8"?>
<set xmlns:android="http://schemas.android.com/apk/res/android">
	<!-- 从左边退出屏幕,初始x坐标设为0,到x坐标为-100%,y坐标不变 -->
    <translate android:fromXDelta="0%" android:toXDelta="-100%"
               android:fromYDelta="0%" android:toYDelta="0%"
               android:duration="700"/>
</set>
slide_out_right.xml:
<?xml version="1.0" encoding="utf-8"?>
<set xmlns:android="http://schemas.android.com/apk/res/android">
	<!-- 从右边退出屏幕,初始x坐标设为0,到x坐标为100%,y坐标不变 -->
    <translate android:fromXDelta="0%" android:toXDelta="100%"
               android:fromYDelta="0%" android:toYDelta="0%"
               android:duration="700"/>
</set>
2、参数
上面的例子中介绍fragment之间的跳转,当然也可以支持参数传递。
override fun onViewCreated(view: View, savedInstanceState: Bundle?) {


    super.onViewCreated(view, savedInstanceState)
    tv.setOnClickListener {


        val navController = Navigation.findNavController(it)
        val bundle = Bundle()
        bundle.putString("key", "test")
        navController.navigate(R.id.action_fragmentA_to_fragmentB2, bundle)
    }
}
参数传递推荐使用谷歌官方的safeArgs,safe args与传统传参方式相比,好处在于安全的参数类型,并且通过谷歌官方的支持,能很方便的进行参数传值。
在项目的根build.gradle(注意不是app目录)下添加插件
classpath "androidx.navigation:navigation-safe-args-gradle-plugin:2.3.1"
buildscript {


    repositories {


        google()
        mavenCentral()
    }
    dependencies {


        classpath "com.android.tools.build:gradle:7.0.0"
        classpath "org.jetbrains.kotlin:kotlin-gradle-plugin:1.5.21"

        classpath "androidx.navigation:navigation-safe-args-gradle-plugin:2.3.5"
    }
}
然后在app的build.gradle中引用 ‘androidx.navigation.safeargs.kotlin’
plugins {
    id 'com.android.application'
    id 'kotlin-android'
    id 'kotlin-android-extensions'

    id "androidx.navigation.safeargs.kotlin"
}
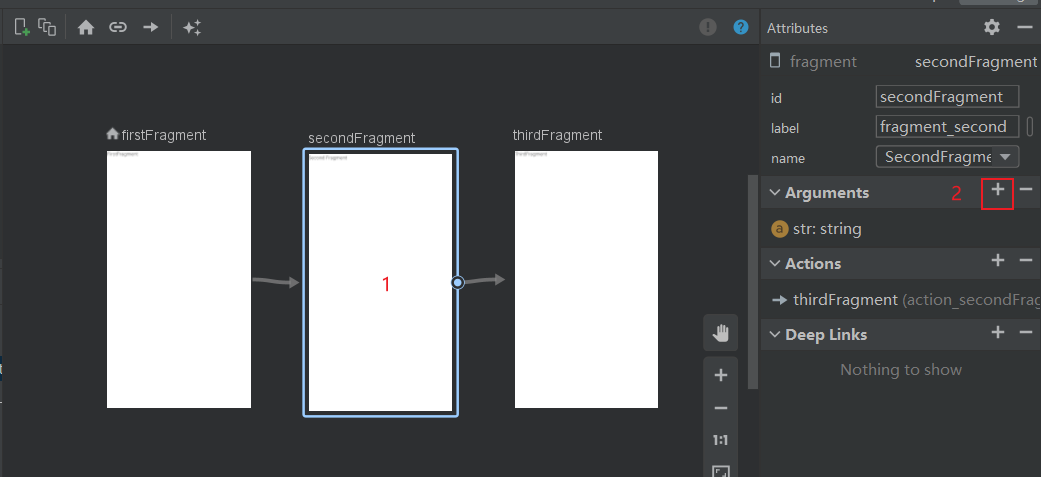
添加完插件后,回到nav_graph,切到design模式,给目标页面添加需要接收的参数,这里需要在FragmentA跳转到FragmentB时传参数,所以给FragmentB设置参数,点击FragmentB,点击右侧面板的Arguments右侧的+,输入参数的key值,指定参数类型和默认值,即可快速添加参数
在代码中,action添加了<argument>标签:
    <fragment
        android:id="@+id/secondFragment"
        android:name="com.example.navigationdemo.SecondFragment"
        android:label="fragment_second"
        tools:layout="@layout/fragment_second" >
        <action
            android:id="@+id/action_secondFragment_to_thirdFragment"
            app:destination="@id/thirdFragment"
            app:enterAnim="@animator/slide_in_right"
            app:exitAnim="@animator/slide_out_left"
            app:popEnterAnim="@animator/slide_in_left"
            app:popExitAnim="@animator/slide_out_right"/>

        <argument
            android:name="str"
            app:argType="string" />
    </fragment>
build一下,safeArgs会自动生成以下文件:
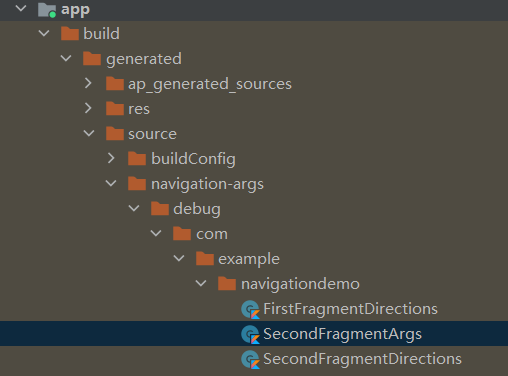
safeArgs会根据nav_graph中的fragment标签生成对应的类,action标签会以“类名+Directions”命名,argument标签会以“类名+Args”命名。
-
使用safeArgs后,传递参数是这样的:
override fun onViewCreated(view: View, savedInstanceState: Bundle?) { super.onViewCreated(view, savedInstanceState) tv.setOnClickListener{ val navController = Navigation.findNavController(it) //navController.navigate(R.id.action_firstFragment_to_secondFragment) //通过safeArgs传递参数 val navDestination = FirstFragmentDirections.actionFirstFragmentToSecondFragment("test") navController.navigate(navDestination) } } -
接收参数:
    override fun onViewCreated(view: View, savedInstanceState: Bundle?) {


        super.onViewCreated(view, savedInstanceState)
        tv.setOnClickListener {


            val navController = Navigation.findNavController(it)
            navController.navigate(R.id.action_secondFragment_to_thirdFragment)
        }
		//这里的argument相当于Java中的getArguments()方法
        arguments?.let {


            val value = SecondFragmentArgs.fromBundle(it).str
            tv.setText(value)
        }
    }
3、栈管理
-
launchSingleTop:如果栈中已经包含了指定要跳转的界面,那么只会保留一个,不指定则栈中会出现两个界面相同的Fragment数据,可以理解为类似activity的singleTop,即栈顶复用模式,但又有点不一样,比如FragmentA@1 -> FragmentA@2,FragmentA@1会被销毁,但如果是FragmentA@01>FragmentB@02>FragmentA@03,FragmentA@1不会被销毁。
-
popUpTo(tag):表示跳转到某个tag,并将tag之上的元素出栈。
-
popUpToInclusive:为true表示会弹出tag,false则不会,个人理解如果为ture就会新建一个Fragment
<?xml version="1.0" encoding="utf-8"?>
<navigation xmlns:android="http://schemas.android.com/apk/res/android"
    xmlns:app="http://schemas.android.com/apk/res-auto"
    xmlns:tools="http://schemas.android.com/tools"
    android:id="@+id/nav_graph"
    app:startDestination="@id/firstFragment">

    <fragment
        android:id="@+id/firstFragment"
        android:name="com.example.navigationdemo.FirstFragment"
        android:label="fragment_first"
        tools:layout="@layout/fragment_first" >
        <action
            android:id="@+id/action_firstFragment_to_secondFragment"
            app:destination="@id/secondFragment"
            app:enterAnim="@animator/slide_in_right"
            app:exitAnim="@animator/slide_out_left"
            app:popEnterAnim="@animator/slide_in_left"
            app:popExitAnim="@animator/slide_out_right"/>
        <action
            android:id="@+id/action_firstFragment_self"
            app:launchSingleTop="true"
            app:destination="@id/firstFragment" />
    </fragment>
    <fragment
        android:id="@+id/secondFragment"
        android:name="com.example.navigationdemo.SecondFragment"
        android:label="fragment_second"
        tools:layout="@layout/fragment_second" >
        <action
            android:id="@+id/action_secondFragment_to_thirdFragment"
            app:destination="@id/thirdFragment"
            app:enterAnim="@animator/slide_in_right"
            app:exitAnim="@animator/slide_out_left"
            app:popEnterAnim="@animator/slide_in_left"
            app:popExitAnim="@animator/slide_out_right"/>
        <argument
            android:name="str"
            app:argType="string" />
    </fragment>
    <fragment
        android:id="@+id/thirdFragment"
        android:name="com.example.navigationdemo.ThirdFragment"
        android:label="fragment_third"
        tools:layout="@layout/fragment_third" >
        <action
            android:id="@+id/action_thirdFragment_to_firstFragment"
            app:destination="@id/firstFragment"

            app:launchSingleTop="true"

            app:popUpTo="@id/firstFragment"
            app:popUpToInclusive="false" />
    </fragment>
</navigation>
4、deeplink
深度链接,就是可以直接跳转到某个页面。navigation创建深度链接可以通过显示和隐式两种方式
按之前的方式新建一个需要通过深度链接打开的目标页面DeepLinkFragment,
接下来为它创建一个deeplink

nav_graph.xml相应的在生成了如下代码:
    <fragment
        android:id="@+id/deepLinkFragment"
        android:name="com.example.navigationdemo.DeepLinkFragment"
        android:label="fragment_deep_link"
        tools:layout="@layout/fragment_deep_link">
        <deepLink
            android:id="@+id/deepLink"
            app:uri="www.deeplink.com/{id}" />
    </fragment>
- 显式深度链接
显示深层链接使用PendingIntent来导航到特定页面,比如点击通知栏,快速打开目标页面。
		//显式深度连接
        btn_deeplink.setOnClickListener {


            val notificationManager = NotificationManagerCompat.from(requireContext())
            //Android8.0 以上需要创建通知通道
            if (Build.VERSION.SDK_INT >= Build.VERSION_CODES.O){


                val importance = NotificationManager.IMPORTANCE_DEFAULT
                val channel =
                    NotificationChannel("deeplink", "自动拉起", importance)
                channel.description = "deeplink"
                notificationManager.createNotificationChannel(channel)
            }

            val navController = Navigation.findNavController(it)
            //创建deeplink
            val deepLinkBuild = navController.createDeepLink()
            val bundle = Bundle()
            bundle.putString("key", "deeplink")
            val pendingIntent = deepLinkBuild
                //传入graph资源文件
                .setGraph(R.navigation.nav_graph)
                //传入参数
                .setArguments(bundle)
                //传入需要通过深度链接打开的目标页面,在nav_graph.xml中的id
                .setDestination(R.id.deepLinkFragment)
                .createPendingIntent()
            //创建通知消息
            val builder = NotificationCompat.Builder(requireContext(), "deeplink")
                .setSmallIcon(R.drawable.ic_launcher_foreground)
                .setContentTitle("测试DeepLink")
                .setContentText("hhh")
                .setContentIntent(pendingIntent)
                .setAutoCancel(true)
                .setPriority(NotificationCompat.PRIORITY_DEFAULT)
            //发送通知
            notificationManager.notify(1, builder.build())
        }
-
隐式深度连接
隐式链接是当用户点击某个链接的时候,通过URI跳转到某个页面,刚刚已经为nav_graph.xml中的FragmentDeepLink添加了
<deepLink app:uri="www.deeplink.com/{id}" />该uri没有声明是http还是https,那么这两个都能匹配。大括号内的是传递的参数。
AndroidManifest.xml中给FragmentDeepLink所属的activity添加一个
<nav-graph>属性,这为MainActivity<activity android:name=".MainActivity"> ...... <nav-graph android:value="@navigation/nav_graph"/> </activity>Navigation 组件会将
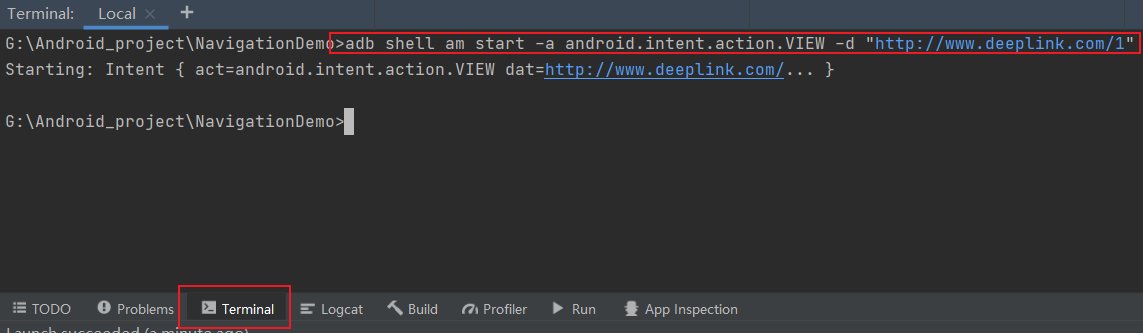
<nav-graph>元素替换为生成的<intent-filter>元素来匹配深层链接。我们可以通过adb来测试隐式深层链接的效果,打开命令行输入:
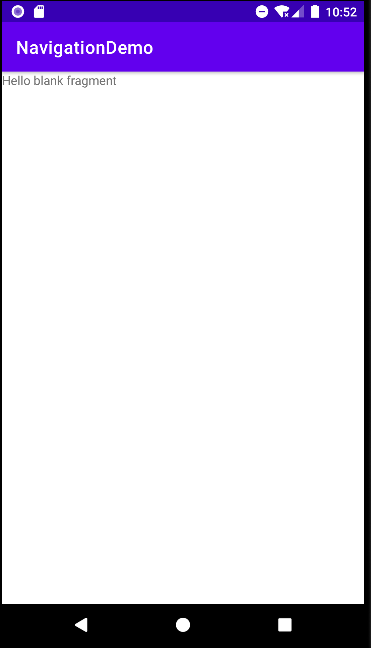
adb shell am start -a android.intent.action.VIEW -d "http://www.deeplink.com/1"在系统弹出的窗口中,选择自己的应用打开,就能跳转到目标页面了。