前言
-
使用vue-admin-template简单模板的时候,添加标签页全局组件,详细实现过程如下。
-
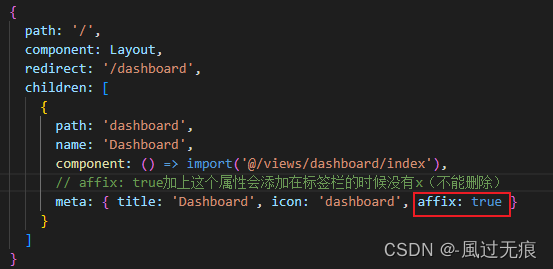
如果是我们不想让他删除的标签页(比如首页)可以在meta加上这个属性affix: true。
-
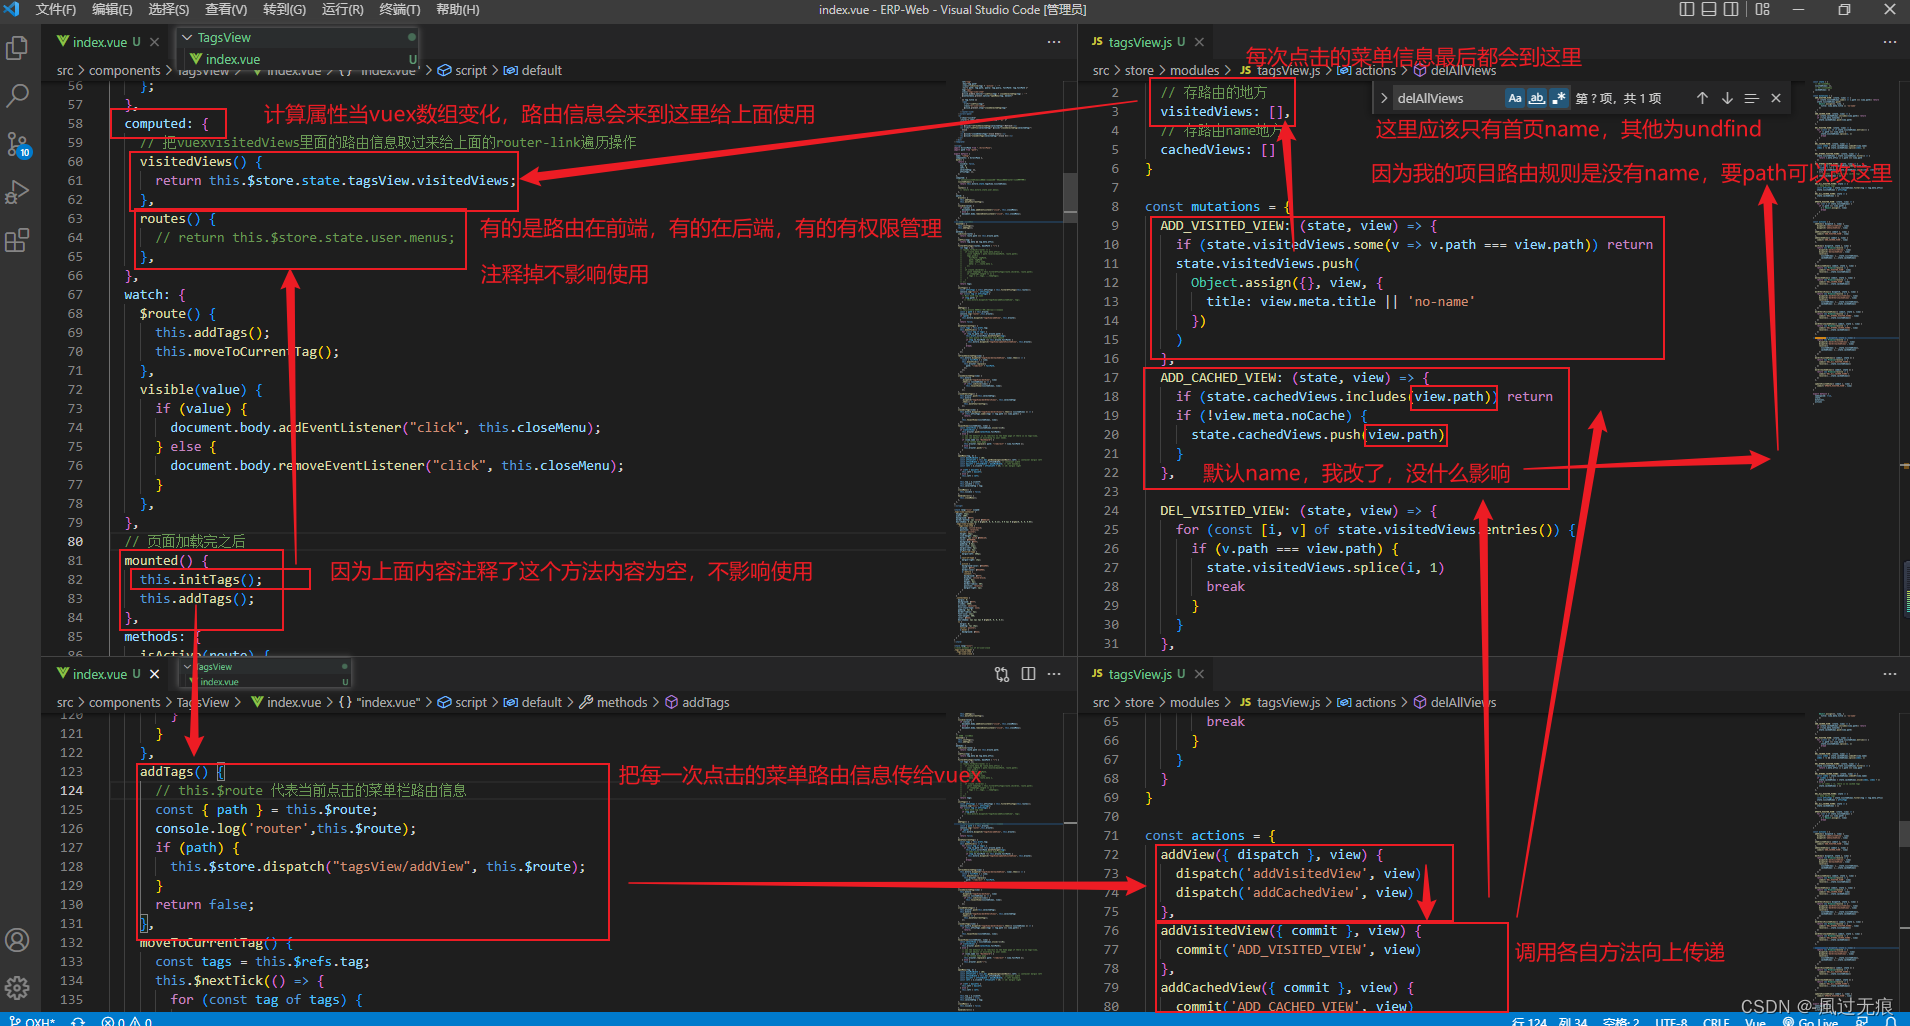
路由在前端,路由在后端,有权限,路由表规则没有name,都会导致报错。下面会有图解。
-
在项目开始之前配置,他会影响到页面高度,要配置。有权限退出登录的时候要清空标签页。
效果图

实现过程
1.把TagsView组件复制到我们的全局组件src/components中,进行全局注册。可以从vue-element-admin完整模板中复制在vue-element-admin/src/layout/components/TagsView文件
统一注册主页文章有
components/index文件
// 引入组件
import TagsView from './TagsView/index.vue'
export default {
// install全局引入 vue中一个方法
install (Vue) {
// 注册组件
Vue.component('TagsView', TagsView)
}
}
2.把vuex的tagsView.js复制到项目store/modules中来,可以从vue-element-admin完整模板中复制在vue-element-admin/src/store/modules/tagsView.js文件
注册在vuex/store/index
import Vue from 'vue'
import Vuex from 'vuex'
import getters from './getters'
import app from './modules/app'
import settings from './modules/settings'
import user from './modules/user'
import tagsView from './modules/tagsView'
Vue.use(Vuex)
//将小仓库注册到大仓库
const store = new Vuex.Store({
modules: {
app,
settings,
user,
tagsView
},
getters
})
//对外暴露仓库
export default store3.把TagsView标签页组件放在layout/index.vue中如图所示

4.项目router/index.js文件给静态路由首页meta属性添加affix: true属性,首页这个标签页没有删除按钮。
5.回到页面查看效果,可能什么都没有,还会有报错。如果看到这些才是正常。


6.是因为我们并没有permission.js vuex文件所以router就是空的,就会什么都没有(空的也不影响使用),我们只要注释一段代码就可以显示首页标签。如下图。注释之后回到页面刷新就可以看见首页标签

7.下面是我的TagsView/index.vue文件代码。多余的代码我注释掉了,不影响正常使用,没有报错
<template>
<div id="tags-view-container" class="tags-view-container">
<scroll-pane
ref="scrollPane"
class="tags-view-wrapper"
@scroll="handleScroll"
>
<router-link
v-for="tag in visitedViews"
ref="tag"
:key="tag.path"
:class="isActive(tag) ? 'active' : ''"
:to="{ path: tag.path, query: tag.query, fullPath: tag.fullPath }"
tag="span"
class="tags-view-item"
@click.middle.native="!isAffix(tag) ? closeSelectedTag(tag) : ''"
@contextmenu.prevent.native="openMenu(tag, $event)"
>
{
{ tag.title }}
<span
v-if="!isAffix(tag)"
class="el-icon-close"
@click.prevent.stop="closeSelectedTag(tag)"
/>
</router-link>
</scroll-pane>
<ul
v-show="visible"
:style="{ left: left + 'px', top: top + 'px' }"
class="contextmenu"
>
<li @click="refreshSelectedTag(selectedTag)">Refresh</li>
<li v-if="!isAffix(selectedTag)" @click="closeSelectedTag(selectedTag)">
Close
</li>
<li @click="closeOthersTags">Close Others</li>
<li @click="closeAllTags(selectedTag)">Close All</li>
</ul>
</div>
</template>
<script>
import ScrollPane from "./ScrollPane";
import path from "path";
export default {
name: "zahng",
components: { ScrollPane },
data() {
return {
visible: false,
top: 0,
left: 0,
selectedTag: {},
affixTags: [],
};
},
computed: {
// 把vuexvisitedViews里面的路由信息取过来给上面的router-link遍历操作
visitedViews() {
return this.$store.state.tagsView.visitedViews;
},
routes() {
// return this.$store.state.permission.routes;
},
},
watch: {
$route() {
this.addTags();
this.moveToCurrentTag();
},
visible(value) {
if (value) {
document.body.addEventListener("click", this.closeMenu);
} else {
document.body.removeEventListener("click", this.closeMenu);
}
},
},
// 页面加载完之后
mounted() {
this.initTags();
this.addTags();
},
methods: {
isActive(route) {
return route.path === this.$route.path;
},
isAffix(tag) {
return tag.meta && tag.meta.affix;
},
filterAffixTags(routes, basePath = "/") {
let tags = [];
// routes.forEach((route) => {
// if (route.meta && route.meta.affix) {
// const tagPath = path.resolve(basePath, route.path);
// tags.push({
// fullPath: tagPath,
// path: tagPath,
// name: route.name,
// meta: { ...route.meta },
// });
// }
// if (route.children) {
// const tempTags = this.filterAffixTags(route.children, route.path);
// if (tempTags.length >= 1) {
// tags = [...tags, ...tempTags];
// }
// }
// });
return tags;
},
initTags() {
const affixTags = (this.affixTags = this.filterAffixTags(this.routes));
console.log("结果", affixTags);
for (const tag of affixTags) {
// Must have tag name
if (tag.path) {
// this.$store.dispatch("tagsView/addVisitedView", tag);
}
}
},
addTags() {
// this.$route 代表当前点击的菜单栏路由信息
const { name } = this.$route;
console.log('router',this.$route);
if (name) {
this.$store.dispatch("tagsView/addView", this.$route);
}
return false;
},
moveToCurrentTag() {
const tags = this.$refs.tag;
this.$nextTick(() => {
for (const tag of tags) {
if (tag.to.path === this.$route.path) {
this.$refs.scrollPane.moveToTarget(tag);
// when query is different then update
if (tag.to.fullPath !== this.$route.fullPath) {
this.$store.dispatch("tagsView/updateVisitedView", this.$route);
}
break;
}
}
});
},
refreshSelectedTag(view) {
this.$store.dispatch("tagsView/delCachedView", view).then(() => {
const { fullPath } = view;
this.$nextTick(() => {
this.$router.replace({
path: "/redirect" + fullPath,
});
});
});
},
closeSelectedTag(view) {
this.$store
.dispatch("tagsView/delView", view)
.then(({ visitedViews }) => {
if (this.isActive(view)) {
this.toLastView(visitedViews, view);
}
});
},
closeOthersTags() {
this.$router.push(this.selectedTag);
this.$store
.dispatch("tagsView/delOthersViews", this.selectedTag)
.then(() => {
this.moveToCurrentTag();
});
},
closeAllTags(view) {
this.$store.dispatch("tagsView/delAllViews").then(({ visitedViews }) => {
if (this.affixTags.some((tag) => tag.path === view.path)) {
return;
}
this.toLastView(visitedViews, view);
});
},
toLastView(visitedViews, view) {
const latestView = visitedViews.slice(-1)[0];
if (latestView) {
this.$router.push(latestView.fullPath);
} else {
// now the default is to redirect to the home page if there is no tags-view,
// you can adjust it according to your needs.
if (view.name === "Dashboard") {
// to reload home page
this.$router.replace({ path: "/redirect" + view.fullPath });
} else {
this.$router.push("/");
}
}
},
openMenu(tag, e) {
const menuMinWidth = 105;
const offsetLeft = this.$el.getBoundingClientRect().left; // container margin left
const offsetWidth = this.$el.offsetWidth; // container width
const maxLeft = offsetWidth - menuMinWidth; // left boundary
const left = e.clientX - offsetLeft + 15; // 15: margin right
if (left > maxLeft) {
this.left = maxLeft;
} else {
this.left = left;
}
this.top = e.clientY;
this.visible = true;
this.selectedTag = tag;
},
closeMenu() {
this.visible = false;
},
handleScroll() {
this.closeMenu();
},
},
};
</script>
<style lang="scss" scoped>
.tags-view-container {
height: 34px;
width: 100%;
background: #fff;
border-bottom: 1px solid #d8dce5;
box-shadow: 0 1px 3px 0 rgba(0, 0, 0, 0.12), 0 0 3px 0 rgba(0, 0, 0, 0.04);
.tags-view-wrapper {
.tags-view-item {
display: inline-block;
position: relative;
cursor: pointer;
height: 26px;
line-height: 26px;
border: 1px solid #d8dce5;
color: #495060;
background: #fff;
padding: 0 8px;
font-size: 12px;
margin-left: 5px;
margin-top: 4px;
&:first-of-type {
margin-left: 15px;
}
&:last-of-type {
margin-right: 15px;
}
&.active {
background-color: #42b983;
color: #fff;
border-color: #42b983;
&::before {
content: "";
background: #fff;
display: inline-block;
width: 8px;
height: 8px;
border-radius: 50%;
position: relative;
margin-right: 2px;
}
}
}
}
.contextmenu {
margin: 0;
background: #fff;
z-index: 3000;
position: absolute;
list-style-type: none;
padding: 5px 0;
border-radius: 4px;
font-size: 12px;
font-weight: 400;
color: #333;
box-shadow: 2px 2px 3px 0 rgba(0, 0, 0, 0.3);
li {
margin: 0;
padding: 7px 16px;
cursor: pointer;
&:hover {
background: #eee;
}
}
}
}
</style>
<style lang="scss">
//reset element css of el-icon-close
.tags-view-wrapper {
.tags-view-item {
.el-icon-close {
width: 16px;
height: 16px;
vertical-align: 2px;
border-radius: 50%;
text-align: center;
transition: all 0.3s cubic-bezier(0.645, 0.045, 0.355, 1);
transform-origin: 100% 50%;
&:before {
transform: scale(0.6);
display: inline-block;
vertical-align: -3px;
}
&:hover {
background-color: #b4bccc;
color: #fff;
}
}
}
}
</style>8.因为我的项目路由表是后端返回来的,没有name。只要改这个地方就可以了,大家可以参考。123行
把name改成path
addTags() {
      // this.$route 代表当前点击的菜单栏路由信息
      const { path } = this.$route;
      console.log('router',this.$route);
      if (path) {
        this.$store.dispatch("tagsView/addView", this.$route);
      }
      return false;
    },
9.如果是有权限的我们应该在退出登录的时候把标签页清空调用addView方法,传空就行了。
 logout({ commit, dispatch }) {

    // 删除token
    commit('removeToken')
    // 删除用户信息
    commit('removeUserInfo')
    // 清空页签
    // 如何调用别的vuex模块里的actions?
    // 代表这个action调用的不是本模块里的,而是调用根模块里的
    dispatch('tagsView/delAllViews', null, { root: true } )
  }
10基本思路图
大家也可以根据自己需求改动,标签页数据持久化等,注意自己路由表写法。建议在开始写项目之前配置,它会占高度位置,影响高度,会出现滚动条。
总结:
经过这一趟流程下来相信你也对 vue-admin-template-添加标签页全局组件-详细使用有了初步的深刻印象,但在实际开发中我 们遇到的情况肯定是不一样的,所以我们要理解它的原理,万变不离其宗。加油,打工人!
什么不足的地方请大家指出谢谢 -- 風过无痕