一、前置知识点
学习本教程,需要一定前置知识点
1> 熟练使用Maven
2> 熟悉web体系
3> 熟练使用Spring/SpringMVC框架
4> 熟练使用SpringBoot框架
5> 熟悉java日志(演示案例)
二、引出starter
先来一个例子感受一下Spring-boot-starter简便性
需求:搭建一个web项目,访问:http://localhost:8080/hello 返回:Hello,浪飞yes
2.1 传统的SpringMVC
步骤1:创建项目-mvc-demo
步骤2:导入依赖包
<properties>
	<spring.version>5.0.8.RELEASE</spring.version>
    <project.build.sourceEncoding>UTF-8</project.build.sourceEncoding>
    <maven.compiler.source>11</maven.compiler.source>
    <maven.compiler.target>11</maven.compiler.target>
</properties>

<dependencies>
	<dependency>
		<groupId>org.springframework</groupId>
		<artifactId>spring-webmvc</artifactId>
		<version>${spring.version}</version>
	</dependency>
	<dependency>
		<groupId>javax.servlet</groupId>
		<artifactId>javax.servlet-api</artifactId>
		<version>3.0.1</version>
		<scope>provided</scope>
	</dependency>
</dependencies>
<build>
	<plugins>
		<plugin>
			<groupId>org.apache.tomcat.maven</groupId>
			<artifactId>tomcat7-maven-plugin</artifactId>
			<version>2.1</version>
			<configuration>
				<port>8080</port>
				<path>/</path>
				<uriEncoding>UTF-8</uriEncoding>
			</configuration>
		</plugin>
	</plugins>
</build>
步骤3:web配置
在 resources 目录下新建 mvc.xml,配置如下:
<!-- 配置 IoC DI 注解解析器,让 Spring 我们创建 HelloController 类的对象 -->
<context:component-scan base-package="com.langfeiyes.mvc.controller"/>
<!-- MVC 注解解析器 -->
<mvc:annotation-driven/>
在 main 目录新建 webapp/WEB-INF/web.xml,内容如下:
<?xml version="1.0" encoding="UTF-8"?>
<web-app xmlns="http://java.sun.com/xml/ns/javaee" xmlns:xsi="http://www.w3.org/2001/XMLSchema-instance"
         xsi:schemaLocation="http://java.sun.com/xml/ns/javaee
                      http://java.sun.com/xml/ns/javaee/web-app_3_0.xsd"
         version="3.0">

    <!-- Spring MVC 前端控制器-->
    <servlet>
        <servlet-name>dispatcherServlet</servlet-name>
        <servlet-class>org.springframework.web.servlet.DispatcherServlet</servlet-class>
        <!-- 指定 Spring 容器启动加载的配置文件-->
        <init-param>
            <param-name>contextConfigLocation</param-name>
            <param-value>classpath:mvc.xml</param-value>
        </init-param>
        <!-- Tomcat 启动初始化 -->
        <load-on-startup>1</load-on-startup>
    </servlet>
    <servlet-mapping>
        <servlet-name>dispatcherServlet</servlet-name>
        <url-pattern>/</url-pattern>
    </servlet-mapping>
</web-app>
步骤4:编写代码
package com.langfeiyes.mvc.controller;

@RestController
public class HelloController {
    // 提供方法处理请求,在浏览器地址栏输入如下 localhost/hello,就会执行下面的方法
    @RequestMapping("/hello")
    public String save() {
        return "hello, 浪飞yes";
    }
}
步骤5:测试
打开浏览器,在地址栏收入 http://localhost:8080/hello,访问看下效果。
2.2 叠加SpringBoot的Starter
步骤1:创建项目-starter-demo
步骤2:导入依赖包
<parent>
    <groupId>org.springframework.boot</groupId>
    <artifactId>spring-boot-starter-parent</artifactId>
    <version>2.3.3.RELEASE</version>
</parent>

<dependencies>
    <dependency>
        <groupId>org.springframework.boot</groupId>
        <artifactId>spring-boot-starter-web</artifactId>
    </dependency>
</dependencies>
步骤3:编写代码
@RestController
public class HelloController {
    @RequestMapping("/hello")
    public String hello() {
        return "Hello,浪飞yes";
    }
}
步骤4:测试
编写启动类启动项目
@SpringBootApplication
public class App {
    public static void main(String[] args) {
        SpringApplication.run(App.class, args);
    }
}
打开浏览器,在地址栏收入 http://localhost:8080/hello,访问看下效果。
这里先记住Starter最显著特点:让开发变得更加简便
三、何为Starter
从上面2个web项目对比,你就会发现,叠加了SpringBoot 的SpringMVC操作,使用会更加简单,不会像传统的Spring MVC那样,一堆的 xml 配置文件,一旦 xml 配置时出现疏忽,整个项目可能莫名其妙的挂掉,如果xml文件多且复杂,你都不知道如何下手解决,这生无可恋感觉不好受。
但是,自从有了SpringBoot + Starter,你会发现世界再美好不过了~
那何为SpringBoot,何为Starter?
3.1 SpringBoot回顾
SpringBoot简单概括起来有着几点:
1> Jar 收集狂,收集各种常见第三方框架/组件的jar
2> 小工具爱好者,将收集起来的各种jar按照模块/功能进行分类汇总,得到更大的功能jar包:Starter
3>自动配置小能手,根据引入jar,自动往项目中加载各种功能
详细的SpringBoot操作这里不展开讲了,属于前置知识点,没基础的朋友,可以到我B站空间看SpringBoot入门视频。<<SpringBoot 入门到企业实战,从菜鸟到老鸟,只需要6个小时~>>
或者csdn课程
3.2 SpringBoot启动器
Spring-boot-starter称之为SpringBoot启动器,由Spring Boot 根据应用程序所需的基本依赖项(jar)进行定制依赖库(jar)集合,可用于快速启动Spring应用程序。比如:导入spring-boot-starter-web便可引入整个mvc环境,导入:spring-boot-starter-Redis 便可以直接使用Redis数据库。
Spring-boot-starter被设计成可分离、可重用的热插拔式模块,大幅度地简化Spring程序的搭建过程以及提高程序设计灵活性。
3.3 常见的Spring-Boot-Starter
starter 分2种,
-
SpringBoot默认的,由Spring官方定制
命名方式 格式:spring-boot-starter-{模块名}
常见的Starter
spring-boot-starter 这是Spring Boot的核心启动器,包含了自动配置、日志和YAML。
spring-boot-starter-actuator 帮助监控和管理应用。
spring-boot-starter-amqp 通过spring-rabbit来支持AMQP协议
spring-boot-starter-aop 支持面向方面的编程即AOP,包括spring-aop和AspectJ。
spring-boot-starter-artemis 通过Apache Artemis支持JMS的API(Java Message Service API)。
spring-boot-starter-batch 支持Spring Batch,包括HSQLDB数据库。
spring-boot-starter-cache 支持Spring的Cache抽象。
spring-boot-starter-cloud-connectors 支持Spring Cloud Connectors,简化了在像Cloud Foundry或Heroku这样的云平台上连接服务。
spring-boot-starter-data-elasticsearch 支持ElasticSearch搜索和分析引擎,包括spring-data-elasticsearch。
spring-boot-starter-data-gemfire 支持GemFire分布式数据存储,包括spring-data-gemfire。
spring-boot-starter-data-jpa 支持JPA(Java Persistence API),包括spring-data-jpa、spring-orm、hibernate。
spring-boot-starter-data-MongoDB 支持MongoDB数据,包括spring-data-mongodb。
spring-boot-starter-data-rest 通过spring-data-rest-webmvc,支持通过REST暴露Spring Data数据仓库。
spring-boot-starter-data-solr 支持Apache Solr搜索平台,包括spring-data-solr。
spring-boot-starter-freemarker 支持FreeMarker模板引擎。
spring-boot-starter-groovy-templates 支持Groovy模板引擎。
spring-boot-starter-hateoas 通过spring-hateoas支持基于HATEOAS的RESTful Web服务。
spring-boot-starter-hornetq 通过HornetQ支持JMS。
spring-boot-starter-integration 支持通用的spring-integration模块。
spring-boot-starter-jdbc 支持JDBC数据库。
spring-boot-starter-jersey 支持Jersey RESTful Web服务框架。
spring-boot-starter-jta-atomikos 通过Atomikos支持JTA分布式事务处理。
spring-boot-starter-jta-bitronix 通过Bitronix支持JTA分布式事务处理。
spring-boot-starter-mail 支持javax.mail模块。
spring-boot-starter-mobile 支持spring-mobile。
spring-boot-starter-mustache 支持Mustache模板引擎。
spring-boot-starter-Redis 支持Redis键值存储数据库,包括spring-redis。
spring-boot-starter-security 支持spring-security。
spring-boot-starter-social-facebook 支持spring-social-facebook
spring-boot-starter-social-linkedin 支持pring-social-linkedin
spring-boot-starter-social-twitter 支持pring-social-twitter
spring-boot-starter-test 支持常规的测试依赖,包括JUnit、Hamcrest、Mockito以及spring-test模块。
spring-boot-starter-thymeleaf 支持Thymeleaf模板引擎,包括与Spring的集成。
spring-boot-starter-velocity 支持Velocity模板引擎。
spring-boot-starter-web S支持全栈式Web开发,包括Tomcat和spring-webmvc。
spring-boot-starter-websocket 支持WebSocket开发。
spring-boot-starter-ws 支持Spring Web Services。
spring-boot-starter-remote-shell 增加了远程ssh shell的支持。
spring-boot-starter-jetty 引入了Jetty HTTP引擎(用于替换Tomcat)。
spring-boot-starter-log4j 支持Log4J日志框架。
spring-boot-starter-logging 引入了Spring Boot默认的日志框架Logback。
spring-boot-starter-tomcat 引入了Spring Boot默认的HTTP引擎Tomcat。
spring-boot-starter-undertow 引入了Undertow HTTP引擎(用于替换Tomcat)-
第三方定制
根据SpringBoot开发的Starter定制规则,很多第三方组织结合SpringBoot定制自身的启动器。
命名方式 格式:{模块名}-spring-boot-starter
mybatis-spring-boot-starter:该starter提供了MyBatis框架的集成支持,可以帮助开发人员更快地搭建基于MyBatis的应用程序。

dubbospring-boot-starter:该starter提供了Dubbo分布式服务框架的集成支持,可以帮助开发人员更快地实现微服务架构。

elasticsearch-spring-boot-starter:该starter提供了Elasticsearch搜索引擎的集成支持,可以帮助开发人员更快地搭建基于Elasticsearch的搜索服务。

logstash-spring-boot-starter:该starter提供了Logstash日志收集框架的集成支持,可以帮助开发人员更快地集成Logstash服务。

druid-spring-boot-starter:该starter提供了Druid数据库连接池的集成支持,可以帮助开发人员更快地实现数据库连接池功能。
四、如何定制Starter
在回答如何定制Starter之前,先要搞清楚一点:为何要定制?
4.1 为何要定制
在日常开发工作中,经常会有一些独立于业务之外的功能模块,传统做法:在项目中直接编码。如果另一个项目需要复用这功能模块时,需要将代码硬拷贝过去,然后重新集成一遍,这重复操作麻烦至极。如果将这些可独立于业务之外的功能模块封装成一个个starter,复用的时候只需要将其在pom中引用依赖即可,是不是很爽呢?
比如下面几个业务之外功能模块
1>通用模块-短信发送模块
2>基于AOP技术日志切面
3>分布式雪花Long类型ID精度损失问题
4>微服务项目的数据库连接池配置
5>微服务项目的Redis数据库引入问题
6>多模块项目鉴权组件引入问题
4.2 Starter定制实现
第一个案例,设计简单一点,简单拦截打印操作。
4.2.1 需求描述
需求:设计一个拦截starter,拦截项目中所有请求,打印配置好的info信息。
要求:
通过yml中配置mvc.interceptor.show的值决定启用或者不启用
mvc:
  interceptor:
    info: hello,浪飞yes
    show: true
4.2.2 实现步骤
1>创建一个项目:intercept-show-spring-boot-starter
2>导入相关依赖
<parent>
    <groupId>org.springframework.boot</groupId>
    <artifactId>spring-boot-starter-parent</artifactId>
    <version>2.3.2.RELEASE</version>
    <relativePath/>
</parent>

<dependencies>
    <dependency>
        <groupId>org.springframework.boot</groupId>
        <artifactId>spring-boot-starter-web</artifactId>
        <scope>compile</scope>
    </dependency>

    <dependency>
        <groupId>org.springframework.boot</groupId>
        <artifactId>spring-boot-configuration-processor</artifactId>
        <optional>true</optional>
    </dependency>
</dependencies>
3>定义接收资源配置ShowProperties配置类
资源配置有2个:info/show
mvc:
  interceptor:
    info: hello,浪飞yes...
    show: true
接收类
package com.langfeiyes.mvc.prop;

import org.springframework.boot.context.properties.ConfigurationProperties;

@ConfigurationProperties(prefix = "mvc.interceptor")
public class ShowProperties {
    private boolean show = true;

    private String info;

    public boolean isShow() {
        return show;
    }

    public void setShow(boolean show) {
        this.show = show;
    }

    public String getInfo() {
        return info;
    }

    public void setInfo(String info) {
        this.info = info;
    }
}
4>定义接拦截器-ShowInfoInterceptor
package com.langfeiyes.mvc.interceptor;

import com.langfeiyes.mvc.prop.ShowProperties;
import org.springframework.beans.factory.annotation.Autowired;
import org.springframework.util.StringUtils;
import org.springframework.web.servlet.HandlerInterceptor;

import javax.servlet.http.HttpServletRequest;
import javax.servlet.http.HttpServletResponse;

public class ShowInfoInterceptor implements HandlerInterceptor {

    @Autowired
    private ShowProperties showProperties;

    @Override
    public boolean preHandle(HttpServletRequest request, HttpServletResponse response, Object handler) throws Exception {
        if (showProperties.isShow()){
            if (StringUtils.hasText(showProperties.getInfo())) {
                System.out.println(showProperties.getInfo());
            }else{
                System.out.println("Hello,浪飞yes....");
            }
        }

        return true;
    }
}
5>定义配置拦截器类--WebConfig
package com.langfeiyes.mvc.config;

import com.langfeiyes.mvc.interceptor.ShowInfoInterceptor;
import com.langfeiyes.mvc.prop.ShowProperties;
import org.springframework.context.annotation.Bean;
import org.springframework.context.annotation.Configuration;
import org.springframework.web.servlet.config.annotation.InterceptorRegistry;
import org.springframework.web.servlet.config.annotation.WebMvcConfigurer;

@Configuration
public class WebConfig implements WebMvcConfigurer {
    @Bean
    public ShowProperties showProperties(){
        return new ShowProperties();
    }

    @Bean
    public ShowInfoInterceptor showInfoInterceptor(){
        return new ShowInfoInterceptor();
    }


    @Override
    public void addInterceptors(InterceptorRegistry registry) {
        registry.addInterceptor(showInfoInterceptor())
                .addPathPatterns("/**");
    }
}
6>配置starter入口启动类/配置类-ShowInfoAutConfig
package com.langfeiyes.mvc.config;


import com.langfeiyes.mvc.interceptor.ShowInfoInterceptor;
import com.langfeiyes.mvc.prop.ShowProperties;
import org.springframework.boot.autoconfigure.condition.ConditionalOnClass;
import org.springframework.boot.autoconfigure.condition.ConditionalOnMissingClass;
import org.springframework.boot.autoconfigure.condition.ConditionalOnProperty;
import org.springframework.boot.context.properties.ConfigurationProperties;
import org.springframework.boot.context.properties.EnableConfigurationProperties;
import org.springframework.context.annotation.Bean;
import org.springframework.context.annotation.ComponentScan;
import org.springframework.context.annotation.Configuration;
import org.springframework.web.servlet.config.annotation.InterceptorRegistry;
import org.springframework.web.servlet.config.annotation.WebMvcConfigurer;


@ConditionalOnProperty(name = "mvc.interceptor.show", matchIfMissing = false)
@Configuration
@ComponentScan("com.langfeiyes.mvc")
public class ShowInfoAutConfig {

}
ConditionalOnProperty:要求配置文件中有show属性,不存在时,默认为false,表示拦截器不生效。
ComponentScan:扫描指定的包,实现各组件加载
7>配置starter启动器入口--resources/META-INF/spring.factories
org.springframework.boot.autoconfigure.EnableAutoConfiguration=\
  com.langfeiyes.mvc.config.ShowInfoAutConfig
4.2.3 使用测试
1>创建一个项目:mvc-starter-demo
2>导入相关依赖
<!--父工程-->
<parent>
    <groupId>org.springframework.boot</groupId>
    <artifactId>spring-boot-starter-parent</artifactId>
    <version>2.3.2.RELEASE</version>
    <relativePath/>
</parent>

<dependencies>
    <dependency>
        <groupId>org.springframework.boot</groupId>
        <artifactId>spring-boot-starter-web</artifactId>
    </dependency>

    <dependency>
        <groupId>com.langfeiyes.mvc</groupId>
        <artifactId>show-spring-boot-starter</artifactId>
        <version>1.0-SNAPSHOT</version>
    </dependency>
</dependencies>
3>配置拦截starter
mvc:
  interceptor:
    info: hello,dafei...
    show: true
4>编写controller发起web请求
import org.springframework.web.bind.annotation.GetMapping;
import org.springframework.web.bind.annotation.RestController;

@RestController
public class HelloController {
    @GetMapping("/hello")
    public String hello(){
        return "hello...fei~";
    }
}
5>启动项目,并测试
package com.langfei.mvc;

import org.springframework.boot.SpringApplication;
import org.springframework.boot.autoconfigure.SpringBootApplication;

@SpringBootApplication
public class App {
    public static void main(String[] args) {
        SpringApplication.run(App.class, args);
    }
}
1:打开浏览器,在地址栏收入 http://localhost:8080/hello,访问看下效果。
2:打开控制台,看拦截器的打印
3:将配置文件的show改为false再测试一次
mvc:
  interceptor:
    info: hello,dafei...
    show: false
4:直接将配置文件删除,在试一下会怎样
五、Starter原理是啥
要讲请求starter的原理,必须先理解SpringBoot自动配置原理。
SpringBoot自动配置原理
@SpringBootApplication
public class App {
    public static void main(String[] args) {
        SpringApplication.run(App.class, args);
    }
}
大白话:
1>项目启动后,SpringBoot会找去jar包下所有META-INF/spring.factories,读取其中预设的候选配置类。
2>然后根据导入依赖/配置文件去匹配候选配置类设置的@ConditionalOnXxx条件
3>当满足候选配置类的预设条件,该候选配置类会被激活,SpringBoot马上装配给配置类所有信息。

上图简化:
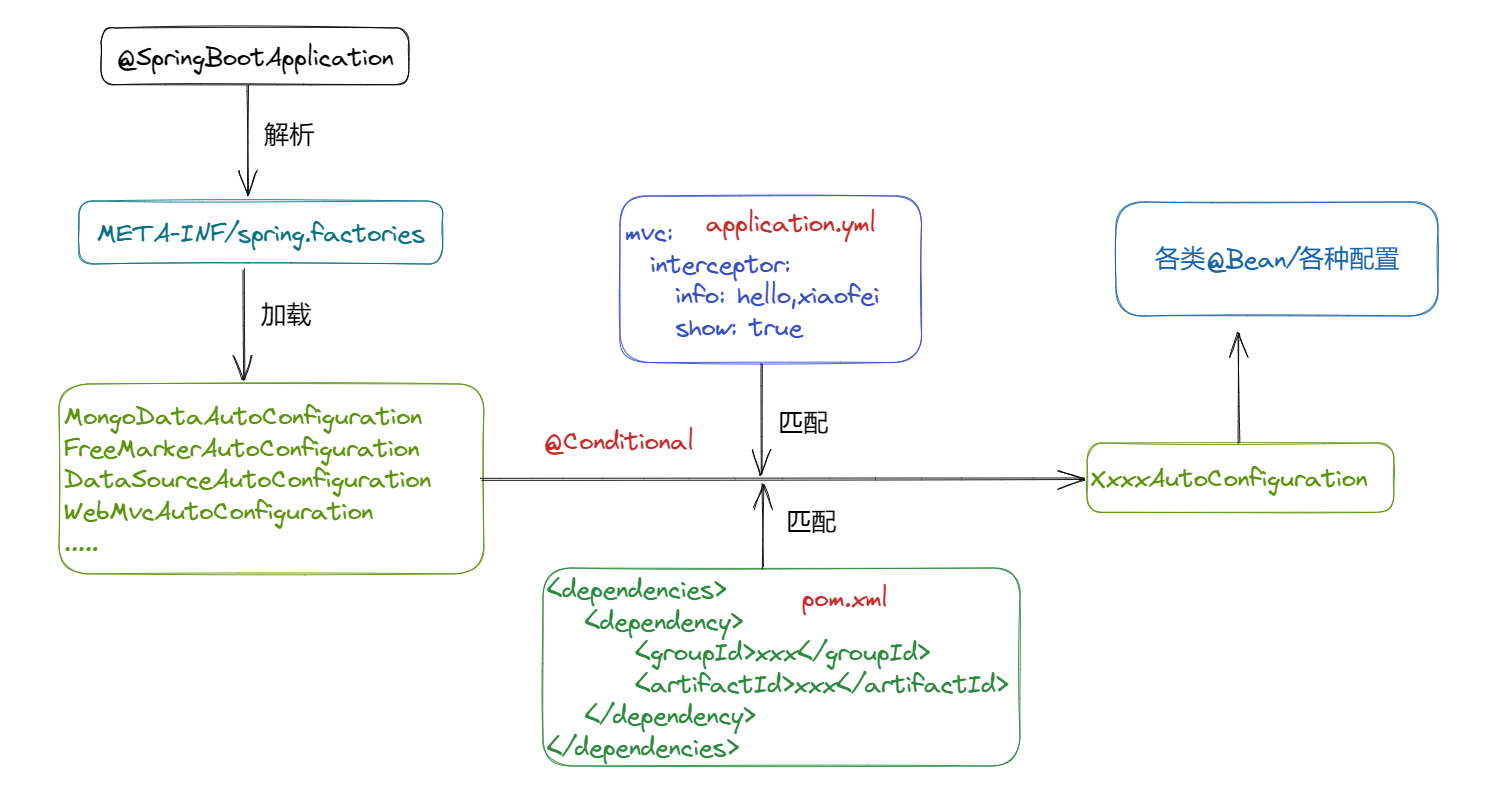
Starter实现原理其实也就是SpringBoot自动装配原理,区别在于需要手动定制starter自己的后续配置类。
案例中实例Starter执行过程
SpringBoot---->spring.factories--->候选的ShowInfoAutConfig配置类
--->匹配:@ConditionalOnClass/@ConditionalOnProperty--->满足条件开始装配
--->@ComponentScan("com.langfeiyes.mvc")--->加载配置:WebConfig--->拦截器配置成功
六、Starter实战案例
6.1 需求描述
需求:定制一个starter,当请求映射方法需要打日志时,贴上@Log注解即可。
要求:通过yml中配置mvc.log.enabled的值决定启用或者不启用
mvc:
  log:
    enabled: true
6.2 实现步骤
1>创建一个项目:log-aspect-spring-boot-starteer
2>导入相关依赖
<parent>
    <groupId>org.springframework.boot</groupId>
    <artifactId>spring-boot-starter-parent</artifactId>
    <version>2.3.2.RELEASE</version>
    <relativePath/>
</parent>

<dependencies>
    <dependency>
        <groupId>org.springframework.boot</groupId>
        <artifactId>spring-boot-starter</artifactId>
    </dependency>

    <dependency>
        <groupId>org.springframework.boot</groupId>
        <artifactId>spring-boot-configuration-processor</artifactId>
        <optional>true</optional>
    </dependency>

    <dependency>
        <groupId>org.springframework.boot</groupId>
        <artifactId>spring-boot-starter-aop</artifactId>
    </dependency>

</dependencies>
3>定义接收资源配置JobProperties配置类
资源暂时配置有1个:enabled
mvc:
  log:
    enabled: true
接收类
package com.langfeiyes.log.prop;

import org.springframework.boot.context.properties.ConfigurationProperties;

@ConfigurationProperties(prefix = "mvc.log")
public class LogProperties {
    private boolean enabled;
    public boolean isEnabled() {
        return enabled;
    }
    public void setEnabled(boolean enabled) {
        this.enabled = enabled;
    }
}
4>定义日志注解-@Log
@Target({ ElementType.PARAMETER, ElementType.METHOD })
@Retention(RetentionPolicy.RUNTIME)
@Documented
public @interface Log {
}
5>定义日志切面类-LogAspect
package com.langfeiyes.log.aspectj;

import com.langfeiyes.log.annotation.Log;
import org.aspectj.lang.JoinPoint;
import org.aspectj.lang.annotation.AfterReturning;
import org.aspectj.lang.annotation.Aspect;
import org.aspectj.lang.annotation.Before;
import org.aspectj.lang.annotation.Pointcut;
import org.springframework.stereotype.Component;

@Aspect
public class LogAspect{

    @Pointcut("@annotation(log)")
    public void webLog(Log log) {
    }

    @Before("webLog(log)")
    public void doBefore(JoinPoint joinPoint, Log log) {
        // 打印请求日志
        System.out.println("before" + log);
    }

    @AfterReturning(returning = "ret", pointcut = "webLog(log)")
    public void doAfterReturning(Object ret, Log log) {
        // 打印响应结果日志
        System.out.println("doAfterReturning" + log);
    }
}
6>配置starter入口启动类/配置类-LogAspectEnableAutoConfiguration
package com.langfeiyes.log.config;


import com.langfeiyes.log.aspectj.LogAspect;
import com.langfeiyes.log.prop.LogProperties;
import org.springframework.boot.autoconfigure.condition.ConditionalOnProperty;
import org.springframework.boot.context.properties.EnableConfigurationProperties;
import org.springframework.context.annotation.Bean;
import org.springframework.context.annotation.ComponentScan;
import org.springframework.context.annotation.Configuration;

@Configuration
@EnableConfigurationProperties(LogProperties.class)
@ConditionalOnProperty(name = "mvc.log.enabled", matchIfMissing = true)
@ComponentScan("com.langfeiyes.log")
public class LogAspectEnableAutoConfiguration {

    @Bean
    public LogProperties logProperties(){
        return  new LogProperties();
    }

    @Bean
    public LogAspect logAspect(){
        return  new LogAspect();
    }
}
ConditionalOnProperty:要求配置文件中有enabled属性,不存在时,默认为false,表示日志不生效。
ComponentScan:扫描指定的包,实现各组件加载
7>配置starter启动器入口--resources/META-INF/spring.factories
org.springframework.boot.autoconfigure.EnableAutoConfiguration=\
  com.langfeiyes.log.config.LogAspectEnableAutoConfiguration
6.3 使用测试
1>创建一个项目:mvc-log-demo
2>导入相关依赖
<parent>
    <groupId>org.springframework.boot</groupId>
    <artifactId>spring-boot-starter-parent</artifactId>
    <version>2.3.2.RELEASE</version>
    <relativePath/>
</parent>

<dependencies>
    <dependency>
        <groupId>org.springframework.boot</groupId>
        <artifactId>spring-boot-starter-web</artifactId>
    </dependency>

    <dependency>
        <groupId>com.langfeiyes.log</groupId>
        <artifactId>log-aspect-spring-boot-starteer</artifactId>
        <version>1.0.0</version>
    </dependency>
</dependencies>
3>配置日志starter
mvc:
  log:
    enabled: true
4>编写controller发起web请求
package com.langfei.mvc.controller;

import com.langfeiyes.log.annotation.Log;
import org.springframework.web.bind.annotation.GetMapping;
import org.springframework.web.bind.annotation.RestController;

@RestController
public class HelloController {

    @Log
    @GetMapping("/hello")
    public String hello(){
        return "ok-aspect";
    }
}
5>启动项目,并测试
package com.langfei.mvc;

import org.springframework.boot.SpringApplication;
import org.springframework.boot.autoconfigure.SpringBootApplication;

@SpringBootApplication
public class App {
    public static void main(String[] args) {
        SpringApplication.run(App.class, args);
    }
}
1:打开浏览器,在地址栏收入 http://localhost:8080/hello,访问看下效果。
2:打开控制台,看日志的打印
3:将配置文件的enabled改为false再测试一次
mvc:
  log:
    enabled: false
4:直接将配置文件删除,在试一下会怎样
6.4 升级改造
改造@Log注解,让日志记录内容更加丰富
@Target({ ElementType.PARAMETER, ElementType.METHOD })
@Retention(RetentionPolicy.RUNTIME)
@Documented
public @interface Log {
    //日志标题
    String title() default "";

    //操作类别
    OperType  type() default OperType.OTHER;
}
新加类型枚举类
package com.langfeiyes.log.annotation;

/**
 * 业务操作类型
 */
public enum OperType
{
    /**
     * 其他
     */
    OTHER,
    /**
     * 查
     */
    QUERY,

    /**
     * 新增
     */
    INSERT,

    /**
     * 修改
     */
    UPDATE,

    /**
     * 删除
     */
    DELETE,
}
改造HelloController类
package com.langfei.mvc.controller;

import com.langfeiyes.log.annotation.Log;
import com.langfeiyes.log.annotation.OperType;
import org.springframework.web.bind.annotation.GetMapping;
import org.springframework.web.bind.annotation.RestController;

@RestController
public class HelloController {

    @GetMapping("/hello")
    public String hello(){
        return "ok-aspect";
    }

    @Log(title = "员工查询", type = OperType.QUERY)
    @GetMapping("/emps/detail")
    public String detail(){
        return "ok-detail";
    }

    @Log(title = "员工添加", type = OperType.INSERT)
    @GetMapping("/emps/save")
    public String save(){
        return "ok-save";
    }
}
启动App类访问下面路径,观察结果:
http://localhost:8080/emps/detail ---》当前执行操作是:员工查询-QUERY
http://localhost:8080/emps/save ---》当前执行操作是:员工添加-INSERT
到这,spring-boot-starter启动器的介绍就结束啦~