前言:之前看过侯老师的《STL源码剖析》但是那已经是多年以前的,现在工作中有时候查问题和崩溃都需要了解实际工作中使用到的STL的实现。因此计划把STL的源码再过一遍。
摘要:本文描述了llvm中libcxx的std::vector的实现。
关键字:vector
其他:参考代码LLVM-libcxx
vector是标准库中的连续存储的容器,也就是容器中说任意两个索引上相邻的元素的地址也是相邻的,可以通过索引随机访问。vector中的元素默认是通过堆内存管理的,在进行空间分配时一般会比时机需求的空间要大,即capacity_size,这样能够避免在插入元素时频繁申请内存导致的性能问题(如果频繁申请内存导致页置换的话还是很耗时的)。
1 vector
先看下容器的定义,和其他容器一样都是一个模板类。_Tp就是类型,而_Allocator是进行内存管理的分配器,默认分配器就是通过::operator new和::operator delete申请和释放内存的。
template <class _Tp, class _Allocator /* = allocator<_Tp> */>
class _LIBCPP_TEMPLATE_VIS vector
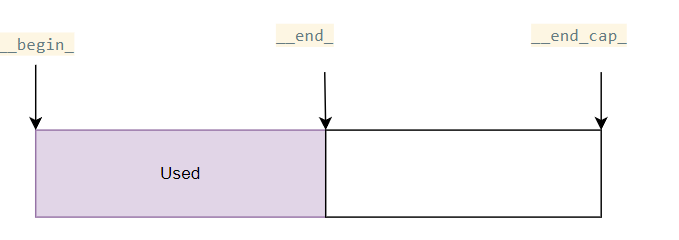
vector的内存布局比较简单如下图,有三个指针分别指向了对应的开始地址,已使用部分的尾地址,申请到的内存的尾地址,[__begin_, __end_)之间是已经使用的内存部分,[__end_, __end_cap_)是申请了但是未使用的部分(保留这一部分是为了避免插入元素时频繁allocate而可能出现的性能问题。)
private:
    pointer __begin_ = nullptr;
    pointer __end_ = nullptr;
    __compressed_pair<pointer, allocator_type> __end_cap_ =
        __compressed_pair<pointer, allocator_type>(nullptr, __default_init_tag());
构造和销毁
vector的构造比较简单,就是先通过allocator申请一块内存,然后通过for循环逐个构造对象。构造时通过for循环实现,由于没有利用CPU的一些SMID指令的优化,必然效率不是很好。
vector(size_type __n, const value_type& __x, const allocator_type& __a) : __end_cap_(nullptr, __a){


    std::__debug_db_insert_c(this);
    if (__n > 0){


        __vallocate(__n);
        __construct_at_end(__n, __x);
    }
}

vector<_Tp, _Allocator>::__construct_at_end(size_type __n, const_reference __x){


    _ConstructTransaction __tx(*this, __n);
    const_pointer __new_end = __tx.__new_end_;
    for (pointer __pos = __tx.__pos_; __pos != __new_end; __tx.__pos_ = ++__pos) {


        __alloc_traits::construct(this->__alloc(), std::__to_address(__pos), __x);
    }
}
销毁就比较直接,通过一个包装器__destroy_vector,先clear再调用deallocate释放内存。
__vec_.__clear();
__alloc_traits::deallocate(__vec_.__alloc(), __vec_.__begin_, __vec_.capacity());;
clear
clear函数只会针对析构容器中的每一个函数并不会释放当前容器中的内存。因此在进行容器释放时需要注意,如果期望释放内存的话可以通过vector().swap(vec)的方式或者在调用clear之后调用shrink_to_fit 调整内存大小。
void clear() _NOEXCEPT{


    size_type __old_size = size();
    __clear();
    __annotate_shrink(__old_size);  //看源码里面什么也不会做
    std::__debug_db_invalidate_all(this);
}

void __clear() _NOEXCEPT {

    __base_destruct_at_end(this->__begin_);}
void __base_destruct_at_end(pointer __new_last) _NOEXCEPT {


    pointer __soon_to_be_end = this->__end_;
    while (__new_last != __soon_to_be_end)          //依然是一个完整的循环析构
        __alloc_traits::destroy(__alloc(), std::__to_address(--__soon_to_be_end));
    this->__end_ = __new_last;
}
push_back
push_back时,如果当前有足够的的大小则会在尾部构建一个对象,扩容的大小是按照现有大小的2倍来,即std::min(max_size(), std::max(current_cap + 1, 2 * current_cap)),简单的理解就是在条件允许的情况下扩容2倍。
void vector<_Tp, _Allocator>::__push_back_slow_path(_Up&& __x){


    allocator_type& __a = this->__alloc();
    //__split_buffer就是一个包装器
    __split_buffer<value_type, allocator_type&> __v(__recommend(size() + 1), size(), __a);
    // __v.push_back(std::forward<_Up>(__x));
    __alloc_traits::construct(__a, std::__to_address(__v.__end_), std::forward<_Up>(__x));
    __v.__end_++;
    __swap_out_circular_buffer(__v);//这个函数没有干什么就是将__v中的size设置给当前的vector
}
emplace_back
emplace_back和push_back基本相同都是向容器中插入元素,如果对于插入vector::value_type类型的对象二者是没有区别的,push_back也实现了右值的重载,不存在push_back对于右值会多次拷贝的情况。主要的区别是emplace_back通过可变参数模板将参数直接传递给了构建器也就意味着同样的代码emplace_back直接在对应的内存上构建对象,而相比之下push_back是先构建再拷贝。
void vector<_Tp, _Allocator>::emplace_back(_Args&&... __args)
resize
resize的实现比较直接,内存小了就扩容,大了就析构但是并不释放内存。
void vector<_Tp, _Allocator>::resize(size_type __sz, const_reference __x){


    size_type __cs = size();
    if (__cs < __sz)
        this->__append(__sz - __cs, __x);
    else if (__cs > __sz)
        this->__destruct_at_end(this->__begin_ + __sz);//只会析构对象,不会释放内存
}
shrink_to_fit
vector<bool, _Allocator>::shrink_to_fit() _NOEXCEPT{


    if (__external_cap_to_internal(size()) > __cap()){


        vector(*this, allocator_type(__alloc())).swap(*this);
    }
}
vector<bool>基本上被建议放弃使用了,所以就不深入了。
2 array
array的实现比较简单就是一个简单的栈数组的包装器。就不详细描述了。
template <class _Tp, size_t _Size>
struct _LIBCPP_TEMPLATE_VIS array
{


    // types:
    typedef array __self;
    typedef _Tp                                   value_type;
    typedef value_type&                           reference;
    typedef const value_type&                     const_reference;
    typedef value_type*                           iterator;
    typedef const value_type*                     const_iterator;
    typedef value_type*                           pointer;
    typedef const value_type*                     const_pointer;
    typedef size_t                                size_type;
    typedef ptrdiff_t                             difference_type;
    typedef _VSTD::reverse_iterator<iterator>       reverse_iterator;
    typedef _VSTD::reverse_iterator<const_iterator> const_reverse_iterator;

    _Tp __elems_[_Size];
};