ansible基础
ansible简介
ansible是一个自动化运维工具,其基于Python开发,集合了众多运维工具(puppet、cfengine、chef、func、fabric)的优点,实现了批量系统配置、批量程序部署、批量运行命令等功能。
作为一个开源配置管理工具,我们可以使用ansible来自动化执行任务,部署应用程序实现IT基础架构,如服务器的初始化配置、安全基线配置、更新和打补丁系统,安装软件包等。ansible架构相对比较简单,仅需通过SSH连接远程主机即客户机执行任务即可
ansible特点
- 部署简单,只需在主控端部署Ansible环境,被控端无需做任何操作;
- 默认使用SSH协议对设备进行管理;
- 有大量常规运维操作模块,可实现日常绝大部分操作;
- 配置简单、功能强大、扩展性强;
- 支持API及自定义模块,可通过Python轻松扩展;
- 通过Playbooks来定制强大的配置、状态管理;
- 轻量级,无需在客户端安装agent,更新时,只需在操作机上进行一次更新即可;
- 提供一个功能强大、操作性强的Web管理界面和REST API接口——AWX平台。
ansible常用概念术语
Control node
控制节点,指的是安装了ansible的主机,也叫ansible服务器端、管理机。ansible控制节点主要用于发布运行任务,执行控制命令。控制节点需要安装Python和ansible所需的各种依赖库
Managed nodes
受控节点,即利用ansible执行任务的客户服务器
Inventory
清单,指的是受控节点的列表,即所有要管理的主机的列表
host文件
清单列表通常保存在一个名为host文件中,在host文件中,可以使用IP地址或者主机名来表示具体的管理主机和认证信息,并可以根据主机的用户进行分组
Modules
模块,即ansible执行特定任务的代码块
Task
ansible客户主机上执行的操作
Playbook
利用YAML标记语言编写的可重复执行的任务的列表
roles
角色,用于层次性、结构化地组织playbook,roles能够根据层次型结构自动装载变量文件、tasks以及handlers等
ansible执行流程
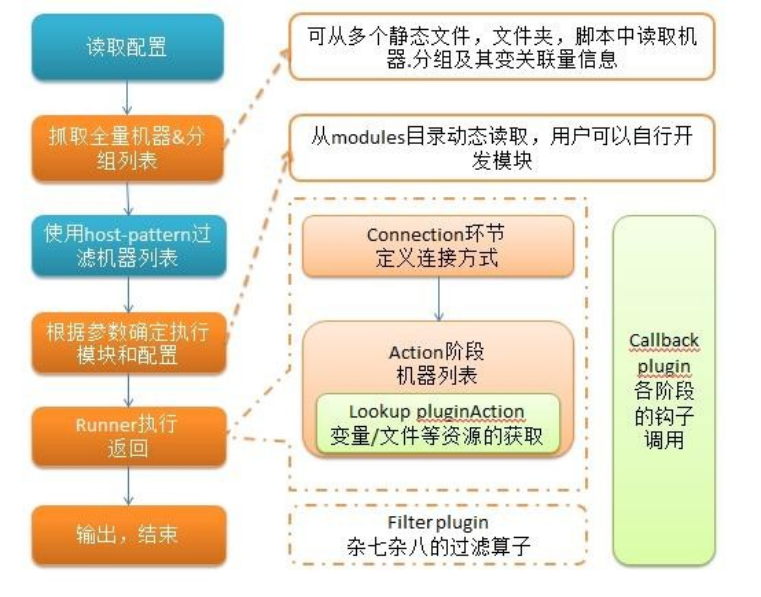
执行过程如下:
- 加载自己的配置文件,默认
/etc/ansible/ansible.cfg; - 查找对应的主机配置文件,找到要执行的主机或者组;
- 加载自己对应的模块文件,如 command;
- 通过ansible将模块或命令生成对应的临时py文件(python脚本), 并将该文件传输至远程服务器;
- 对应执行用户的家目录的
.ansible/tmp/XXX/XXX.PY文件; - 给文件 +x 执行权限;
- 执行并返回结果;
- 删除临时py文件,
sleep 0退出;
通俗来讲,Ansible在运行时, 首先读取
ansible.cfg中的配置, 根据规则获取Inventory中的管理主机列表, 并行的在这些主机中执行配置的任务, 最后等待执行返回的结果
安装部署
安装环境
主控节点
系统:centos7 内存:4G
网络类型:NAT模式 硬盘大小:80G
最小化安装 语言:英语
IP:192.168.180.131
受控节点
系统:centos7 内存:4G
网络类型:NAT模式 硬盘大小:80G
最小化安装 语言:英语
IP:192.168.180.137
安装(主控节点执行)
# rpm包安装:EPEL源
yum install -y epel-release
yum install -y ansible

# 查看版本信息
[root@localhost ~]# ansible-doc --version
ansible-doc 2.9.27
  config file = /etc/ansible/ansible.cfg
  configured module search path = [u'/root/.ansible/plugins/modules', u'/usr/share/ansible/                           plugins/modules']
  ansible python module location = /usr/lib/python2.7/site-packages/ansible
  executable location = /usr/bin/ansible-doc
  python version = 2.7.5 (default, Jun 28 2022, 15:30:04) [GCC 4.8.5 20150623 (Red Hat 4.8.                           5-44)]
# ansible安装目录结构
安装目录如下(yum安装):
  配置文件目录:/etc/ansible/
  执行文件目录:/usr/bin/
  Lib库依赖目录:/usr/lib/pythonX.X/site-packages/ansible/
  Help文档目录:/usr/share/doc/ansible-X.X.X/
  Man文档目录:/usr/share/man/man1/
修改配置文件(主控节点)
修改hosts文件
# 进入/etc/ansible
[root@localhost ~]# cd /etc/ansible/
[root@localhost ansible]# ll
total 24
-rw-r--r-- 1 root root 19985 Jan 16  2022 ansible.cfg
-rw-r--r-- 1 root root  1016 Jan 16  2022 hosts
drwxr-xr-x 2 root root     6 Jan 16  2022 roles

[root@localhost ansible]# vim hosts
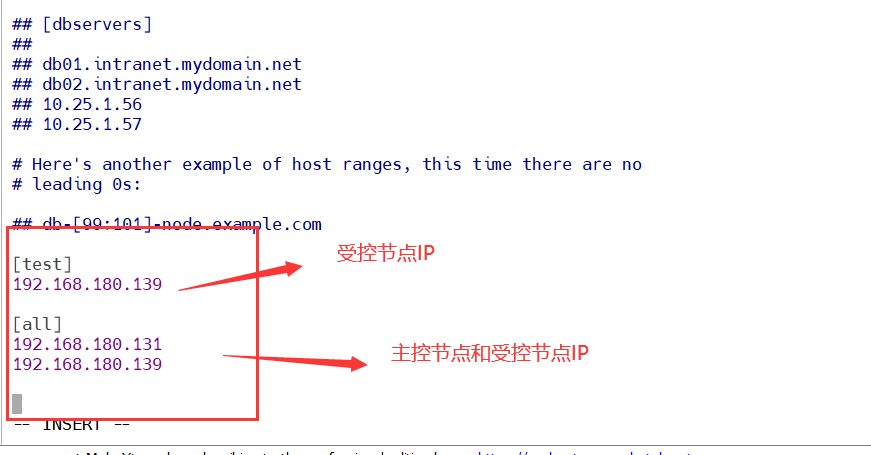
# 删除两个注释
[root@localhost ~]# cd /etc/ansible/
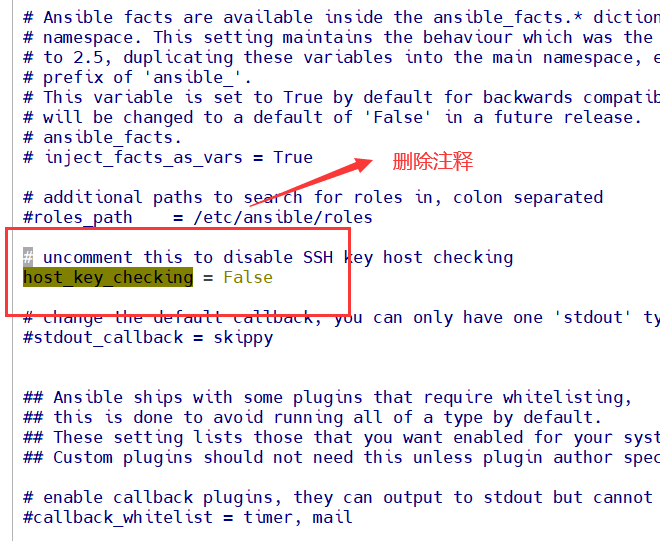
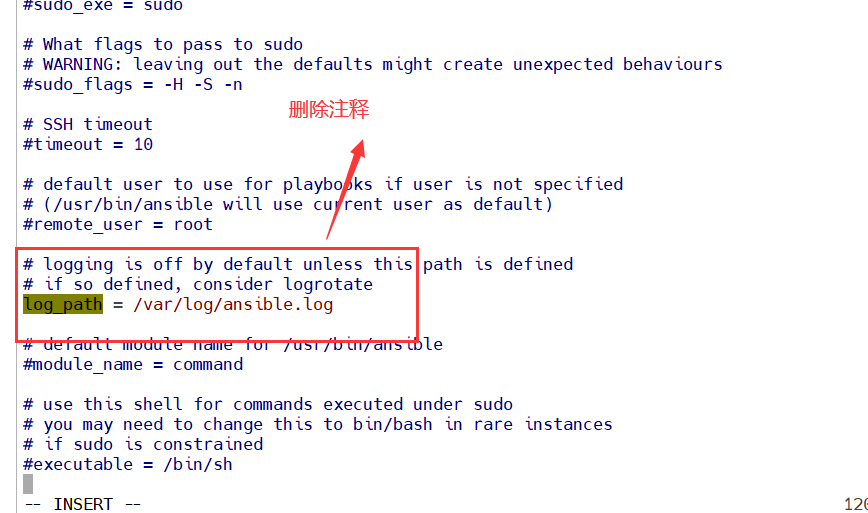
[root@localhost ansible]# vim ansible.cfg
去掉第一次连接ssh ask确认
开启记录日志
# 生成密钥,并将主控节点的密钥发送给受控节点(一直按enter键即可)

[root@localhost ansible]# ssh-keygen
Generating public/private rsa key pair.
Enter file in which to save the key (/root/.ssh/id_rsa):
Created directory '/root/.ssh'.
Enter passphrase (empty for no passphrase):
Enter same passphrase again:
Your identification has been saved in /root/.ssh/id_rsa.
Your public key has been saved in /root/.ssh/id_rsa.pub.
The key fingerprint is:
SHA256:7PaCpAHoDkrvwcDJfc4WnhRNS5z1cPWlx4y3JSvvWYw [email protected]
The key's randomart image is:
+---[RSA 2048]----+
|      .ooo ...  .|
|      +o. +   .=.|
| .   . o   .  +.*|
|+ +   ..       =o|
|.= o +  S   . .. |
|.oo B +.     o o |
|= .o X .o     E o|
|.. .+ ....   . o |
|  ..     ..   o  |
+----[SHA256]-----+


# 远程连接受控节点
shh root@受控节点IP

[root@localhost ansible]# ssh [email protected]
The authenticity of host '192.168.180.139 (192.168.180.139)' can't be established.
ECDSA key fingerprint is SHA256:MdtTymY/z3bVlBL5CtBn9J5FcTMxhusCqU/nMj8uTME.
ECDSA key fingerprint is MD5:43:01:fc:03:e8:97:87:cb:86:35:6d:5b:24:35:fe:2b.
Are you sure you want to continue connecting (yes/no)? yes
Warning: Permanently added '192.168.180.139' (ECDSA) to the list of known hosts.
[email protected]'s password:
Last login: Fri Mar 31 15:49:09 2023 from 192.168.180.1

# 此时已经登录到受控节点了,输入exit退出登录
[root@localhost ~]# exit
logout
Connection to 192.168.180.139 closed.


# 设置免密登录
ssh-copy-id root@需要作免密登录的IP地址

[root@localhost ansible]# ssh-copy-id [email protected]
/usr/bin/ssh-copy-id: INFO: Source of key(s) to be installed: "/root/.ssh/id_rsa.pub"
/usr/bin/ssh-copy-id: INFO: attempting to log in with the new key(s), to filter out any that are already installed
/usr/bin/ssh-copy-id: INFO: 1 key(s) remain to be installed -- if you are prompted now it is to install the new keys
[email protected]'s password:

Number of key(s) added: 1

Now try logging into the machine, with:   "ssh '[email protected]'"
and check to make sure that only the key(s) you wanted were added.

# 验证免密登陆是否设置成功
[root@localhost ansible]# ssh [email protected]
Last login: Fri Mar 31 16:20:11 2023 from 192.168.180.131

# 可以看到此时已经不需要再输入密码
主机连通性测试
# 通过命令
ansible all -m ping
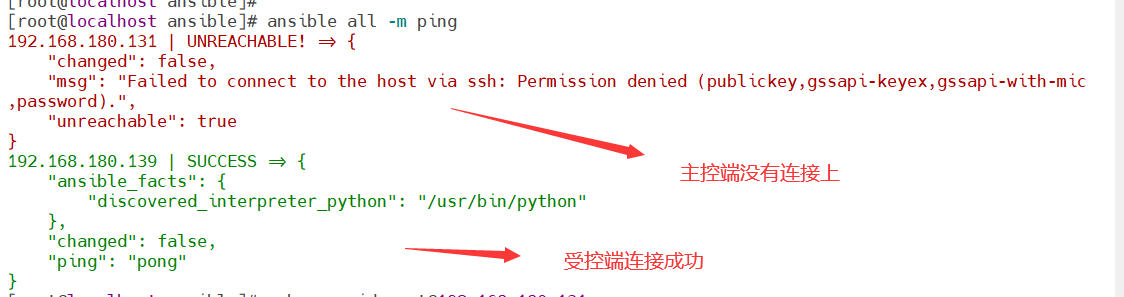
这里主控节点连接失败是因为没有作免密登录
# 将主控节点作免密登录后
[root@localhost ansible]# ssh-copy-id [email protected]
/usr/bin/ssh-copy-id: INFO: Source of key(s) to be installed: "/root/.ssh/id_rsa.pub"
/usr/bin/ssh-copy-id: INFO: attempting to log in with the new key(s), to filter out any that are alr          eady installed
/usr/bin/ssh-copy-id: INFO: 1 key(s) remain to be installed -- if you are prompted now it is to inst          all the new keys
[email protected]'s password:

Number of key(s) added: 1

Now try logging into the machine, with:   "ssh '[email protected]'"
and check to make sure that only the key(s) you wanted were added.
再次测试连通性

可以看到现在两台都已经联通了