目录
一、搭建项目
引入相关依赖,编写配置文件
配置文件:
spring:
  rabbitmq:
    host: 192.168.66.130
    port: 5672
    username: root
    password: root
    virtual-host: /


#日志格式
logging:
  pattern:
    console: '%d{HH:mm:ss.SSS} %clr(%-5level) ---  [%-15thread] %cyan(%-50logger{50}):%msg%n'
相关依赖:
 <dependencies>
        <dependency>
            <groupId>org.springframework.boot</groupId>
            <artifactId>spring-boot-starter-amqp</artifactId>
        </dependency>

        <dependency>
            <groupId>org.springframework.boot</groupId>
            <artifactId>spring-boot-starter-test</artifactId>
            <scope>test</scope>
        </dependency>
        <dependency>
            <groupId>org.springframework.amqp</groupId>
            <artifactId>spring-rabbit-test</artifactId>
            <scope>test</scope>
        </dependency>
    </dependencies>
二、创建队列和虚拟机
一定要注意虚拟机和队列的创建是在配置类中的,交换机类型是根据返回值类型不同而改变的
package com.example.demo;


import org.springframework.amqp.core.*;
import org.springframework.beans.factory.annotation.Qualifier;
import org.springframework.context.annotation.Bean;
import org.springframework.context.annotation.Configuration;

@Configuration
public class SpringConfig {
    //交换机名字
    private final String exchange_name="exchange_one";
    //队列名字
    private final String queue_name="queue_one";

    //创建交换机
    @Bean("bootexchange")
    public Exchange getexchange(){
        //想换交换机类型
        //返回值可以写成DirectExchange
        //TopicExchange等等
        return ExchangeBuilder
                .topicExchange(exchange_name)//交换机名字
                .durable(true)//是否持久化
        .build();
    }

    //创建队列
    @Bean("bootqueue")
    public Queue getqueue(){
        return new Queue(queue_name);//队列名
    }
    //交换机绑定队列
    @Bean
    public Binding bingmessagequeue(@Qualifier("bootexchange") Exchange exchange,
                                    @Qualifier("bootqueue") Queue queue){
        return BindingBuilder
                .bind(queue)
                .to(exchange)
                .with("#.mess.#")
                .noargs();
    }
}
三、编写生产者
生产者的发送信息不需要那么繁琐,直接可以使用提供的工具类即可
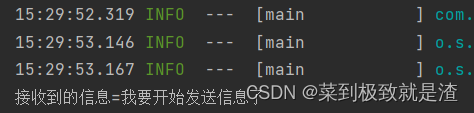
package com.example.demo;

import org.junit.jupiter.api.Test;
import org.springframework.amqp.rabbit.core.RabbitTemplate;
import org.springframework.beans.factory.annotation.Autowired;
import org.springframework.boot.test.context.SpringBootTest;

@SpringBootTest
public class TestProducer {
    //注入rabbittemplate工具类
    @Autowired
    private RabbitTemplate rabbitTemplate;

    @Test
    public void send(){
        //参数一是交换机
        //参数二是路由键
        //参数三表示要发送的信息
        rabbitTemplate.convertAndSend("exchange_one","mess","我要开始发送信息了");
    }
}
四、编写消费者
消费者的代码不要和生产者在同一个项目中
package com.example.rabbitmq2;

import org.springframework.amqp.rabbit.annotation.RabbitListener;
import org.springframework.stereotype.Component;

@Component
public class consumer {
    @RabbitListener(queues ="queue_one")
    public void listen(String m){
        System.out.println("接收到的信息="+m);
    }
}