目录
1. QString 字符串类
QString是Qt中的字符串类,与C和C++不同的是,Qt的字符串使用Unicode编码。每一个字符使用一个16位的QChar,而不是之前8位的char,所以Qt处理中文没有问题,并且每个中文算作一个字符。
Qt是基于C++的开发框架,因此很多类会尽可能地兼容C++的API,QString支持绝大多数std::string的API,例如append、size、length、at、push_back等。除此之外,也有修改和新增的部分。
对于QString类的API,可以通过认识常用的英文单词查询文档使用。

dialog.cpp
#include "dialog.h"

Dialog::Dialog(QWidget *parent)
    : QDialog(parent)
{
    //支持多国语言
    QString text="αβγあいうえおАБВ";
    qDebug()<<text;
    qDebug()<<"字符串长度:"<<text.size();
    qDebug()<<text.length();
    qDebug()<<text.count();

    //int--->QString
    //参数1:要转换的数字    参数2:进制, 默认十进制
    text=QString::number(12,16);//c
    qDebug()<<"数字转换为字符串:"<<text;
    //向后追加
    text.setNum(12,16).append("哈哈哈");
    text.push_back("g");
    qDebug()<<"向后追加:"<<text;
    //向前追加
    text.prepend("e");
    text.push_front("d");
    qDebug()<<"向前追加:"<<text;

    text.insert(0,"a");
    qDebug()<<"插入元素"<<text;
    //移除  下标从0开始
    text.remove(1,4);
    qDebug()<<"移除后:"<<text;
    //替换
    text="Say yes!";
    text.replace(4,3,"no");
    qDebug()<<"替换:"<<text;
    //分割
    text="a,b,c";
    QStringList list=text.split(",");
    qDebug()<<"以逗号分割:"<<list;


    //QString-->int
    // int	toInt(bool * ok = 0, int base = 10) const
    //参数1:表示是否转换成功  参数2:进制,默认十进制
    //返回值:转换的结果,0表示失败
    text="12";
    bool result;//转换是否成功
    int i=text.toInt(&result);
    qDebug()<<"是否成功:"<<result;
    qDebug()<<i;
}

Dialog::~Dialog()
{

}
2. 容器类
C++的STL容器类已经不适用于Qt的环境,因为Qt重新实现了部分容器类,据官方所说,Qt的容器类更加轻巧、安全和易于使用。Qt对这些容器类进行存储优化,可以使生成的exe可执行文件的体积减小,这些容器类是线程安全的,支持同时被多个线程进行只读访问,几乎支持C++的STL容器类的API,并在此基础上进行了扩充。
2.1 顺序容器 QList
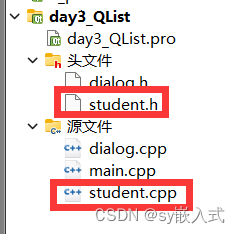
先创建一个自定义的C++类,然后使用QList存储这个类的对象。
在Qt中创建一个自定义的C++类的操作步骤如下:
1. 在Qt Creator中选中项目名称,鼠标右键,点击“添加新文件”。
2. 在弹出的窗口中,按照下图所示进行操作。
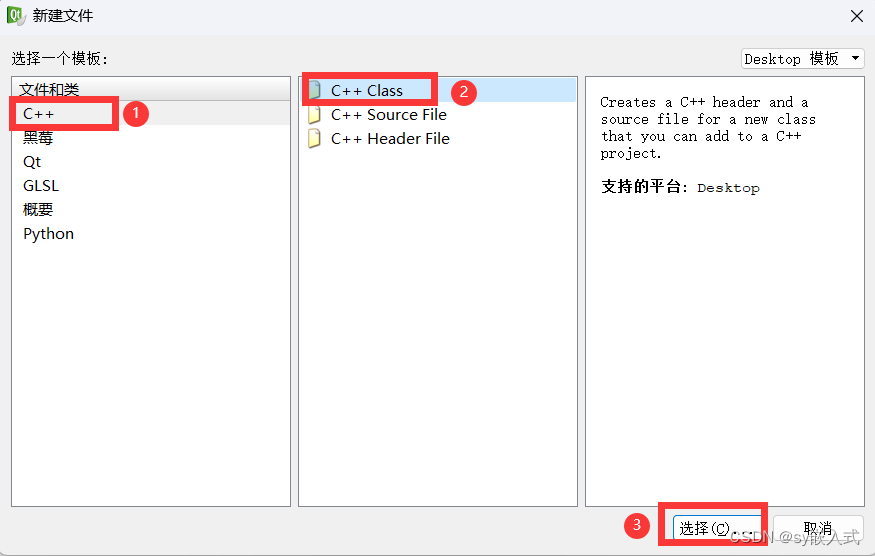

3. 在弹出的窗口中,先给类命名(主题使用大驼峰命名法,即所有单词的首字母大写),然后点击“下一步”。
4. 在项目管理界面直接点击完成。可以看到在项目中已经有对应的头文件和源文件了。
QList除了支持C++的迭代器以外,还支持Java的迭代器,对应关系如下。
| C++迭代器 |
等效的Java迭代器 |
| QList::const_iterator |
QListIterator |
| QList::iterator |
QMutableListIterator |
QStringList类基本等同于QList
示例代码:
student.h
#ifndef STUDENT_H
#define STUDENT_H
//引入头文件
#include<QString>

class Student
{
public:
    Student(QString,int,QString);

    QString getName() const;
    void setName(const QString &value);


    int getAge() const;
    void setAge(int value);


    QString getMajor() const;
    void setMajor(const QString &value);

private:
    QString name;
    int age;
    QString major;
};

#endif // STUDENT_H
student.cpp
#include "student.h"

Student::Student(QString name,int age,QString major)
    :name(name),age(age)
{
    this->major=major;
}

QString Student::getName() const
{
    return name;
}

void Student::setName(const QString &value)
{
    name = value;
}

int Student::getAge() const
{
    return age;
}

void Student::setAge(int value)
{
    age = value;
}

QString Student::getMajor() const
{
    return major;
}

void Student::setMajor(const QString &value)
{
    major = value;
}
dialog.h
#ifndef DIALOG_H
#define DIALOG_H

#include <QDialog>
//头文件
#include<QList>
#include"student.h"
#include<QDebug>

class Dialog : public QDialog
{
    Q_OBJECT

public:
    Dialog(QWidget *parent = 0);
    ~Dialog();
};

#endif // DIALOG_H
dialog.cpp
#include "dialog.h"

Dialog::Dialog(QWidget *parent)
    : QDialog(parent)
{
    //创建一个QList对象
    QList<Student> stu;
    Student s1("张三",18,"计算机应用技术");
    Student s2("李四",20,"电子信息工程");
    Student s3("王五",21,"计算机科学与技术");
    Student s4("赵六",19,"电子工程技术");
    Student s5("玛丽",23,"计算机应用技术");
    Student s6("杰克",24,"计算机科学与技术");

    //增加元素
    stu.push_back(s1);//向后追加
    stu.append(s2); //向后追加
    stu.push_front(s3);//向前追加
    stu<< s1<<s2<<s3;//连续追加
    //在第二个位置插入元素
    //参数1:位置
    //参数2:元素值
    stu.insert(1,s4);

    //删除元素
    stu.pop_back();//删除最后一个元素 -->removeLast()
    stu.pop_front();//删除第一个元素 -->removeFirst()
    stu.removeAt(3);//删除第n个元素
    //int QList::removeAll(const T & value) 删除所有相同元素
    //bool QList::removeOne(const T & value) 删除第一个相同的元素

    //更新元素
    stu[1]=s5;
    //参数1:元素位置
    //参数2:更新的位置
    stu.replace(2,s6);


    for(int i=0;i<stu.count();i++)
    {
        Student s=stu.at(i);//更高效
        qDebug()<<s.getName()<<s.getAge()<<s.getMajor();
    }

    qDebug()<<"---------C++ STL迭代器-------------";
    //
    for(QList<Student>::const_iterator it=stu.begin();
        it!=stu.end();it++)
    {
        Student s=*it;
        qDebug()<<s.getName()<<s.getAge()<<s.getMajor();
    }

     qDebug()<<"---------Java迭代器----------------";
     //Java迭代器构造函数,参数为容器对象
     QListIterator<Student> it(stu);
     while(it.hasNext())//判断后续有无有效元素
     {
         //向后移动并取出
         Student s=it.next();
         qDebug()<<s.getName()<<s.getAge()<<s.getMajor();
     }

}

Dialog::~Dialog()
{

}
运行结果:

2.2 关联容器 QMap
关联容器的元素是以键值对的方式存在的,键表示数据的名称(通常使用字符串类型),值表示数据的本身(支持任何类型)。可以通过键来找到对应的值,关联容器是没有顺序的。
QMap除了支持C++的迭代器以外,还支持Java的迭代器,对应关系如下。
| C++迭代器 |
等效的Java迭代器 |
| QMap::const_iterator |
QMapIterator |
| QMap::iterator |
QMutableMapIterator |
示例代码:
dialog.h
#ifndef DIALOG_H
#define DIALOG_H

#include <QDialog>
#include<QDebug>
#include<QMap>
class Dialog : public QDialog
{
    Q_OBJECT

public:
    Dialog(QWidget *parent = 0);
    ~Dialog();
};

#endif // DIALOG_H
dialog.cpp
#include "dialog.h"

Dialog::Dialog(QWidget *parent)
    : QDialog(parent)
{
    QMap<QString,int> map;
    map["身高"]=180;
    map["年龄"]=18;
    map["体重"]=97;
    map["性别"]=1;
    //参数1:键
    //参数2:值
    map.insert("体重",90);//重新赋值

    //删除元素
    //参数:键
    //返回值:删除的键值对数量 返回0失败
    qDebug()<<map.remove("性别");//1
    qDebug()<<map.remove("性别");//0

    if(!map.contains("身高"))
        //修改
        map["身高"]=165;
    else
        qDebug()<<"身高键值对已存在,无法修改!";

    if(map.contains("身高"))
        //取出
        qDebug()<<map["身高"];//不存在返回0
    //参数1:键
    //参数2:如果取不到的默认值 自设默认值为-1
    qDebug()<<map.value("体重2",-1);

    qDebug()<<"------支持直接输出-----------";
    qDebug()<<map;

    qDebug()<<"-------C++ STL迭代器 -----------";
    for(QMap<QString,int>::iterator iter=map.begin();
        iter!=map.end();iter++)
    {
        //输出键值对
        qDebug()<<iter.key()<<iter.value();
    }
     qDebug()<<"--------- Java迭代器 -----------";
    QMutableMapIterator<QString,int> iter(map);
    while(iter.hasNext())
    {
        iter.next();// 向后移动迭代器指针
         //输出键值对
        qDebug()<<iter.key()<<iter.value();
    }
}

Dialog::~Dialog()
{

}
运行结果:

3. Qt类型(熟悉)
3.1 跨平台数据类型
C++中的数据类型可能会受到不同平台的影响,导致数据长度不同。Qt为了达到跨平台特性,规定了等效的跨平台类型,可以使这些类型不受到平台的影响。

3.2 QVariant 统一数据类型
QVariant类支持常用的Qt类型进行构造,也支持转换为这些数据类型。
构造函数 to开头的成员函数
4. QDateTime 日期时间类(熟悉)
QDateTime类是两个类的合并:QDate和QTime,可以处理日期和时间。
常用函数如下:
// 返回一个基于1970年1月1日00:00:00到现在的毫秒数(格林威治时间)
qint64 QDateTime::currentMSecsSinceEpoch() [static]
// 返回一个包含基于当前时区、当前日期和时间的QDateTime对象
QDateTime QDateTime::currentDateTime() [static]
// 返回一个制定格式的日期和时间
// 参数为日期和时间的格式,可参考文档
QString QDateTime::toString(const QString & format) const
dialog.h
#ifndef DIALOG_H
#define DIALOG_H

#include <QDialog>
//头文件
#include<QDebug>
#include<QDateTime>

namespace Ui {
class Dialog;
}

class Dialog : public QDialog
{
    Q_OBJECT

public:
    explicit Dialog(QWidget *parent = 0);
    ~Dialog();

private:
    Ui::Dialog *ui;
};

#endif // DIALOG_H
dialog.cpp
#include "dialog.h"
#include "ui_dialog.h"

Dialog::Dialog(QWidget *parent) :
    QDialog(parent),
    ui(new Ui::Dialog)
{

    ui->setupUi(this);
    qint64 time=QDateTime::currentMSecsSinceEpoch();
    qDebug()<<time;
    //把time作为种子生成随机数
    qsrand(time);
    qDebug()<<"0到200的随机数:"<<qrand()%201;

    QDateTime dt=QDateTime::currentDateTime();
    //输出格式为:年-月-日 时:分:秒
    QString dtText=dt.toString("yyyy-MM-dd hh:mm:ss");
    qDebug()<<dtText;
}

Dialog::~Dialog()
{
    delete ui;
}
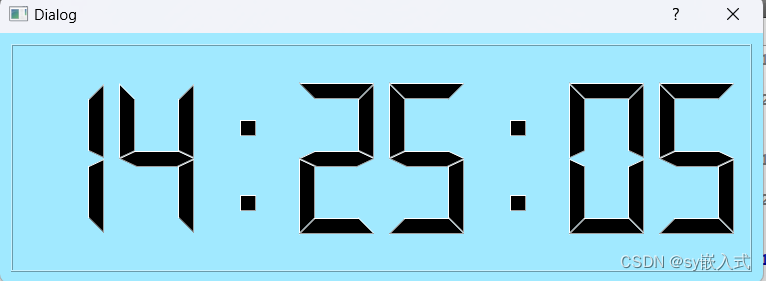
运行结果:

5. QTimer 定时器类(掌握)
QTimer类提供了一次性和周期性两种定时器模式。
QTimer的常用属性有:
// 定时器是否在运行
active : const bool
// 是否一次性
singleShot : bool
// 间隔时间,单位毫秒
interval : int
常用函数如下:
// 启动定时器
// 如果定时器正在运行,此函数会停止其运行,并重新运行
void QTimer::start() [slot]
// 停止定时器
void QTimer::stop() [slot]// 触发时发射的信号
void QTimer::timeout() [signal]示例代码:
dialog.ui

dialog.h
#ifndef DIALOG_H
#define DIALOG_H

#include <QDialog>
//头文件
#include<QTimer>
#include<QDateTime>

namespace Ui {
class Dialog;
}

class Dialog : public QDialog
{
    Q_OBJECT

public:
    explicit Dialog(QWidget *parent = 0);
    ~Dialog();

private:
    Ui::Dialog *ui;
    QTimer * timer;//创建手动管理的堆内存定时对象
private slots:
    //与timeout信号连接
    void timeoutSlot();
};

#endif // DIALOG_H
dialog.cpp
#include "dialog.h"
#include "ui_dialog.h"

Dialog::Dialog(QWidget *parent) :
    QDialog(parent),
    ui(new Ui::Dialog)
{
    ui->setupUi(this);
    timeoutSlot();

    //创建定时器对象
    timer=new QTimer(this);
    //设置间隔时间
    timer->setInterval(1000);
    //设置为周期性 true代表单次
    timer->setSingleShot(false);//是否为一次性 false代表周期性
    connect(timer,SIGNAL(timeout()),this,SLOT(timeoutSlot()));
    //启动定时器
    timer->start();

}
//到点更新显示
void Dialog::timeoutSlot()
{
  //获取当前时间
  QString time=QDateTime::currentDateTime().toString("hh:mm:ss");
  // QLcdNumber设置显示void	display(const QString & s)
  ui->lcdNumber->display(time);

}

Dialog::~Dialog()
{
    if(timer->isActive())
        timer->stop();
    delete timer;
    delete ui;
}
运行结果: