记录:422
场景:在Spring Boot微服务上,应用knife4j发布后端API接口,辅助开发与调试。
版本:JDK 1.8,Spring Boot 2.6.3,knife4j-3.0.3,springfox-swagger2-3.0.0。
Knife4j: 是一个集Swagger2 和 OpenAPI3为一体的增强解决方案
1.在pom.xml引入依赖
1.1直接引入knife4j
<dependency>
  <groupId>com.github.xiaoymin</groupId>
  <artifactId>knife4j-spring-boot-starter</artifactId>
  <version>3.0.3</version>
</dependency>1.2间接引入springfox-swagger2等包
在引入knife4j后,相关联的io.swagger、io.springfox等一序列依赖会被引入。
2.配置application.yml
2.1在yml中指定路径匹配策略
spring:
  mvc:
    pathmatch:
      matching-strategy: ant_path_matcher
2.2指定路径匹配策略原因

Spring MVC的path有两种:ANT_PATH_MATCHER和PATH_PATTERN_PARSER。
Spring Boot微服务默认使用PATH_PATTERN_PARSER。
当Spring Boot 2.6.3和knife4j-3.0.3以及springfox-swagger2-3.0.0集成时,使用默认的PATH_PATTERN_PARSER启动报错。
2.3不指定路径匹配策略报错
报错信息:
org.springframework.context.ApplicationContextException: Failed to start bean 'documentationPluginsBootstrapper'; nested exception is java.lang.NullPointerException
解决方式:
在yml中指定Spring MVC的path策略为:ant_path_matcher。
3.基于注解配置Swagger2
3.1配置类
@Configuration
@EnableSwagger2
public class SwaggerConfig {
  @Bean("docketApi")
  public Docket docketApi() {
    return new Docket(DocumentationType.SWAGGER_2)
      .apiInfo(apiInfo())
      .select()
      .apis(RequestHandlerSelectors.basePackage("com.hub.example"))
      .paths(PathSelectors.any())
      .build();
  }
  private ApiInfo apiInfo() {
    return new ApiInfoBuilder()
      .title("hub-example-206微服务API文档")
      .description("微服务API文档")
      .version("1.1.1")
      .license("Apache License")
      .licenseUrl("http://www.apache.org/licenses/")
      .contact(new Contact("beiZhen"
              , "https://blog.csdn.net/zhangbeizhen18"
              , "[email protected]"))
      .build();
  }
}
3.2解析
@EnableSwagger2,标记开启Swagger2相关功能。
Docket类,springfox.documentation.spring.web.plugins.Docket,在此类是Swagger提供给使用者的配置类,可以按需配置个性化功能。
4.在实体类中使用Swagger2注解
4.1注解@ApiModel和@ApiModelProperty
@ApiModel:作用在实体类上。
@ApiModelProperty:作用在实体类属性上。
4.2示例
(1)CityReqDTO
@Data
@ApiModel("城市请求对象")
public class CityReqDTO {
  @ApiModelProperty(value = "城市ID",
          required = true)
  private Long cityId;
  @ApiModelProperty("城市名称")
  private String cityName;
}
(2)CityResDTO
@Data
@Builder
@ApiModel("城市请求对象")
public class CityResDTO implements Serializable {
  @ApiModelProperty(value = "城市ID",
          required = true)
  private Long cityId;
  @ApiModelProperty("城市名称")
  private String cityName;
  @ApiModelProperty("城市面积")
  private Double landArea;
  @ApiModelProperty("城市人口")
  private Long population;
  @ApiModelProperty("城市GDP")
  private Double gross;
  @ApiModelProperty("城市描述")
  private String cityDescribe;
  @ApiModelProperty("数据年份")
  private String dataYear;
  @JsonFormat(
          pattern = "yyyy-MM-dd HH:mm:ss"
  )
  @ApiModelProperty("操作时间")
  private Date updateTime;
}
(3)ResultObj
@Data
@ApiModel("统一响应结果对象")
public class ResultObj<T> implements Serializable {
  @ApiModelProperty(value = "编码",
          required = true,
          example = "200: 成功,400: 失败")
  private int code;
  @ApiModelProperty("成功失败标志")
  private boolean success;
  @ApiModelProperty("成功失败信息")
  private String msg;
  @ApiModelProperty("业务数据")
  private T data;

  private ResultObj(int code, T data, String msg) {
      this.code = code;
      this.data = data;
      this.msg = msg;
      this.success = code == 200;
  }

  public static <T> ResultObj<T> data(int code, T data, String msg) {
      return new ResultObj<>(code, data, msg);
  }
}
4.3解析
在使用@ApiModel、@ApiModelProperty等注解后,可以清晰展现每个实体类业务意义、实体类属性业务意义。一目了然,可以不用再写注解。
5.在Controller类中使用Swagger2注解
5.1注解@Api和@ApiOperation
@Api:作用在Controller类上。
@ApiOperation:作用在Controller类的方法上。
5.2示例
@RestController
@RequestMapping("/hub/example/city")
@Slf4j
@Api(tags = "城市信息获取服务")
public class CityController {
  @ApiOperation(value = "使用城市编码获取信息接口",
      notes = "使用城市编码获取信息"
  )
  @GetMapping("/queryByCityId")
  public ResultObj<CityResDTO> queryByCityId(String cityId) {
    CityResDTO cityResDTO = CityResDTO.builder()
        .cityId(Long.parseLong(cityId)).cityName("杭州")
        .landArea(16850D).population(1238L)
        .gross(1.88D).cityDescribe("杭州是一个互联网城市")
        .dataYear("2022").updateTime(new Date())
        .build();
    log.info("接收参数: "+cityId);
    log.info("返回数据: "+cityResDTO.toString());
    return ResultObj.data(200, cityResDTO, "执行成功");
  }

  @ApiOperation(value = "使用城市编码和名称获取信息接口",
      notes = "使用城市编码和城市名称获取信息"
  )
  @PostMapping("/queryByCity")
  public ResultObj<CityResDTO> queryByCity(@RequestBody CityReqDTO cityReqDTO) {
    CityResDTO cityResDTO = CityResDTO.builder()
      .cityId(cityReqDTO.getCityId())
      .cityName(cityReqDTO.getCityName())
      .landArea(8657.32D).population(1291L)
      .gross(2.4D).cityDescribe("苏州是一个工业城市")
      .dataYear("2022").updateTime(new Date())
      .build();
    log.info("接收参数: "+cityReqDTO.toString());
    log.info("返回数据: "+cityResDTO.toString());
    return ResultObj.data(200, cityResDTO, "执行成功");
  }
  @ApiOperation(value = "使用城市名称获取信息接口",
      notes = "使用城市名称获取信息",
      extensions = {@Extension(
          name = "扩展参数",
          properties = {@ExtensionProperty(name = "cityCode", value = "330100"),
                  @ExtensionProperty(name = "dataFrequency", value = "RealTime")
          })}
  )
  @GetMapping("/queryByCityName")
  public ResultObj<CityResDTO> queryByCityName(String cityName) {
    // 1.从请求头获取城市编码
    RequestAttributes reqAttributes = RequestContextHolder.currentRequestAttributes();
    HttpServletRequest request = ((ServletRequestAttributes) reqAttributes).getRequest();
    String cityCode = request.getHeader("cityCode");
    // 2.组装返回参数
    CityResDTO cityResDTO = CityResDTO.builder()
            .cityId(Long.parseLong(cityCode)).cityName(cityName)
            .landArea(16850D).population(1238L)
            .gross(1.88D).cityDescribe("杭州是一个互联网城市")
            .dataYear("2022").updateTime(new Date())
            .build();
    log.info("接收参数: "+cityName);
    log.info("请求头cityCode = : "+cityCode);
    log.info("返回数据: "+cityResDTO.toString());
    return ResultObj.data(200, cityResDTO, "执行成功");
  }
}
5.3解析
在使用@Api和@ApiOperation等注解后,可以清晰展现每个Controller类业务意义、Controller类发布的Restful方法的业务意义。一目了然,可以不用再写注解。
6.在浏览器中查看Swagger2发布的API接口信息
6.1登录地址
(1)默认地址
地址:http://127.0.0.1:18080/doc.html
解析:根据实际组装IP和端口。
(2)本例地址
本例地址:http://127.0.0.1:18206/hub-example-206/doc.html
页面发布的jar包:knife4j-spring-ui-3.0.3.jar,
页面位置:\META-INF\resources\doc.html。
6.2API接口首页
在页面中可以看到微服务发布的Restful接口信息概览。
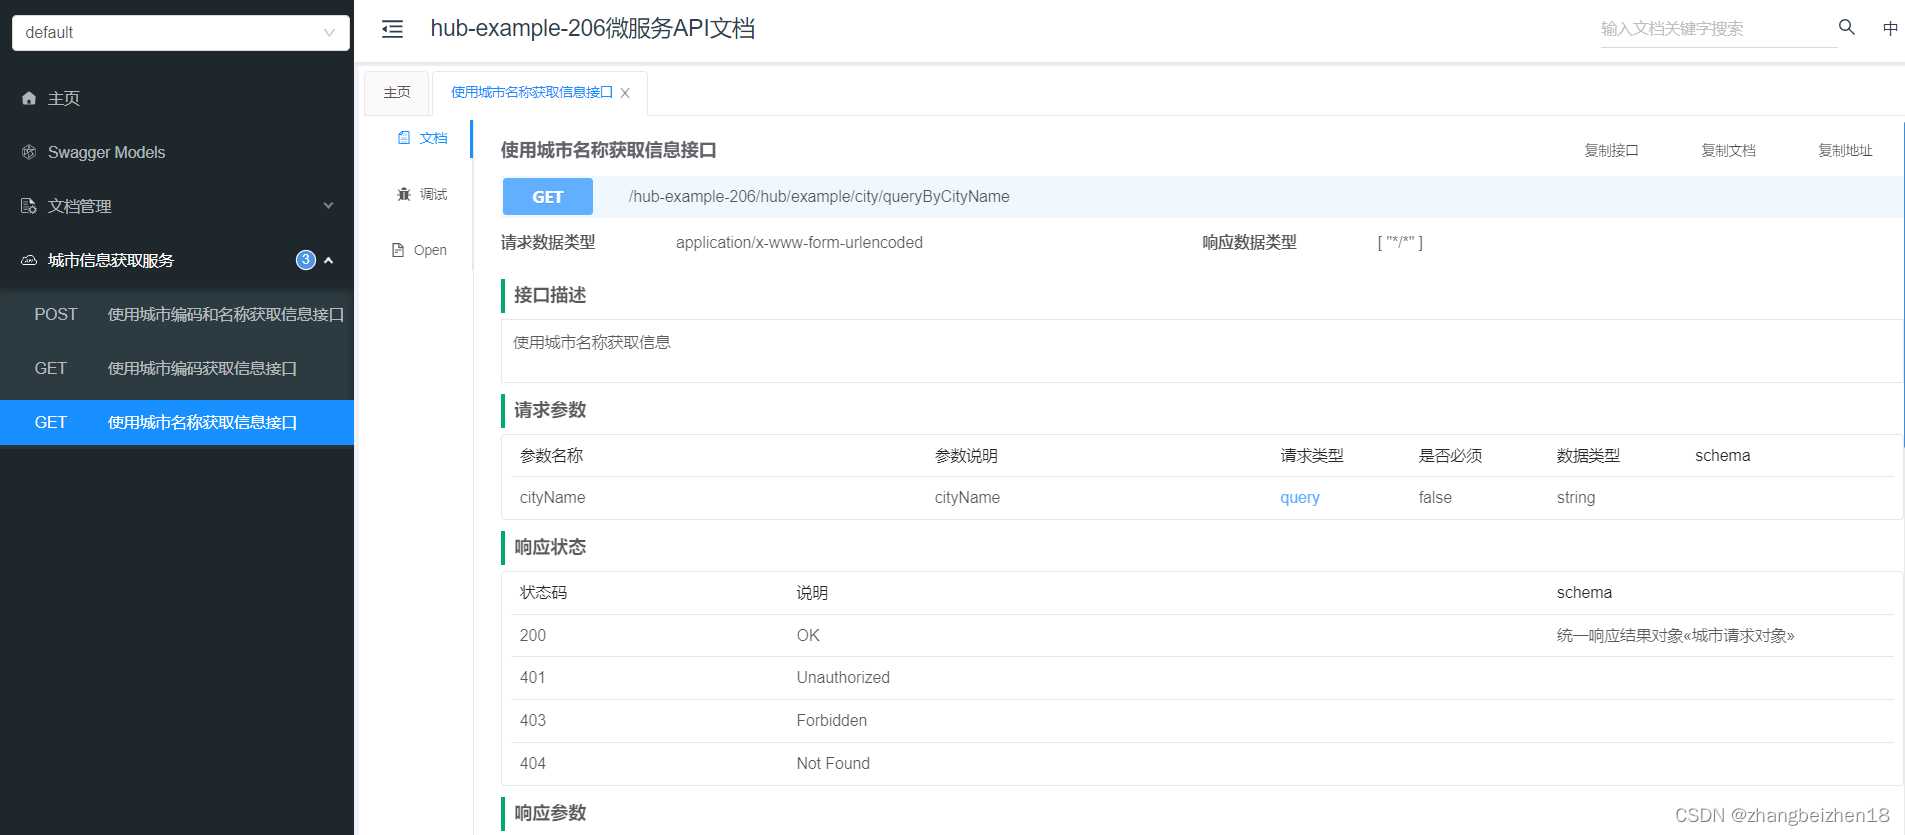
6.3接口信息
选择其中一个接口,能看到接口文档、调试、Open功能列表。
7.使用knife4j的API接口调试后端接口
7.1设置knife4j的API接口支持传递请求头
设置knife4j的API接口支持传递请求头。
选择:文档管理->个性化设置->开启动态请求参数。
注意:默认没有开启,即默认不支持设置请求头部。

7.2调试GET请求
选择接口:使用城市名称获取信息接口。
在接口页面,选择:调试。
(1)设置请求头部

(2)设置请求参数
根据参数列表设置请求参数。

(3)发起请求
点击:发送,发起请求,调用后端微服务。
可以看到后端返回值信息。

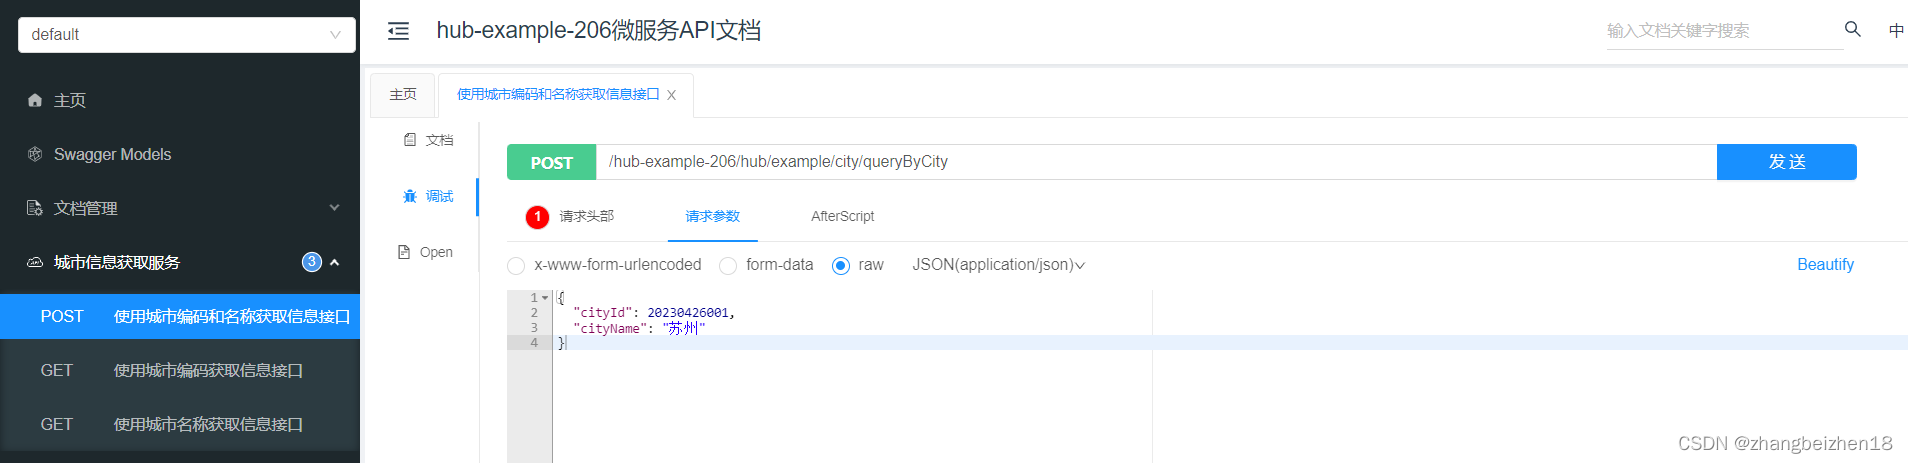
7.3调试POST请求
选择接口:使用城市编码和名称获取信息接口。
在接口页面,选择:调试。
(1)设置请求头部

(2)设置请求参数
根据参数列表设置请求参数。
(3)发起请求
点击:发送,发起请求,调用后端微服务。
可以看到后端返回值信息。

以上,感谢。
2023年4月26日