简述
- 前后端分离架构的主要意义在于前后端解耦、独立部署,有利于各自的可扩展性、高可用性。
- 前后端分离的常见部署方式是使用nginx部署前端项目,java后端用java系服务器或者用集大成的SpringBoot框架,前端访问接口时,通过nginx代理访问后端服务接口获取数据
- 前后端分离也有一些不是完全分离的部署模式,比如Thymeleaf模板引擎等
- 本文将以上述两种部署模式做示例
部署方案
本文以部署单个后端服务为例(单机模式),分布式架构请见
1、linux + nginx + React + SpringBoot2.x
架构图
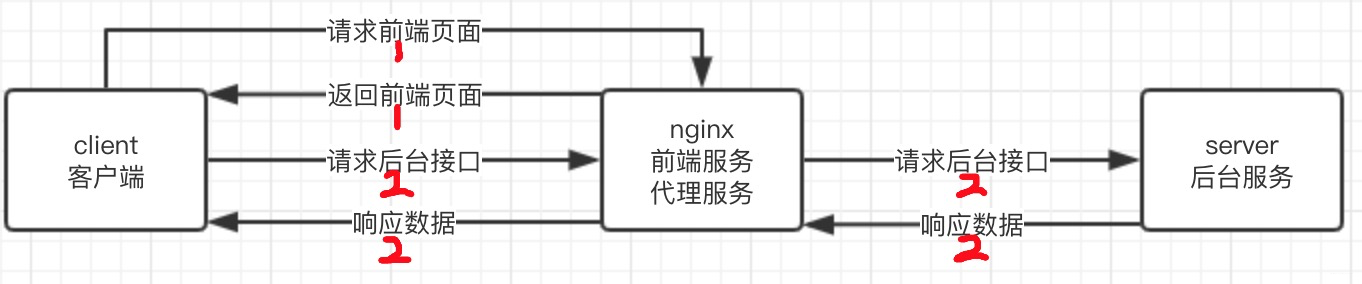
流程说明
- 1、客户端通过请求nginx前端项目路径获取页面
- 2、页面请求接口至nginx,nginx根据路由去请求后台服务获取数据,然后返回数据给页面
环境说明
- linux系统CentOs7.x
- nginx1.16.0
- 后端:SpringBoot2.x
- 前端:react开发 webpack打包(单页面应用)
部署步骤
1、安装nginx
安装nginx依赖插件
#安装必要依赖插件
yum install -y gcc gcc-c++ pcre \
pcre-devel zlib zlib-devel openssl openssl-devel wget
下载nginx
cd /usr/local
mkdir install-file && cd install-file
wget https://nginx.org/download/nginx-1.16.0.tar.gz
解压并安装
tar zxvf nginx-1.16.0.tar.gz
cd nginx-1.16.0
./configure --prefix=/usr/local/nginx
make && make install
添加全局命令
ln -s /usr/local/nginx/sbin/nginx /usr/bin/nginx
查看版本号,验证安装成功
nginx -V
启动nginx
nginx
查看nginx进程
ps -ef|grep nginx
配置nginx服务开机自启
systemctl enable nginx
安装完毕 ,配置文件在:

vim /usr/local/nginx/conf/nginx.conf
nginx基本命令
#启动nginx
nginx
#此方式相当于先查出nginx进程id再使用kill命令强制杀掉进程。
nginx -s stop
#此方式停止步骤是待nginx进程处理任务完毕进行停止。
nginx -s quit
#重启nginx
nginx -s reload
隐藏版本号
nginx的版本号默认是打开的,可以在默认的错误页面和http响应头中查看到。不同版本,特别是低版本的nginx可能存在漏洞,所以如果不希望被别人获取到版本号的话,可以选择进行版本号隐藏。**
nginx.conf文件的server_tokens修改成off
cd /usr/local/nginx/conf
vim nginx.conf
#修改配置文件
http {


...
server_tokens off;
...
}
再修改fastcgi.conf
vim fastcgi.conf
修改如下行
fastcgi_param SERVER_SOFTWARE nginx/$nginx_version;
改为:
fastcgi_param SERVER_SOFTWARE nginx;
隐藏版本号完毕
2、部署前端项目
前端项目打包上传至服务器以下目录
mkdir /usr/local/front
文件内容

复制一份nginx.conf到目录apps
cd /usr/local/nginx/conf/
mkdir apps
cp nginx.conf /apps/front.conf
修改nginx配置文件
vim /usr/local/nginx/conf/nginx.conf
修改内容:使用include apps/*.conf;将前端项目配置文件front.conf引入
    # Load modular configuration files from the /etc/nginx/conf.d directory.
    # See http://nginx.org/en/docs/ngx_core_module.html#include
    # for more information.
    include apps/*.conf;
修改front.conf
vim /usr/local/nginx/conf/apps/front.conf
修改内容
server {


    listen       8888;
    location /   {


        root   /usr/local/front;
        index  index.html index.htm;
    }
    }
重启nginx
nginx -s reload
浏览器输入地址,访问项目:http://127.0.0.1:8888/
3、部署后端项目
使用maven插件将SpringBoot项目build为jar包
cd /项目根目录
#maven构建jar命令
mvn -U clean package -Dmaven.test.skip=true
将jar包上传至服务器目录下:/usr/local/back
cd /usr/local/ && mkdir back
cd back && ls
xxxxxx.jar
启动jar, 以端口为9000为例
nohup java -Xms256m -Xmx512m -jar xxx.jar >/dev/null 2>&1 &
echo $! > /usr/local/back/xxx\.PID
修改front.conf, /api为前端访问后台接口统一前缀(例:http://127.0.0.1:8888/api/后端接口url),用来匹配路由
server {


    listen       8888;
    location /   {


        root   /usr/local/front;
        index  index.html index.htm;
    }
    location /api   {


        proxy_pass http://127.0.0.1:9000/;
        proxy_set_header Host $host:$server_port;
        proxy_set_header X-Forwarded-For $remote_addr;
    }
 }
重启nginx
nginx -s reload
访问项目,http://127.0.0.1:8888/,浏览器抓包查看请求接口
部署完成
2、linux + React + oss + SpringBoot2.x + Thymeleaf
架构图
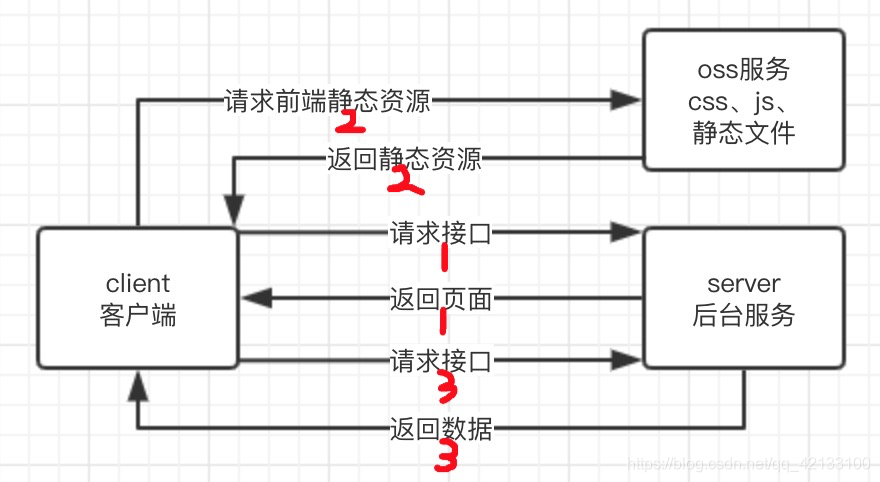
流程说明
- 1、客户端通过请求后端服务接口获取页面
- 2、返回页面后请求oss静态资源
- 3、页面请求后台接口获取数据,然后返回数据给页面
环境说明
- linux CentOs7.x
- 后端 SpringBoot2.x + Thymeleaf
- 前端React Webpack打包 (单页面应用)
部署步骤
1、前端部署
- 1、前端将build之后的css、js以及静态文件上传至oss
- 2、将文件路径通知后端
2、部署后端
创建一个SpringBoot项目,引入thymeleaf依赖
        <dependency>
            <groupId>org.springframework.boot</groupId>
            <artifactId>spring-boot-starter-thymeleaf</artifactId>
        </dependency>
SpringBoot配置文件添加配置:
spring:
  thymeleaf:
    cache: false
    prefix: classpath:/templates/
    check-template-location: true
    suffix: html
    encoding: UTF-8
    content-type: text/html
    mode: HTML5
提供一个接口返回前端静态页面
import org.springframework.beans.factory.annotation.Autowired;
import org.springframework.core.env.Environment;
import org.springframework.stereotype.Controller;
import org.springframework.web.bind.annotation.RequestMapping;
import org.springframework.web.servlet.ModelAndView;

import java.util.HashMap;
import java.util.Map;

/**
 * @author feiyang
 */
@Controller
@RequestMapping("/")
public class IndexController {


    @Autowired
    private Environment environment;

    @RequestMapping({

    ""})
    public ModelAndView index() {


        //前端版本或者分支
        String frontVersion = environment.getProperty("frontversion", "daily/1.0.0");
        //前端build之后的css及js文件的oss根路径
        String prefix = environment.getProperty("prefix", "feiyang-fe.oss-cn-beijing.aliyuncs.com/demo-front");
        Map<String, String> versionMsg = new HashMap<String, String>();
        //将前端分支以及目录信息通过modelAndView传至页面,页面根据key取得变量
        versionMsg.put("frontVersion", frontVersion);
        versionMsg.put("prefix", prefix);
        //index为静态文件名,不带后缀。
        //modelAndView将会找到index.html,然后返回给前端
        ModelAndView modelAndView = new ModelAndView("index");
        modelAndView.addAllObjects(versionMsg);
        return modelAndView;
    }
}
创建index.html
<!doctype html>
<html lang="en">
<head>
    <title>demo</title>
    <meta charset="utf-8">
    <meta name="viewport" content="width=device-width,initial-scale=1,shrink-to-fit=no">
    <meta name="theme-color" content="#000000">
    <!--引入css文件,${prefix}、{frontVersion}从后台传入-->
    <link th:href="|https://${prefix}/${frontVersion}/main.css|" rel="stylesheet">
</head>
<body>
<!--引入js文件,${prefix}、{frontVersion}从后台传入-->
    <script type="text/javascript" th:src="|https://${prefix}/${frontVersion}/main.js|"></script>
</body>
</html>
部署完成
总结
前后端分离架构下的部署模式会有多种,但万变不离其宗,所以重在掌握原理