Ubuntu18.0.4+2080Ti+CUDA9.0+TesorFlow1.10.0+Keras2.1.6
一.Ubuntu18.0.4
1.制作ubuntu 18.04 U盘启动盘:
可参考链接:https://blog.csdn.net/yaoyut/article/details/78003061
2.设置U盘启动
重启,进入boot,一般是Delete键,选择你的那个U盘启动系统
之后步骤可参考链接:https://jingyan.baidu.com/article/3c343ff7d596480d3779630f.html
二.2080Ti显卡驱动
1.手动下载新驱动:到Nvidia官网里下载(https://www.geforce.com/drivers),根据自己的显卡配置选择,例如我这边是2080Ti显卡驱动,台式机

2.安装驱动之前要删除可能存在的已有驱动
sudo apt-get purge nvidia-*
3.禁用系统默认显卡驱动
打开系统黑名单:sudo gedit /etc/modprobe.d/blacklist.conf
将下列代码填入文件末尾:
blacklist amd76x_edac
blacklist rivafb
blacklist vga16fb
blacklist nouveau
blacklist nvidiafb
blacklist rivatv
保存,然后更新内核:
sudo update-initramfs -u
重启电脑:sudo reboot
查看是否禁用成功,无输出则禁用成功:
lsmod | grep nouveau

4.安装gcc和make
sudo apt install gcc
sudo apt install make
5.运行显卡驱动安装包
sudo chmod +x NVIDIA-Linux-x86_64-418.56.run
sudo ./NVIDIA-Linux-x86_64-418.56.run --no-x-check
更新内核:sudo update-initramfs -u
重启电脑:sudo reboot
6.运行nvidia-smi,出现如下图则成功
三.CUDA9.0与cudnn7.4安装
1)CUDA9.0安装
[根据要装的TensorFlow版本来确定CUDA版本,可以去TensorFlow官网查看各版本对应的CUDA版本与cudnn]
1.下载CUDA9.0安装包
各CUDA版本链接:https://developer.nvidia.com/cuda-toolkit-archive
2.由于CUDA9.0只支持gcc-6.0以下版本,所以需要先对gcc和g++降级
可以使用gcc -v和g++ -v查看gcc和g++的版本
降级命令:sudo apt install gcc-6 sudo apt install g++-6
3.然后:
chmod +x cuda_9.0.176_384.81_linux.run
sudo ./cuda_9.0.176_384.81_linux.run --override
按q滑到最后,输入accept,其中第二个安装Nvidia驱动[因为已经安装了],其余选择yes,按回车
4.修改环境变量:sudo gedit ~/.bashrc
在文件末尾输入:
export PATH=/usr/local/cuda-9.0/bin:$PATH
export LD_LIBRARY_PATH=/usr/local/cuda-9.0/lib64:$LD_LIBRARY_PATH
保存文件后,重启电脑sudo reboot
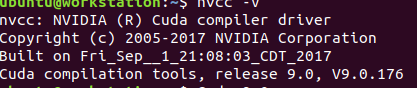
至此在终端输入nvcc -V检查cuda9.0是否安装成功,如图:
2)cudnn7.4安装
1.下载cudnn7.4安装包,链接:https://developer.nvidia.com/rdp/cudnn-archive
需要注册账号,选择

下载tar格式的压缩包,不要选择其他格式

不然解压会失败
2.解压cudnn压缩包,解压命令:tar -xzvf cudnn-9.0-linux-x64-v7.4.1.5.tgz,然后copy解压文件到cuda目录,命令如下:
sudo cp cuda/include/cudnn.h /usr/local/cuda/include/
sudo cp cuda/lib64/libcudnn* /usr/local/cuda/lib64/
sudo chmod a+r /usr/local/cuda/include/cudnn.h /usr/local/cuda/lib64/libcudnn*
至此cuDNN安装完成。
检测一下cuda版本,命令如下:
cat /usr/local/cuda/version.txt
四.TesorFlow-gpu1.10.0和Keras2.1.6安装
1)安装Miniconda3
wget https://repo.continuum.io/miniconda/Miniconda3-latest-Linux-x86_64.sh
bash Miniconda3-latest-Linux-x86_64.sh
2)创建TesorFlow-gpu环境
source activate tensorflow_gpu
conda install -c anaconda tensorflow-gpu==1.10.0
测试
命令:
python

import tensorflow as tf
hello = tf.constant('Hello there!')
sess=tf.Session()
print(sess.run(hello))
结果如图:


图中,会显示显卡型号,显存,而且上面的那个文件夹时gpu文件夹
3)安装 Keras2.1.6
命令:
conda install -c conda-forge keras=2.1.6
测试
代码
import numpy as np
np.random.seed(1337)#for reproducibility
from  keras.datasets import  mnist
from keras.utils import  np_utils
from keras.models import Sequential
from  keras.layers import Dense,Activation
from keras.optimizers import RMSprop

#download the mnist to the path '-/.keras/datasets/' if it is the first time to be called
#X shape(60,000 28x28),y shape(10,000,)
(X_train,y_train),(X_test,y_test)=mnist.load_data()

#data pre-processing
X_train=X_train.reshape(X_train.shape[0],-1)/255 # normalize
X_test=X_test.reshape(X_test.shape[0],-1)/255 # normalize
y_train=np_utils.to_categorical(y_train,num_classes=10)
y_test=np_utils.to_categorical(y_test,num_classes=10)

#Another way to build your neural net
model=Sequential([
    Dense(32,input_dim=784),#传入784,传出来的只有32
    Activation('relu'),
    Dense(10),#传出来的只有10个单位,不用再定义input
    Activation('softmax')
])
#Another way to define your optimizer
rmsprop=RMSprop(lr=0.001,rho=0.9,epsilon=1e-08,decay=0.0)

#We add metrics to get more results you want see
model.compile(
    optimizer=rmsprop,
    loss='categorical_crossentropy',
    metrics=['accuracy'],
)

print('Training -------------')
#Another way to train the model
model.fit(X_train,y_train,epochs=10,batch_size=60000)

print('\nTesting -------------')
#Evaluate the model with the metrics we defined earlier
loss,accuracy=model.evaluate(X_test,y_test)

print('test loss',loss)
print('test accuracy',accuracy)
运行结果如图
