ubuntu搭建xl2tpd服务器
服务端配置
先安装xl2tpd和ppp组件
sudo apt-get install xl2tpd ppp
服务端 /etc/xl2tpd/xl2tpd.conf
[global]
ipsec saref = no
debug tunnel = yes
debug avp = yes
debug network = yes
debug state = yes
access control = no
port = 1701
auth file = /etc/ppp/chap-secrets
[lns default]
ip range = 10.0.0.2-10.0.0.10
local ip = 10.0.0.1
require chap = yes
refuse pap = yes
require authentication = yes
ppp debug = yes
pppoptfile = /etc/ppp/options.xl2tpd
length bit = yes
服务端 /etc/ppp/options.xl2tpd
lock
noauth
dump
logfd 2
mtu 1400
mru 1400
ms-dns 10.0.0.1
lcp-echo-failure 12
lcp-echo-interval 5
require-mschap-v2
nomppe
服务端 /etc/ppp/chap-secrets
# Secrets for authentication using CHAP
# client	server	secret			IP addresses
axk1 * axk *
按行添加格式如下
用户名 * 密码 *
启动服务端
配置完成后
开启ip转发
echo 1 > /proc/sys/net/ipv4/ip_forward
或者
sysctl -w net.ipv4.ip_forward=1
sudo service xl2tpd restart
或者
xl2tpd -D>xl2tpd.log 直接启动也可以 -D之后可以生成log到xl2tpd.log
linux l2tp客户端配置
linux 配置xl2tpd客户端,也是需要xl2tpd ppp两个组件
客户端配置
客户端 /etc/xl2tpd/xl2tpd.conf 其中lac testvpn配置中的ins是l2tp服务器的wan地址
[global]
port = 1701
access control = no
ipsec saref = no

[lac testvpn]
name = axk1
lns = 192.168.204.130
pppoptfile = /etc/ppp/options.xl2tpd
ppp debug = yes
客户端 /etc/ppp/options.xl2tpd
remotename 配置后面是xl2tpd.conf的 lac后的名字
user 后面跟用户名 password 后面跟密码 对应服务端/etc/ppp/chap-secrets 文件配置
remotename testvpn
user "axk1"
password "axk"
unit 0
lock
nodeflate
nobsdcomp
noauth
persist
nopcomp
noaccomp
maxfail 5
debug
然后执行启动客户端 xl2tpd
也可以自定义配置文件 myxl2tpd.conf, 使用xl2tpd -c myxl2tpd.conf运行
运行成功并不代表已经连接
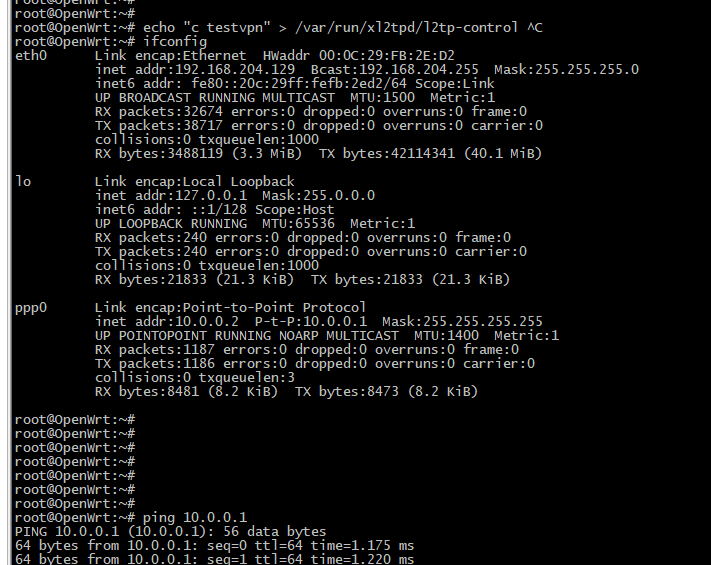
echo “c testvpn” >/var/run/xl2tpd/l2tp-control 连接
echo “d testvpn” >/var/run/xl2tpd/l2tp-control 断开连接
运行成功截图