目录
- 前言
- 矩形
- 椭圆
- 线
- 环
- 最后
前言
在没有UI设计师的时候, 或者是想简单看下效果的时候, 用shape进行快速绘制是极好的!
一共有四种shape:
- rectangle
- oval
- line
- ring
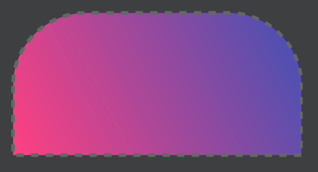
矩形
我们一个一个来看, 首先是矩形:
<?xml version="1.0" encoding="utf-8"?>
<shape xmlns:android="http://schemas.android.com/apk/res/android"
    android:shape="rectangle">

    <!-- 尺寸 -->
    <size
        android:width="160dp"
        android:height="80dp" />

    <!-- 颜色 -->
    <!--<solid android:color="@color/colorPrimary" />-->

    <!-- 内间距 -->
    <padding
        android:bottom="8dp"
        android:left="8dp"
        android:right="8dp"
        android:top="8dp" />

    <!-- 渐变 -->
    <gradient
        android:angle="45"
        android:endColor="@color/colorPrimary"
        android:startColor="@color/colorAccent"
        android:type="linear" />

    <!-- 圆角 -->
    <!--<corners android:radius="200dp" />-->

    <!-- 圆角单独设置 -->
    <corners
        android:bottomLeftRadius="0dp"
        android:bottomRightRadius="0dp"
        android:topLeftRadius="40dp"
        android:topRightRadius="40dp" />

    <!-- 描边 -->
    <stroke
        android:width="2dp"
        android:color="#666"
        android:dashGap="4dp"
        android:dashWidth="4dp" />
</shape>
- 渐变gradient是会覆盖颜色的, 如果你想要纯色, 直接设置颜色值即可, 就是设置solid中的color.
- 顺带一提, solid只有color一个参数.
- 如果你没有渐变gradient, 也不写solid, 那么将会是空心的.
渐变gradient的type参数有3个:
- linear 线性渐变
- sweep 扫描渐变
- radial 放射渐变, 需要配合参数gradientRadius
圆角corners可以直接设置radius, 也可以一个一个指定.
- 描边stroke的话不写dashGap, dashWidth就会是实线, dashWidth代表虚线宽度, dashGap代表虚线间隔.
- 内间距padding和尺寸size就不提了, 大家都懂的.
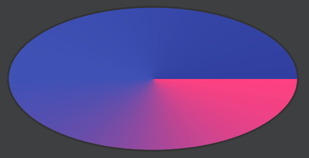
椭圆
然后是椭圆:
<?xml version="1.0" encoding="utf-8"?>
<shape xmlns:android="http://schemas.android.com/apk/res/android"
    android:shape="oval">

    <!-- 尺寸 -->
    <size
        android:width="160dp"
        android:height="80dp" />

    <!-- 颜色 -->
    <!--<solid android:color="@color/colorPrimary" />-->

    <!-- 内间距 -->
    <padding
        android:bottom="8dp"
        android:left="8dp"
        android:right="8dp"
        android:top="8dp" />

    <!-- 渐变 -->
    <gradient
        android:centerColor="@color/colorPrimary"
        android:endColor="@color/colorPrimaryDark"
        android:startColor="@color/colorAccent"
        android:type="sweep" />

    <!-- 描边 -->
    <stroke
        android:width="1dp"
        android:color="#333" />
</shape>
渐变是最多可以设置三种颜色:
- startColor, centerColor, endColor
一般椭圆都会用来绘制实心的小圆点.
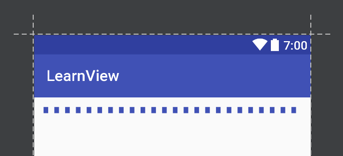
线
线就很简单了:
<?xml version="1.0" encoding="utf-8"?>
<shape xmlns:android="http://schemas.android.com/apk/res/android"
android:shape="line">
<!-- 描边 -->
<stroke
android:width="8dp"
android:color="@color/colorPrimary"
android:dashGap="8dp"
android:dashWidth="6dp" />
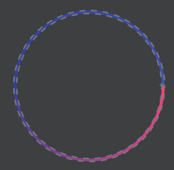
</shape>环
最后来看环, 它有些特有属性:
<?xml version="1.0" encoding="utf-8"?>
<shape xmlns:android="http://schemas.android.com/apk/res/android"
    android:innerRadiusRatio="4"
    android:shape="ring"
    android:thicknessRatio="100"
    android:useLevel="false">

    <!-- 尺寸 -->
    <size
        android:width="200dp"
        android:height="200dp" />

    <!-- 渐变 -->
    <gradient
        android:angle="0"
        android:centerColor="@color/colorPrimaryDark"
        android:endColor="@color/colorPrimary"
        android:startColor="@color/colorAccent"
        android:type="sweep" />

    <!-- 描边 -->
    <stroke
        android:width="1dp"
        android:color="#777"
        android:dashGap="4dp"
        android:dashWidth="4dp" />
</shape>thicknessRatio指的是环厚度百分比, 默认是9, 比如说这里宽度是200dp, thicknessRatio是100, 环厚度就是200dp / 100 = 2dp. 当然, 你可以直接用thickness设置厚度.
innerRadiusRatio是内环百分比, 默认是3, 就是指用宽度 / 百分比得到的值就是内环半径. 同样可以用innerRadius直接设置.
最后
这样一来很多简单图形都可以直接画出来了, 是不是方便多了.