上回说到字符设备驱动程序的注册与销毁register_chrdev()和unregister_chrdev()这是有缺陷的。
现在用另外一个更好的方法代替,我们先来看看register_chrdev()实际上是调用了
__register_chrdev(major, 0, 256, name, fops);
static inline int register_chrdev(unsigned int major, const char *name,const struct file_operations *fops){return __register_chrdev(major, 0, 256, name, fops);}
这个256其实就是申请的次设备号个数。
还记得怎么创建设备节点吗,无论是手动创建还是自动创建都是用主设备号加上次设备号,一个驱动程序可以有很多不同的设备节点。
一个驱动程序有自己对应的file_operations结构体,A驱动对应A_fop结构体,用register_chrdev()后,A驱动的256个设备节点都对应A_fop结构体。
用另外一种方法,可以指定次设备号个数,举例:
用register_chrdev()后,A驱动主设备号254,B驱动主设备号就不能用254,不然就冲突了。
而另外一种方法,A驱动主设备号254,次设备号申请0-2,3个,B驱动主设备号仍然可以用254,次设备号只要不用0-3就行,主设备号相同也不会产生冲突。
实际上另外一种方法就是把register_chrdev()展开:
1.分配主次设备号
#define LED_MAJOR 0#define DEVICE_NUM 1static int major = LED_MAJOR;static int __init myled_init(void){int ret;dev_t devno = MKDEV (major,0);if (major)ret = register_chrdev_region(devno, DEVICE_NUM, "myled");else {ret = alloc_chrdev_region(&devno, 0, DEVICE_NUM, "myled") ;major = MAJOR(devno);}
dev_t devno定义了完整设备号, 为 32 位, 其中 12 位为主设备号, 20 位为次设备号。
使用如下宏可以从 dev_t 获得主设备号和次设备号:
MAJOR (dev_t dev)
MINOR (dev_t dev)
使用如下宏从主、次设备号获得完整的设备号
MKDEV (major,minor)
register_chrdev_region()函数用于已知起始设备的设备号的情况, 而alloc_chrdev_region() 用于设备号未知, 向系统动态申请未被占用的设备号的情况,可以自动避开设备号重复的冲突。
DEVICE_NUM为我们要申请的次设备号个数,这里设置了1个。
2.初始化 cdev 结构体
在 Linux 内核中, 使用 cdev 结构体描述一个字符设备, cdev 结构体的定义如下:
struct cdev {struct kobject kobj; /* 内嵌的 kobject */struct module *owner; /* 所属模块 */struct file_operations *ops; /* 文件操作结构体 */struct list_head list;dev_t dev; /* 设备号 */unsigned int count;};
cdev 结构体里有一个重要成员 file_operations 定义了字符设备驱动提供给虚拟文件系统的接口函数。
绑定file_operations结构体在cdev结构体初始化中完成
为了精简就写个什么都没有的open函数。
static int led_open (struct inode *node, struct file *filp){return 0;}static struct file_operations myled_oprs = {.owner = THIS_MODULE,.open = led_open,};static int __init myled_init(void){int ret;dev_t devno = MKDEV (major,0);if (major)ret = register_chrdev_region(devno, DEVICE_NUM, "myled");else {ret = alloc_chrdev_region(&devno, 0, DEVICE_NUM, "myled") ;major = MAJOR(devno);}cdev_init(&cdev_myled, &myled_oprs);//初始化......}
3.添加驱动
很简单,就是在初始化后加一句
cdev_add (&cdev_myled, devno, DEVICE_NUM);4.删除驱动和设备号
在驱动出口使用
cdev_del(&cdev_myled);unregister_chrdev_region(MKDEV (major, 0), DEVICE_NUM);
5.完整测试
自动创建设备节点的方式是一样的,我们只申请一个次设备号0,但是用次设备号0和1,创建两个设备节点myled0,myled1。
然后写一个简单的应用程序,功能只是打开设备节点,如果是一个myled0能打开,myled1打不开即正常。
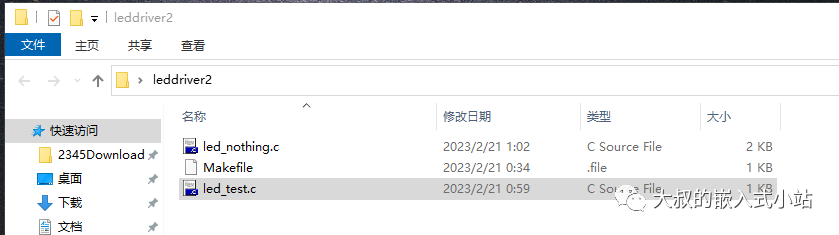
驱动:
#include <linux/module.h>#include <linux/kernel.h>#include <linux/fs.h>#include <linux/init.h>#include <linux/delay.h>#include <linux/uaccess.h>#include <asm/irq.h>#include <asm/io.h>#include <linux/cdev.h>#include <linux/device.h>#define LED_MAJOR 0#define DEVICE_NUM 1static int major = LED_MAJOR;static struct class *led_class;static struct cdev cdev_myled;static int led_open (struct inode *node, struct file *filp){return 0;}static struct file_operations myled_oprs = {.owner = THIS_MODULE,.open = led_open,};static int __init myled_init(void){int ret;dev_t devno = MKDEV (major,0);if (major)ret = register_chrdev_region(devno, DEVICE_NUM, "myled");else {ret = alloc_chrdev_region(&devno, 0, DEVICE_NUM, "myled") ;major = MAJOR(devno);}cdev_init(&cdev_myled, &myled_oprs);cdev_add (&cdev_myled, devno, DEVICE_NUM);led_class = class_create(THIS_MODULE, "myled");device_create(led_class, NULL, MKDEV(major, 0),NULL,"myled0");device_create(led_class, NULL, MKDEV(major, 1),NULL,"myled1");return 0;}static void __exit myled_exit(void){cdev_del(&cdev_myled);unregister_chrdev_region(MKDEV (major, 0), DEVICE_NUM);device_destroy(led_class, MKDEV(major, 0));device_destroy(led_class, MKDEV(major, 1));class_destroy(led_class);}module_init(myled_init);module_exit(myled_exit);MODULE_LICENSE("GPL");
应用:
#include <sys/types.h>#include <sys/stat.h>#include <fcntl.h>#include <stdio.h>int main(int argc,char **argv){int fd;if(argc != 2) {printf("usage:%s num",argv[0]);return 0;}fd = open(argv[1],O_RDWR);if(fd < 0) {printf("can't open!\n");} elseprintf("can open\n");return 0;}
makefile:
KERN_DIR = /usr/src/linux-headers-4.8.0-36-genericall:make -C $(KERN_DIR) M=`pwd` modulesgcc -o led_test led_test.cclean:make -C $(KERN_DIR) M=`pwd` modules cleanrm -rf modules.orderrm -f led_nothingobj-m += led_nothing.o
文件传入linux系统,make命令编译,insmod命令加载驱动:
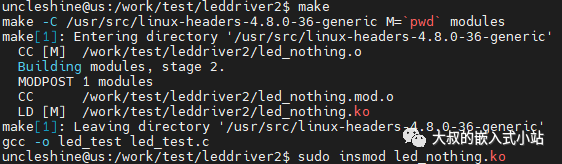
结果:

测试成功
6.测试2
两个驱动用同一个主设备号,看看系统能不能识别
如下代码,第一个主设备号由系统自动分配后,第二个主设备号就用和第一个一样的,两个驱动对应不同的open函数,分别生成两个设备,对应设备成功打开时,用printk输出信息。
如果打开不同节点时,输出信息不同,说明成功。
应用程序和上文完全相同
#include <linux/module.h>#include <linux/kernel.h>#include <linux/fs.h>#include <linux/init.h>#include <linux/delay.h>#include <linux/uaccess.h>#include <asm/irq.h>#include <asm/io.h>#include <linux/cdev.h>#include <linux/device.h>#define LED_MAJOR 0#define DEVICE_NUM 2static int major = LED_MAJOR;static struct class *led_class;static struct cdev cdev_myled;static struct cdev cdev_myled2;static int led_open (struct inode *node, struct file *filp){printk("myled0/1 open\n");return 0;}static struct file_operations myled_oprs = {.owner = THIS_MODULE,.open = led_open,};static int led_open2 (struct inode *node, struct file *filp){printk("myled2/3 open\n");return 0;}static struct file_operations myled_oprs2 = {.owner = THIS_MODULE,.open = led_open2,};static int __init myled_init(void){int ret;dev_t devno = MKDEV (major,0);if (major)ret = register_chrdev_region(devno, DEVICE_NUM, "myled");else {ret = alloc_chrdev_region(&devno, 0, DEVICE_NUM, "myled") ;major = MAJOR(devno);}cdev_init(&cdev_myled, &myled_oprs);cdev_add (&cdev_myled, devno, DEVICE_NUM);register_chrdev_region(MKDEV (major,2), DEVICE_NUM, "myled2");cdev_init(&cdev_myled2, &myled_oprs2);cdev_add (&cdev_myled2, MKDEV (major,2), DEVICE_NUM);led_class = class_create(THIS_MODULE, "myled");device_create(led_class, NULL, MKDEV(major, 0),NULL,"myled0");device_create(led_class, NULL, MKDEV(major, 1),NULL,"myled1");device_create(led_class, NULL, MKDEV(major, 2),NULL,"myled2");device_create(led_class, NULL, MKDEV(major, 3),NULL,"myled3");return 0;}static void __exit myled_exit(void){cdev_del(&cdev_myled);unregister_chrdev_region(MKDEV (major, 0), DEVICE_NUM);device_destroy(led_class, MKDEV(major, 0));device_destroy(led_class, MKDEV(major, 1));cdev_del(&cdev_myled2);unregister_chrdev_region(MKDEV (major, 2), DEVICE_NUM);device_destroy(led_class, MKDEV(major, 2));device_destroy(led_class, MKDEV(major, 3));class_destroy(led_class);}module_init(myled_init);module_exit(myled_exit);MODULE_LICENSE("GPL");
编译后insmod装载驱动,cat /proc/devices查看一下
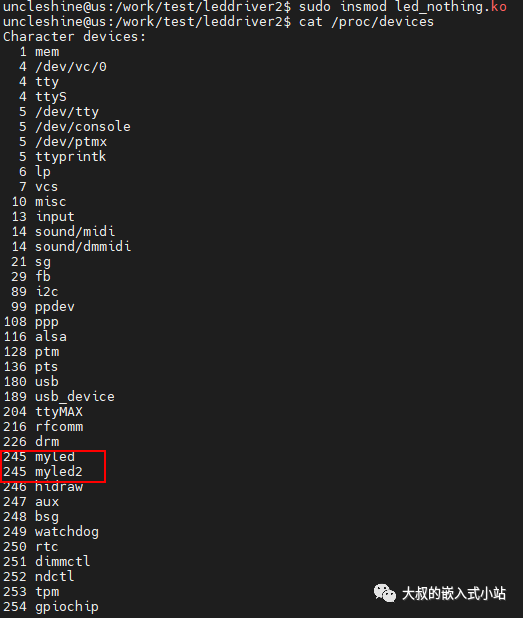
两个主设备号相同的驱动程序出现了
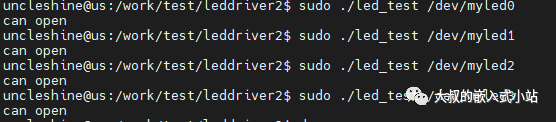
四个设备节点也都打开成功,用dmseg命令查看内核打印信息
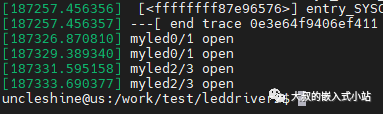
成功。可见cdev方法虽然多了几步,但是更加灵活。在今后的讲解中为了精简代码,还是用register_chrdev()。
更多内容与参考资料:大叔的嵌入式小站:
嵌入式linux驱动学习-3.用cdev代替register_chrrdev