目录
4.2.3 NamedParameterJdbcTemplate
4.3.7 MybatisAutoConfiguration
第四章 访问数据库
Spring Boot框架为SQL数据库提供了广泛的支持,既有用JdbcTemplate直接访问JDBC,同时支持“object relational mapping”技术(如Hibernate,MyBatis)。Spring Data独立的项目提供对多种关系型和非关系型数据库的访问支持。比如 MySQL, Oracle , MongoDB , Redis, R2DBC,Apache Solr,Elasticsearch...
Spring Boot也支持嵌入式数据库比如H2, HSQL, and Derby。这些数据库只需要提供jar包就能在内存中维护数据。我们这章访问关系型数据库。
4.1 DataSource
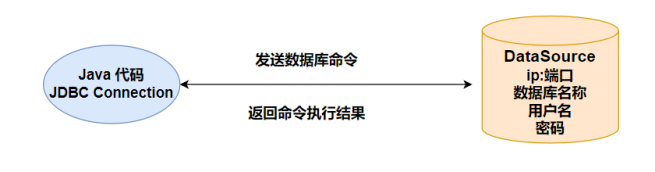
通常项目中使用MySQL,Oracle,PostgreSQL等大型关系数据库。Java中的jdbc技术支持了多种关系型数据库的访问。在代码中访问数据库,我们需要知道数据库程序所在的ip,端口,访问数据库的用户名和密码以及数据库的类型信息。以上信息用来初始化数据源,数据源也就是DataSource。数据源表示数据的来源,从某个ip上的数据库能够获取数据。javax.sql.DataSource接口表示数据源,提供了标准的方法获取与数据库绑定的连接对象(Connection)。
javax.sql.Connection是连接对象,在Connection上能够从程序代码发送查询命令,更新数据的语句给数据库;同时从Connection获取命令的执行结果。Connection很重要,像一个电话线把应用程序和数据库连接起来。
DataSource在application配置文件中以spring.datasource.*作为配置项。类似下面的代码:
spring.datasource.url=jdbc:mysql://localhost/mydb
spring.datasource.username=dbuser
spring.datasource.password=dbpass
DataSourceProperties.java是数据源的配置类,更多配置参考这个类的属性。
@ConfigurationProperties(prefix = "spring.datasource")
public class DataSourceProperties implements BeanClassLoaderAware, InitializingBean {
}
Spring Boot能够从spring.datasource.url推断所使用的数据驱动类,如果需要特殊指定请设置spring.datasource.driver-class-name为驱动类的全限定名称。
Spring Boot支持多种数据库连接池,优先使用 HikariCP,其次是Tomcat pooling,再次是 Commons DBCP2,如果以上都没有,最后会使用Oracle UCP连接池。当项目中starter依赖了spring-boot-starter-jdbc 或者spring-boot-starter-data-jpa默认添加HikariCP连接池依赖,也就是默认使用HikariCP连接池。
4.2 轻量的JdbcTemplate
使用JdbcTemplate我们提供自定义SQL, Spring执行这些SQL得到记录结果集。JdbcTemplate和NamedParameterJdbcTemplate类是自动配置的,您可以@Autowire注入到自己的Bean中。开箱即用。
JdbcTemplate执行完整的SQL语句,我们将SQL语句拼接好,交给JdbcTemplate执行,JdbcTemplate底层就是使用JDBC执行SQL语句。是JDBC的封装类而已。
NamedParameterJdbcTemplate可以在SQL语句部分使用“:命名参数”作为占位符, 对参数命名,可读性更好。NamedParameterJdbcTemplate包装了JdbcTemplate对象,“:命名参数”解析后,交给JdbcTemplate执行SQL语句。
JdbcTemplateAutoConfiguration自动配置了JdbcTemplate对象,交给JdbcTemplateConfiguration创建了JdbcTemplate对象。并对JdbcTemplate做了简单的初始设置(QueryTimeout,maxRows等)。
4.2.1 准备环境
访问数据库先准备数据库的script。SpringBoot能够自动执行DDL,DML脚本。两个脚本文件名称默认是schema.sql和data.sql。脚本文件在类路径中自动加载。
自动执行脚本还涉及到spring.sql.init.mode配置项:
- always:总是执行数据库初始化脚本
- never:禁用数据库初始化
更进一步
Spring Boot处理特定的数据库类型,为特定的数据库定制script文件。首先设置spring.sql.init.platform=hsqldb、h2、oracle、mysql、postgresql等等,其次准备 schema-${platform}. sql 、 data-${platform}. sql 脚本文件。
4.2.1.1 准备数据库和表脚本
首先创建数据库,安装MySQL8.5。有可用的MySQL数据库就可以,最好是5以上版本。
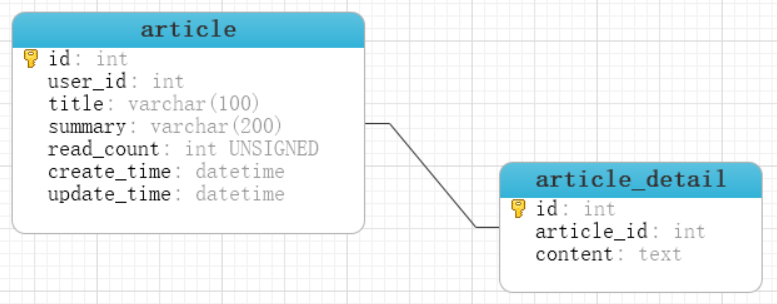
数据库名称Blog , 表目前使用一个 article(文章表),初始两条数据。
schema.sql
CREATE TABLE `article` (
  `id` int(11) NOT NULL AUTO_INCREMENT COMMENT '主键',
  `user_id` int(11) NOT NULL COMMENT '作者ID',
  `title` varchar(100) NOT NULL COMMENT '文章标题',
  `summary` varchar(200) DEFAULT NULL COMMENT '文章概要',
  `read_count` int(11) unsigned zerofill NOT NULL COMMENT '阅读读数',
  `create_time` datetime NOT NULL COMMENT '创建时间',
  `update_time` datetime NOT NULL COMMENT '最后修改时间',
  PRIMARY KEY (`id`)) ENGINE=InnoDB AUTO_INCREMENT=1 DEFAULT CHARSET=utf8mb4;
data.sql
INSERT INTO `article` VALUES ('1','2101','SpringBoot核心注解',
'核心注解的主要作用','00000008976','2023-01-16 12:11:12','2023-01-16 12:11:19');
INSERT INTO `article` VALUES ('2','356752','JVM调优',
'HotSpot虚拟机详解','00000000026','2023-01-16 12:15:27','2023-01-16 12:15:30');
4.2.1.2 创建Spring Boot工程
新建Spring Boot工程Lession09-JdbcTemplate
构建工具:Maven
包名:com.bjpowernode.jdbc
JDK:19
Starter依赖:Lombok,MySQL Driver, JDBC API
Maven依赖(pom.xml)
<dependency>
  <groupId>org.springframework.boot</groupId>
  <artifactId>spring-boot-starter-jdbc</artifactId>
</dependency>

<dependency>
  <groupId>com.mysql</groupId>
  <artifactId>mysql-connector-j</artifactId>
  <scope>runtime</scope>
</dependency>

<dependency>
  <groupId>org.projectlombok</groupId>
  <artifactId>lombok</artifactId>
  <optional>true</optional>
</dependency>

<dependency>
   <groupId>org.springframework.boot</groupId>
   <artifactId>spring-boot-starter-test</artifactId>
   <scope>test</scope>
</dependency>
IDEA Maven Tool查看依赖列表

依赖包含了连接池com.zaxxer:HikariCP:5.0.1 , spring-jdbc 6.0.3 , mysql驱动mysql-connector-j 8.0.31。
4.2.2 JdbcTemplate访问MySQL
项目中依赖了spring-jdbc 6.0.3,JdbcTemplate对象会自动创建好。把JdbcTemplate对象注入给你的Bean,再调用JdbcTemplate的方法执行查询,更新,删除的SQL。
JdbcTemplate上手快,功能非常强大。提供了丰富、实用的方法,归纳起来主要有以下几种类型的方法:
- execute方法:可以用于执行任何SQL语句,常用来执行DDL语句。
- update、batchUpdate方法:用于执行新增、修改与删除等语句。
- query和queryForXXX方法:用于执行查询相关的语句。
- call方法:用于执行数据库存储过程和函数相关的语句。
我们在2.2.1.2已经创建了Spring Boot工程,在工程上继续添加代码,完成对Blog库,article表的CRUD。
step1:将schema.sql , data.sql拷贝到resources目录

step2:修改application.properties
spring.datasource.driver-class-name=com.mysql.cj.jdbc.Driver
spring.datasource.url=jdbc:mysql://localhost:3306/blog?serverTimezone=Asia/Shanghai&useUnicode=true&characterEncoding=utf8&autoReconnect=true&useSSL=false

spring.datasource.username=root
spring.datasource.password=123456
#总是执行数据库脚本,以后设置为never
spring.sql.init.mode=always
step3: 创建实体类 ArticlePO
@Data
@NoArgsConstructor
@AllArgsConstructor
public class ArticlePO {
  private Integer id;
  private Integer userId;
  private String title;
  private String summary;
  private Integer readCount;
  private LocalDateTime createTime;
  private LocalDateTime updateTime;
}
Lomok注解给类的属性生成set,get方法。 默认和所有参数构造方法
step4: 单元测试,注入JdbcTemplate对象
@SpringBootTest
public class TestJdbcTemplate {
  @Resource
   private JdbcTemplate jdbcTemplate;
}
测试聚合函数
@Test
void testCount() {
    String sql="select count(*) as ct from article";
    Long count = jdbcTemplate.queryForObject(sql, Long.class);
System.out.println("文章总数 = " + count);
}
测试“?”占位符
@Test
void testQuery() {
    // ?作为占位符
    String sql = "select * from article where id= ? ";
    //BeanPropertyRowMapper 将查询结果集,列名与属性名称匹配, 名称完全匹配或驼峰
    ArticlePO article = jdbcTemplate.queryForObject(sql,
        new BeanPropertyRowMapper<>(ArticlePO.class), 1 );
System.out.println("查询到的文章 = " + article);
}
测试自定义RowMapper
@Test
void testQueryRowMapper() {
  //只能查询出一个记录,查询不出记录抛出异常
    String sql = "select * from article where id= " + 1;
    ArticlePO article = jdbcTemplate.queryForObject(sql, (rs, rownum) -> {
      var id = rs.getInt("id");
      var userId = rs.getInt("user_id");
      var title = rs.getString("title");
      var summary = rs.getString("summary");
      var readCount = rs.getInt("read_count");
      var createTime = new Timestamp(rs.getTimestamp("create_time").getTime())
.toLocalDateTime();
      var updateTime = new Timestamp(rs.getTimestamp("update_time").getTime())
.toLocalDateTime();
      return new ArticlePO(id, userId, title, summary, readCount,
                          createTime, updateTime);
});
System.out.println("查询的文章 = " + article);
}
测试List集合
@Test
void testList() {
    String sql="select * from article  order by id ";
    List<Map<String, Object>> listMap = jdbcTemplate.queryForList(sql);
    listMap.forEach( el->{
        el.forEach( (field,value)->{
System.out.println("字段名称:"+field+",列值:"+value);
});
        System.out.println("===================================");
});
}
测试更新记录
@Test
void testUpdate() {
    String sql="update article set title = ? where id= ? ";
    //参数是从左往右 第一个,第二个...
int updated = jdbcTemplate.update(sql, "Java核心技术思想", 2);
System.out.println("更新记录:"+updated);
}
4.2.3 NamedParameterJdbcTemplate
NamedParameterJdbcTemplate能够接受命名的参数,通过具名的参数提供代码的可读性,JdbcTemplate使用的是参数索引的方式。
在使用模板的位置注入NamedParameterJdbcTemplate对象,编写SQL语句,在SQL中WHERE部分“:命名参数”。调用NamedParameterJdbcTemplate的诸如query,queryForObject, execute,update等时,将参数封装到Map中。
step1:注入模板对象
@Resource
private JdbcTemplate jdbcTemplate;
step2: 使用命名参数
@Test
void testNameQuery() {
    // :参数名
    String sql="select count(*) as ct from article where user_id=:uid and read_count > :num";

//key是命名参数
    Map<String,Object> param = new HashMap<>();
    param.put("uid", 2101);
    param.put("num", 0);
    Long count = nameJdbcTemplate.queryForObject(sql, param, Long.class);
    System.out.println("用户被阅读的文章数量 = " + count);
}
4.2.4 多表查询
多表查询关注是查询结果如何映射为Java Object。常用两种方案:一种是将查询结果转为Map。列名是key,列值是value,这种方式比较通用,适合查询任何表。第二种是根据查询结果中包含的列,创建相对的实体类。属性和查询结果的列对应。将查询结果自定义RowMapper、ResultSetExtractor映射为实体类对象。
现在创建新的表article_detail,存储文章内容,与article表是一对一关系。
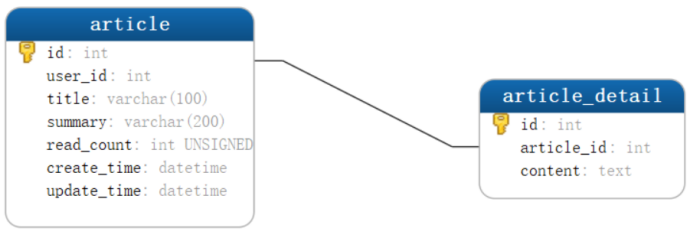
article_detail表
CREATE TABLE `article_detail` (
  `id` int(11) NOT NULL AUTO_INCREMENT COMMENT '注解',
  `article_id` int(11) NOT NULL COMMENT '文章ID',
  `content` text NOT NULL COMMENT '文章内容',
  PRIMARY KEY (`id`))
ENGINE=InnoDB AUTO_INCREMENT=1 DEFAULT CHARSET=utf8mb4;
需求:查询某个文章的全部属性,包括文章内容
step1:创建新的实体类ArticleMainPO, 将ArticlePO作为成员变量
@Data
@NoArgsConstructor
@AllArgsConstructor
public class ArticleMainPO {
  private Integer id;
  private Integer userId;
  private String title;
  private String summary;
  private Integer readCount;
  private LocalDateTime createTime;
  private LocalDateTime updateTime;
  private ArticleDetailPO articleDetail;
}
step2: 查询一对一文章
@Test
void testArticleContent() {
   String sql= """
       select m.*,d.id as detail_id, d.article_id,d.content
        from article m join article_detail d
        on  m.id = d.article_id
        where m.id=:id
        """;
    Map<String,Object> param = new HashMap<>();
    param.put("id", 1);

    List<ArticleMainPO> list = nameJdbcTemplate.query(sql, param, (rs, rowNum) -> {
      var id = rs.getInt("id");
      var userId = rs.getInt("user_id");
      var title = rs.getString("title");
      var summary = rs.getString("summary");
      var readCount = rs.getInt("read_count");
      var createTime = new Timestamp(rs.getTimestamp("create_time").getTime())
.toLocalDateTime();
      var updateTime = new Timestamp(rs.getTimestamp("update_time").getTime())
.toLocalDateTime();

      //文章详情
      var detailId = rs.getInt("detail_id");
      var content = rs.getString("content");
      var articleId = rs.getInt("article_id");

      ArticleDetailPO detail = new ArticleDetailPO();
      detail.setId(detailId);
      detail.setArticleId(articleId);
      detail.setContent(content);

     return new ArticleMainPO(id, userId, title, summary, readCount,
                             createTime, updateTime, detail);
    });

    list.forEach(m -> {
      System.out.println("m.getId() = " + m.getId());
      System.out.println("m.getArticleDetail() = " + m.getArticleDetail());
    });

}
总结:
JdbcTemplate的优点简单,灵活,上手快,访问多种数据库。对数据的处理控制能力比较强,RowMapper, ResultSetExtractor能够提供按需要灵活定制记录集与实体类的关系。
缺点:对SQL要求高,适合对SQL比较了解,自定义查询结果比较多,调优需求的。 JdbcTemplate对象的调整参数,比较少。可设置spring.jdbc.template.开头的配置项目,比如设置超时为10秒,spring.jdbc.template.query-timeout=10。
4.3 MyBatis
数据库访问MyBatis,MyBatis-Plus国内很常用,掌握了MyBatis,MyBatis-Plus就会了大部分了。MyBatis-Plus附加的功能需要单独学习。我们以MyBatis来自介绍Spring Boot集成ORM框架。
MyBatis使用最多的是mapper xml文件编写SQL语句。本章使用MyBatis的注解,JDK新特性文本块,以及Record完成java对象和表数据的处理。
4.3.1 单表CRUD
首先向blog数据库的article表添加新的文章,以及修改,查询文章。在新工程Lession10-MyBatis集成MyBatis框架。项目包名com.bjpowernode.orm。依赖需要mysql驱动、mybatis依赖,Lombok。
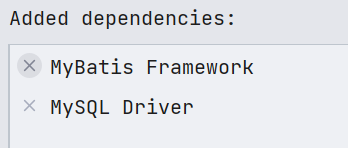
step1: Maven依赖
<dependencies>
 <dependency>
 <groupId>org.mybatis.spring.boot</groupId>
  <artifactId>mybatis-spring-boot-starter</artifactId>
  <version>3.0.0</version>
 </dependency>

 <dependency>
  <groupId>com.mysql</groupId>
  <artifactId>mysql-connector-j</artifactId>
  <scope>runtime</scope>
 </dependency>

 <dependency>
  <groupId>org.projectlombok</groupId>
  <artifactId>lombok</artifactId>
  <optional>true</optional>
 </dependency>

 <dependency>
  <groupId>org.springframework.boot</groupId>
  <artifactId>spring-boot-starter-test</artifactId>
 <scope>test</scope>
 </dependency>
</dependencies>
step2:创建实体类
//PO:Persistent Object
@Data
public class ArticlePO {
  private Integer id;
  private Integer userId;
  private String title;
  private String summary;
  private Integer readCount;
  private LocalDateTime createTime;
  private LocalDateTime updateTime;
}
step3: 创建Mapper接口
public interface ArticleMapper {

  String field_list="id,user_id,title,summary,read_count,create_time,update_time";

  @Insert("""
      insert into article(user_id,title,summary,read_count,create_time,update_time) \
      values(#{userId},#{title},#{summary},#{readCount},#{createTime},#{updateTime})
      """)
  int insertArticle(ArticlePO article);

  @Update("""
      update article set read_count=#{num} where id=#{id}
      """)
  int updateReadCount(Integer id,Integer num);

  @Delete("""
      delete from article where id=#{id}
      """)
  int deleteById(Integer id);

  @Select("select " + field_list + " from article where id=#{articleId}")
  @Results({
      @Result(id = true,column = "id",property = "id"),
      @Result(column = "user_id",property = "userId"),
      @Result(column = "read_count",property = "readCount"),
      @Result(column = "create_time",property = "createTime"),
      @Result(column = "update_time",property = "updateTime"),
  })
  ArticlePO selectById(@Param("articleId") Integer id);

}
@Results部分为结果映射(XML中的<ResultMap>), 或者用MyBatis的驼峰命名也能实现默认的映射关系。
application.properties
#驼峰,下划线命名
mybatis.configuration.map-underscore-to-camel-case=true
step4: 启动类加入扫描注解
@MapperScan({"com.bjpowernode.orm.repository"})
@SpringBootApplication
public class Lession10MyBatisApplication {

 public static void main(String[] args) {
  SpringApplication.run(Lession10MyBatisApplication.class, args);
 }
}
@MapperScan是扫描注解,参数是Mapper接口所在的包名。参数是数组,可以指定多个包位置。
step5: 配置数据源
application.properties或yml都可以
spring.datasource.driver-class-name=com.mysql.cj.jdbc.Driver
spring.datasource.url=jdbc:mysql://localhost:3306/blog?serverTimezone=Asia/Shanghai&useUnicode=true&characterEncoding=utf8&autoReconnect=true&useSSL=false
spring.datasource.username=root
spring.datasource.password=123456

#驼峰,下划线命名
mybatis.configuration.map-underscore-to-camel-case=true
step6:单元测试
@SpringBootTest
class Lession10MyBatisApplicationTests {
@Autowired
 private ArticleMapper articleMapper;
 @Test
 void testInsert() {
  ArticlePO article = new ArticlePO();
  article.setTitle("什么时候用微服务");
  article.setSummary("微服务优缺点");
  article.setUserId(219);
 article.setReadCount(560);
  article.setCreateTime(LocalDateTime.now());
  article.setUpdateTime(LocalDateTime.now());
  articleMapper.insertArticle(article);
 }

 @Test void testUpdate() {
  int rows = articleMapper.updateReadCount(1, 230);
  System.out.println("修改的记录数量:" + rows);
 }

 @Test
 void testDelete(){
  int rows = articleMapper.deleteById(11);
  System.out.println("删除记录的数量 " + rows);
 }

 @Test
 void testSelect(){
  ArticlePO articlePO = articleMapper.selectById(3);
  System.out.println("查询到的文章:" + articlePO);
 }
}
4.3.2 ResultMap
查询操作得到包含多个列的集合,将列值转为对象属性使用结果映射的功能,注解@Results,@ResultMap能够帮助我们完成此功能。
@Results用于定义结果映射,每个列和Java对象属性的一一对应。
@ResultMap 指定使用哪个结果映射,两种方式可以使用@Results,另一种XML文件。
需求:执行多个select语句,使用结果映射转换数据库记录为Java Object。
step1:创建新的Mapper对象。
public interface ArticleDao {

  //定义mapper, id表示唯一名称
  @Select("")
  @Results(id = "BaseMapper", value = {
      @Result(id = true, column = "id", property = "id"),
      @Result(column = "user_id", property = "userId"),
      @Result(column = "read_count", property = "readCount"),
      @Result(column = "create_time", property = "createTime"),
     @Result(column = "update_time", property = "updateTime"),
  })
  ArticlePO articleMapper();

  @Select("""
     select id,user_id,title,summary,read_count,create_time,update_time
      from article where user_id=${userId}
      """)
  @ResultMap("BaseMapper")
  List<ArticlePO> selectList(Integer userId);
  @Select("""
      select id,user_id,title,summary,read_count,create_time,update_time
     from article where id=#{articleId}
      """)
  @ResultMap("BaseMapper")
  ArticlePO selectById(@Param("articleId") Integer id);
}
@Results的id定义当前结果映射的唯一名称, 后面内容是列和属性的一一映射说明。
其他的查询方法@ResultMap引用@Results的id。使用BaseMapper的映射规则处理查询结果。
step2: 单元测试
@SpringBootTest
public class ArticleDaoTest {

  @Autowired
  private ArticleDao articleDao;

  @Test
  void testSelectList() {
    List<ArticlePO> poList = articleDao.selectList(219);
    poList.forEach(po -> {
      System.out.println("po = " + po);
    });
  }

  @Test
  void testSelect(){
    ArticlePO articlePO = articleDao.selectById(1);
    System.out.println("查询到的文章:" + articlePO);
  }
}
另一种方法在xml中定义<resultMap>标签,在@ResultMap注解引用。 这种方式首先创建xml。在resources目录下创建自定义的mapper目录。 新建ArticleMapper.xml 。
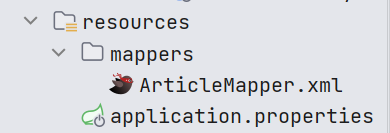
ArticleMapper.xml 代码清单:
<?xml version="1.0" encoding="UTF-8" ?>
<!DOCTYPE mapper
  PUBLIC "-//mybatis.org//DTD Mapper 3.0//EN"
  "https://mybatis.org/dtd/mybatis-3-mapper.dtd">
<mapper namespace="com.bjpowernode.orm.repository.ArticleDao">
  <resultMap id="ArticleMapper" type="com.bjpowernode.orm.po.ArticlePO">
    <id column="id" property="id"/>
    <result column="user_id" property="userId" />
    <result column="read_count" property="readCount" />
    <result column="create_time" property="createTime" />
    <result column="update_time" property="updateTime" />
  </resultMap>
</mapper>
step2:修改application.properties配置mapper文件的路径
mybatis.mapper-locations:自定义mapper xml 文件保存路径。
spring.datasource.driver-class-name=com.mysql.cj.jdbc.Driver
spring.datasource.url=jdbc:mysql://localhost:3306/blog?serverTimezone=Asia/Shanghai&useUnicode=true&characterEncoding=utf8&autoReconnect=true&useSSL=false
spring.datasource.username=root
spring.datasource.password=123456

#驼峰命名
#mybatis.configuration.map-underscore-to-camel-case=true

mybatis.mapper-locations=classpath:/mappers/**/*.xml
step3:修改ArticleDao的查询方法上面的@ResultMap。
@Select("""
    select id,user_id,title,summary,read_count,create_time,update_time
    from article where id=#{articleId}
    """)
//@ResultMap("BaseMapper")
@ResultMap("ArticleMapper")
ArticlePO selectById(@Param("articleId") Integer id);
在重复执行单元测试代码。
4.3.3 SQL提供者
我们能在方法上面直接编写SQL语句。使用Text Block编写长的语句。方法上编写SQL显的不够简洁。MyBatis提供了SQL提供者的功能。将SQL以方法的形式定义在单独的类中。 Mapper接口通过引用SQL提供者中的方法名称,表示要执行的SQL。
SQL提供者有四类@SelectProvider,@InsertProvider,@UpdateProvider,@DeleteProvider。
SQL提供者首先创建提供者类,自定义的。类中声明静态方法,方法体是SQL语句并返回SQL。例如:
public static String selectById() {
        return "SELECT * FROM users WHERE id = #{id}";
}
其次Mapper接口的方法上面,应用@SelectProvider(type = 提供者类.class, method = "方法名称")
step1: 创建SQL提供者
public class SqlProvider {

  public static String selectArticle(){
    return """
        select id,user_id,title,summary,read_count,create_time,update_time
        from article where id=#{articleId}
        """;
  }

 public static String updateTime(){
    return """
        update article set update_time=#{newTime}  where id=#{id}
        """;
  }
}
step2: 创建mapper接口
public interface ArticleRepository {

  @Select("")
  @Results(id = "BaseMapper", value = {
      @Result(id = true, column = "id", property = "id"),
      @Result(column = "user_id", property = "userId"),
      @Result(column = "read_count", property = "readCount"),
      @Result(column = "create_time", property = "createTime"),
      @Result(column = "update_time", property = "updateTime"),
  })
  ArticlePO articleMapper();

  //查询
  @ResultMap("BaseMapper")
  @SelectProvider(type = SqlProvider.class,method = "selectArticle")
  ArticlePO selectById(Integer id);

  //更新
  @UpdateProvider(type = SqlProvider.class,method = "updateTime")
  int updateTime(Integer id, LocalDateTime newTime);
}
其他注解@InsertProvider,@DeleteProvider类似的使用方式
step3:单元测试
@SpringBootTest
public class ArticleRepositoryTest {

  @Autowired
  private ArticleRepository articleRepository;

  @Test
  void testSelect() {
    Integer id = 2;
    ArticlePO article = articleRepository.selectById(id);
   System.out.println("article = " + article);
 }

  @Test
  void testUpdate() {
    int rows = articleRepository.updateTime(3, LocalDateTime.now());

System.out.println("更新的记录数量 = " + rows);

  }
}
我们可以分别创建 Insert的提供者, Update提供者,Delete提供者,Select查询者。 每个查询者只提供一种操作。Select提供者的方法只提供Select语句。
4.3.4 @One一对一查询
MyBatis支持一对一,一对多,多对多查询。 XML文件和注解都能实现关系的操作。我们使用注解表示article和article_detail的一对一关系。 MyBatis维护这个关系, 开发人员自己也可以维护这种关系。
@One: 一对一
@Many: 一对多
关系表一个article有一个article_detail 文章内容。
step1: 创建两个表的实体
@Data
public class Article {
  private Integer id;
  private Integer userId;
  private String title;
  private String summary;
  private Integer readCount;
  private LocalDateTime createTime;
  private LocalDateTime updateTime;
  private ArticleDetail articleDetail;
}

@Datapublic class ArticleDetail {
  private Integer id;
  private Integer articleId;
  private String content;
}
Article 声明了ArticleDetail 对象。表示文章内容。
step2:创建Mapper查询接口
public interface ArticleOneToOneMapper {

  @Select("""
      select id,article_id,content from article_detail
      where article_id = #{articleId}
      """)
  @Results({
      @Result(id = true, column = "id", property = "id"),
      @Result(column = "article_id", property = "articleId"),
      @Result(column = "content", property = "content")
  })
  ArticleDetail queryContent(Integer articleId);

  @Select("""
      select id,
             user_id,
             title,
             summary,
             read_count,
             create_time,
             update_time
      from article
      where id = #{id}
            """)
  @Results({
      @Result(id = true, column = "id", property = "id"),
      @Result(column = "user_id", property = "userId"),
      @Result(column = "read_count", property = "readCount"),
      @Result(column = "create_time", property = "createTime"),
      @Result(column = "update_time", property = "updateTime"),
      @Result(column = "id", property = "articleDetail",
          one = @One(select =
   "com.bjpowernode.orm.repository.ArticleOneToOneMapper.queryContent",
fetchType = FetchType.LAZY))
  })
  Article queryAllArticle(Integer id);
}
step3:单元测试
@SpringBootTest
public class OneToOneTest {

  @Autowired
  private ArticleOneToOneMapper articleOneToOneMapper;

  @Test
  void testOne() {
    Article article = articleOneToOneMapper.queryAllArticle(1);
    System.out.println("article = " + article);
  }
}
4.3.5 @Many一对多查询
一对多查询使用@Many注解,步骤与一对一基本相同。
准备环境,新建comment评论表。article与comment存在一对多关系。一篇文章多个评论。
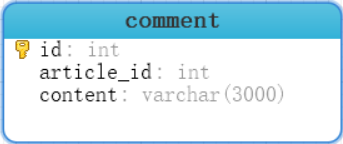
step1:创建CommentPO实体
@Data
public class CommentPO {
  private Integer id;
  private Integer articleId;
  private String content;
}
step2:创建新的文章聚合实体
@Data
public class ArticleEntity {
  private Integer id;
  private Integer userId;
  private String title;
  private String summary;
  private Integer readCount;
  private LocalDateTime createTime;
  private LocalDateTime updateTime;
  private List<CommentPO> comments; //评论的集合
}
step3:新建Mapper接口
public interface ArticleOneToManyMapper {

  @Select("""
      select id,article_id,content from comment
      where article_id = #{articleId}
      """)
  @Results(id="CommentMapper",value = {
      @Result(id = true, column = "id", property = "id"),
      @Result(column = "article_id", property = "articleId"),
      @Result(column = "content", property = "content")
  })
  List<CommentPO> queryComments(Integer articleId);

  @Select("""
      select id, user_id,title,summary,
             read_count,create_time,update_time
     from article
      where id = #{id}
            """)
  @Results(id="ArticleBaseMapper",value={
      @Result(id = true, column = "id", property = "id"),
      @Result(column = "user_id", property = "userId"),
      @Result(column = "read_count", property = "readCount"),
      @Result(column = "create_time", property = "createTime"),
      @Result(column = "update_time", property = "updateTime"),
      @Result(column = "id", property = "comments",
          many = @Many(select = "com.bjpowernode.orm.repository.ArticleOneToManyMapper.queryComments", fetchType = FetchType.LAZY))
  })
  ArticleEntity queryArticleAndComments(Integer id);

}
step4:单元测试
@SpringBootTest
public class OneToManyTest {

  @Autowired
  private ArticleOneToManyMapper articleOneToManyMapper;

  @Test
  void testOnetoMany() {
    ArticleEntity article = articleOneToManyMapper.queryArticleAndComments(1);
    System.out.println("ArticleEntity = " + article);
  }
 }
4.3.6 常用配置参数
MyBatis的项设置,在application文件中“mybatis”开头进行设置。
全部设置参考:https://mybatis.org/mybatis-3/zh/configuration.html#settings
常用设置:
#驼峰命名
mybatis.configuration.map-underscore-to-camel-case=true
#mapper xml文件位置
mybatis.mapper-locations=classpath:/mappers/**/*.xml
#启用缓存
mybatis.configuration.cache-enabled=true
#延迟加载mybatis.configuration.lazy-loading-enabled=true
#mybatis主配置文件,按需使用
mybatis.config-location=classpath:/sql-config.xml
上述设置内容比较多时,可以将设置放到MyBatis主配置文件,mybatis.config-location 加载主配置文件。
sql-config.xml
<?xml version="1.0" encoding="UTF-8" ?>
<!DOCTYPE configuration
  PUBLIC "-//mybatis.org//DTD Config 3.0//EN"
  "https://mybatis.org/dtd/mybatis-3-config.dtd">
<configuration>

  <settings>
    <setting name="cacheEnabled" value="true"/>
    <setting name="lazyLoadingEnabled" value="true"/>
    <setting name="mapUnderscoreToCamelCase" value="true"/>
  </settings>

  <typeAliases>
    <package name="com.bjpowernode.po"/>
  </typeAliases>

</configuration>
4.3.7 MybatisAutoConfiguration
MyBatis框架的在Spring Boot的自动配置类MybatisAutoConfiguration.class

imports文件中定义了org.mybatis.spring.boot.autoconfigure.MybatisAutoConfiguration 自动配置类
@Configuration
@ConditionalOnClass({SqlSessionFactory.class, SqlSessionFactoryBean.class})
@ConditionalOnSingleCandidate(DataSource.class)
@EnableConfigurationProperties({MybatisProperties.class})
@AutoConfigureAfter({DataSourceAutoConfiguration.class, MybatisLanguageDriverAutoConfiguration.class})
public class MybatisAutoConfiguration implements InitializingBean {
  private static final Logger logger =
LoggerFactory.getLogger(MybatisAutoConfiguration.class);  private final MybatisProperties properties;
  .....
}
关注:
MybatisProperties.class
DataSourceAutoConfiguration.class , DataSourceProperties.class
SqlSessionFactory.class
SqlSessionTemplate.class
@Bean
@ConditionalOnMissingBean
public SqlSessionFactory sqlSessionFactory(DataSource dataSource) throws Exception {
  SqlSessionFactoryBean factory = new SqlSessionFactoryBean();
  factory.setDataSource(dataSource);
  ....
}

@Bean
@ConditionalOnMissingBean
public SqlSessionTemplate sqlSessionTemplate(SqlSessionFactory sqlSessionFactory) {
  ExecutorType executorType = this.properties.getExecutorType();
  return executorType != null ? new SqlSessionTemplate(sqlSessionFactory, executorType) : new SqlSessionTemplate(sqlSessionFactory);
}
SqlSessionTemplate是线程安全的,MyBatis为了与Spring继承。 提供的由Spring管理的Bean。这个SqlSesionTemplate实现了SqlSession接口, 能够由Spring事务管理器使用。提供Spring的事务处理。同时管理SqlSession的创建,销毁。
4.4 适合的连接池
HikariCP连接池
https://github.com/brettwooldridge/HikariCP/wiki
连接池配置:
https://github.com/brettwooldridge/HikariCP/wiki/About-Pool-Sizing
MySQL连接池配置建议
https://github.com/brettwooldridge/HikariCP/wiki/MySQL-Configuration
prepStmtCacheSize
这将设置 MySQL 驱动程序将缓存每个连接的预准备语句数。默认值为保守的 25。我们建议将其设置为 250-500 之间。

prepStmtCacheSqlLimit
这是驱动程序将缓存的准备好的 SQL 语句的最大长度。MySQL 默认值为 256。根据我们的经验,特别是对于像Hibernate这样的ORM框架,这个默认值远低于生成的语句长度的阈值。我们推荐的设置为 2048。

cachePrepStmts
如果缓存实际上被禁用,则上述参数都没有任何影响,因为默认情况下是禁用的。必须将此参数设置为 。true

useServerPrepStmts:较新版本的MySQL支持服务器端准备语句,这可以提供实质性的性能提升。将此属性设置为 。true
application.yml
spring:
  datasource:
    type: com.zaxxer.hikari.HikariDataSource
    driver-class-name: com.mysql.cj.jdbc.Driver
    url: jdbc:mysql://localhost:3306/blog?serverTimezone=Asia/Shanghai
    username: root
    password: 123456
    hikari:
      auto-commit: true
      # # connections = ((cpu核心数 * 2) + 磁盘数量) 近似值。 默认10
      maximum-pool-size: 10
      #最小连接数,默认10,不建议设置。默认与maximum-pool-size一样大小。推荐使用固定大小的连接池
      minimum-idle: 10
      #获取连接时,检测语句
      connection-test-query: select 1
      ###
     # 连接超时,默认30秒。
      # 控制客户端在获取池中 Connection 的等待时间,
      # 如果没有连接可用的情况下超过该时间,则抛出 SQLException 异常,
      ###
      connection-timeout: 20000
      #其他属性
      data-source-properties:
        cachePrepStmts: true
        dataSource.cachePrepStmtst: true
        dataSource.prepStmtCacheSize: 250
        dataSource.prepStmtCacheSqlLimit: 2048
        dataSource.useServerPrepStmts: true
4.5 声明式事务
事务分为全局事务与本地事务,本地事务是特定于资源的,例如与JDBC连接关联的事务。本地事务可能更容易使用,但有一个显著的缺点:它们不能跨多个事务资源工作。比如在方法中处理连接多个数据库的事务,本地事务是无效的。
Spring解决了全局和本地事务的缺点。它允许应用程序开发人员在任何环境中使用一致的编程模型。只需编写一次代码,就可以从不同环境中的不同事务管理策略中获益。Spring框架同时提供声明式和编程式事务管理。推荐声明式事务管理。
Spring事务抽象的关键是事务策略的概念,org.springframework.transaction.PlatformTransactionManager接口定义了事务的策略。
事务控制的属性:
- Propagation : 传播行为。代码可以继续在现有事务中运行(常见情况),也可以暂停现有事务并创建新事务
- Isolation: 隔离级别。此事务与其他事务的工作隔离的程度。例如,这个事务能看到其他事务未提交的写吗?
- Timeout超时时间:该事务在超时和被底层事务基础结构自动回滚之前运行的时间。
- Read-only只读状态:当代码读取但不修改数据时,可以使用只读事务。在某些情况下,例如使用Hibernate时,只读事务可能是一种有用的优化。
AOP:
Spring Framework的声明式事务管理是通过Spring面向方面编程(AOP)实现的。事务方面的代码以样板的方式使用,及时不了解AOP概念,仍然可以有效地使用这些代码。事务使用AOP的环绕通知(TransactionInterceptor)。
声明式事务的方式:
- XML配置文件:全局配置
- @Transactional注解驱动 :和代码一起提供,比较直观。和代码的耦合比较高。【Spring团队建议您只使用@Transactional注释具体类(以及具体类的方法),而不是注释接口。当然,可以将@Transactional注解放在接口(或接口方法)上,但这只有在使用基于接口的代理时才能正常工作】
方法的可见性:
公共(public)方法应用@Transactional主机。如果使用@Transactional注释了受保护的、私有的或包可见的方法,则不会引发错误,但注释的方法不会显示配置的事务设置,事务不生效。如果需要受保护的、私有的方法具有事务考虑使用AspectJ。而不是基于代理的机制。
4.5.1.1 准备事务演示环境
在新的Spring Boot项目演示事务处理。新项目Lession011-Trans 。 添加MyBatis, MySQL, Lombok依赖。使用之前blog库的article , article_detail 表。
需求:某个作者发布了新的文章,article,article_detail两个表同时添加记录。需要事务控制两个表的insert操作。 step1: 创建实体类
@Data
public class ArticlePO {
  private Integer id;
  private Integer userId;
  private String title;
  private String summary;
  private Integer readCount;
  private LocalDateTime createTime;
  private LocalDateTime updateTime;
}

//PO:Persistent Object
@Data
public class ArticleDetailPO {
  private Integer id;
  private Integer articleId;
  private String content;
}
step2:创建Mapper接口,创建两个方法,添加文章属性,文章内容
public interface ArticleMapper {

  @Insert("""
      insert into article(user_id,title,summary,read_count,create_time,update_time) \
      values(#{userId},#{title},#{summary},#{readCount},#{createTime},#{updateTime})
      """)
  @Options(useGeneratedKeys = true,keyColumn = "id",keyProperty = "id")
  int insertArticle(ArticlePO article);

  @Insert("""
      insert into article_detail(article_id,content)
      values(#{articleId},#{content})
      """)
  int insertArticleContent(ArticleDetailPO detail);
}
step3:创建Service接口,声明发布文章的方法
public interface ArticleService {
  boolean postNewArticle(ArticlePO article,String content);
}

@Service
public class ArticleServiceImpl implements ArticleService {

  @Autowired
  private ArticleMapper articleMapper;

  @Override
  public boolean postNewArticle(ArticlePO article, String content) {

    //新增文章
    articleMapper.insertArticle(article);

    //新增文章内容
    ArticleDetailPO detail = new ArticleDetailPO();
    detail.setArticleId(article.getId());
    detail.setContent(content);
    articleMapper.insertArticleContent(detail);

    return true;
  }
}
step4:启动类
@MapperScan(basePackages = "com.bjpowernode.trans.repository")
@SpringBootApplicationpublic class Lession11TransApplication {

  public static void main(String[] args) {
    SpringApplication.run(Lession11TransApplication.class, args);
  }
}
step5:编写配置文件
spring:
  datasource:
    type: com.zaxxer.hikari.HikariDataSource
    driver-class-name: com.mysql.cj.jdbc.Driver
    url: jdbc:mysql://localhost:3306/blog?serverTimezone=Asia/Shanghai
    username: root
    password: 123456
    hikari:
      auto-commit: true
      # # connections = ((cpu核心数 * 2) + 磁盘数量) 近似值。 默认10
      maximum-pool-size: 10
      #获取连接时,检测语句
      connection-test-query: select 1

mybatis:
  configuration:
    log-impl: org.apache.ibatis.logging.stdout.StdOutImpl
step6:单元测试
@SpringBootTest
class Lession11TransApplicationTests {

  @Autowired
  private ArticleService articleService;

  @Test
  void testAddArticle() {
   ArticlePO article = new ArticlePO();
    article.setTitle("Spring事务管理");
    article.setSummary("Spring事务属性,事务实现");
    article.setUserId(2001);
    article.setReadCount(0);
    article.setCreateTime(LocalDateTime.now());
    article.setUpdateTime(LocalDateTime.now());
    boolean add = articleService.postNewArticle(article, "Spring 统一事务管理。事务管理器管理本地事务");
    System.out.println("add = " + add);
  }
}
现在业务方法正常执行,添加数据到两个表,但是事务没有Spring参与。 postNewArticle()方法没有事务管理。
4.5.1.2 添加事务注解
step1:修改postNewArticle()方法添加@Transactional
@Transactional
@Overridepublic boolean postNewArticle(ArticlePO article, String content) {

  //新增文章
  articleMapper.insertArticle(article);

  if( article.getReadCount() <  1) {
    throw new RuntimeException("已读数量不能 < 1 ");
  }

 //新增文章内容
  ArticleDetailPO detail = new ArticleDetailPO();
  detail.setArticleId(article.getId());
  detail.setContent(content);
  articleMapper.insertArticleContent(detail);

  return true;
}
@Transactional可在类上,接口,方法上声明。 表示方法需要事务管理。 Spring对public方法添加事务处理。
step2:启动类
@EnableTransactionManagement
@MapperScan(basePackages = "com.bjpowernode.trans.repository")
@SpringBootApplication
public class Lession11TransApplication {

  public static void main(String[] args) {
    SpringApplication.run(Lession11TransApplication.class, args);
  }
}
step3:单元测试
@Test
void testAddArticle() {
  ArticlePO article = new ArticlePO();
  article.setTitle("Spring事务管理111");
  article.setSummary("Spring事务属性,事务实现111");
  article.setUserId(2202);
  article.setReadCount(0);
  article.setCreateTime(LocalDateTime.now());
  article.setUpdateTime(LocalDateTime.now());
  boolean add = articleService.postNewArticle(article, "Spring 统一事务管理。事务管理器管理本地事务111");
  System.out.println("add = " + add);
}
添加数据失败, 在事务中抛出运行时异常。Spring默认回滚事务。
4.5.1.3 无效事务1
Spring事务处理是AOP的环绕通知,只有通过代理对象调用具有事务的方法才能生效。类中有A方法,调用带有事务的B方法。 调用A方法事务无效。当然protected, private方法默认是没有事务功能的。
step1: 接口中增加方法managerArticles
接口中增加方法
boolean managerArticle(String action,ArticlePO article,String content);

实现类方法:
@Override
public boolean managerArticle(String action, ArticlePO article, String content) {
  return postNewArticle(article,content);
}
step2:单元测试,readCount为0
@Test
void testAddArticle2() {
  ArticlePO article = new ArticlePO();
  article.setTitle("Spring事务管理222");
  article.setSummary("Spring事务属性,事务实现222");
  article.setUserId(2202);
  article.setReadCount(0);
  article.setCreateTime(LocalDateTime.now());
  article.setUpdateTime(LocalDateTime.now());
  boolean add = articleService.managerArticle("add",article, "222 Spring 统一事务管理。事务管理器管理本地事务");
  System.out.println("add = " + add);
}
测试发现,事务不起作用。aritcleService是代理对象,managerArticle方法不是事务方法。事务无效。
4.5.1.4 无效事务2
方法在线程中运行的,在同一线程中方法具有事务功能, 新的线程中的代码事务无效。
step1:修改接口方法的实现
@Transactional
@Override
public boolean postNewArticle(ArticlePO article, String content)  {
  System.out.println("Start 父线程:" + Thread.currentThread().threadId());
  Thread thread = new Thread(() -> {
    System.out.println("子线程:" + Thread.currentThread().threadId());
    //新增文章
    articleMapper.insertArticle(article);

    if (article.getReadCount() < 1) {
      throw new RuntimeException("===已读数量不能 < 1 ");
    }

    //新增文章内容
    ArticleDetailPO detail = new ArticleDetailPO();
    detail.setArticleId(article.getId());
    detail.setContent(content);
    articleMapper.insertArticleContent(detail);
  });
  //线程启动
  thread.start();
  try{
    //等他thread执行完成,在继续后面的代码
    thread.join();
  }catch (Exception e){
    e.printStackTrace();
  }
  System.out.println("End 父线程:" + Thread.currentThread().threadId());
  return true;
}
step2: 单元测试
@Test
void testAddArticle() throws InterruptedException {
  ArticlePO article = new ArticlePO();
  article.setTitle("Spring事务管理555");
  article.setSummary("Spring事务属性,事务实现555");
  article.setUserId(2203);
  article.setReadCount(0);
  article.setCreateTime(LocalDateTime.now());
  article.setUpdateTime(LocalDateTime.now());
  boolean add = articleService.postNewArticle(article, "Spring 统一事务管理。事务管理器管理本地事务");
  System.out.println("add = " + add);
}
4.5.1.5 事务回滚规则
- RuntimeException的实例或子类时回滚事务
- Error会导致回滚
- 已检查异常不会回滚。默认提交事务
@Transactional注解的属性控制回滚
- rollbackFor
- noRollbackFor
- rollbackForClassName
- noRollbackForClassName