前言:
有些信息是在网上查资料后总结的,没有去追代码验证。如果有说得不对的地方,欢迎提出指正。感谢!
手机启动的大致流程
1.长按开机键
2.执行存储在ROM里(应该是某一个固定地址或是预定义的地址)的Primary Bootloader,会做以下事情:
初始化RAM
将secondary stage bootloader拷贝到内存
3.secondary stage bootloader会做以下事情
准备好device tree,告诉内核dtb的首地址
初始化一些硬件设备,比如显示
启动内核,传递参数
与显示相关的部分:dpu、dsi、dphy、屏幕上电,读屏幕ID来识别屏幕,屏幕初始化,显示开机logo
4.Kernel
启动init进程
挂载根文件系统(init进程内核态)
解析cmdline参数
创建各种服务进程(init进程用户态)
bootloader阶段,显示做了什么
目前在网上没有找到高通最新的uefi源码,先空着吧。
内核启动时,显示驱动做了什么
module_init
vendor\qcom\opensource\display-drivers\msm\msm_drv.c
module_init(msm_drm_register);
module_init是一个宏定义:#define module_init(x) __initcall(x);
将msm_drm_register函数放在.initcall6.init段中,在内核启动过程中通过start_kernel -> reset_init -> kernel_init->do_initcalls调用通过module_init注册的msm_drm_register函数。[10][11]
那register函数做了什么?
vendor\qcom\opensource\display-drivers\msm\msm_drv.c
static int __init msm_drm_register(void)
{


	...
	platform_driver_register(&msm_platform_driver);
	dsi_display_register();
	...
}
vendor\qcom\opensource\display-drivers\msm\dsi\dsi_display.c
void __init dsi_display_register(void)
{


	...
	dsi_phy_drv_register();
	dsi_ctrl_drv_register();
	dsi_display_parse_boot_display_selection();-------------2
	platform_driver_register(&dsi_display_driver);
}
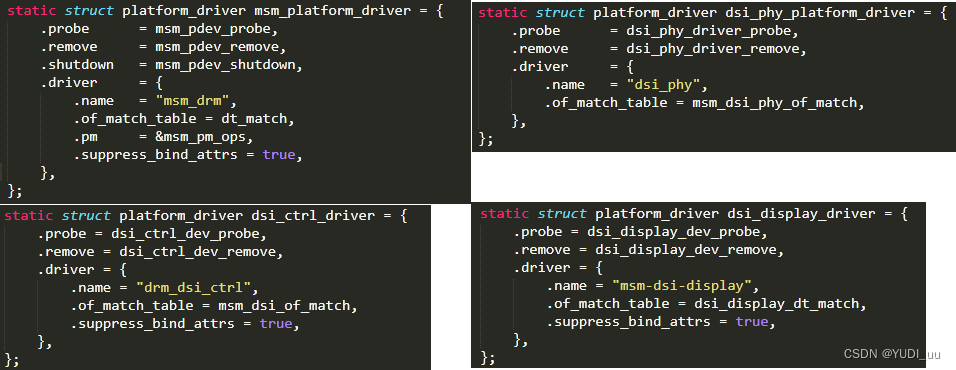
调用platform_driver_register函数注册以下platform driver:
msm_platform_driver、dsi_phy_platform_driver、dsi_ctrl_driver、dsi_display_driver
从名字上可以看出来,dsi_phy_platform_driver对于dphy模块,dsi_ctrl_driver对应dsi模块,其它两个呢?
2.解析屏幕名字。具体分析参考DRM驱动代码分析:uboot和kernel之间屏幕是如何匹配的
tips:
宏定义__init,用于告诉编译器相关函数或变量仅用于初始化。
编译器将标__init的所有代码存在特殊的内存段中,初始化结束后就释放这段内存。
来源:百度百科-__init
qcom DRM driver里的platform driver:
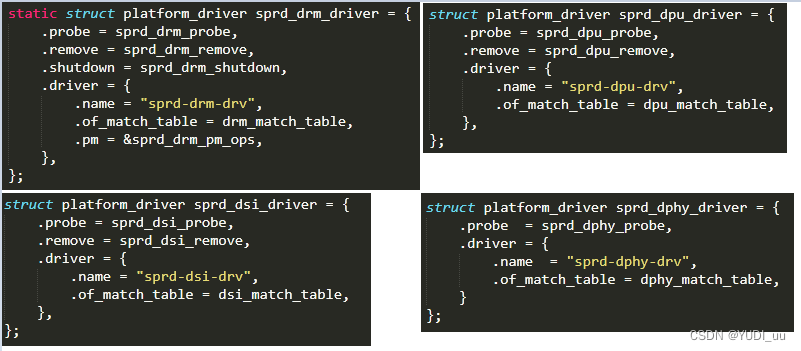
unisoc DRM driver里的platform driver:
static const struct of_device_id dsi_display_dt_match[] = {


	{

    .compatible = "qcom,dsi-display"},
	{

    }
};
不管是高通还是展讯,驱动里都定义了of_match_table的compatible变量,有的还定义了data。接下来看看compatible的作用。
drivers\base\platform.c
static int platform_match(struct device *dev, struct device_driver *drv)
{


	...
	/* Attempt an OF style match first */
	if (of_driver_match_device(dev, drv))------------------------1
		return 1;

	/* Then try to match against the id table */
	if (pdrv->id_table)
		return platform_match_id(pdrv->id_table, pdev) != NULL;-----2

	/* fall-back to driver name match */
	return (strcmp(pdev->name, drv->name) == 0);------------------3
}
总线上的device和driver进行匹配的时候会调用bus的match函数,对于platform bus而言就是platform_match。
来源:Linux设备模型(8)_platform设备
1.将驱动of_match_table变量中的compatible、type、name和dts节点对应的值进行比较,来判断设备和驱动是否匹配。
2.目前看起来显示驱动的这几个模块都没有定义id_table,暂时不管。
3.比较platform driver的name值。
module_platform_driver
除了module_init();也可以用module_platform_driver();
include\linux\platform_device.h
/* module_platform_driver() - Helper macro for drivers that don't do
 * anything special in module init/exit.  This eliminates a lot of
 * boilerplate.  Each module may only use this macro once, and
 * calling it replaces module_init() and module_exit()
 */
#define module_platform_driver(__platform_driver) \
	module_driver(__platform_driver, platform_driver_register, \
			platform_driver_unregister)

include\linux\device\driver.h
#define module_driver(__driver, __register, __unregister, ...) \
static int __init __driver##_init(void) \
{

       \
	return __register(&(__driver) , ##__VA_ARGS__); \
} \
module_init(__driver##_init); \
static void __exit __driver##_exit(void) \
{

       \
	__unregister(&(__driver) , ##__VA_ARGS__); \
} \
module_exit(__driver##_exit);
如注释所说,如果不需要在module init和exit函数里完成特定的操作,则可以使用module_platform_driver()。
LK、UEFI、uboot、bootloader是什么?
LK、UEFI、uboot都属于bootloader。
设备驱动prove的时机有如下几种(分为自动触发和手动触发):
将struct device类型的变量注册到内核中时自动触发(device_register,device_add,device_create_vargs,device_create)
将struct device_driver类型的变量注册到内核中时自动触发(driver_register)
手动查找同一bus下的所有device_driver,如果有和指定device同名的driver,执行probe操作(device_attach)
手动查找同一bus下的所有device,如果有和指定driver同名的device,执行probe操作(driver_attach)
自行调用driver的probe接口,并在该接口中将该driver绑定到某个device结构中----即设置dev->driver(device_bind_driver)
来源:Linux设备模型(5)_device和device driver
static int msm_pdev_probe(struct platform_device *pdev)
							|
							add_display_components(&pdev->dev, &match);
							|
							component_master_add_with_match(&pdev->dev, &msm_drm_ops, match);

static const struct component_master_ops msm_drm_ops = {


	.bind = msm_drm_bind,
	.unbind = msm_drm_unbind,
};
static int add_display_components(struct device *dev,
				  struct component_match **matchptr)
{


	struct device *mdp_dev = NULL;
	struct device_node *node;
	int ret;

	if (of_device_is_compatible(dev->of_node, "qcom,sde-kms")) {


		struct device_node *np = dev->of_node;
		unsigned int i;

		for (i = 0; ; i++) {


			node = of_parse_phandle(np, "connectors", i);
			if (!node)
				break;

			component_match_add(dev, matchptr, compare_of, node);
		}

		return 0;
	}
	...
}
&soc {


	mdss_mdp: qcom,mdss_mdp@ae00000 {


		compatible = "qcom,sde-kms";
		...
		};
};

&mdss_mdp {


	connectors = <&smmu_sde_unsec &smmu_sde_sec &sde_dp &sde_wb &sde_dsi	&sde_dsi1 &sde_rscc>;
};
mdss_mdp是master,相关联的设备有smmu_sde_unsec、smmu_sde_sec、sde_dp、sde_wb、sde_dsi、sde_dsi1、sde_rscc。 如果某些设备不支持,则需要删掉。
todo:为什么是这些设备作为component?
int dsi_display_dev_probe(struct platform_device *pdev)
			|
			rc = dsi_display_init(display);
							|
							rc = component_add(&pdev->dev, &dsi_display_comp_ops);

static const struct component_ops dsi_display_comp_ops = {


	.bind = dsi_display_bind,
	.unbind = dsi_display_unbind,
};

sde_dsi: qcom,dsi-display-primary {


		compatible = "qcom,dsi-display";
		...
};
调用component_add注册sde_dsi设备。
static int msm_drm_bind(struct device *dev)
							|
							msm_drm_component_init(dev);
												|
												msm_component_bind_all(dev, ddev);
																	|
																	component_bind_all(dev, drm_dev);
在master的bind函数msm_drm_bind中调用component_bind_all,从而调用各个子设备的bind函数。[14]
缩写:
PBL:Primary Bootloader
UEFI:Unified extensible firmware interface统一的可扩展固件接口
MDP:mobile display processor
参考资料
[1]CSDN 木希 《安卓开机流程》
[2]《高通平台UEFI有关介绍》
[3]《聊一聊汽车控制器的启动——BOOT》
[4]CSDN 没有皮卡丘的小志《 Android开机启动流程简析》
[5]CSDN 河马虚拟化 《Linux启动过程 - 从MBR到第一个应用》
[6]CSDN 花生酱拌面 《uboot移植——启动内核》
[7]wowotech linuxer 《ARM64的启动过程之(一):内核第一个脚印》
[8]Documentation/arm64/booting.txt
[9]CSDN 天糊土 《init进程的详解》
[10]CSDN Richard_LiuJH《linux驱动 之 module_init解析 (上)》
[11]CSDN Richard_LiuJH《linux驱动 之 module_init解析 (下)》
[12]Linux设备模型(8)_platform设备
[13]Linux设备模型(5)_device和device driver
[14]linux kernel component框架分析