在前一篇文章中,这里介绍了dalton的安装,以及使用dalton中的多种探针手动分析pcap数据包。在和其他程序联动的时候,手动分析无法满足要求,本篇文章将介绍如何通过使用dalton提供的API进行数据包的自动化分析。
在手动提交数据包分析的过程中,UI界面选择了若干参数,以suricata的操作为例实际抓包看一下,如下图1:
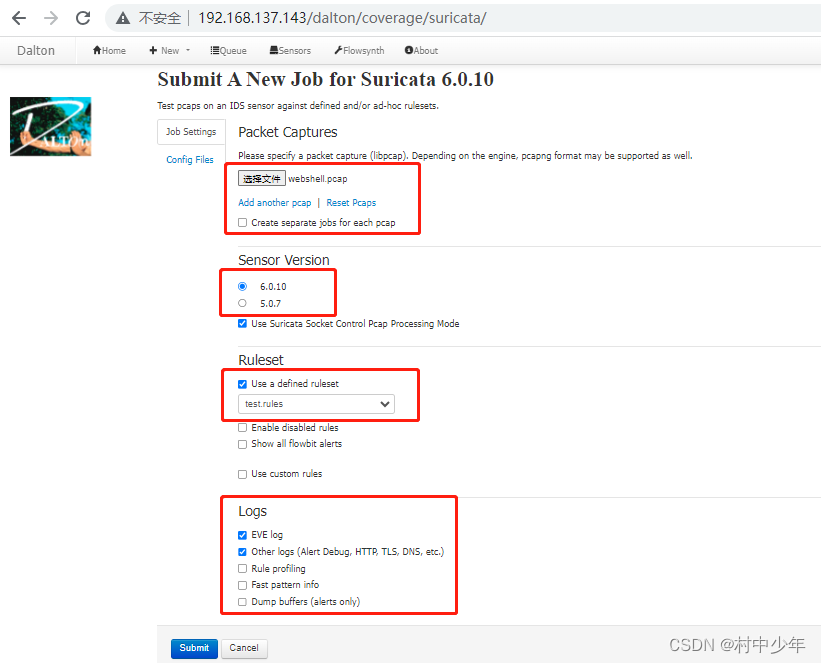
图1
图1中选择的参数如红框所示,包括待分析的数据包,suricata版本,规则集,以及日志种类。针对submit之后的请求进行抓包,如下图2:
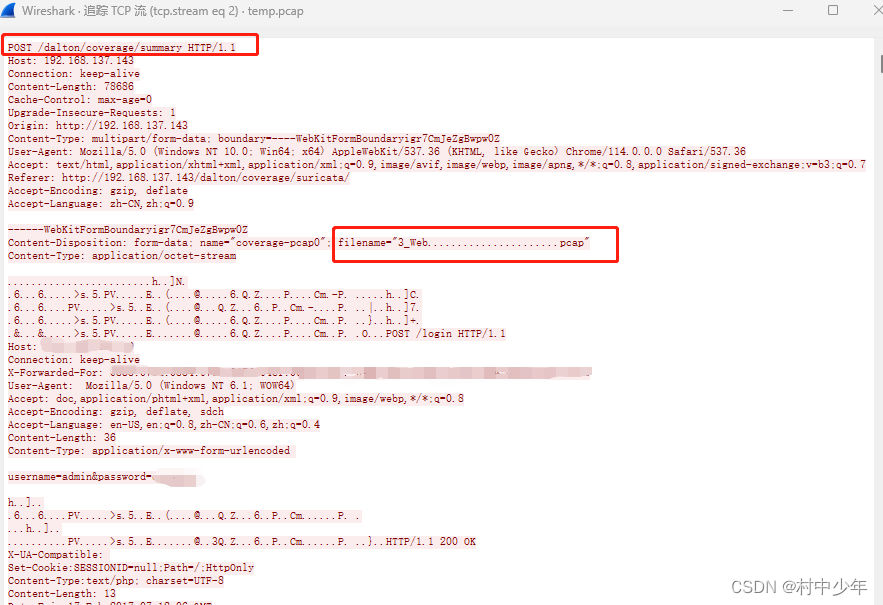
图2
可以看到针对/dalton/coverage/summary路径提交了HTTP payload中的参数请求。此处涉及到文件上传,因此遵循文件上传协议的约定,具体原理见这里。图2中http的全部payload格式如下:
------WebKitFormBoundaryigr7CmJeZgBwpw0Z
Content-Disposition: form-data; name="coverage-pcap0"; filename="3_Web......................pcap"
Content-Type: application/octet-stream

此处填充上传数据包内容数据
------WebKitFormBoundaryigr7CmJeZgBwpw0Z
Content-Disposition: form-data; name="coverage-pcap1"; filename=""
Content-Type: application/octet-stream


------WebKitFormBoundaryigr7CmJeZgBwpw0Z
Content-Disposition: form-data; name="coverage-pcap2"; filename=""
Content-Type: application/octet-stream


------WebKitFormBoundaryigr7CmJeZgBwpw0Z
Content-Disposition: form-data; name="coverage-pcap3"; filename=""
Content-Type: application/octet-stream


------WebKitFormBoundaryigr7CmJeZgBwpw0Z
Content-Disposition: form-data; name="coverage-pcap4"; filename=""
Content-Type: application/octet-stream


------WebKitFormBoundaryigr7CmJeZgBwpw0Z
Content-Disposition: form-data; name="coverage-pcap5"; filename=""
Content-Type: application/octet-stream


------WebKitFormBoundaryigr7CmJeZgBwpw0Z
Content-Disposition: form-data; name="coverage-pcap6"; filename=""
Content-Type: application/octet-stream


------WebKitFormBoundaryigr7CmJeZgBwpw0Z
Content-Disposition: form-data; name="coverage-pcap7"; filename=""
Content-Type: application/octet-stream


------WebKitFormBoundaryigr7CmJeZgBwpw0Z
Content-Disposition: form-data; name="coverage-pcap8"; filename=""
Content-Type: application/octet-stream


------WebKitFormBoundaryigr7CmJeZgBwpw0Z
Content-Disposition: form-data; name="coverage-pcap9"; filename=""
Content-Type: application/octet-stream


------WebKitFormBoundaryigr7CmJeZgBwpw0Z
Content-Disposition: form-data; name="sensor_tech"

suricata/6.0.10 此处填充探针版本
------WebKitFormBoundaryigr7CmJeZgBwpw0Z
Content-Disposition: form-data; name="optionUseSC"

use_sock_control
------WebKitFormBoundaryigr7CmJeZgBwpw0Z
Content-Disposition: form-data; name="optionProdRuleset"

prod
------WebKitFormBoundaryigr7CmJeZgBwpw0Z
Content-Disposition: form-data; name="prod_ruleset"

/opt/dalton/rulesets/suricata/test.rules  此处填充规则集路径
------WebKitFormBoundaryigr7CmJeZgBwpw0Z
Content-Disposition: form-data; name="custom_ruleset"


------WebKitFormBoundaryigr7CmJeZgBwpw0Z
Content-Disposition: form-data; name="optionAlertDetailed"

optionAlertDetailed
------WebKitFormBoundaryigr7CmJeZgBwpw0Z
Content-Disposition: form-data; name="optionEveLog"

optionEveLog  此处选择EVE格式日志
------WebKitFormBoundaryigr7CmJeZgBwpw0Z
Content-Disposition: form-data; name="optionOtherLogs"

optionOtherLogs  此处选择其他日志
------WebKitFormBoundaryigr7CmJeZgBwpw0Z
Content-Disposition: form-data; name="overrideExternalNet"

eoverride
------WebKitFormBoundaryigr7CmJeZgBwpw0Z
Content-Disposition: form-data; name="custom_engineconf"
此处填充suricata.yaml文件内容
------WebKitFormBoundaryigr7CmJeZgBwpw0Z--
可以看到payload中的数据部分(汉字说明部分)和上图1中的UI部分选择的数据包内容,suricata版本,规则集,以及日志种类是可以对应上的。因此可以通过python的request库发起相应HTTP请求,替换payload中的对应内容即可以向dalton提交数据包分析的请求。同时结合HTTP的响应可以提取job ID ,提取对应JOB ID中的分析结果,如下图3:
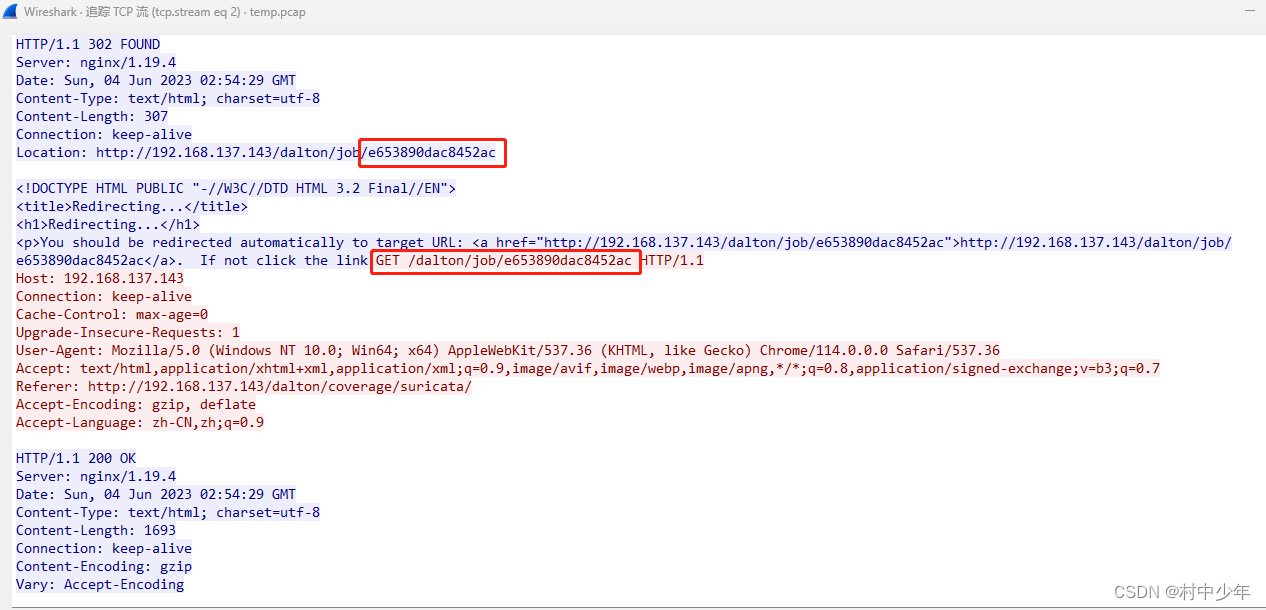
图3
图3中在HTTP的响应部分可以通过location字段获取重定向的URL,因此对重定向的URL发起请求即可获取job ID对应的分析结果。
通常来说如果dalton没有对外暴露API,则可以通过上述分析HTTP请求和响应的方式,构造对应的请求和响应,自动化的提交数据包进行分析。但是dalton的说明文档中提供了对应的API,因此上述的分析可以作为API背后的原理解释。如下图4为dalton提供的API:
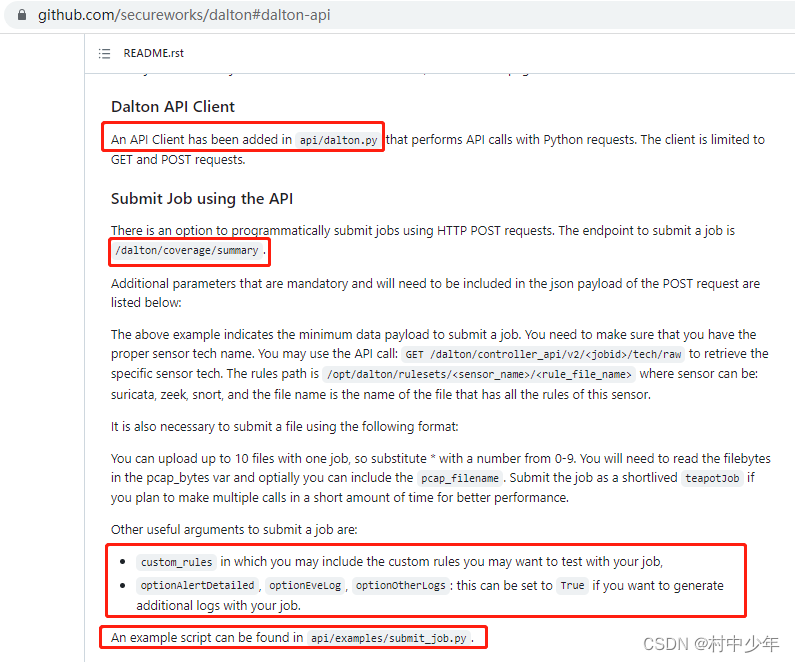
图4
dalton将API的功能封装在了api/dalton.py中,并提供了示例examples/job_submission.py,如下图5:
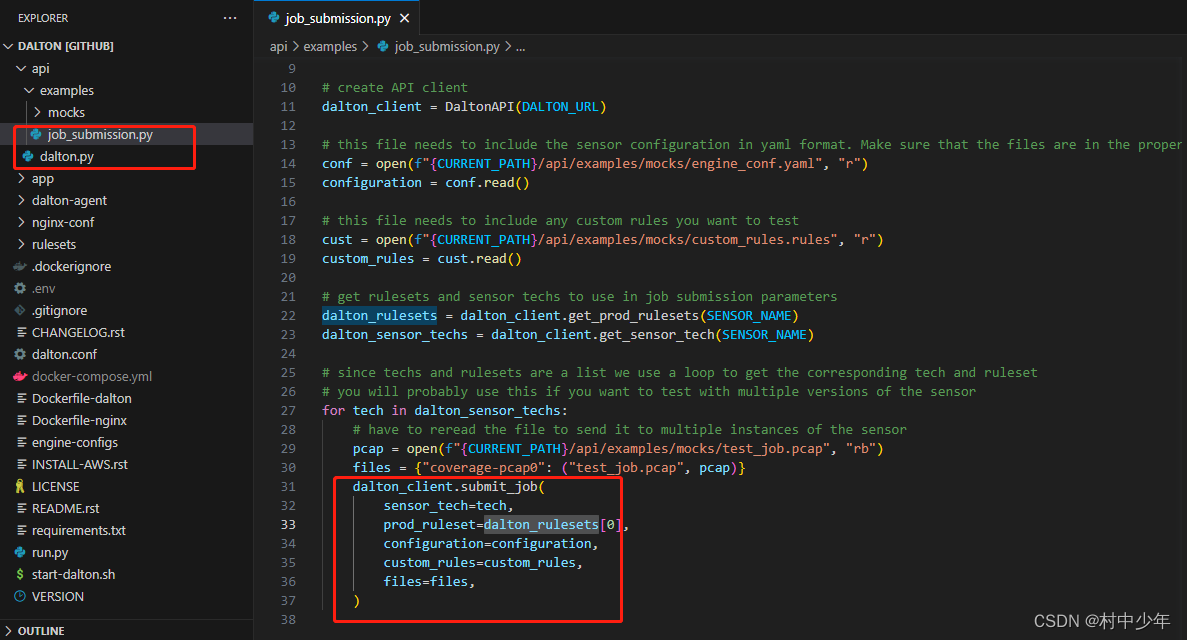
图5
可以看到,使用该示例,替换对应的输入参数,即可使用python 自动的提交pcap进行分析。当然可以根据需要将其输入参数改造成为对应的命令行形式。可以看到示例中的代码只是做了代码的提交工作,并没有涉及到对相应的返回数据解析以及eve日志的获取。如果需要获取eve格式文件,需要对job_submission.py代码进行改造,如下:
"""Example on how to submit a job using the Dalton Client API. Mock data is in mocks directory."""
import os
import sys
from pathlib import Path
sys.path.append(str(Path(__file__).resolve().parents[2]))
from api.dalton import DaltonAPI
import json
import time

DALTON_URL = os.getenv("DALTON_URL", "http://localhost")
SENSOR_NAME = "suricata"
CURRENT_PATH = os.getcwd()

# create API client
dalton_client = DaltonAPI(DALTON_URL)

# this file needs to include the sensor configuration in yaml format. Make sure that the files are in the proper directory.
conf = open(f"{

      CURRENT_PATH}/api/examples/mocks/engine_conf.yaml", "r")
configuration = conf.read()

# this file needs to include any custom rules you want to test
cust = open(f"{

      CURRENT_PATH}/api/examples/mocks/custom_rules.rules", "r")
custom_rules = cust.read()

# get rulesets and sensor techs to use in job submission parameters
dalton_rulesets = dalton_client.get_prod_rulesets(SENSOR_NAME)
dalton_sensor_techs = dalton_client.get_sensor_tech(SENSOR_NAME)

# since techs and rulesets are a list we use a loop to get the corresponding tech and ruleset
# you will probably use this if you want to test with multiple versions of the sensor
for tech in dalton_sensor_techs:
    # have to reread the file to send it to multiple instances of the sensor
    pcap = open(f"{

      CURRENT_PATH}/api/examples/mocks/test_job.pcap", "rb")
    files = {

    "coverage-pcap0": ("test_job.pcap", pcap)}
    job_ID = dalton_client.submit_job(
        sensor_tech=tech,
        prod_ruleset=dalton_rulesets[0],
        configuration=configuration,
        custom_rules=custom_rules,
        files=files,
    )
    print(job_ID.content)
    time.sleep(5)#由于运行需要一定的时间,因此此处需要等待几秒,不然请求内容为空
    job_content = dalton_client.get_job_content(job_ID.content.decode())

    data = job_content.text
    with open(job_ID.content.decode()+'.json', 'w') as data_file:
        data_file.write(data)

    break
需要注意的是在提交job内容和请求job结果之间需要间隔几秒,不然由于数据没有被引擎解析完毕之前发起请求,请求job结果为空。由于需要获取EVE格式的文件,因此对于dalton.py中需要将data指定为eve格式,如下:
data = {


            "sensor_tech": sensor_tech,
            "optionProdRuleset": "prod",
            "prod_ruleset": prod_ruleset,
            "custom_engineconf": configuration,
            "custom_ruleset": custom_rules,
            "optionEveLog": "optionEveLog", #添加eve格式输出
            "teapotJob": 1,
        }
同时在dalton.py中添加获取eve格式文件的请求代码如下:
def get_job_content(self,job_id:str) -> requests.Response:
        response = self._dalton_get("dalton/controller_api/v2/"+job_id+"/eve/raw")
        return response
通过上述代码即获取对应的eve格式的文件,因为eve格式文件路径可以通过UI界面操作抓包进行获取,如下图6:
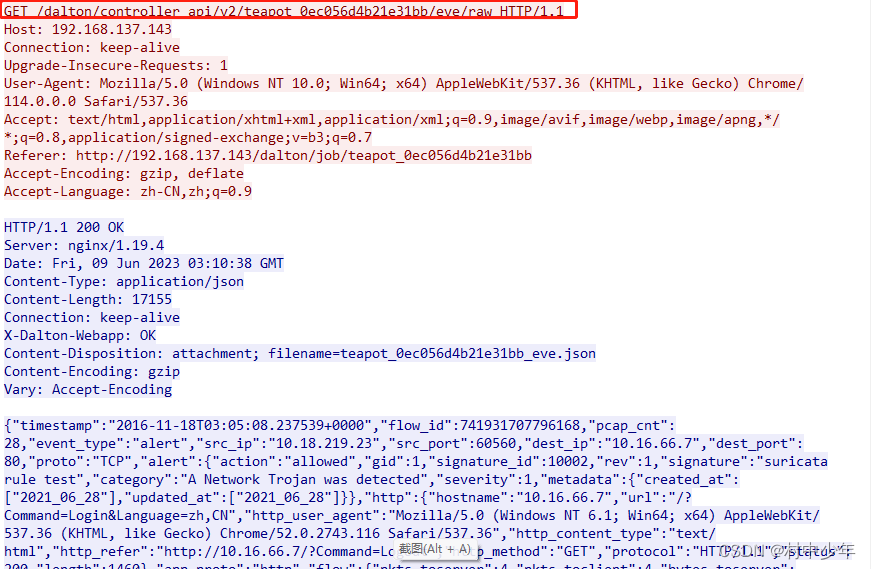
图6
生成的eve文本文件如下图7:
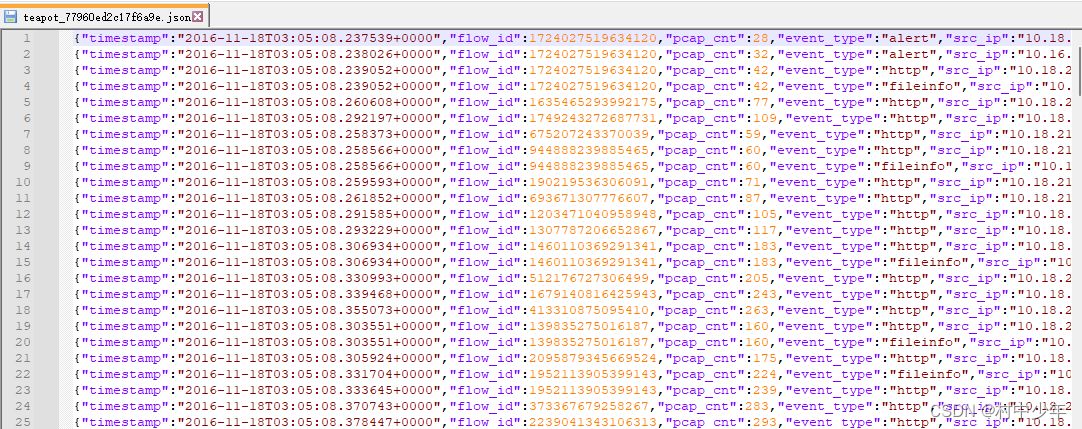
图7
有了自动化的数据包分析,就可以在wireshark中实时的分析数据包的威胁检测结果了。下一篇文章将介绍如何使用wireshark在打开数据包情况下自动的提交数据包分析,并根据数据包分析结果显示suricata告警结果。上述使用了suricata进行了介绍,对于snort和zeek的自动化分析同理。
在dalton官方提供的示例中,由于在dalton.py中设置了"teapotJob": 1,因此请求响应和正常手动操作有所不同,这个需要注意下。设置该标志位的主要目的是在数据量提交比较多的情况下,减少结果数据存储的时间,如下图8:

图8
本文为CSDN村中少年原创文章,未经允许不得转载,博主链接这里。