目录
前言
网上资料对于Yolov5原理比较多,代码解释比较少。
那就写个注释补充个流程吧(综合多方资料以及视频学习)
这部分代码主要来源于官方,v6.2:官方github
1. detect.py
通过detect代码文件来预测
window文件用\,而linux操作系统使用/
一开始的文件都是导入包名(为了验证导入的包路径正确,使用如下的代码进行验证)
# 获取该文件的绝对路径,输出为:B:\BaiduNetdiskDownload\ubuntu 实验\yolov5\detect.py
FILE = Path(__file__).resolve()

#获取yolov5下的根本路径,输出为 B:\BaiduNetdiskDownload\ubuntu 实验\yolov5
ROOT = FILE.parents[0]

# 查询路径的列表是否在内,如果不在内则添加
if str(ROOT) not in sys.path:
    sys.path.append(str(ROOT))

# 将其绝对路径转换为相对路径
ROOT = Path(os.path.relpath(ROOT, Path.cwd()))
整体的主函数为:
if __name__ == "__main__":
	# 解析命令行格式下的参数
    opt = parse_opt()
    # 调用主函数
    main(opt)
对应命令行格式下的参数可以为图片或者视频流:python detect.py --source data/images/bus.jpg,代码运行截图如下:

具体解析参数的函数如下:
def parse_opt():
   # 传入的参数,以上的参数为命令行赋值的参数,如果没有给定该参数值,会有一个default的默认值进行赋值
    parser = argparse.ArgumentParser()
    parser.add_argument('--weights', nargs='+', type=str, default=ROOT / 'yolov5s.pt', help='model path or triton URL')
    parser.add_argument('--source', type=str, default=ROOT / 'data/images', help='file/dir/URL/glob/screen/0(webcam)')
    parser.add_argument('--data', type=str, default=ROOT / 'data/coco128.yaml', help='(optional) dataset.yaml path')
    parser.add_argument('--imgsz', '--img', '--img-size', nargs='+', type=int, default=[640], help='inference size h,w')

	# 省略的参数(由于参数比较多,此处就不放入

    opt = parser.parse_args()

    # 此处对传入的size加以判断。如果不传入,默认为640,则长度为1,则对应size 为640 * 640。如果传入的参数为640 * 640 ,则不修改
    opt.imgsz *= 2 if len(opt.imgsz) == 1 else 1  # expand
    # 将其所有的参数信息进行打印
    print_args(vars(opt)
    # 将其opt的参数返回,后续调用main函数需要调用该参数
    return opt
具体main函数的执行如下:
def main(opt):
	# 检查requirement的依赖包 有无成功安装,如果没有安装部分会在此处报错
    check_requirements(exclude=('tensorboard', 'thop'))
    # 如果成功安装,将其所有的参数代入,并执行此处的run函数
    run(**vars(opt))
补充**vars(opt)参数讲解,可看我这篇文章的补充:Python关于 *args 和 **kwargs 参数的详解(全)
对应run函数主要内容如下:
- 判断命令行传入的参数以及进行处理
- 新建保存模型的文件夹
- 下载模型权重
- 加载带预测的图片
- 执行模型推理过程,产生结果
- 打印最终的信息
下面的代码模块将依照该顺序进行讲解:
1.1 传入、处理参数
# 该注解是自个定义的注解,主要的功能是判断torch版本
# 如果torch>=1.9.0则应用torch.inference_mode()装饰器,否则使用torch.no_grad()装饰器
@smart_inference_mode()
def run(
        weights=ROOT / 'yolov5s.pt',  # 模型权重或路径
        source=ROOT / 'data/images',  # 图像路径
        data=ROOT / 'data/coco128.yaml',  # coco数据集
        imgsz=(640, 640),  # 图像尺寸
        conf_thres=0.25,  # 置信度
        iou_thres=0.45,  # NMS IOU 大小
        max_det=1000,  # 每张图像的最大检测量
        device='',  # cuda 为0 或者 0 1 2 3 或者 cpu,代码有所判断
        view_img=False,  # 展示图片结果
        save_txt=False,  # 将结果保存到*.txt
        save_conf=False,  # 保存置信度到txt标签中
        save_crop=False,  # 保存裁剪的预测框
        nosave=False,  # 不保存图片或者视频
        classes=None,  # 按照类别筛选,0 或者0 1 2
        agnostic_nms=False,  # class-agnostic NMS
        augment=False,  # 增强推理
        visualize=False,  # 可视化功能
        update=False,  # 更新所有模型
        project=ROOT / 'runs/detect',  # 将结果保存到项目/名称
        name='exp',  # 将结果保存到项目/名称
        exist_ok=False,  # 现有项目名称(不要添加)
        line_thickness=3,  # 边界框像素
        hide_labels=False,  # hide labels
        hide_conf=False,  # hide confidences
        half=False,  # 使用FP16半精度推理
        dnn=False,  # 使用OpenCV DNN进行ONNX推理
        vid_stride=1,  # 视频流的帧步
):
	# 此行代码将其source 转换字符串
	# source 为命令行传入的图片或者视频,大致为:python detect.py --source data/images/bus.jpg
    source = str(source)

	# 是否保存预测后的图片
	# nosave为false,则not nosave为true
	# source传入的参数为jpg而不是txt,为true
	# 最后则表示需要存储最后的预测结果
    save_img = not nosave and not source.endswith('.txt')

	# Path(source):为文件地址,data/images/bus.jpg
	# suffix[1:]:截取文件后缀,即为bus.jpg,而[1:]则为jpg后,最后输出为jpg
	# 判断该jpg是否在(IMG_FORMATS + VID_FORMATS) 该列表内,该列表可参照下一个代码模块。最后输出为true
    is_file = Path(source).suffix[1:] in (IMG_FORMATS + VID_FORMATS)

	# 判断是否为网络流地址或者是网络的图片地址
	# 将其地址转换为小写,并且判断开头是否包括如下网络流开头的
    is_url = source.lower().startswith(('rtsp://', 'rtmp://', 'http://', 'https://'))

	# 是否是使用webcam 网页数据,一般为false
	# 判断source是否为数值(0为摄像头路径)或者txt文件 或者 网络流并且不是文件地址
    webcam = source.isnumeric() or source.endswith('.txt') or (is_url and not is_file)

    # 是否传入的为屏幕快照文件
    screenshot = source.lower().startswith('screen')
    # 如果是网络流地址 以及文件,则对应下载该文件
    if is_url and is_file:
    	# 下载,该函数在下文中有所讲解
        source = check_file(source)
代码中的(IMG_FORMATS + VID_FORMATS) 列表 表示如下:
# 包括的图片后缀
IMG_FORMATS = 'bmp', 'dng', 'jpeg', 'jpg', 'mpo', 'png', 'tif', 'tiff', 'webp', 'pfm'

# 包括的视频后缀
VID_FORMATS = 'asf', 'avi', 'gif', 'm4v', 'mkv', 'mov', 'mp4', 'mpeg', 'mpg', 'ts', 'wmv'
代码中的check_file(source) 函数 代码如下:
# 该函数主要的核心功能为:找到文件或者下载文件
def check_file(file, suffix=''):
    # 在可用的文件后缀中找到文件,该函数在下文中有所讲解
    check_suffix(file, suffix)
    # 转换文件为字符串
    file = str(file)

	# 如果文件存在 或者 不是一个文件,则直接返回文件
    if os.path.isfile(file) or not file:  # exists
        return file

	# 如果文件的前缀为网络流信息,则对应进行下载
    elif file.startswith(('http:/', 'https:/')):
        url = file
        # urllib.parse.unquote(file) 相当于JS中的urldecode(),对url进行解码
        # 类似https://url.com/file.txt?auth 结果为https://url.com/file.txt
        file = Path(urllib.parse.unquote(file).split('?')[0]).name
        # 如果文件存在,则输出logger日志
        if os.path.isfile(file):
            LOGGER.info(f'Found {

      url} locally at {

      file}')
       	# 如果文件不存在,则对应下载文件
        else:
            LOGGER.info(f'Downloading {

      url} to {

      file}...')
            torch.hub.download_url_to_file(url, file)
            assert Path(file).exists() and Path(file).stat().st_size > 0, f'File download failed: {

      url}'  # check
        return file

	# 如果文件前缀为ClearML Dataset,设置断言,表明没有安装,需要用pip进行安装
    elif file.startswith('clearml://'):  # ClearML Dataset ID
        assert 'clearml' in sys.modules, "ClearML is not installed, so cannot use ClearML dataset. Try running 'pip install clearml'."
        return file

	# 都不是以上的情况,则对应搜索目录,找到该文件,并且返回该文件
    else:
        files = []
        # 搜索这些目录
        for d in 'data', 'models', 'utils':
        	# 模糊搜索,并且添加到files的列表中
            files.extend(glob.glob(str(ROOT / d / '**' / file), recursive=True))
        # 设置断言
        assert len(files), f'File not found: {

      file}'  # assert file was found
        assert len(files) == 1, f"Multiple files match '{

      file}', specify exact path: {

      files}"  # assert unique
        return files[0]  # return file
上文中的check_suffix(file, suffix)函数如下:
# 默认按照传参进行设置,如果不传参则赋以下默认值
def check_suffix(file='yolov5s.pt', suffix=('.pt',), msg=''):
    # 在可用的文件后缀中检查后缀
    if file and suffix:
    	# 如果文件后缀为str字符串,则转换为列表
        if isinstance(suffix, str):
            suffix = [suffix]

		# 如果文件为列表或者元组则遍历文件,否则将其文件变为列表来遍历
        for f in file if isinstance(file, (list, tuple)) else [file]:
        	# 找到文件后缀 并且小写
            s = Path(f).suffix.lower()
            if len(s):
                assert s in suffix, f"{

      msg}{

      f} acceptable suffix is {

      suffix}"
1.2 新建文件夹
对应的代码如下:
# 创建文件夹

# Path(project) 为一开始定义的:   project=ROOT / 'runs/detect'
# name为保存的项目名:   name='exp'
# 表示两者的拼接 :runs/detect/exp
save_dir = increment_path(Path(project) / name, exist_ok=exist_ok)

# 传入的命令参数save_txt 为false,则直接创建exp文件夹
# 传入的命令参数save_txt 为 true,则直接拼接一个/ 'labels 创建文件夹
(save_dir / 'labels' if save_txt else save_dir).mkdir(parents=True, exist_ok=True)  # make dir
每次执行detect代码模块,生成的文件夹会进行增量表示(exp序号增量显示)
对应截图如下:

函数源码如下:
# 递增路径 如 run/train/exp --> runs/train/exp{sep}0, runs/exp{sep}1 etc.
def increment_path(path, exist_ok=False, sep='', mkdir=False):
    # string/win路径 -> win路径
    path = Path(path)

	#如果文件路径存在
    if path.exists() and not exist_ok:
    	# 文件path路径为:.with_suffix 将路径添加一个后缀 ''
    	# 文件后缀为:path的后缀
        path, suffix = (path.with_suffix(''), path.suffix) if path.is_file() else (path, '')

        # 方法一
        for n in range(2, 9999):
        	# f开头表示字符串内支持大括号的python表达式
        	# increment
            p = f'{

      path}{

      sep}{

      n}{

      suffix}'
            # 如果不存在该路径,则break退出
            if not os.path.exists(p):
                break
        path = Path(p)

        # 方法二(已弃用)
        # 模糊搜索和path\sep相似的路径
        # dirs = glob.glob(f"{path}{sep}*")

        # re 模糊查询模块  查找dir中有字符串'exp/数字'的d   \d匹配数字
        # matches = [re.search(rf"{path.stem}{sep}(\d+)", d) for d in dirs]

        # 生成对应下标
        # i = [int(m.groups()[0]) for m in matches if m]  # indices

        # 生成的文件后exp数字对应加1
        # n = max(i) + 1 if i else 2  # increment number

		# increment path
        # path = Path(f"{path}{sep}{n}{suffix}")

	# 默认mkdir为false,先不创建dir
    if mkdir:
        path.mkdir(parents=True, exist_ok=True)

    return path
1.3 模型加载
主题代码模块如下:
# 模型加载

# 选择CPU或者GPU,主要为逻辑判断(此处代码就不post出)
# 此处的device 为 None or 'cpu' or 0 or '0' or '0,1,2,3'
device = select_device(device)

# 以下参数都在一开始初始化中定义了
# 模型后端框架,传入对应的参数
model = DetectMultiBackend(weights, device=device, dnn=dnn, data=data, fp16=half)

#加载完模型之后,对应读取模型的步长、类别名、pytorch模型类型
stride, names, pt = model.stride, model.names, model.pt

# 判断模型步长是否为32的倍数
imgsz = check_img_size(imgsz, s=stride)
模型后端框架 DetectMultiBackend选择对应模块:
class DetectMultiBackend(nn.Module):
    def __init__(self, weights='yolov5s.pt', device=torch.device('cpu'), dnn=False, data=None, fp16=False, fuse=True):


		# 限定了作用域以避免循环导入
        from models.experimental import attempt_download, attempt_load
		# 父函数初始化
        super().__init__()
        # 如果weights权重为列表则取出第一个,否则直接取出weights
        w = str(weights[0] if isinstance(weights, list) else weights)
        # 判断框架模型,本身就是pt了
        pt, jit, onnx, xml, engine, coreml, saved_model, pb, tflite, edgetpu, tfjs, paddle, triton = self._model_type(w)
        fp16 &= pt or jit or onnx or engine
        # BHWC formats (vs torch BCWH)
        nhwc = coreml or saved_model or pb or tflite or edgetpu
        # 初始步长为32
        stride = 32
        cuda = torch.cuda.is_available() and device.type != 'cpu'  # use CUDA
        if not (pt or triton):
        	# 如果不在本地会在网络进行下载,如果存在本地则加载权重文件
            w = attempt_download(w)


        if pt:  # PyTorch
        	# 加载模型权重
            model = attempt_load(weights if isinstance(weights, list) else w, device=device, inplace=True, fuse=fuse)
			# 模型的最大权重
            stride = max(int(model.stride.max()), 32)
            # 如果不用COCO数据集或者ImageNet数据集的标签,加载模型pt权重
            names = model.module.names if hasattr(model, 'module') else model.names
            # 用fp16则用半精度推理,没有则用float
            model.half() if fp16 else model.float()
            # 得到加载好的模型
            self.model = model  # explicitly assign for to(), cpu(), cuda(), half()
		elif ...
		# 省略其他情况(大同小异)

     # 生成class name闹脾气哦阿门
    if 'names' not in locals():
    	# 生成对应的 999个标签
        names = yaml_load(data)['names'] if data else {

    i: f'class{

      i}' for i in range(999)}
    if names[0] == 'n01440764' and len(names) == 1000:  # ImageNet
        names = yaml_load(ROOT / 'data/ImageNet.yaml')['names']  # human-readable names

    self.__dict__.update(locals())  # assign all variables to self
对应ImageNet的yml标签如下(部分截图):
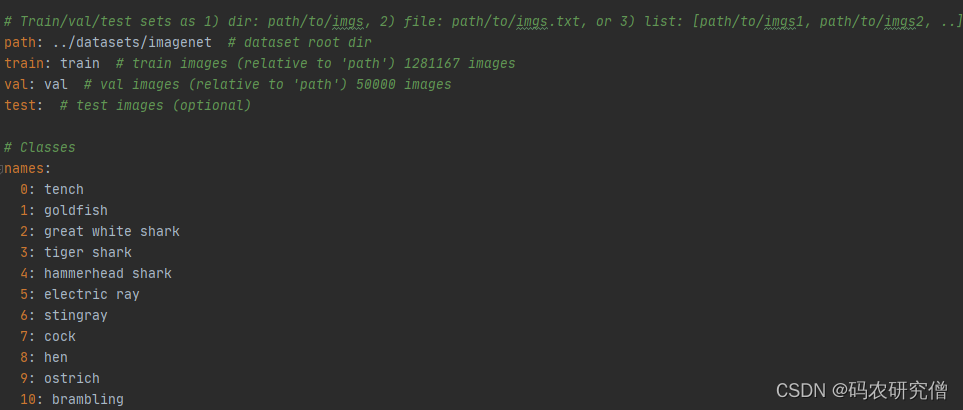
对应的COCO128标签值如下:
# 数据集源路径root、训练集、验证集、测试集地址

# 数据集源路径root dir
path: ../datasets/coco128
# root下的训练集地址 128 images
train: images/train2017
# root下的验证集地址 128 images
val: images/train2017
# root下的验证集地址 128 images
test:

# 数据集类别信息
nc: 80  # 数据集类别数量
names: [ 'person', 'bicycle', 'car', 'motorcycle', 'airplane', 'bus', 'train', 'truck', 'boat', 'traffic light',
         'fire hydrant', 'stop sign', 'parking meter', 'bench', 'bird', 'cat', 'dog', 'horse', 'sheep', 'cow',
         'elephant', 'bear', 'zebra', 'giraffe', 'backpack', 'umbrella', 'handbag', 'tie', 'suitcase', 'frisbee',
         'skis', 'snowboard', 'sports ball', 'kite', 'baseball bat', 'baseball glove', 'skateboard', 'surfboard',
         'tennis racket', 'bottle', 'wine glass', 'cup', 'fork', 'knife', 'spoon', 'bowl', 'banana', 'apple',
         'sandwich', 'orange', 'broccoli', 'carrot', 'hot dog', 'pizza', 'donut', 'cake', 'chair', 'couch',
         'potted plant', 'bed', 'dining table', 'toilet', 'tv', 'laptop', 'mouse', 'remote', 'keyboard', 'cell phone',
         'microwave', 'oven', 'toaster', 'sink', 'refrigerator', 'book', 'clock', 'vase', 'scissors', 'teddy bear',
         'hair drier', 'toothbrush' ]  # 数据集类别名
对应的check_img_size函数如下:
# 验证图像大小是每个维度步幅的倍数
def check_img_size(imgsz, s=32, floor=0):
    # 如果尺寸类型为int
    if isinstance(imgsz, int):
    	# 返回能被除数整除的最接近的x
        new_size = max(make_divisible(imgsz, int(s)), floor)

    # 尺寸类型为其他,转换为列表:img_size=[640, 480]
    else:
        imgsz = list(imgsz)  # convert to list if tuple
        # 新的尺寸对应for遍历循环
        new_size = [max(make_divisible(x, int(s)), floor) for x in imgsz]
    if new_size != imgsz:
        LOGGER.warning(f'WARNING ⚠️ --img-size {

      imgsz} must be multiple of max stride {

      s}, updating to {

      new_size}')
    return new_size
对应的make_divisible 函数如下:
# 返回能被除数整除的最接近的x
def make_divisible(x, divisor):
	# 本身传入的参数为32,32为torch.Tensor的类型,则将其转换为int类型
    if isinstance(divisor, torch.Tensor):
        divisor = int(divisor.max())  # to int

    return math.ceil(x / divisor) * divisor
1.4 加载带预测图
主体函数如下:
# Dataloader
bs = 1  # batch_size

# 流加载器,类似代码 python detect.py——source 'rtsp://example.com/media.mp4'
# 命令行此处定义的webcam 为flase,所以跳过该逻辑
if webcam:
    view_img = check_imshow(warn=True)
    dataset = LoadStreams(source, img_size=imgsz, stride=stride, auto=pt, vid_stride=vid_stride)
    bs = len(dataset)
# 屏幕截图,加载带预测图
elif screenshot:
    dataset = LoadScreenshots(source, img_size=imgsz, stride=stride, auto=pt)
# 加载图
else:
    dataset = LoadImages(source, img_size=imgsz, stride=stride, auto=pt, vid_stride=vid_stride)
vid_path, vid_writer = [None] * bs, [None] * bs
此处讲解一下如何加载图的LoadImages 函数:
class LoadImages:
    # 执行代码:python detect.py --source image.jpg/vid.mp4

    # 初始化字段,本身传入的参数如下:
    # path:data\images\bus.jpg
    # img_size:传入的为【640,640】列表
    # stride步长32
    def __init__(self, path, img_size=640, stride=32, auto=True, transforms=None, vid_stride=1):
    	# 定义一个文件的空列表
        files = []
        # 遍历path路径
        for p in sorted(path) if isinstance(path, (list, tuple)) else [path]:
        	# 通过相对路径得到绝对路径
            p = str(Path(p).resolve())
            # 判断路径是否有带*
            if '*' in p:
            	# 如果p是采样正则化表达式提取图片/视频, 可以使用glob获取文件路径
                files.extend(sorted(glob.glob(p, recursive=True)))
            # 判断路径是否为文件夹
            elif os.path.isdir(p):
            	# 如果p是一个文件夹,使用glob获取全部文件路径
                files.extend(sorted(glob.glob(os.path.join(p, '*.*'))))
            # 判断路径是否为文件
            elif os.path.isfile(p):
            	# 对应添加文件到列表中,本身也是转化为列表
                files.append(p)
            else:
                raise FileNotFoundError(f'{

      p} does not exist')

		# 图片后缀判断是否在IMG_FORMATS,视频后缀判断是否在VID_FORMATS
        images = [x for x in files if x.split('.')[-1].lower() in IMG_FORMATS]
        videos = [x for x in files if x.split('.')[-1].lower() in VID_FORMATS]
        # 图片与视频数量
        ni, nv = len(images), len(videos)

        self.img_size = img_size
        self.stride = stride
        self.files = images + videos
        self.nf = ni + nv  # number of files
        # 此处为标志, 是不是video
        self.video_flag = [False] * ni + [True] * nv
        self.mode = 'image'
        # 默认值为true
        self.auto = auto
        self.transforms = transforms  # optional
        self.vid_stride = vid_stride  # video frame-rate stride
        # 判断videos有无值(此处明显为空)
        if any(videos):
        	# 判断有没有video文件  如果包含video文件,则初始化opencv中的视频模块,cap=cv2.VideoCapture等
            self._new_video(videos[0])
        else:
            self.cap = None
        assert self.nf > 0, f'No images or videos found in {

      p}. ' \
                            f'Supported formats are:\nimages: {

      IMG_FORMATS}\nvideos: {

      VID_FORMATS}'

	# 迭代器
    def __iter__(self):
    	# 调用该类别的时候都会执行一次count计数
       self.count = 0
       return self

	# 与iter一起用
    def __next__(self):
    	# 判断计数是否与总文件数一样,如果一样则表明已经迭代结束
        if self.count == self.nf:
            raise StopIteration
        # 读取当前文件路径
        path = self.files[self.count]

		# 判断当前文件是否是视频
        if self.video_flag[self.count]:
            # Read video
            self.mode = 'video'
            for _ in range(self.vid_stride):
                self.cap.grab()
            # 获取当前帧画面,ret_val为一个bool变量,直到视频读取完毕之前都为True
            ret_val, im0 = self.cap.retrieve()
            # 如果当前视频读取结束,则读取下一个视频
            while not ret_val:
                self.count += 1
                self.cap.release()
                # 表明已经读取完
                if self.count == self.nf:  # last video
                    raise StopIteration
                path = self.files[self.count]
                self._new_video(path)
                ret_val, im0 = self.cap.read()

			# 当前读取视频的帧数
            self.frame += 1
            # im0 = self._cv2_rotate(im0)  # for use if cv2 autorotation is False
            s = f'video {

      self.count + 1}/{

      self.nf} ({

      self.frame}/{

      self.frames}) {

      path}: '

        else:
            # Read image
            self.count += 1
            im0 = cv2.imread(path)  # BGR
            assert im0 is not None, f'Image Not Found {

      path}'
            s = f'image {

      self.count}/{

      self.nf} {

      path}: '

        if self.transforms:
            im = self.transforms(im0)  # transforms
        else:
        	# 填充resize,将其原图变为resize后的图片
            im = letterbox(im0, self.img_size, stride=self.stride, auto=self.auto)[0]  # padded resize

            # 转换,习惯把通道数放置在前面
            im = im.transpose((2, 0, 1))[::-1]  # HWC to CHW, BGR to RGB
            im = np.ascontiguousarray(im)  # contiguous

		# 返回最后的路径、resize + pad的图片、原始图片、视频对象、s为字符串(后续方便输出)
        return path, im, im0, self.cap, s

    def new_video(self, path):
        # 记录帧数
        self.frame = 0
        # 初始化视频对象
        self.cap = cv2.VideoCapture(path)
        # 得到视频文件中的总帧数
        self.frames = int(self.cap.get(cv2.CAP_PROP_FRAME_COUNT))

    def _cv2_rotate(self, im):
       # Rotate a cv2 video manually
       if self.orientation == 0:
           return cv2.rotate(im, cv2.ROTATE_90_CLOCKWISE)
       elif self.orientation == 180:
           return cv2.rotate(im, cv2.ROTATE_90_COUNTERCLOCKWISE)
       elif self.orientation == 90:
           return cv2.rotate(im, cv2.ROTATE_180)
       return im

    def __len__(self):
        return self.nf  # number of files
剩下两个函数,分别为LoadStreams 以及 LoadWebcam 大同小异。
在这些函数中有填充函数:letterbox,讲讲内部细节
# 填充resize,将其原图变为resize后的图片
im = letterbox(im0, self.img_size, stride=self.stride, auto=self.auto)[0]  # padded resize
其函数如下:
# 将图片缩放到指定大小

# img: 原图 hwc
# new_shape: 缩放后的最长边大小
# color: 填充的颜色

# auto: True,保证缩放后的图片保持原图的比例 即 将原图最长边缩放到指定大小,再将原图较短边按原图比例缩放(不会失真)
		#False,将原图最长边缩放到指定大小,再将原图较短边按原图比例缩放,最后将较短边两边pad操作缩放到最长边大小(不会失真)

# scale_fill: True 直接将原图resize到指定的大小,没有pad操作(失真)

# scale_up: True  对于小于new_shape的原图进行缩放,大于的不变
            # False 对于大于new_shape的原图进行缩放,小于的不变
def letterbox(im, new_shape=(640, 640), color=(114, 114, 114), auto=True, scaleFill=False, scaleup=True, stride=32):
    # (1000,810)
    shape = im.shape[:2]  # current shape [height, width]
    if isinstance(new_shape, int):
    	# (512, 512)
        new_shape = (new_shape, new_shape)

    # 也就是640 /1000 以及 640 / 810 求出最小
    # 对于大于new_shape(r<1)的原图进行缩放,小于new_shape(r>1)的不变
    # 总的来说,就是按照长边缩放,短边补零
    r = min(new_shape[0] / shape[0], new_shape[1] / shape[1])
    if not scaleup:  # only scale down, do not scale up (for better val mAP)
    	# 只进行下采样 因为上采样会让图片模糊
        r = min(r, 1.0)

    # Compute padding
    # 此时按照长边的比例进行缩放
    ratio = r, r  # width, height ratios,(1, 1)
    # 缩放过后的图片尺寸为width, height:(480,640)
    # shape[1]在前,shape[0]在后,大致将其宽和高颠倒过来
    new_unpad = int(round(shape[1] * r)), int(round(shape[0] * r))
    dw, dh = new_shape[1] - new_unpad[0], new_shape[0] - new_unpad[1]  # 用原图减去缩放后的图,也就是160,0

    # 输入的只要是32倍的系数,就可输入到图形预测
    # 保证原图比例不变,将图像最大边缩放到指定大小
    if auto:  # minimum rectangle
    	# 取余操作可保证padding后的图片是32的整数倍
        dw, dh = np.mod(dw, stride), np.mod(dh, stride)  # wh padding
    # stretch 直接将图片缩放到指定尺寸
    elif scaleFill:  # stretch
        dw, dh = 0.0, 0.0
        new_unpad = (new_shape[1], new_shape[0])
        ratio = new_shape[1] / shape[1], new_shape[0] / shape[0]  # width, height ratios

	# 此时的宽和高是32的倍数,所以不用进行填充
    dw /= 2  # divide padding into 2 sides
    dh /= 2

	# shape:[h, w]  new_unpad:[w, h]
    if shape[::-1] != new_unpad:  # resize
    	# 将原图resize到new_unpad(长边相同,比例相同的新图)
        im = cv2.resize(im, new_unpad, interpolation=cv2.INTER_LINEAR)
    # 计算上下两侧的padding  # top=0 bottom=0
    top, bottom = int(round(dh - 0.1)), int(round(dh + 0.1))
    # 计算左右两侧的padding  # left=0 right=0
    left, right = int(round(dw - 0.1)), int(round(dw + 0.1))
    # 也就是此处的值没有padding
    im = cv2.copyMakeBorder(im, top, bottom, left, right, cv2.BORDER_CONSTANT, value=color)  # add border

	# img: (480, 640, 3)
    return im, ratio, (dw, dh)
返回到主体函数即为 640 * 480 * 3
1.5 执行推理模型
主体核心代码如下:
# 通过运行一次推理来预热模型(内部初始化一张空白图预热模型)
model.warmup(imgsz=(1 if pt or model.triton else bs, 3, *imgsz))


seen, windows, dt = 0, [], (Profile(), Profile(), Profile())
# dataset数据集遍历,path为图片路径
# im为压缩后的图片, 640 * 480 * 3
# im0s为原图,1080 * 810
# vid_cap 空
# s 打印图片的信息
for path, im, im0s, vid_cap, s in dataset:
    with dt[0]:
    	# numpy array to tensor and device
    	# 在模型中运算,需要转换成pytorch,从numpy转成pytorch
    	# 在将其数据放入到cpu 或者 gpu中
        im = torch.from_numpy(im).to(model.device)
        # 半精度训练 uint8 to fp16/32
        im = im.half() if model.fp16 else im.float()
        # 归一化
        im /= 255  # 0 - 255 to 0.0 - 1.0
		# 图片为3维(RGB),在前面添加一个维度,batch_size=1。本身输入网络的图片需要是4维, [batch_size, channel, w, h]
		# 【1,3,640,480】
        if len(im.shape) == 3:
            im = im[None]  # expand for batch dim

    # Inference
    # visualize 一开始为false,如果为true则对应会保存一些特征
    with dt[1]:
        visualize = increment_path(save_dir / Path(path).stem, mkdir=True) if visualize else False
        # 数据的推断增强,但也会降低速度。最后检测出的结果为18900个框
        # 结果为【1,18900,85】,预训练有85个预测信息,4个坐标 + 1个置信度 +80各类别
        pred = model(im, augment=augment, visualize=visualize)

	# NMS 非极大值阈值过滤
	# conf_thres: 置信度阈值;iou_thres: iou阈值
    # classes: 是否只保留特定的类别 默认为None
    # agnostic_nms: 进行nms是否也去除不同类别之间的框 默认False
    # max_det: 每张图片的最大目标个数 默认1000,超过1000就会过滤
    # pred: [1,num_obj, 6] = [1,5, 6]   这里的预测信息pred还是相对于 img_size(640) 。本身一开始18900变为了5个框,6为每个框的 x左右y左右 以及 置信度 类别值
    with dt[2]:
        pred = non_max_suppression(pred, conf_thres, iou_thres, classes, agnostic_nms, max_det=max_det)
原本之前的版本有记录每一步的耗时时间,现在没了,大致讲讲:
# 对每张图片/视频进行前向推理
t1 = time_synchronized()

t2 = time_synchronized()
对应warmup函数:
# 通过运行一次推理来预热模型
def warmup(self, imgsz=(1, 3, 640, 640)):
    # Warmup model by running inference once
    warmup_types = self.pt, self.jit, self.onnx, self.engine, self.saved_model, self.pb, self.triton
    if any(warmup_types) and (self.device.type != 'cpu' or self.triton):
        im = torch.empty(*imgsz, dtype=torch.half if self.fp16 else torch.float, device=self.device)  # input
        for _ in range(2 if self.jit else 1):  #
            self.forward(im)  # warmup
接着主体代码如下:
# Process predictions

# 对每张图片进行处理,将pred(相对img_size 640)映射回原图img0 size
# 此处的det 表示5个检测框中的信息
for i, det in enumerate(pred):
	# 每处理一张图片,就会加1
    seen += 1
    # 输入源是网页,对应取出dataset中的一张照片
    if webcam:  # batch_size >= 1
        p, im0, frame = path[i], im0s[i].copy(), dataset.count
        s += f'{

      i}: '
    else:
    	# p为当前图片或者视频绝对路径
    	# im0原始图片
    	# frame: 初始为0  可能是当前图片属于视频中的第几帧
        p, im0, frame = path, im0s.copy(), getattr(dataset, 'frame', 0)

    p = Path(p)  # to Path
    # 图片的保存路径
    save_path = str(save_dir / p.name)  # im.jpg
    # txt 保存路径(保存预测框的坐标)
    txt_path = str(save_dir / 'labels' / p.stem) + ('' if dataset.mode == 'image' else f'_{

      frame}')  # im.txt

	# 输出图片shape (w, h)
    s += '%gx%g ' % im.shape[2:]  # print string
    # gn = [w, h, w, h]  用于后面的归一化
    gn = torch.tensor(im0.shape)[[1, 0, 1, 0]]  # normalization gain whwh
    # imc: for save_crop 在save_crop中使用
    imc = im0.copy() if save_crop else im0  # for save_crop

	# 绘图工具,画图检测框的粗细,一种通过PIL,一种通过CV2处理
    annotator = Annotator(im0, line_width=line_thickness, example=str(names))
    if len(det):
        # Rescale boxes from img_size to im0 size
        # 将预测信息(相对img_size 640)映射回原图 img0 size
        det[:, :4] = scale_boxes(im.shape[2:], det[:, :4], im0.shape).round()

        # Print results
        # 统计每个框的类别
        for c in det[:, 5].unique():
            n = (det[:, 5] == c).sum()  # detections per class
            s += f"{

      n} {

      names[int(c)]}{

      's' * (n > 1)}, "  # add to string

        # Write results
        # 保存预测信息: txt、img0上画框、crop_img
        for *xyxy, conf, cls in reversed(det):
        	# 将每个图片的预测信息分别存入save_dir/labels下的xxx.txt中 每行: class_id+score+xywh
            if save_txt:  # Write to file
            	# 将xyxy(左上角 + 右下角)格式转换为xywh(中心的 + 宽高)格式 并除以gn(whwh)做归一化 转为list再保存
                xywh = (xyxy2xywh(torch.tensor(xyxy).view(1, 4)) / gn).view(-1).tolist()  # normalized xywh
                line = (cls, *xywh, conf) if save_conf else (cls, *xywh)  # label format
                with open(f'{

      txt_path}.txt', 'a') as f:
                    f.write(('%g ' * len(line)).rstrip() % line + '\n')

			# 在原图上画框 + 将预测到的目标剪切出来 保存成图片 保存在save_dir/crops下
            if save_img or save_crop or view_img:  # Add bbox to image
                c = int(cls)  # integer class
                label = None if hide_labels else (names[c] if hide_conf else f'{

      names[c]} {

      conf:.2f}')
                annotator.box_label(xyxy, label, color=colors(c, True))
           # 如果需要就将预测到的目标剪切出来 保存成图片 保存在save_dir/crops下
            if save_crop:
                save_one_box(xyxy, imc, file=save_dir / 'crops' / names[c] / f'{

      p.stem}.jpg', BGR=True)

    # Stream results
    im0 = annotator.result()
    if view_img:
        if platform.system() == 'Linux' and p not in windows:
            windows.append(p)
            cv2.namedWindow(str(p), cv2.WINDOW_NORMAL | cv2.WINDOW_KEEPRATIO)  # allow window resize (Linux)
            cv2.resizeWindow(str(p), im0.shape[1], im0.shape[0])
        # 通过imshow显示出框
        cv2.imshow(str(p), im0)
        cv2.waitKey(1)  # 1 millisecond

    # Save results (image with detections)
    # 是否需要保存图片或视频(检测后的图片/视频 里面已经被我们画好了框的) img0
    if save_img:
        if dataset.mode == 'image':
            cv2.imwrite(save_path, im0)
        else:  # 'video' or 'stream'
            if vid_path[i] != save_path:  # new video
                vid_path[i] = save_path
                if isinstance(vid_writer[i], cv2.VideoWriter):
                    vid_writer[i].release()  # release previous video writer
                if vid_cap:  # video
                    fps = vid_cap.get(cv2.CAP_PROP_FPS)
                    w = int(vid_cap.get(cv2.CAP_PROP_FRAME_WIDTH))
                    h = int(vid_cap.get(cv2.CAP_PROP_FRAME_HEIGHT))
                else:  # stream
                    fps, w, h = 30, im0.shape[1], im0.shape[0]
                save_path = str(Path(save_path).with_suffix('.mp4'))  # force *.mp4 suffix on results videos
                vid_writer[i] = cv2.VideoWriter(save_path, cv2.VideoWriter_fourcc(*'mp4v'), fps, (w, h))
            vid_writer[i].write(im0)

# Print time (inference-only)
LOGGER.info(f"{

      s}{

      '' if len(det) else '(no detections), '}{

      dt[1].dt * 1E3:.1f}ms")
1.6 打印信息
最后输出打印的结果信息:
# seen为预测图片总数,dt为耗时时间,求出平均时间
t = tuple(x.t / seen * 1E3 for x in dt)  # speeds per image
LOGGER.info(f'Speed: %.1fms pre-process, %.1fms inference, %.1fms NMS per image at shape {

      (1, 3, *imgsz)}' % t)

# 保存预测的label信息 xywh等   save_txt
if save_txt or save_img:
    s = f"\n{

      len(list(save_dir.glob('labels/*.txt')))} labels saved to {

      save_dir / 'labels'}" if save_txt else ''
    LOGGER.info(f"Results saved to {

      colorstr('bold', save_dir)}{

      s}")
if update:
	# strip_optimizer函数将optimizer从ckpt中删除  更新模型
    strip_optimizer(weights[0])  # update model (to fix SourceChangeWarning)
2. yolo.py
整体代码架构如下:

不同版本显示不一样(总体差不多,解耦而已):

主体主函数如下:
if __name__ == '__main__':
    parser = argparse.ArgumentParser()
    parser.add_argument('--cfg', type=str, default='yolov5s.yaml', help='model.yaml')
    parser.add_argument('--batch-size', type=int, default=1, help='total batch size for all GPUs')
    parser.add_argument('--device', default='', help='cuda device, i.e. 0 or 0,1,2,3 or cpu')
    parser.add_argument('--profile', action='store_true', help='profile model speed')
    parser.add_argument('--line-profile', action='store_true', help='profile model speed layer by layer')
    parser.add_argument('--test', action='store_true', help='test all yolo*.yaml')
    opt = parser.parse_args()
    opt.cfg = check_yaml(opt.cfg)  # check YAML
    print_args(vars(opt))
    device = select_device(opt.device)

    # Create model
    # 随机定义一张图片
    im = torch.rand(opt.batch_size, 3, 640, 640).to(device)
    # 创建模型,初始化
    model = Model(opt.cfg).to(device)

    # 针对模型的一些操作
    # Options
    if opt.line_profile:  # profile layer by layer
        model(im, profile=True)

    elif opt.profile:  # profile forward-backward
        results = profile(input=im, ops=[model], n=3)

    elif opt.test:  # test all models
        for cfg in Path(ROOT / 'models').rglob('yolo*.yaml'):
            try:
                _ = Model(cfg)
            except Exception as e:
                print(f'Error in {

      cfg}: {

      e}')

    else:  # report fused model summary
        model.fuse()
对应创建model 以及 初始化的结构如下:
看上面第一个类中第一个函数是初始化,初始化过程中用到了配置文件
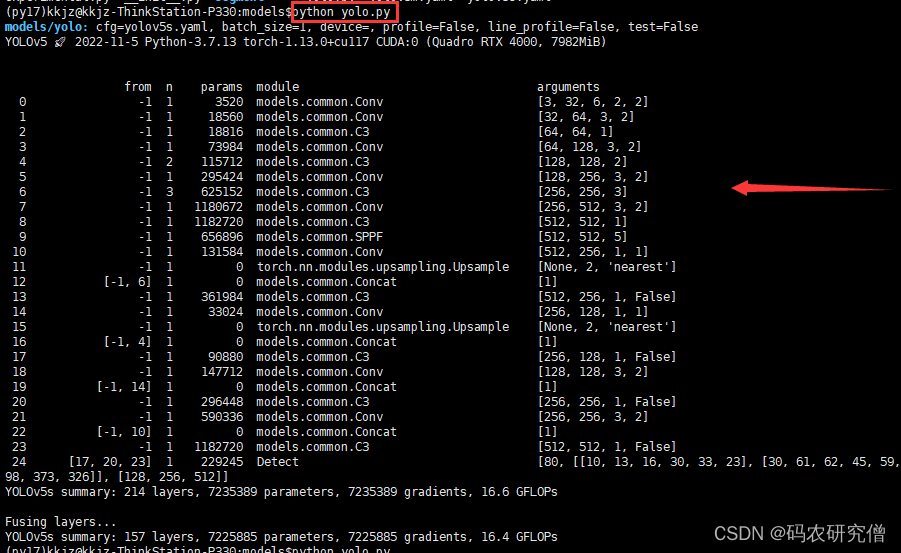
运行该文件,结果如下:
2.1 配置文件
如果没有配置文件,默认使用yolov5s.yml的配置文件
(不同yml文件中,只是depth_multiple 和 width_multiple 不同,也就是卷积核个数和通道尺度不一样而已,整体网络架构一样 )
- 速度:yolov5n>yolov5s>yolov5m>yolov5l>yolov5x
- 准确度:yolov5x>yolov5l>yolov5m>yolov5s>yolov5n
以下为yolov5s的配置文件:
# parameters
nc: 80  # number of classes

# depth_multiple,BottleneckCSP模块的缩放因子,将所有BottleneckCSP模块的Bottleneck乘上该参数得到最终个数。也就是0.33 * 3 个C3结构
# width_multiple,卷积通道的缩放因子,就是将配置里面的backbone和head部分有关Conv通道的设置,全部乘以该系数。也就是 [-1, 1, Conv, [128, 3, 2]], 其中128 * 0.5才是通道数
# 通过这两个参数就可以实现不同复杂度的模型设计。
depth_multiple: 0.33  # model depth multiple 控制模型的深度(BottleneckCSP个数)
width_multiple: 0.50  # layer channel multiple 控制Conv通道channel个数(卷积核数量)


# anchors(提前预定好的矩形框来检测)
# P3/8 - P4/16 - # P5/32 分别对应的层级为(小中大)
anchors:
  - [10,13, 16,30, 33,23]  # P3/8  wh  stride=8
  - [30,61, 62,45, 59,119]  # P4/16
  - [116,90, 156,198, 373,326]  # P5/32

# YOLOv5 backbone,24层结构
backbone:
  # [from, number, module, args]
  # from 当前模块的输入来自那一层的输出,-1表示来自上一层的输出
  # number 本模块重复的次数,1表示只有一个,3表示重复3次
  # module: 模块,比如卷积、c3、上采样、拼接
  # 每个层传入的参数(初始化参数),比如卷积核个数、步长等

# 比如0 - p1/2,2表示跟原图尺寸倍数,缩放2倍
  [[-1, 1, Focus, [64, 3]],          # 0-P1/2   [3, 32, 3]
   [-1, 1, Conv, [128, 3, 2]],       # 1-P2/4   [32, 64, 3, 2]
   [-1, 3, C3, [128]],               # 2        [64, 64, 1]
   [-1, 1, Conv, [256, 3, 2]],       # 3-P3/8   [64, 128, 3, 2]
   [-1, 9, C3, [256]],               # 4        [128, 128, 3]
   [-1, 1, Conv, [512, 3, 2]],       # 5-P4/16  [128, 256, 3, 2]
   [-1, 9, C3, [512]],               # 6        [256, 256, 3]
   [-1, 1, Conv, [1024, 3, 2]],      # 7-P5/32  [256, 512, 3, 2]
   [-1, 1, SPP, [1024, [5, 9, 13]]], # 8        [512, 512, [5, 9, 13]]
   [-1, 3, C3, [1024, False]],       # 9        [512, 512, 1, False]
  ]


# YOLOv5 head  作者没有区分neck模块,所以head部分包含了PANet+Detect部分
head:
  [[-1, 1, Conv, [512, 1, 1]], # 10                 [512, 256, 1, 1]
   [-1, 1, nn.Upsample, [None, 2, 'nearest']], # 11 [None, 2, 'nearest']
   [[-1, 6], 1, Concat, [1]],  # 12 cat backbone P4 [1]
   [-1, 3, C3, [512, False]],  # 13                 [512, 256, 1, False]

   [-1, 1, Conv, [256, 1, 1]], # 14                 [256, 128, 1, 1]
   [-1, 1, nn.Upsample, [None, 2, 'nearest']], #15  [None, 2, 'nearest']
   [[-1, 4], 1, Concat, [1]],  # 16 cat backbone P3 [1]
   [-1, 3, C3, [256, False]],  # 17 (P3/8-small)    [256, 128, 1, False]

   [-1, 1, Conv, [256, 3, 2]], # 18                 [128, 128, 3, 2]
   [[-1, 14], 1, Concat, [1]], # 19 cat head P4     [1]
   [-1, 3, C3, [512, False]],  # 20 (P4/16-medium)  [256, 256, 1, False]

   [-1, 1, Conv, [512, 3, 2]], # 21                 [256, 256, 3, 2]
   [[-1, 10], 1, Concat, [1]], # 22 cat head P5     [1]
   [-1, 3, C3, [1024, False]], # 23 (P5/32-large)   [512, 512, 1, False]


   [[17, 20, 23], 1, Detect, [nc, anchors]],  # 24  Detect(P3, P4, P5)
   # [nc, anchors, 3个Detect的输出channel]
   # [1, [[10, 13, 16, 30, 33, 23], [30, 61, 62, 45, 59, 119], [116, 90, 156, 198, 373, 326]], [128, 256, 512]]
  ]
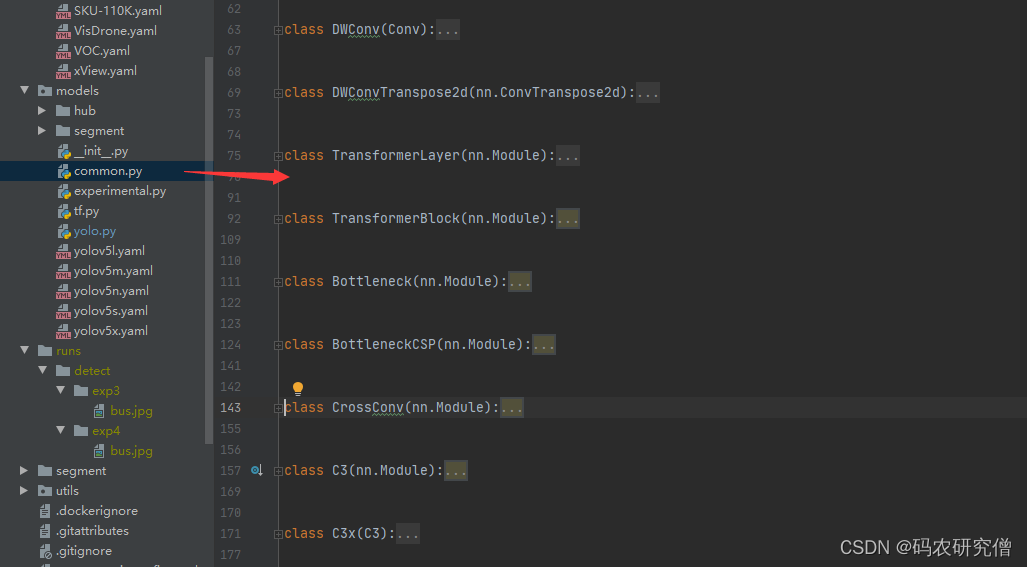
上面每一层的网络结构用到了卷积层、c3层、或者注意力机制(放在了common代码中):
2.2 初始化
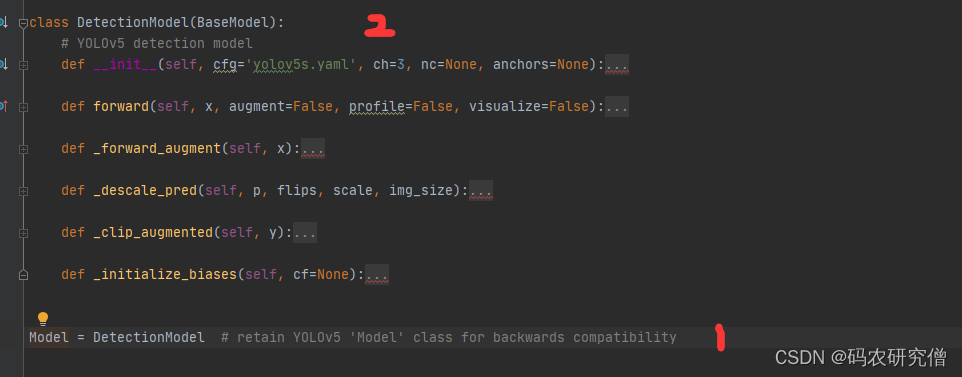
class DetectionModel(BaseModel):
    # YOLOv5 detection model
    # ch ,input img channels 一般是3 RGB文件
    # nc: number of classes 数据集的类别个数
    # anchors: 一般是None
    def __init__(self, cfg='yolov5s.yaml', ch=3, nc=None, anchors=None):  # model, input channels, number of classes
    	# 1. 加载配置文件
        super().__init__()
        if isinstance(cfg, dict):
            self.yaml = cfg  # model dict
        else:  # is *.yaml
            import yaml  # for torch hub
            self.yaml_file = Path(cfg).name
            # 如果配置文件中有中文,打开时要加encoding参数
            with open(cfg, encoding='ascii', errors='ignore') as f:
            	# model dict  取到配置文件中每条的信息(没有注释内容)
                self.yaml = yaml.safe_load(f)  # model dict

		# 2. 加载配置文件搭建网络中的每一层
        # Define model
        # 通道数此处为3
        ch = self.yaml['ch'] = self.yaml.get('ch', ch)  # input channels
        # 一般不执行这个,nc=self.yaml['nc']恒成立
        if nc and nc != self.yaml['nc']:
            LOGGER.info(f"Overriding model.yaml nc={

      self.yaml['nc']} with nc={

      nc}")
            self.yaml['nc'] = nc  # override yaml value
        # anchors默认为none,一般不执行
        if anchors:
            LOGGER.info(f'Overriding model.yaml anchors with anchors={

      anchors}')
            self.yaml['anchors'] = round(anchors)  # override yaml value

		# 创建网络模型(这个parse_model 函数等等会讲)
		# self.model: 初始化的整个网络模型(包括Detect层结构)
        # self.save: 所有层结构中from不等于-1的序号,并排好序  [4, 6, 10, 14, 17, 20, 23]
        self.model, self.save = parse_model(deepcopy(self.yaml), ch=[ch])  # model, savelist

        # 80个类别
        self.names = [str(i) for i in range(self.yaml['nc'])]  # default names

		# self.inplace=True  默认True  不使用加速推理
        self.inplace = self.yaml.get('inplace', True)

		# 3. 求网络步长以及anchor信息
        # Build strides, anchors
        # 获取Detect模块的stride(相对输入图像的下采样率)和anchors在当前Detect输出的feature map的尺度
        # 取出模块的最后一层
        m = self.model[-1]  # Detect()
        if isinstance(m, (Detect, Segment)):
            s = 256  # 2x min stride
            m.inplace = self.inplace

            # 通过前向传播,计算总体的步长
            forward = lambda x: self.forward(x)[0] if isinstance(m, Segment) else self.forward(x)
            # 计算三个feature map下采样的倍率  [8, 16, 32]
            m.stride = torch.tensor([s / x.shape[-2] for x in forward(torch.zeros(1, ch, s, s))])  # forward

            # 检查anchor顺序与stride顺序是否一致,低层对应低层,高层对应高层
            check_anchor_order(m)

            # 求出相对当前feature map的anchor大小 如[10, 13]/8 -> [1.25, 1.625]
            # anchor为像素坐标,需要除以缩放的倍数,才是最后图像的坐标
            m.anchors /= m.stride.view(-1, 1, 1)
            self.stride = m.stride
            self._initialize_biases()  # only run once

		# 4. 打印具体信息
        # Init weights, biases
        # 调用torch_utils.py下initialize_weights初始化模型权重
        initialize_weights(self)
        self.info()
        LOGGER.info('')
2.3 网络模型
主要讲解一下parse_model这个函数
# 更新当前层参数,计算当前层通道。通过当前层参数搭建,并生成卷积保存
#  model_dict 模型文件,字典形式 {dict:7}  yolov5s.yaml中的6个元素 + ch
# input_channels(3)
def parse_model(d, ch):
    # Parse a YOLOv5 model.yaml dictionary
    # 打印相关信息
    LOGGER.info(f"\n{

      '':>3}{

      'from':>18}{

      'n':>3}{

      'params':>10}  {

      'module':<40}{

      'arguments':<30}")
    # 取出anchors、nc、depth_multiple、width_multiple
    anchors, nc, gd, gw, act = d['anchors'], d['nc'], d['depth_multiple'], d['width_multiple'], d.get('activation')
    if act:
        Conv.default_act = eval(act)  # redefine default activation, i.e. Conv.default_act = nn.SiLU()
        LOGGER.info(f"{

      colorstr('activation:')} {

      act}")  # print

	# 每一个predict head上的anchor数 = 3
	# yml文件中的 [10,13, 16,30, 33,23] 、[30,61, 62,45, 59,119]  、[116,90, 156,198, 373,326]
	# 此处的anchors[0]代表[10,13, 16,30, 33,23],得出的数量na是3
    na = (len(anchors[0]) // 2) if isinstance(anchors, list) else anchors  # number of anchors
    # 模型最终输出的通道数 = anchors * (classes + 5) = 3 * 85 = 255
    no = na * (nc + 5)  # number of outputs = anchors * (classes + 5)

	# 开始搭建网络
    # layers: 保存每一层的层结构
    # save: 记录下所有层结构中from中不是-1的层结构序号,主要供后续拼接层使用
    # c2: 保存当前层的输出通道数
    layers, save, c2 = [], [], ch[-1]  # layers, savelist, ch out
    # from(输入来自哪些层), number(当前层个数), module(当前层模块), args(当前层类参数 初定)
    # 遍历backbone和head的每一层
    for i, (f, n, m, args) in enumerate(d['backbone'] + d['head']):  # from, number, module, args
    	# 得到m 当前层的真实类名
        m = eval(m) if isinstance(m, str) else m  # eval strings

		# 此代码无意义,因为args中的a本身就不是字符串
        for j, a in enumerate(args):
            with contextlib.suppress(NameError):
                args[j] = eval(a) if isinstance(a, str) else a  # eval strings

		# 此处输出的第0层为【64,6,2,2】

		# 上面的权重文件已经提及,此处的n实际层个数,是要乘以depth_multiple
		# yolov5s: n*0.33   n: 当前模块的次数(间接控制深度)
		# gd:控制深度
		# 只有n大于1的时候才处理
        n = n_ = max(round(n * gd), 1) if n > 1 else n  # depth gain
        # 求出对应n的层数之后,判定m(每一层的模块)是哪一个,对应添加args参数
        if m in {


                Conv, GhostConv, Bottleneck, GhostBottleneck, SPP, SPPF, DWConv, MixConv2d, Focus, CrossConv,
                BottleneckCSP, C3, C3TR, C3SPP, C3Ghost, nn.ConvTranspose2d, DWConvTranspose2d, C3x}:
            # c1: 当前层的输入的通道数,函数一开始传入的参数就是ch
            #  c2: 当前层的输出的通道数字(初定) ,比如第0层的args输出【64,6,2,2】,则args【0】= 64
            c1, c2 = ch[f], args[0]
            #  只有最后一层c2=no 不用控制宽度,其他的层都要控制宽度
            if c2 != no:  # if not output
            	# gw:控制宽度
            	# yolov5s:如c2*0.5  c2: 当前层的最终输出的channel数(间接控制宽度)
            	# 控制的通道数是不是8的倍数,如果不是8的倍数,则会变成8的倍数
                c2 = make_divisible(c2 * gw, 8)

			# [in_channel, out_channel, *args[1:]]
			# 对应将其重新拼接,因为c1,c2已经改变了,具体值为【3,32,6,2,2】
            args = [c1, c2, *args[1:]]
            # 如果当前层是BottleneckCSP/C3/C3TR, 则需要在args中加入bottleneck的个数
            if m in {

    BottleneckCSP, C3, C3TR, C3Ghost, C3x}:
            	# 在第二个位置插入bottleneck个数n
                args.insert(2, n)  # number of repeats
                # 恢复默认值1,因为传入的参数一开始n为1
                n = 1

        # BN层只需要返回上一层的输出channel
        elif m is nn.BatchNorm2d:
            args = [ch[f]]
       # Concat层则将f中所有的输出累加得到这层的输出channel
        elif m is Concat:
            c2 = sum(ch[x] for x in f)
        # TODO: channel, gw, gd
        elif m in {

    Detect, Segment}:
			# 在args中加入三个Detect层的输出channel
            args.append([ch[x] for x in f])
            if isinstance(args[1], int):  # number of anchors
                args[1] = [list(range(args[1] * 2))] * len(f)
            if m is Segment:
                args[3] = make_divisible(args[3] * gw, 8)
        elif m is Contract:
            c2 = ch[f] * args[0] ** 2
        elif m is Expand:
            c2 = ch[f] // args[0] ** 2
        else:
            c2 = ch[f]

		# 得到当前层module  如果n>1就创建多个m(当前层结构), 如果n=1就创建一个m
        m_ = nn.Sequential(*(m(*args) for _ in range(n))) if n > 1 else m(*args)  # module
        t = str(m)[8:-2].replace('__main__.', '')  # module type
        # 统计这一层的参数量
        np = sum(x.numel() for x in m_.parameters())  # number params
        m_.i, m_.f, m_.type, m_.np = i, f, t, np  # attach index, 'from' index, type, number params
        LOGGER.info(f'{

      i:>3}{

      str(f):>18}{

      n_:>3}{

      np:10.0f}  {

      t:<40}{

      str(args):<30}')  # print
        # 把所有层结构中from不是-1的值记下 ,也就是需要保存记录的层,给后面拼接 [6, 4, 14, 10, 17, 20, 23]
        save.extend(x % i for x in ([f] if isinstance(f, int) else f) if x != -1)  # append to savelist
        # 将当前层结构module加入layers中
        layers.append(m_)

		# 第0层的时候,变为ch列表
        if i == 0:
            ch = []
		# 把当前层的输出channel数加入ch,为了下次迭代可以更好的使用上层输出
        ch.append(c2)
        # 返回整个层的网络结构而且是需要保存的结构,并且排序。 [4, 6, 10, 14, 17, 20, 23]
    return nn.Sequential(*layers), sorted(save)
执行完这个函数后,返回到上层,继续执行初始化的代码模块(已在代码中加注释)
2.4 其他函数
    def forward(self, x, augment=False, profile=False, visualize=False):
    	# 是否在测试时也使用数据增强
        if augment:
            return self._forward_augment(x)  # augmented inference, None
        # 默认执行 正常前向推理
        return self._forward_once(x, profile, visualize)  # single-scale inference, train

	# TTA数据增强
    def _forward_augment(self, x):
        img_size = x.shape[-2:]  # height, width
        s = [1, 0.83, 0.67]  # scales
        f = [None, 3, None]  # flips (2-ud, 3-lr)
        y = []  # outputs
        # zip是 将对象中对应的元素打包成一个个元组,然后返回由这些元组组成的列表
        for si, fi in zip(s, f):
        	# scale_img缩放图片尺寸,该函数后面会讲到
            xi = scale_img(x.flip(fi) if fi else x, si, gs=int(self.stride.max()))
            yi = self._forward_once(xi)[0]  # forward
            # cv2.imwrite(f'img_{si}.jpg', 255 * xi[0].cpu().numpy().transpose((1, 2, 0))[:, :, ::-1])  # save
            # _descale_pred将推理结果恢复到相对原图图片尺寸
            yi = self._descale_pred(yi, fi, si, img_size)
            y.append(yi)
        y = self._clip_augmented(y)  # clip augmented tails
        return torch.cat(y, 1), None  # augmented inference, train

	# TTA,恢复结果图为原图
    def _descale_pred(self, p, flips, scale, img_size):
        # de-scale predictions following augmented inference (inverse operation)
        if self.inplace:
            p[..., :4] /= scale  # de-scale
            if flips == 2:
                p[..., 1] = img_size[0] - p[..., 1]  # de-flip ud
            elif flips == 3:
                p[..., 0] = img_size[1] - p[..., 0]  # de-flip lr
        else:
            x, y, wh = p[..., 0:1] / scale, p[..., 1:2] / scale, p[..., 2:4] / scale  # de-scale
            if flips == 2:
                y = img_size[0] - y  # de-flip ud
            elif flips == 3:
                x = img_size[1] - x  # de-flip lr
            p = torch.cat((x, y, wh, p[..., 4:]), -1)
        return p

    def _clip_augmented(self, y):
        # Clip YOLOv5 augmented inference tails
        nl = self.model[-1].nl  # number of detection layers (P3-P5)
        g = sum(4 ** x for x in range(nl))  # grid points
        e = 1  # exclude layer count
        i = (y[0].shape[1] // g) * sum(4 ** x for x in range(e))  # indices
        y[0] = y[0][:, :-i]  # large
        i = (y[-1].shape[1] // g) * sum(4 ** (nl - 1 - x) for x in range(e))  # indices
        y[-1] = y[-1][:, i:]  # small
        return y

    def _initialize_biases(self, cf=None):  # initialize biases into Detect(), cf is class frequency
        # https://arxiv.org/abs/1708.02002 section 3.3
        # cf = torch.bincount(torch.tensor(np.concatenate(dataset.labels, 0)[:, 0]).long(), minlength=nc) + 1.

		 # 获取Detect模块的stride(相对输入图像的下采样率)和anchors在当前Detect输出的feature map的尺度
        m = self.model[-1]  # Detect() module
        for mi, s in zip(m.m, m.stride):  # from
            b = mi.bias.view(m.na, -1)  # conv.bias(255) to (3,85)
            b.data[:, 4] += math.log(8 / (640 / s) ** 2)  # obj (8 objects per 640 image)
            b.data[:, 5:5 + m.nc] += math.log(0.6 / (m.nc - 0.99999)) if cf is None else torch.log(cf / cf.sum())  # cls
            mi.bias = torch.nn.Parameter(b.view(-1), requires_grad=True)
对应BaseModel后使用到的函数:
class BaseModel(nn.Module):
    # YOLOv5 base model
    def forward(self, x, profile=False, visualize=False):
        return self._forward_once(x, profile, visualize)  # single-scale inference, train

	# profile: True 可做一些性能评估
	# feature_vis: True 可以做一些特征可视化
    def _forward_once(self, x, profile=False, visualize=False):
    	# y: 存放着self.save=True的每一层的输出,后续concat等操作要用到
    	# dt: 在profile中做性能评估时使用
        y, dt = [], []  # outputs
        for m in self.model:
        	# 前向推理每一层结构   m.i=index   m.f=from   m.type=类名   m.np=number of params
            if m.f != -1:  # if not from previous layer
            	# 此处有四个concat以及1个Detect操作
            	# concat,m.f=[-1, 6],用上层输出以及第6层的输出 再送到x=m(x)做concat操作
            	# Detect,m.f=[17, 20, 23],分别别存放第17层第20层第23层的输出 再送到x=m(x)做Detect的forward
            	# 此处的逻辑操作如果看不懂可以拆开
                x = y[m.f] if isinstance(m.f, int) else [x if j == -1 else y[j] for j in m.f]  # from earlier layers

			# 打印日志信息
            if profile:
                self._profile_one_layer(m, x, dt)

			# run正向推理  执行每一层的forward函数(除Concat和Detect操作)
			# 此处迭代
            x = m(x)  # run

			# self.save: 所有层结构中from不等于-1的序号,并排好序  [4, 6, 10, 14, 17, 20, 23]
			# 后面需要用来作concat等操作要用到
            y.append(x if m.i in self.save else None)  # save output

			# 如可 可视化,则对应某一层进行特征可视化
            if visualize:
                feature_visualization(x, m.type, m.i, save_dir=visualize)
        return x

    def _profile_one_layer(self, m, x, dt):
        c = m == self.model[-1]  # is final layer, copy input as inplace fix
        o = thop.profile(m, inputs=(x.copy() if c else x,), verbose=False)[0] / 1E9 * 2 if thop else 0  # FLOPs
        t = time_sync()
        for _ in range(10):
            m(x.copy() if c else x)
        dt.append((time_sync() - t) * 100)
        if m == self.model[0]:
            LOGGER.info(f"{

      'time (ms)':>10s} {

      'GFLOPs':>10s} {

      'params':>10s}  module")
        LOGGER.info(f'{

      dt[-1]:10.2f} {

      o:10.2f} {

      m.np:10.0f}  {

      m.type}')
        if c:
            LOGGER.info(f"{

      sum(dt):10.2f} {

      '-':>10s} {

      '-':>10s}  Total")

    def fuse(self):  # fuse model Conv2d() + BatchNorm2d() layers
        LOGGER.info('Fusing layers... ')
        for m in self.model.modules():
            if isinstance(m, (Conv, DWConv)) and hasattr(m, 'bn'):
                m.conv = fuse_conv_and_bn(m.conv, m.bn)  # update conv
                delattr(m, 'bn')  # remove batchnorm
                m.forward = m.forward_fuse  # update forward
        self.info()
        return self

    def info(self, verbose=False, img_size=640):  # print model information
        model_info(self, verbose, img_size)

    def _apply(self, fn):
        # Apply to(), cpu(), cuda(), half() to model tensors that are not parameters or registered buffers
        self = super()._apply(fn)
        m = self.model[-1]  # Detect()
        if isinstance(m, (Detect, Segment)):
            m.stride = fn(m.stride)
            m.grid = list(map(fn, m.grid))
            if isinstance(m.anchor_grid, list):
                m.anchor_grid = list(map(fn, m.anchor_grid))
        return self
3. train.py
训练过程中主要用到的两条命令:
-
通过权重网络来训练:
python train.py --data coco128.yaml --weights yolov5s.pt --img 640
-
通过cfg的配置搭建网络从头开始训练:
python train.py --data coco128.yaml --weights '' --cfg yolov5s.yaml --img 640
执行这些命令的时候
- 一般没有数据集,将其数据集下载之后放到yolov5同级目录,并且
datasets/coco128/images/train2017:数据集下载 - 没有字体显示,对应添加字体放到yolov5根目录下:字体下载
文件开头的这几行主要用分布式训练:(一般没有使用,默认值设置为-1)
LOCAL_RANK = int(os.getenv('LOCAL_RANK', -1))  # https://pytorch.org/docs/stable/elastic/run.html
RANK = int(os.getenv('RANK', -1))
WORLD_SIZE = int(os.getenv('WORLD_SIZE', 1))
与detect.py代码一开始差不多,有主函数的传参,main函数执行:
if __name__ == "__main__":
    opt = parse_opt()
    main(opt)
3.1 传入、解析参数
具体参数有如下:
| 参数 | 描述 |
|---|---|
| weights | 权重文件 |
| cfg | 权重配置文件 (nc、depth_multiple、width_multiple、anchors、backbone、head等) |
| data | 数据集 (path、train、val、test、nc、names、download等) |
| hyp | 初始超参文件 |
| epochs | 训练轮次 |
| batch-size | 训练批次大小 |
| img-size | 原始图片分辨率 |
| resume | 断点续训, 默认False |
| nosave | 不保存模型 默认False(保存) |
| notest | 是否只测试最后一轮 默认False( 每轮训练完都测试mAP) |
| workers | dataloader中的最大work数(线程个数) |
| device | 训练的设备(CPU GPU) |
| single-cls | 数据集是否只有一个类别 默认False |
| rect | 训练集是否采用矩形训练 默认False |
| noautoanchor | 不自动调整anchor 默认False(自动调整anchor) |
| evolve | 是否进行超参进化 默认False |
| multi-scale | 是否使用多尺度训练 默认False |
| label-smoothing | 标签平滑增强 默认0.0不增强 要增强一般就设为0.1 |
| linear-lr | 是否使用linear lr 线性学习率 默认False 使用cosine lr |
| cache-image | 是否提前缓存图片到内存cache,加速训练 。 默认False |
| project | 训练结果保存的根目录,默认是runs/train |
| name | 训练结果保存的目录,默认是exp 最终: runs/train/exp |
| exist-ok | 文件不存在就新建或increment name , 默认False(默认文件都是不存在的) |
| save_period | 默认-1 ,不需要log model 信息 |
| local_rank | rank为进程编号 -1且gpu=1时不进行分布式 -1且多块gpu使用DataParallel模式 |
完整代码如下:
def parse_opt(known=False):
    parser = argparse.ArgumentParser()
    parser.add_argument('--weights', type=str, default=ROOT / 'yolov5s.pt', help='initial weights path')
    parser.add_argument('--cfg', type=str, default='', help='model.yaml path')
    parser.add_argument('--data', type=str, default=ROOT / 'data/coco128.yaml', help='dataset.yaml path')
    parser.add_argument('--hyp', type=str, default=ROOT / 'data/hyps/hyp.scratch-low.yaml', help='hyperparameters path')
    parser.add_argument('--epochs', type=int, default=100, help='total training epochs')
    parser.add_argument('--batch-size', type=int, default=16, help='total batch size for all GPUs, -1 for autobatch')
    parser.add_argument('--imgsz', '--img', '--img-size', type=int, default=640, help='train, val image size (pixels)')
    parser.add_argument('--rect', action='store_true', help='rectangular training')
    parser.add_argument('--resume', nargs='?', const=True, default=False, help='resume most recent training')
    parser.add_argument('--nosave', action='store_true', help='only save final checkpoint')
    parser.add_argument('--noval', action='store_true', help='only validate final epoch')
    parser.add_argument('--noautoanchor', action='store_true', help='disable AutoAnchor')
    parser.add_argument('--noplots', action='store_true', help='save no plot files')
    parser.add_argument('--evolve', type=int, nargs='?', const=300, help='evolve hyperparameters for x generations')
    parser.add_argument('--bucket', type=str, default='', help='gsutil bucket')
    parser.add_argument('--cache', type=str, nargs='?', const='ram', help='image --cache ram/disk')
    parser.add_argument('--image-weights', action='store_true', help='use weighted image selection for training')
    parser.add_argument('--device', default='', help='cuda device, i.e. 0 or 0,1,2,3 or cpu')
    parser.add_argument('--multi-scale', action='store_true', help='vary img-size +/- 50%%')
    parser.add_argument('--single-cls', action='store_true', help='train multi-class data as single-class')
    parser.add_argument('--optimizer', type=str, choices=['SGD', 'Adam', 'AdamW'], default='SGD', help='optimizer')
    parser.add_argument('--sync-bn', action='store_true', help='use SyncBatchNorm, only available in DDP mode')
    parser.add_argument('--workers', type=int, default=8, help='max dataloader workers (per RANK in DDP mode)')
    parser.add_argument('--project', default=ROOT / 'runs/train', help='save to project/name')
    parser.add_argument('--name', default='exp', help='save to project/name')
    parser.add_argument('--exist-ok', action='store_true', help='existing project/name ok, do not increment')
    parser.add_argument('--quad', action='store_true', help='quad dataloader')
    parser.add_argument('--cos-lr', action='store_true', help='cosine LR scheduler')
    parser.add_argument('--label-smoothing', type=float, default=0.0, help='Label smoothing epsilon')
    parser.add_argument('--patience', type=int, default=100, help='EarlyStopping patience (epochs without improvement)')
    parser.add_argument('--freeze', nargs='+', type=int, default=[0], help='Freeze layers: backbone=10, first3=0 1 2')
    parser.add_argument('--save-period', type=int, default=-1, help='Save checkpoint every x epochs (disabled if < 1)')
    parser.add_argument('--seed', type=int, default=0, help='Global training seed')
    parser.add_argument('--local_rank', type=int, default=-1, help='Automatic DDP Multi-GPU argument, do not modify')

    # Logger arguments
    parser.add_argument('--entity', default=None, help='Entity')
    parser.add_argument('--upload_dataset', nargs='?', const=True, default=False, help='Upload data, "val" option')
    parser.add_argument('--bbox_interval', type=int, default=-1, help='Set bounding-box image logging interval')
    parser.add_argument('--artifact_alias', type=str, default='latest', help='Version of dataset artifact to use')

    return parser.parse_known_args()[0] if known else parser.parse_args()
之后执行run函数(支持指令执行这个脚本 封装train接口)
def run(**kwargs):
    # Usage: import train; train.run(data='coco128.yaml', imgsz=320, weights='yolov5m.pt')
    opt = parse_opt(True)
    for k, v in kwargs.items():
        setattr(opt, k, v)
    main(opt)
    return opt
3.2 日志初始化
具体函数如下:
    # 日志初始化
    # RANK默认是-1
    if RANK in {

    -1, 0}:
        # 输出所有训练opt参数
        print_args(vars(opt))
        # 检查代码版本是否是最新的
        check_git_status()
        # 检查requirements.txt所需包是否都满足 requirements
        check_requirements()
关于检查代码版本是否最新 函数:
@TryExcept()
@WorkingDirectory(ROOT)
def check_git_status(repo='ultralytics/yolov5', branch='master'):
    # YOLOv5 status check, recommend 'git pull' if code is out of date
    url = f'https://github.com/{

      repo}'
    msg = f', for updates see {

      url}'
    # 彩色显示github单词
    s = colorstr('github: ')  # string
    # 检查有没有安装git仓库
    assert Path('.git').exists(), s + 'skipping check (not a git repository)' + msg
    # 检查主机是否联网
    assert check_online(), s + 'skipping check (offline)' + msg

    splits = re.split(pattern=r'\s', string=check_output('git remote -v', shell=True).decode())
    matches = [repo in s for s in splits]
    if any(matches):
        remote = splits[matches.index(True) - 1]
    else:
        remote = 'ultralytics'
        check_output(f'git remote add {

      remote} {

      url}', shell=True)
    check_output(f'git fetch {

      remote}', shell=True, timeout=5)  # git fetch
    local_branch = check_output('git rev-parse --abbrev-ref HEAD', shell=True).decode().strip()  # checked out
    n = int(check_output(f'git rev-list {

      local_branch}..{

      remote}/{

      branch} --count', shell=True))  # commits behind
    # n>0 说明当前版本之后还有commit 因此当前版本不是最新的
    if n > 0:
        pull = 'git pull' if remote == 'origin' else f'git pull {

      remote} {

      branch}'
        s += f"⚠️ YOLOv5 is out of date by {

      n} commit{

      's' * (n > 1)}. Use `{

      pull}` or `git clone {

      url}` to update."
    else:
        s += f'up to date with {

      url} ✅'
    LOGGER.info(s)
检查版本包是否已装上:
@TryExcept()
def check_requirements(requirements=ROOT / 'requirements.txt', exclude=(), install=True, cmds=''):
    # Check installed dependencies meet YOLOv5 requirements (pass *.txt file or list of packages or single package str)
    prefix = colorstr('red', 'bold', 'requirements:')
    check_python()  # check python version
    # 解析requirements.txt中的所有包,解析成列表
    if isinstance(requirements, Path):  # requirements.txt file
        file = requirements.resolve()
        assert file.exists(), f"{

      prefix} {

      file} not found, check failed."
        with file.open() as f:
            requirements = [f'{

      x.name}{

      x.specifier}' for x in pkg.parse_requirements(f) if x.name not in exclude]
    elif isinstance(requirements, str):
        requirements = [requirements]

    s = ''
    # 统计下面程序更新包的个数
    n = 0
    for r in requirements:
        try:
            # 返回对应包所需的所有依赖包
            pkg.require(r)
        except (pkg.VersionConflict, pkg.DistributionNotFound):  # exception if requirements not met
            s += f'"{

      r}" '
            n += 1

    if s and install and AUTOINSTALL:  # check environment variable
        LOGGER.info(f"{

      prefix} YOLOv5 requirement{

      's' * (n > 1)} {

      s}not found, attempting AutoUpdate...")
        try:
            # assert check_online(), "AutoUpdate skipped (offline)"
            LOGGER.info(check_output(f'pip install {

      s} {

      cmds}', shell=True).decode())
            source = file if 'file' in locals() else requirements
            s = f"{

      prefix} {

      n} package{

      's' * (n > 1)} updated per {

      source}\n" \
                f"{

      prefix} ⚠️ {

      colorstr('bold', 'Restart runtime or rerun command for updates to take effect')}\n"
            LOGGER.info(s)
        except Exception as e:
            LOGGER.warning(f'{

      prefix} ❌ {

      e}')
3.3 是否断点恢复
    # Resume (from specified or most recent last.pt)
    # 判断是否使用断点续训resume, 加载参数
    # 本身使用的是预训练好的pt权重文件,所以resume一般为false
    if opt.resume and not check_comet_resume(opt) and not opt.evolve:
        # 使用断点续训 就从last.pt中读取相关参数
        # 如果resume是str,则表示传入的是模型的路径地址
        # 如果resume是True,则通过get_lastest_run()函数找到runs为文件夹中最近的权重文件last.pt
        last = Path(check_file(opt.resume) if isinstance(opt.resume, str) else get_latest_run())
        opt_yaml = last.parent.parent / 'opt.yaml'  # train options yaml
        opt_data = opt.data  # original dataset
        if opt_yaml.is_file():
            with open(opt_yaml, errors='ignore') as f:
                d = yaml.safe_load(f)
        else:
            d = torch.load(last, map_location='cpu')['opt']
        opt = argparse.Namespace(**d)  # replace
        opt.cfg, opt.weights, opt.resume = '', str(last), True  # reinstate
        if is_url(opt_data):
            opt.data = check_file(opt_data)  # avoid HUB resume auth timeout
    else:
    	# 传入对应参数
        opt.data, opt.cfg, opt.hyp, opt.weights, opt.project = \
            check_file(opt.data), check_yaml(opt.cfg), check_yaml(opt.hyp), str(opt.weights), str(opt.project)  # checks
        #判断cfg weights这两个文件是否为空
        assert len(opt.cfg) or len(opt.weights), 'either --cfg or --weights must be specified'
        if opt.evolve:
            if opt.project == str(ROOT / 'runs/train'):  # if default project name, rename to runs/evolve
                opt.project = str(ROOT / 'runs/evolve')
            opt.exist_ok, opt.resume = opt.resume, False  # pass resume to exist_ok and disable resume
        if opt.name == 'cfg':
            opt.name = Path(opt.cfg).stem  # use model.yaml as name
        # 根据opt.project生成目录  如: runs/train/exp3。increment_path增量路径
        opt.save_dir = str(increment_path(Path(opt.project) / opt.name, exist_ok=opt.exist_ok))
3.4 选择设备
这一部分的设备主要选择CPU 还是cuda:0
    # DDP mode
    device = select_device(opt.device, batch_size=opt.batch_size)
    # 进行多GPU训练
    if LOCAL_RANK != -1:
        msg = 'is not compatible with YOLOv5 Multi-GPU DDP training'
        assert not opt.image_weights, f'--image-weights {

      msg}'
        assert not opt.evolve, f'--evolve {

      msg}'
        assert opt.batch_size != -1, f'AutoBatch with --batch-size -1 {

      msg}, please pass a valid --batch-size'
        assert opt.batch_size % WORLD_SIZE == 0, f'--batch-size {

      opt.batch_size} must be multiple of WORLD_SIZE'
        assert torch.cuda.device_count() > LOCAL_RANK, 'insufficient CUDA devices for DDP command'
        torch.cuda.set_device(LOCAL_RANK)
        # 根据GPU编号选择设备
        device = torch.device('cuda', LOCAL_RANK)
        # 初始化进程组
        dist.init_process_group(backend="nccl" if dist.is_nccl_available() else "gloo")
3.5 训练过程
训练的过程是最核心的,其他都是一些基本工作
训练的参数有30多个,手动调参比较麻烦
默认的超参数训练,训练完成之后得到一个不错的训练参数,后用遗传算法来改变参数(得到最好的),不断的迭代(不同超参数选择更好的),但是迭代过程比较慢。遗传算法默认是进化300代
根据之前训练时的hyp来确定一个base hyp再进行突变(每次进化得到的结果来确定之前每个hyp的权重)
有了每个hyp和每个hyp的权重之后有两种进化方式:
- 根据每个hyp的权重随机选择一个之前的hyp作为
base hyp,random.choices(range(n), weights=w) - 根据每个hyp的权重对之前所有的hyp进行融合获得一个
base hyp,(x * w.reshape(n, 1)).sum(0) / w.sum()
evolve.txt会记录每次进化之后的results+hyp
- 每次进化时,hyp会根据之前的结果进行从大到小的排序
- 再根据fitness函数计算之前每次进化得到的hyp的权重,确定哪一种进化方式来进行进化
主体代码如下:
    # Train
    # 不使用遗传算法
    if not opt.evolve:
        #不进行超参数训练,直接训练
        train(opt.hyp, opt, device, callbacks)

    # Evolve hyperparameters (optional)
    # 使用遗传算法求出最佳的参数,在对应训练
    else:
        # Hyperparameter evolution metadata (mutation scale 0-1, lower_limit, upper_limit)
        meta = {


            'lr0': (1, 1e-5, 1e-1),  # initial learning rate (SGD=1E-2, Adam=1E-3)
            'lrf': (1, 0.01, 1.0),  # final OneCycleLR learning rate (lr0 * lrf)
            'momentum': (0.3, 0.6, 0.98),  # SGD momentum/Adam beta1
            'weight_decay': (1, 0.0, 0.001),  # optimizer weight decay
            'warmup_epochs': (1, 0.0, 5.0),  # warmup epochs (fractions ok)
            'warmup_momentum': (1, 0.0, 0.95),  # warmup initial momentum
            'warmup_bias_lr': (1, 0.0, 0.2),  # warmup initial bias lr
            'box': (1, 0.02, 0.2),  # box loss gain
            'cls': (1, 0.2, 4.0),  # cls loss gain
            'cls_pw': (1, 0.5, 2.0),  # cls BCELoss positive_weight
            'obj': (1, 0.2, 4.0),  # obj loss gain (scale with pixels)
            'obj_pw': (1, 0.5, 2.0),  # obj BCELoss positive_weight
            'iou_t': (0, 0.1, 0.7),  # IoU training threshold
            'anchor_t': (1, 2.0, 8.0),  # anchor-multiple threshold
            'anchors': (2, 2.0, 10.0),  # anchors per output grid (0 to ignore)
            'fl_gamma': (0, 0.0, 2.0),  # focal loss gamma (efficientDet default gamma=1.5)
            'hsv_h': (1, 0.0, 0.1),  # image HSV-Hue augmentation (fraction)
            'hsv_s': (1, 0.0, 0.9),  # image HSV-Saturation augmentation (fraction)
            'hsv_v': (1, 0.0, 0.9),  # image HSV-Value augmentation (fraction)
            'degrees': (1, 0.0, 45.0),  # image rotation (+/- deg)
            'translate': (1, 0.0, 0.9),  # image translation (+/- fraction)
            'scale': (1, 0.0, 0.9),  # image scale (+/- gain)
            'shear': (1, 0.0, 10.0),  # image shear (+/- deg)
            'perspective': (0, 0.0, 0.001),  # image perspective (+/- fraction), range 0-0.001
            'flipud': (1, 0.0, 1.0),  # image flip up-down (probability)
            'fliplr': (0, 0.0, 1.0),  # image flip left-right (probability)
            'mosaic': (1, 0.0, 1.0),  # image mixup (probability)
            'mixup': (1, 0.0, 1.0),  # image mixup (probability)
            'copy_paste': (1, 0.0, 1.0)}  # segment copy-paste (probability)

        with open(opt.hyp, errors='ignore') as f:
            # 载入初始化的参数
            hyp = yaml.safe_load(f)  # load hyps dict
            if 'anchors' not in hyp:  # anchors commented in hyp.yaml
                hyp['anchors'] = 3
        if opt.noautoanchor:
            del hyp['anchors'], meta['anchors']
        opt.noval, opt.nosave, save_dir = True, True, Path(opt.save_dir)  # only val/save final epoch
        # ei = [isinstance(x, (int, float)) for x in hyp.values()]  # evolvable indices
        # 超参进化后文件保存地址
        evolve_yaml, evolve_csv = save_dir / 'hyp_evolve.yaml', save_dir / 'evolve.csv'
        if opt.bucket:
            os.system(f'gsutil cp gs://{

      opt.bucket}/evolve.csv {

      evolve_csv}')  # download evolve.csv if exists

        for _ in range(opt.evolve):  # generations to evolve
            if evolve_csv.exists():  # if evolve.csv exists: select best hyps and mutate
                # Select parent(s)
                # 选择超参进化方式 只用single和weighted两种
                parent = 'single'  # parent selection method: 'single' or 'weighted'
                # 加载evolve_csv
                x = np.loadtxt(evolve_csv, ndmin=2, delimiter=',', skiprows=1)
                # 选取至多前五次进化的结果
                n = min(5, len(x))  # number of previous results to consider
                # 根据resluts计算hyp权重
                x = x[np.argsort(-fitness(x))][:n]  # top n mutations
                w = fitness(x) - fitness(x).min() + 1E-6  # weights (sum > 0)
                # 根据不同进化方式获得base hyp
                if parent == 'single' or len(x) == 1:
                    # x = x[random.randint(0, n - 1)]  # random selection
                    x = x[random.choices(range(n), weights=w)[0]]  # weighted selection
                elif parent == 'weighted':
                    x = (x * w.reshape(n, 1)).sum(0) / w.sum()  # weighted combination

                # Mutate
                mp, s = 0.8, 0.2  # mutation probability, sigma
                npr = np.random
                npr.seed(int(time.time()))
                # 获取突变初始值
                g = np.array([meta[k][0] for k in hyp.keys()])  # gains 0-1
                ng = len(meta)
                v = np.ones(ng)
                # 设置突变
                while all(v == 1):  # mutate until a change occurs (prevent duplicates)
                    v = (g * (npr.random(ng) < mp) * npr.randn(ng) * npr.random() * s + 1).clip(0.3, 3.0)
                for i, k in enumerate(hyp.keys()):  # plt.hist(v.ravel(), 300)
                    hyp[k] = float(x[i + 7] * v[i])  # mutate

            # Constrain to limits
            for k, v in meta.items():
                hyp[k] = max(hyp[k], v[1])  # lower limit
                hyp[k] = min(hyp[k], v[2])  # upper limit
                hyp[k] = round(hyp[k], 5)  # significant digits

            # 训练 使用突变后的参超 测试其效果
            # Train mutation
            results = train(hyp.copy(), opt, device, callbacks)
            callbacks = Callbacks()
            # Write mutation results
            keys = ('metrics/precision', 'metrics/recall', 'metrics/mAP_0.5', 'metrics/mAP_0.5:0.95', 'val/box_loss',
                    'val/obj_loss', 'val/cls_loss')
            print_mutation(keys, results, hyp.copy(), save_dir, opt.bucket)

        # Plot results
        plot_evolve(evolve_csv)
        LOGGER.info(f'Hyperparameter evolution finished {

      opt.evolve} generations\n'
                    f"Results saved to {

      colorstr('bold', save_dir)}\n"
                    f'Usage example: $ python train.py --hyp {

      evolve_yaml}')
对应不使用遗传算法的训练
3.5.1 初始化参数配置
对应的代码如下:
def train(hyp, opt, device, callbacks):  # hyp is path/to/hyp.yaml or hyp dictionary
    save_dir, epochs, batch_size, weights, single_cls, evolve, data, cfg, resume, noval, nosave, workers, freeze = \
        Path(opt.save_dir), opt.epochs, opt.batch_size, opt.weights, opt.single_cls, opt.evolve, opt.data, opt.cfg, \
        opt.resume, opt.noval, opt.nosave, opt.workers, opt.freeze

    # 日志的回调函数,查找有无这个函数
    callbacks.run('on_pretrain_routine_start')

    # Directories
    # save_dir 保存训练结果的目录
    # w为权重文件的保存目录
    w = save_dir / 'weights'  # weights dir
    (w.parent if evolve else w).mkdir(parents=True, exist_ok=True)  # make dir
    # 权重结果保存一个最好的 还有最后一个
    last, best = w / 'last.pt', w / 'best.pt'

    # Hyperparameters
    if isinstance(hyp, str):
        with open(hyp, errors='ignore') as f:
            # 加载超参数
            hyp = yaml.safe_load(f)  # load hyps dict
    LOGGER.info(colorstr('hyperparameters: ') + ', '.join(f'{

      k}={

      v}' for k, v in hyp.items()))
    opt.hyp = hyp.copy()  # for saving hyps to checkpoints

    # Save run settings
    if not evolve:
        yaml_save(save_dir / 'hyp.yaml', hyp)
        yaml_save(save_dir / 'opt.yaml', vars(opt))

    # Loggers
    data_dict = None
    if RANK in {

    -1, 0}:
        loggers = Loggers(save_dir, weights, opt, hyp, LOGGER)  # loggers instance

        # Register actions
        # 遍历日志记录器,通过callback需求对应函数代码
        for k in methods(loggers):
            callbacks.register_action(k, callback=getattr(loggers, k))

        # Process custom dataset artifact link
        data_dict = loggers.remote_dataset
        if resume:  # If resuming runs from remote artifact
            weights, epochs, hyp, batch_size = opt.weights, opt.epochs, opt.hyp, opt.batch_size

    # Config
    # 通过plot 看看是否需要将其图表画出
    plots = not evolve and not opt.noplots  # create plots
    # 选择设备,是否支持cuda
    cuda = device.type != 'cpu'
    # 设置一系列的随机数种子,保证之后可以复现
    init_seeds(opt.seed + 1 + RANK, deterministic=True)
    with torch_distributed_zero_first(LOCAL_RANK):
        # 检查数据集,读取COCO128数据集,如果本地没有则从torch库中下载并解压数据集
        data_dict = data_dict or check_dataset(data)  # check if None

    # 取出的训练集路径和测试集路径,在COCO128中
    # path:../ datasets / coco128  # dataset root dir
    # train: yolov5 / data / images / train2017  # train images (relative to 'path') 128 images
    # val: yolov5 / data / images / train2017
    train_path, val_path = data_dict['train'], data_dict['val']
    #数据集有多少种类别
    nc = 1 if single_cls else int(data_dict['nc'])  # number of classes
    # names: 数据集所有类别的名字
    names = {

    0: 'item'} if single_cls and len(data_dict['names']) != 1 else data_dict['names']  # class names
    # 验证当前数据集是否是coco数据集(此处我用的不是COCO,而是COCO128的数据集,所以后缀不是下面这个,最后is_coco这个变量为false)
    is_coco = isinstance(val_path, str) and val_path.endswith('coco/val2017.txt')  # COCO dataset
3.5.2 模型载入
加载模型有两种方式,一种是通过opt.cfg 另一种是通过ckpt['model'].yaml。区别在于是否使用resume 如果使用resume会将opt.cfg设为空,按照ckpt['model'].yaml来创建模型
    # Model
    # 检查权重文件后缀
    check_suffix(weights, '.pt')  # check weights
    # 载入模型
    pretrained = weights.endswith('.pt')
    # 使用预训练
    if pretrained:
        # 该函数主用于同步不同进程对数据读取的上下文管理器
        with torch_distributed_zero_first(LOCAL_RANK):
            # 通过google下载,一般下载失败。提前到github下载到weights中
            weights = attempt_download(weights)  # download if not found locally
        # 加载模型及参数,ckpt存储加载进来的权重文件
        ckpt = torch.load(weights, map_location='cpu')  # load checkpoint to CPU to avoid CUDA memory leak
        # 根绝传输进来的ckpt这个权重文件,添加对应的ch(通道数)、 nc(类别数)、anchors参数,创建新的网络架构
        # 之所以又要创建一个网络架构,是因为权重文件的pt是80个类别,但是训练的时候类别数换了,所以某些参数更改,整体的网络架构重新构建
        model = Model(cfg or ckpt['model'].yaml, ch=3, nc=nc, anchors=hyp.get('anchors')).to(device)  # create

        exclude = ['anchor'] if (cfg or hyp.get('anchors')) and not resume else []  # exclude keys
        # 重新构建部分参数,提取对应的csd特征
        csd = ckpt['model'].float().state_dict()  # checkpoint state_dict as FP32
        # 筛选字典中的键值对,把exclude删除
        csd = intersect_dicts(csd, model.state_dict(), exclude=exclude)  # intersect
        # 载入模型权重。虽然训练和测试的 类别不一样,但是可以将之前训练有用的特征 加载到 测试的特征中
        model.load_state_dict(csd, strict=False)  # load

        LOGGER.info(f'Transferred {

      len(csd)}/{

      len(model.state_dict())} items from {

      weights}')  # report
    else:
        # 不使用预训练
        model = Model(cfg, ch=3, nc=nc, anchors=hyp.get('anchors')).to(device)  # create
    amp = check_amp(model)  # check AMP

    # Freeze
    # 冻结权重层,如果训练全部层数,可以得到更好的性能,当然也会慢
    # 冻结对应的层不用训练
    freeze = [f'model.{

      x}.' for x in (freeze if len(freeze) > 1 else range(freeze[0]))]  # layers to freeze
    for k, v in model.named_parameters():
        v.requires_grad = True  # train all layers
        # v.register_hook(lambda x: torch.nan_to_num(x))  # NaN to 0 (commented for erratic training results)
        if any(x in k for x in freeze):
            LOGGER.info(f'freezing {

      k}')
            v.requires_grad = False

    # Image size
    # gs: 获取模型最大stride=32   [32 16 8]
    # 模型缩小的倍数(相较于原图缩小的倍数)
    gs = max(int(model.stride.max()), 32)  # grid size (max stride)
    # 检查输入的图片是否满足32倍的关系,如果不满足会自动补偿满足32倍
    imgsz = check_img_size(opt.imgsz, gs, floor=gs * 2)  # verify imgsz is gs-multiple
3.5.3 优化及学习
# Batch size
    if RANK == -1 and batch_size == -1:  # single-GPU only, estimate best batch size
        batch_size = check_train_batch_size(model, imgsz, amp)
        loggers.on_params_update({

    "batch_size": batch_size})

    # Optimizer
    nbs = 64  # nominal batch size
    #  64/16=4 ,模型更新,扩大batch size
    accumulate = max(round(nbs / batch_size), 1)  # accumulate loss before optimizing
    # 根据accumulate设置超参: 权重衰减参数
    hyp['weight_decay'] *= batch_size * accumulate / nbs  # scale weight_decay
    optimizer = smart_optimizer(model, opt.optimizer, hyp['lr0'], hyp['momentum'], hyp['weight_decay'])

    # Scheduler
    if opt.cos_lr:
        #使用one cycle 学习率
        lf = one_cycle(1, hyp['lrf'], epochs)  # cosine 1->hyp['lrf']
    else:
        #线性学习率
        lf = lambda x: (1 - x / epochs) * (1.0 - hyp['lrf']) + hyp['lrf']  # linear
    # 实例化
    scheduler = lr_scheduler.LambdaLR(optimizer, lr_lambda=lf)  # plot_lr_scheduler(optimizer, scheduler, epochs)
训练过程前的准备:
# EMA
    # 单卡训练: 使用EMA(指数移动平均)对模型的参数做平均, 一种给予近期数据更高权重的平均方法, 以求提高测试指标并增加模型鲁棒。
    ema = ModelEMA(model) if RANK in {

    -1, 0} else None

    # Resume
    #预训练
    best_fitness, start_epoch = 0.0, 0
    if pretrained:
        if resume:
            best_fitness, start_epoch, epochs = smart_resume(ckpt, optimizer, ema, weights, epochs, resume)
        del ckpt, csd

    # DP mode
    # 使用DataParallel单机多卡模式  效果并不好(分布不平均)
    if cuda and RANK == -1 and torch.cuda.device_count() > 1:
        LOGGER.warning('WARNING ⚠️ DP not recommended, use torch.distributed.run for best DDP Multi-GPU results.\n'
                       'See Multi-GPU Tutorial at https://github.com/ultralytics/yolov5/issues/475 to get started.')
        model = torch.nn.DataParallel(model)

    # SyncBatchNorm, 是否使用跨卡BN
    if opt.sync_bn and cuda and RANK != -1:
        model = torch.nn.SyncBatchNorm.convert_sync_batchnorm(model).to(device)
        LOGGER.info('Using SyncBatchNorm()')
3.5.4 数据加载
    # Trainloader
    train_loader, dataset = create_dataloader(train_path,
                                              imgsz,
                                              batch_size // WORLD_SIZE,
                                              gs,
                                              single_cls,
                                              hyp=hyp,
                                              augment=True,
                                              cache=None if opt.cache == 'val' else opt.cache,
                                              rect=opt.rect,
                                              rank=LOCAL_RANK,
                                              workers=workers,
                                              image_weights=opt.image_weights,
                                              quad=opt.quad,
                                              prefix=colorstr('train: '),
                                              shuffle=True)
    # 取出类别数
    labels = np.concatenate(dataset.labels, 0)
    # 获取标签中最大类别值
    mlc = int(labels[:, 0].max())  # max label class
    # 小于类别数则表示有问题
    assert mlc < nc, f'Label class {

      mlc} exceeds nc={

      nc} in {

      data}. Possible class labels are 0-{

      nc - 1}'

    # Process 0
    if RANK in {

    -1, 0}:
        val_loader = create_dataloader(val_path,
                                       imgsz,
                                       batch_size // WORLD_SIZE * 2,
                                       gs,
                                       single_cls,
                                       hyp=hyp,
                                       cache=None if noval else opt.cache,
                                       rect=True,
                                       rank=-1,
                                       workers=workers * 2,
                                       pad=0.5,
                                       prefix=colorstr('val: '))[0]
        # 不使用断点恢复
        if not resume:
            # 计算默认锚框anchor与数据集标签框的高宽比
            # 标签的高h宽w与anchor的高h_a宽h_b的比值 即h/h_a, w/w_a都要在(1/hyp['anchor_t'], hyp['anchor_t'])是可以接受的
            # 如果bpr小于98%,则根据k-mean算法聚类新的锚框
            if not opt.noautoanchor:
                check_anchors(dataset, model=model, thr=hyp['anchor_t'], imgsz=imgsz)  # run AutoAnchor
            model.half().float()  # pre-reduce anchor precision

        callbacks.run('on_pretrain_routine_end', labels, names)
3.5.5 训练
设置预备的参数准备:
    # Start training
    t0 = time.time()
    nb = len(train_loader)  # number of batches
    # 获取热身迭代的次数iterations
    nw = max(round(hyp['warmup_epochs'] * nb), 100)  # number of warmup iterations, max(3 epochs, 100 iterations)
    # nw = min(nw, (epochs - start_epoch) / 2 * nb)  # limit warmup to < 1/2 of training
    last_opt_step = -1
    # 初始化每个map
    maps = np.zeros(nc)  # mAP per class
    # 初始化results
    results = (0, 0, 0, 0, 0, 0, 0)  # P, R, [email protected], [email protected], val_loss(box, obj, cls)
    # 设置学习率衰减所进行到的轮次,即使打断训练,使用resume接着训练也能正常衔接之前的训练进行学习率衰减
    scheduler.last_epoch = start_epoch - 1  # do not move
    # 设置amp混合精度训练
    scaler = torch.cuda.amp.GradScaler(enabled=amp)
    stopper, stop = EarlyStopping(patience=opt.patience), False
    # 初始化损失函数
    compute_loss = ComputeLoss(model)  # init loss class
    callbacks.run('on_train_start')
    LOGGER.info(f'Image sizes {

      imgsz} train, {

      imgsz} val\n'
                f'Using {

      train_loader.num_workers * WORLD_SIZE} dataloader workers\n'
                f"Logging results to {

      colorstr('bold', save_dir)}\n"
                f'Starting training for {

      epochs} epochs...')
训练过程:
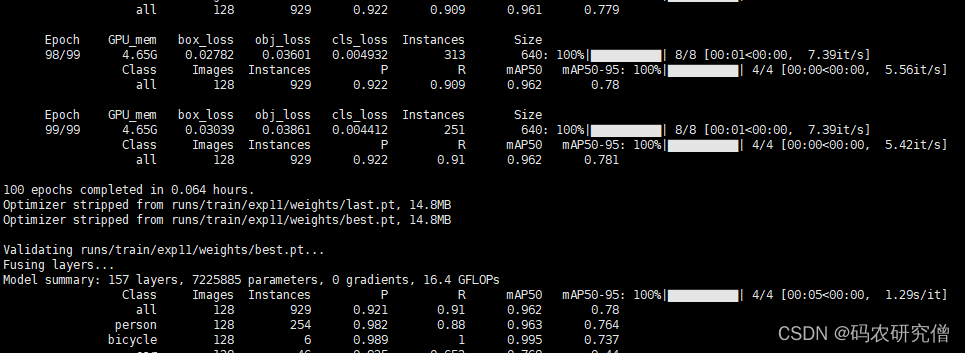
# 训练的批次 迭代入口
    for epoch in range(start_epoch, epochs):  # epoch ------------------------------------------------------------------
        callbacks.run('on_train_epoch_start')
        model.train()

        # Update image weights (optional, single-GPU only)
        # 如果为True 进行图片采样策略(按数据集各类别权重采样)
        if opt.image_weights:
            # model.class_weights(每个类别的权重 频率高的权重小)
            cw = model.class_weights.cpu().numpy() * (1 - maps) ** 2 / nc  # class weights
            # 对应图片的权重
            iw = labels_to_image_weights(dataset.labels, nc=nc, class_weights=cw)  # image weights
            # 得到所有图片的采样顺序
            dataset.indices = random.choices(range(dataset.n), weights=iw, k=dataset.n)  # rand weighted idx

        # Update mosaic border (optional)
        # b = int(random.uniform(0.25 * imgsz, 0.75 * imgsz + gs) // gs * gs)
        # dataset.mosaic_border = [b - imgsz, -b]  # height, width borders

        # 初始化训练时打印的平均损失信息
        mloss = torch.zeros(3, device=device)  # mean losses

        if RANK != -1:
            # DDP模式打乱数据,并且dpp.sampler的随机采样数据是基于epoch+seed作为随机种子,每次epoch不同,随机种子不同
            train_loader.sampler.set_epoch(epoch)

        # 进度条
        pbar = enumerate(train_loader)
        LOGGER.info(('\n' + '%11s' * 7) % ('Epoch', 'GPU_mem', 'box_loss', 'obj_loss', 'cls_loss', 'Instances', 'Size'))
        if RANK in {

    -1, 0}:
            # 创建进度条
            pbar = tqdm(pbar, total=nb, bar_format='{l_bar}{bar:10}{r_bar}{bar:-10b}')  # progress bar

        # 梯度清零
        optimizer.zero_grad()
        for i, (imgs, targets, paths, _) in pbar:  # batch -------------------------------------------------------------
            callbacks.run('on_train_batch_start')
            # ni: 计算当前迭代次数
            ni = i + nb * epoch  # number integrated batches (since train start)
            imgs = imgs.to(device, non_blocking=True).float() / 255  # uint8 to float32, 0-255 to 0.0-1.0

			# Warmup
            # 热身训练迭代的次数iteration范围[1:nw]
            # 选取较小的accumulate,学习率以及momentum, 慢慢的训练选取较小的accumulate,学习率以及momentum,慢慢的训练
            if ni <= nw:
                xi = [0, nw]  # x interp
                # compute_loss.gr = np.interp(ni, xi, [0.0, 1.0])  # iou loss ratio (obj_loss = 1.0 or iou)
                accumulate = max(1, np.interp(ni, xi, [1, nbs / batch_size]).round())
                for j, x in enumerate(optimizer.param_groups):
                    # bias lr falls from 0.1 to lr0, all other lrs rise from 0.0 to lr0
                    # bias的学习率从0.1下降到基准学习率lr*lf(epoch) 其他的参数学习率增加到lr*lf(epoch)
                    # lf为上面设置的余弦退火的衰减函数
                    x['lr'] = np.interp(ni, xi, [hyp['warmup_bias_lr'] if j == 0 else 0.0, x['initial_lr'] * lf(epoch)])
                    if 'momentum' in x:
                        x['momentum'] = np.interp(ni, xi, [hyp['warmup_momentum'], hyp['momentum']])

            # Multi-scale
            # 多尺度训练
            if opt.multi_scale:
                # 从[imgsz*0.5, imgsz*1.5+gs]间随机选取一个尺寸(32的倍数)作为当前batch的尺寸送入模型开始训练
                # imgsz:原图
                # gs: 模型最大stride=32   [32 16 8]
                sz = random.randrange(imgsz * 0.5, imgsz * 1.5 + gs) // gs * gs  # size
                sf = sz / max(imgs.shape[2:])  # scale factor
                if sf != 1:
                    ns = [math.ceil(x * sf / gs) * gs for x in imgs.shape[2:]]  # new shape (stretched to gs-multiple)
                    # 下采样
                    imgs = nn.functional.interpolate(imgs, size=ns, mode='bilinear', align_corners=False)

            # Forward
            # 混合精度训练
            with torch.cuda.amp.autocast(amp):
                pred = model(imgs)  # forward
                # 计算损失,包括分类损失,置信度损失和框的回归损失
                # loss为总损失值
                # loss_items为一个元组,包含分类损失、置信度损失、框的回归损失和总损失
                loss, loss_items = compute_loss(pred, targets.to(device))  # loss scaled by batch_size
                if RANK != -1:
                    # 采用DDP训练 平均不同gpu之间的梯度
                    loss *= WORLD_SIZE  # gradient averaged between devices in DDP mode
                if opt.quad:
                    loss *= 4.

            # Backward
            scaler.scale(loss).backward()

            # Optimize - https://pytorch.org/docs/master/notes/amp_examples.html
            # 模型反向传播 ,到accumulate次更新参数
            if ni - last_opt_step >= accumulate:
                # 值不是 infs 或者 NaNs, 那么调用optimizer.step()来更新权重,否则不更新
                scaler.unscale_(optimizer)  # unscale gradients
                torch.nn.utils.clip_grad_norm_(model.parameters(), max_norm=10.0)  # clip gradients
                scaler.step(optimizer)  # optimizer.step

                scaler.update()
                optimizer.zero_grad()
                if ema:
                    ema.update(model)
                last_opt_step = ni

            # Log
            # 打印epoch、显存、损失(box、obj、cls、total)、当前batch的target的数量和图片的size等信息
            if RANK in {

    -1, 0}:
                mloss = (mloss * i + loss_items) / (i + 1)  # update mean losses
                mem = f'{

      torch.cuda.memory_reserved() / 1E9 if torch.cuda.is_available() else 0:.3g}G'  # (GB)
                pbar.set_description(('%11s' * 2 + '%11.4g' * 5) %
                                     (f'{

      epoch}/{

      epochs - 1}', mem, *mloss, targets.shape[0], imgs.shape[-1]))
                callbacks.run('on_train_batch_end', model, ni, imgs, targets, paths, list(mloss))
                if callbacks.stop_training:
                    return
            # end batch ------------------------------------------------------------------------------------------------

        # Scheduler
        # 每个epoch都要调整学习率(pg0、pg1、pg2)
        lr = [x['lr'] for x in optimizer.param_groups]  # for loggers
        scheduler.step()

        # validation
        if RANK in {

    -1, 0}:
            # mAP
            callbacks.run('on_train_epoch_end', epoch=epoch)
            ema.update_attr(model, include=['yaml', 'nc', 'hyp', 'names', 'stride', 'class_weights'])
            # 判断当前epoch是否是最后一轮
            final_epoch = (epoch + 1 == epochs) or stopper.possible_stop

            # noval: 是否只测试最后一轮
                # True: 只测试最后一轮
                # False: 每轮训练完都测试mAP

            # maps: [80] 所有类别的[email protected]:0.95
            # box_loss 验证集回归损失, obj_loss 验证集置信度损失, cls_loss 验证集分类损失
            if not noval or final_epoch:  # Calculate mAP
                results, maps, _ = validate.run(data_dict, # 数据集配置文件地址 包含数据集的路径、类别个数、类名、下载地址等信息
                                                batch_size=batch_size // WORLD_SIZE * 2,
                                                imgsz=imgsz,
                                                half=amp,
                                                model=ema.ema,
                                                single_cls=single_cls, # 是否是单类数据集
                                                dataloader=val_loader,
                                                save_dir=save_dir,# 保存地址 runs/train/expn
                                                plots=False,
                                                callbacks=callbacks,
                                                compute_loss=compute_loss)# 损失函数(train)

            # Update best mAP
            # fi: [P, R, [email protected], [email protected]]的一个加权值 = 0.1*[email protected] + 0.9*[email protected]
            fi = fitness(np.array(results).reshape(1, -1))  # weighted combination of [P, R, [email protected], [email protected]]
            stop = stopper(epoch=epoch, fitness=fi)  # early stop check
            if fi > best_fitness:
                best_fitness = fi
            log_vals = list(mloss) + list(results) + lr
            callbacks.run('on_fit_epoch_end', log_vals, epoch, best_fitness, fi)

            # Save model
            if (not nosave) or (final_epoch and not evolve):  # if save
                ckpt = {


                    'epoch': epoch,
                    'best_fitness': best_fitness,
                    'model': deepcopy(de_parallel(model)).half(),
                    'ema': deepcopy(ema.ema).half(),
                    'updates': ema.updates,
                    'optimizer': optimizer.state_dict(),
                    'opt': vars(opt),
                    'date': datetime.now().isoformat()}

                # Save last, best and delete
                torch.save(ckpt, last)
                if best_fitness == fi:
                    torch.save(ckpt, best)
                if opt.save_period > 0 and epoch % opt.save_period == 0:
                    torch.save(ckpt, w / f'epoch{

      epoch}.pt')
                del ckpt
                callbacks.run('on_model_save', last, epoch, final_epoch, best_fitness, fi)

        # EarlyStopping
        if RANK != -1:  # if DDP training
            broadcast_list = [stop if RANK == 0 else None]
            dist.broadcast_object_list(broadcast_list, 0)  # broadcast 'stop' to all ranks
            if RANK != 0:
                stop = broadcast_list[0]
        if stop:
            break  # must break all DDP ranks

        # end epoch ----------------------------------------------------------------------------------------------------
    # end training -----------------------------------------------------------------------------------------------------
打印输出的信息:
    if RANK in {

    -1, 0}:
        # 日志: 打印训练时间
        LOGGER.info(f'\n{

      epoch - start_epoch + 1} epochs completed in {

      (time.time() - t0) / 3600:.3f} hours.')
        # 模型训练完后, strip_optimizer函数将optimizer从ckpt中删除。并对模型进行model.half() 将Float32->Float16 这样可以减少模型大小, 提高inference速度
        for f in last, best:
            if f.exists():
                strip_optimizer(f)  # strip optimizers


                if f is best:
                    LOGGER.info(f'\nValidating {

      f}...')
                    results, _, _ = validate.run(
                        data_dict,
                        batch_size=batch_size // WORLD_SIZE * 2,
                        imgsz=imgsz,
                        model=attempt_load(f, device).half(),
                        iou_thres=0.65 if is_coco else 0.60,  # best pycocotools at iou 0.65
                        single_cls=single_cls,
                        dataloader=val_loader,
                        save_dir=save_dir,
                        save_json=is_coco,
                        verbose=True,
                        plots=plots,
                        callbacks=callbacks,
                        compute_loss=compute_loss)  # val best model with plots
                    if is_coco:
                        callbacks.run('on_fit_epoch_end', list(mloss) + list(results) + lr, epoch, best_fitness, fi)

        callbacks.run('on_train_end', last, best, epoch, results)

    torch.cuda.empty_cache()
    return results