常用命令
```
# 查看当前运行情况
service irqbalance status
# 终止服务
service irqbalance stop
取消开机启动:
chkconfig irqbalance off
# irqbalance -h
```
```
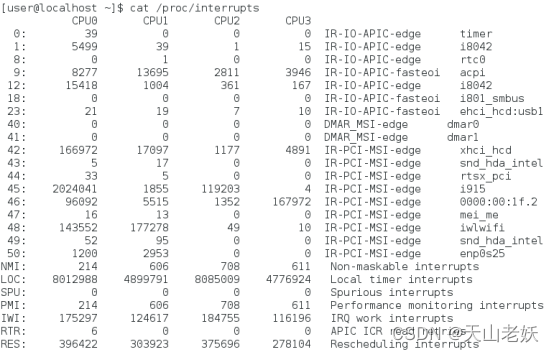
/proc/interrupts 文件中可以看到各个 cpu 上的中断情况。
/proc/irq/#/smp_affinity_list 可以查看指定中断当前绑定的 CPU
获得各网卡中断的当前 cpu 的整体情况
cat /proc/interrupts | grep eth0- | cut -d: -f1 | while read i; do echo -ne irq":$i\t bind_cpu: "; cat /proc/irq/$i/smp_affinity_list; done | sort -n -t' ' -k3
```Linux 调优篇 :虚拟化调优(irqbalance 网卡中断绑定)* 贰_查里王的博客-CSDN博客_irqbalance linux
irqbalance_adaptiver的博客-CSDN博客_irqbalance服务
irqbalance不平衡中断?|设置了irqbalance没效果?
(https://access.redhat.com/solutions/677073)
1,内核确保大于版本kernel-2.6.32-358.2.1.el6
2,确保irqbalance版本足够新
3,Root Cause
-
Previously, the irqbalance daemon did not consider the NUMA node assignment for an IRQ (interrupt request) for the banned CPU set. Consequently, irqbalance set the affinity incorrectly when the IRQBALANCE_BANNED_IRQS variable was set to a single CPU. In addition, IRQs could not be assigned to a node that had no eligible CPUs. Node assignment has been restricted to nodes that have eligible CPUs as defined by the unbanned_cpus bitmask, thus fixing the bug. As a result, irqbalance now sets affinity properly, and IRQs are assigned to the respective nodes correctly. (BZ#1054590, BZ#1054591)
-
Prior to this update, the dependency of the irqbalance daemon was set incorrectly referring to a wrong kernel version. As a consequence, irqbalance could not balance IRQs on NUMA systems. With this update, the dependency has been fixed, and IRQs are now balanced correctly on NUMA systems. Note that users of irqbalance packages have to update kernel to 2.6.32-358.2.1 or later in order to use the irqbalance daemon in correct manner. (BZ#1055572, BZ#1055574)
-
Prior to its latest version, irqbalance could not accurately determine the NUMA node it was local to or the device to which an IRQ was sent. The kernel affinity_hint values were created to work around this issue. With this update, irqbalance is now capable of parsing all information about an IRQ provided by the sysfs() function. IRQ balancing now works correctly, and the affinity_hint values are now ignored by default not to distort the irqbalance functionality. (BZ1093441, BZ1093440)
诊断步骤
-
中断没有被平衡Interrupts are not balancing:
CPU0 CPU1 CPU2 CPU3 CPU4 CPU5 59: 1292013110 0 0 0 0 0 PCI-MSI-edge eth0-rxtx-0 60: 851840288 0 0 0 0 0 PCI-MSI-edge eth0-rxtx-1 61: 843207989 0 0 0 0 0 PCI-MSI-edge eth0-rxtx-2 62: 753317489 0 0 0 0 0 PCI-MSI-edge eth0-rxtx-3 $ grep eth /proc/interrupts 71: 2073421 5816340 ...lots of zeroes... PCI-MSI-edge eth11-q0 72: 294863 114392 ...lots of zeroes... PCI-MSI-edge eth11-q1 73: 63206 234005 ...lots of zeroes... PCI-MSI-edge eth11-q2 74: 238342 72189 ...lots of zeroes... PCI-MSI-edge eth11-q3 79: 1491483 699 ...lots of zeroes... PCI-MSI-edge eth9-q0 80: 1 525546 ...lots of zeroes... PCI-MSI-edge eth9-q1 81: 1524075 5 ...lots of zeroes... PCI-MSI-edge eth9-q2 82: 9 1869645 ...lots of zeroes... PCI-MSI-edge eth9-q3 -
The irqbalance service is turned on and running:
$ chkconfig | grep irqb irqbalance 0:off 1:off 2:off 3:on 4:on 5:on 6:off $ grep irqb ps root 1480 0.0 0.0 10948 668 ? Ss Oct31 4:27 irqbalance -
There's no additional irqbalance config:
$ egrep -v "^#" /etc/sysconfig/irqbalance $ grep: /etc/sysconfig/irqbalance: No such file or directory -
Interrupts are allowed to land on other/all CPU cores:
(要想irqbalance 把中断分到cpu上,就需要设置亲和性,允许中断在那些cpu上执行)
$ for i in {59..62}; do echo -n "Interrupt $i is allowed on CPUs "; cat /proc/irq/$i/smp_affinity_list; done Interrupt 59 is allowed on CPUs 0-5 Interrupt 60 is allowed on CPUs 0-5 Interrupt 61 is allowed on CPUs 0-5 Interrupt 62 is allowed on CPUs 0-5 $ for i in {71..82}; do echo -n " IRQ $i: "; cat /proc/irq/$i/smp_affinity_list; done IRQ 71: 1,3,5,7,9,11,13,15,17,19,21,23 IRQ 72: 0,2,4,6,8,10,12,14,16,18,20,22 IRQ 73: 1,3,5,7,9,11,13,15,17,19,21,23 IRQ 74: 0,2,4,6,8,10,12,14,16,18,20,22 IRQ 79: 0,2,4,6,8,10,12,14,16,18,20,22 IRQ 80: 1,3,5,7,9,11,13,15,17,19,21,23 IRQ 81: 0,2,4,6,8,10,12,14,16,18,20,22 IRQ 82: 1,3,5,7,9,11,13,15,17,19,21,23 -
Processors do not share cache locality, which stops irqbalance from working by design
(确保处理器不共享缓存位置,因为那样会阻碍irqbalance的工作)
$ for i in {0..3}; do for j in {0..7}; do echo -n "cpu$j, index $i: "; cat /sys/devices/system/cpu/cpu$j/cache/index$i/shared_cpu_map; done; done cpu0, index 0: 00000001 cpu1, index 0: 00000002 cpu2, index 0: 00000004 cpu3, index 0: 00000008 cpu4, index 0: 00000010 cpu5, index 0: 00000020 cpu6, index 0: 00000040 cpu7, index 0: 00000080 cpu0, index 1: 00000001 cpu1, index 1: 00000002 cpu2, index 1: 00000004 cpu3, index 1: 00000008 cpu4, index 1: 00000010 cpu5, index 1: 00000020 cpu6, index 1: 00000040 cpu7, index 1: 00000080 cpu0, index 2: 00000001 cpu1, index 2: 00000002 cpu2, index 2: 00000004 cpu3, index 2: 00000008 cpu4, index 2: 00000010 cpu5, index 2: 00000020 cpu6, index 2: 00000040 cpu7, index 2: 00000080 cpu0, index 3: 00000001 cpu1, index 3: 00000002 cpu2, index 3: 00000004 cpu3, index 3: 00000008 cpu4, index 3: 00000010 cpu5, index 3: 00000020 cpu6, index 3: 00000040 cpu7, index 3: 00000080 -
Top users of CPU & MEM
USER %CPU %MEM RSS oracle 204.9% 12.2% 5.34 GiB -
Oracle instance is uninteruptible sleep & Defunct processes:
USER PID %CPU %MEM VSZ-MiB RSS-MiB TTY STAT START TIME COMMAND oracle 17631 10.5 0.2 260 57 ? Ds 22:10 3:17 ora_j000_INDWS -
The
irqbalanceservice reports "Resource temporarily unavailable" error inlsof -b:lsof | grep -i irqbalance lsof: avoiding stat(/usr/sbin/irqbalance): -b was specified. irqbalanc 1480 0 txt unknown /usr/sbin/irqbalance (stat: Resource temporarily unavailable) irqbalanc 1480 0 mem REG 8,2 423023 /usr/sbin/irqbalance (stat: Resource temporarily unavailable)
however -b or the presence of an NFS mount prevent lsof from running stat() and instead runs statsafely(), so this message is expected:
statsafely(path, buf)
        char *path;                     /* file path */
        struct stat *buf;               /* stat buffer address */
{
        if (Fblock) {
            if (!Fwarn)
                (void) fprintf(stderr,
                    "%s: avoiding stat(%s): -b was specified.\n",
                    Pn, path);
            errno = EWOULDBLOCK;
            return(1);
        }
        return(doinchild(dostat, path, (char *)buf, sizeof(struct stat)));
}
when the -b option is specified, Fblock gets True. EWOULDBLOCK (=EAGAIN) is returned.
中断说明
由于硬中断处理程序不能被中断,如果它执行时间过长,会导致CPU没法响应其它硬件的中断,于是内核引入软中断,将硬中断处理函数中耗时的部分移到软中断处理函数处理。
内核中的ksoftirqd进程专门负责软中断的处理,
当它收到软中断后,就会调用相应软中断所对应的处理函数:网卡驱动模块抛出的软中断,ksoftirqd会调用网络模块的net_rx_action函数。
来自 <LINUX内核网络中的软中断KSOFTIRQD - 嵌入式技术 - 电子发烧友网>
数据包--->网卡--DMA-->内存--硬件中断-->ksoftirqd (软中断ksoftirqd。可以把软中断系统想象成一系列内核线程,每个 CPU 一个)
软中断实际上是以内核线程的方式运行的,每个 CPU 都对应一个软中断内核线程,这个软中断内核线程就叫做 ksoftirqd/CPU 编号。
$ ps aux | grep softirq
root 7 0.0 0.0 0 0 ? S Oct10 0:01 [ksoftirqd/0]
root 16 0.0 0.0 0 0 ? S Oct10 0:01 [ksoftirqd/1]
名字括在中括号里的,一般都是内核线程。
通过 top 命令,会注意到 ksoftirqd/0 这个内核线程,其表示这个软中断线程跑在 CPU 0 上,如下图所示。
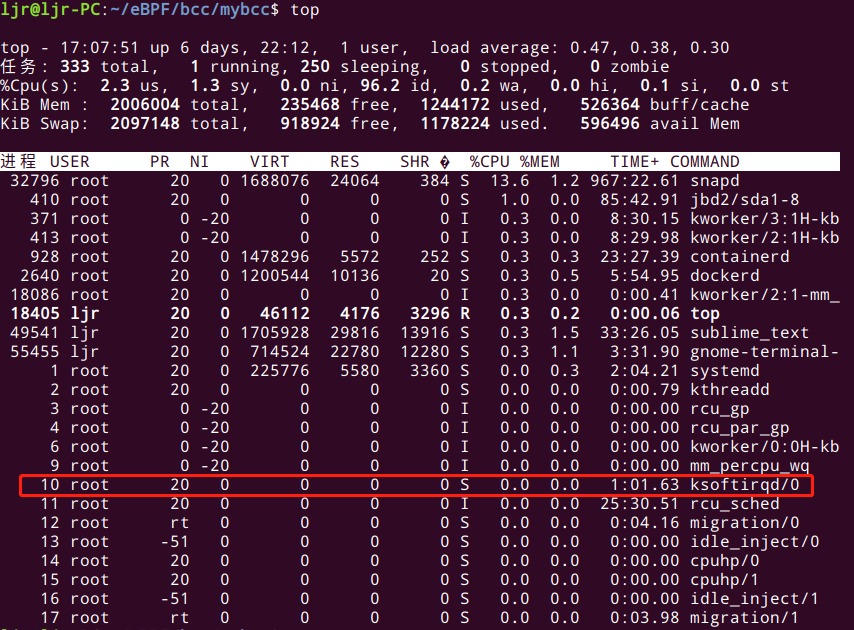
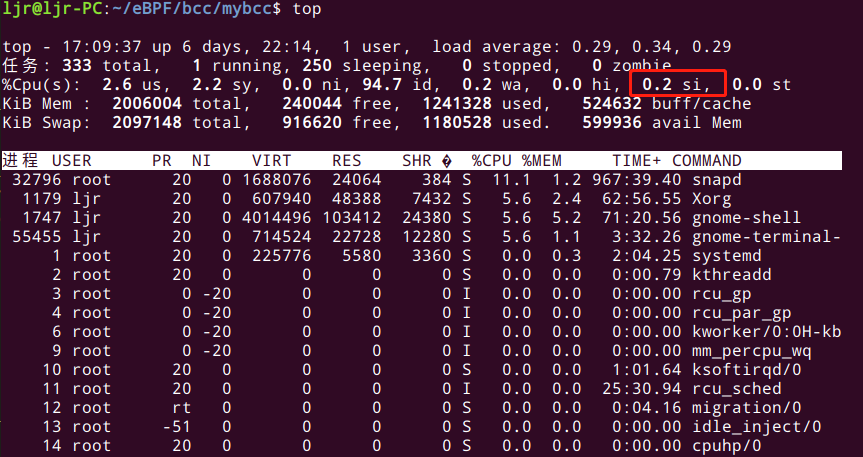
查看 CPU 利用率时,si 字段对应的就是 softirq软中断
RSS(Receive Side Scaling)是网卡的硬件特性,实现了多队列,可以将不同的中断次数分发到不同的CPU上。
单核CPU不能完全处满足网卡的需求,通过多队列网卡驱动的支持,将各个队列通过中断绑定到不同的核上,以满足网卡的需求,同时也可以降低CPU0的负载。
查看网卡是否支持队列,支持多少个队列
awk '$NF~/ens3f0np0/{print $1,$NF}' /proc/interrupts
awk '$NF~/ens3/{print $1,$NF}' /proc/interrupts
37: eth0-TxRx-0
38: eth0-TxRx-1
39: eth0-TxRx-2
40: eth0-TxRx-3
41: eth0-TxRx-4
42: eth0-TxRx-5
43: eth0-TxRx-6
44: eth0-TxRx-7
以上网卡eth0为例支持队列,37-44是中断号, 一般现在主流网卡驱动都支持多队列,默认是7个队列
查各个中断号是哪个cpu处理
中断绑定
网卡支持了队列,意味着我们就可以绑定中断号与处理CPU之间的关系,
Linux系统默认使用irqbalance服务优化中断分配,它能自动收集数据,调度中断请求,但是它的分配调度机制极不均匀,不建议开启,为了了解中断绑定,我们把irqbalance服务关掉,手工调整绑定关系。
##相关配置文件:
中断IRQ_ID的CPU亲和配置有两个等价的配置文件
/proc/irq/中断号/smp_affinity,16进制
/proc/irq/中断号/smp_affinity_list,10进制,
smp_affinity和smp_affinity_list等价,修改其一即可(另外一个会跟着改变),smp_affinity_list修改更方便
*)关于smp_affinity,它是一个16进制bitmask,以逗号分隔,CPU掩码最多有64位,如核心数超过32个,可使用两个32位掩码,逗号隔开,如:00000001,0000ff00)
比如 0000,00000020表示该 irq 分给了 CPU5。(0x20=00100000,第5个cpu)
echo 0x0004 > /proc/irq /50/smp_affinity
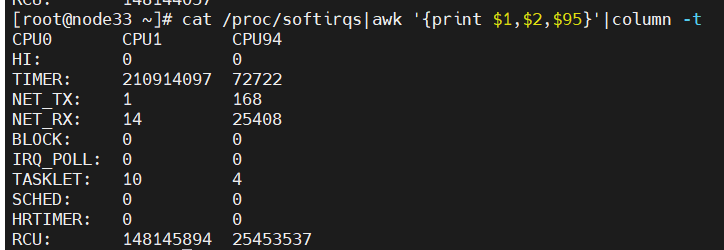
/proc/softirqs 提供了软中断的运行情况
[root@node33 ~]# cat /proc/softirqs|awk '{print $1,$2,$95}'|column -t
CPU0 CPU1 CPU94
HI: 0 0
TIMER: 2109 14097 72722
NET_TX: 1 168
NET_RX: 14 25408
BLOCK: 0 0
IRQ_POLL: 0 0
TASKLET: 10 4
SCHED: 0 0
HRTIMER: 0 0
RCU: 148145894 25453537
注意以下这两点:
第一,要注意软中断的类型,第一列
第二,要注意同一种软中断在不同 CPU 上的分布情况,也就是同一行的内容
第一列是中断ID号,CPU N列是中断在第n个CPU核心上的响应次数,倒数第二列是中断类型,最后一列是描述。
利用echo命令将CPU掩码写入/proc/irq /中断ID/smp_affinity文件中,即可实现修改某一中断的CPU亲和性。例如
echo 0x0004 > /proc/irq /50/smp_affinity
2.2 配置irqblance避免中断
中断平衡守护进程(irqbalance daemon)会周期性地将中断平均地公平地分配给各个CPU核心,它默认是开启的。一种方法我们可以直接关闭irqblance,中断就不会自动分配到各个核心;另一种方法就是自定义中断平衡策略,可以将时延敏感核心从策略中剔除也就是不接收中断,也可以设置中断的亲和性使中断不会分配到时延敏感核心中,下面逐一介绍。
关闭irqblance
将这个守护进程关闭就可以将中断响应都由CPU0核心处理。
查看守护进程的运行状态:systemctl status irqbalance
关闭守护进程:systemctl stop irqbalance
取消进程,使其开机不会重启:systemctl disable irqbalance
指定CPU脱离irqblance
我们可以通过修改 /etc/sysconfig/irqbalance 配置文件,将指定的CPU核心从中断平衡守护进程的列表中脱离出来,即守护进程不会再将中断分配给这些CPU核心。
打开/etc/sysconfig/irqbalance文件,找到“#IRQBALANCE_BANNED_CPUS=”位置,将注释取消,然后在等号后面填写CPU十六进制掩码,比如
IRQBALANCE_BANNED_CPUS=0000ff00
这里的掩码最多可以有64位,如果系统具有的核心数超过32个,则可以在等号后面添加两个32位掩码,并用逗号隔开,例如
IRQBALANCE_BANNED_CPUS=00000001,0000ff00
就是将8~15和33这9个核心隔离了。
统中有哪些中断
查看硬中断
cat /proc/interrupts
1
查看软中断
cat /proc/softirqs
1
就以笔者为例,可以看到笔者的单核系统中软中断对应中断次数统计如下,第一列对应的中断类型分别时
NET_RX 表示网络接收中断
NET_TX 表示网络发送中断
TIMER 表示定时中断
RCU 表示 RCU 锁中断
SCHED 表示内核调度中断
当然,我们也可以通过来看看软中断的实时变化速率
watch -d cat /proc/softirqs
我们都知道,软中断最终的处理时交给内核线程来处理的,我们不妨键入以下命令查看
ps aux |grep softirq
如下图所示,由于笔者服务器是单核的,所以只有一个内核线程,他的名字也很简单[ksoftirq/cpu号]
。
原文链接:https://blog.csdn.net/shark_chili3007/article/details/114441820
中断统计方法
#定义通用变量
INTERFACE=ens3f1np1
PCI_ADDR=$(ethtool -i ${INTERFACE}|grep "bus-info"|awk '{print $2}')
SIZE=1M_all_cpu
RW=write
#1下io前后记录中断次数
#前:
cat /proc/interrupts|grep -E "$PCI_ADDR"|awk '{print $1,$(31+2),$(63+2),$(95+2),$(127+2)}'|column -t > cpu31-63-95-127irq-${SIZE}-${RW}-0.txt
#后:
cat /proc/interrupts|grep -E "$PCI_ADDR"|awk '{print $1,$(31+2),$(63+2),$(95+2),$(127+2)}'|column -t > cpu31-63-95-127irq-${SIZE}-${RW}-1.txt
#*解释:PCI_ADDR 获取网卡的pci地址。awk '{print $1,$(31+2),$(63+2),$(95+2),$(127+2)}' 表示打印第一列(中断号),CPU31,CPU63,CPU95,CPU127的中断统列。
#2计算
paste cpu31-63-95-127irq-${SIZE}-${RW}-0.txt cpu31-63-95-127irq-${SIZE}-${RW}-1.txt > uinte.txt #把前后两个文档横向合并
cat uinte.txt|awk '{print $1,$7-$2,$8-$3,$9-$4,$10-$5}' |column -t|tr ':' ' ' > cpu31-63-95-127irq-${SIZE}-${RW}-result.txt #列相减(后面的统计减去前面的统计)
#3 筛选结果
#取出31 cpus上中断的统计
cat cpu31-63-95-127irq-${SIZE}-${RW}-result.txt |awk '$2 > 0 {print $0 }'
其他:
去掉冒号 cat cpu31-63-95-127irq-1M-write-result.txt|tr ':' ' ' > uinte.txt
用sumlime 打开结果文件,按住鼠标中键,可以按列选择,贴到excel
CPU中断数查看
多核CPU每个核心CPU发生中断的数量查看
# mpstat -I SUM -P ALL 1 3
Linux 5.4.0-40-generic (verify-new-511kernel) 08/28/2021 _x86_64_ (72 CPU)
09:09:30 AM CPU intr/s
09:09:31 AM all 18762.00
09:09:31 AM 0 253.00
09:09:31 AM 1 256.00
09:09:31 AM 2 253.00
09:09:31 AM 3 253.00
09:09:31 AM 4 254.00
09:09:31 AM 5 260.00
说明:
pstat [-I {SUM| CPU | SCPU}][-P {|ALL}] [internal [count]]
参数 解释
-I 查看中断 {SUM 表示汇总每个CPU上的中断数| SCPU 单个软件中断数}
-P {|ALL} 表示监控哪个CPU, cpu在[0,cpu个数-1]中取值
internal 相邻的两次采样的间隔时间、
count 采样的次数,count只能和delay一起使用
当中断集中在某个CPU时,会把这个CPU打满,建议将中断平均分配每个CPU处理。
-----------------------------------
CPU中断数查看与网卡中断绑核
https://blog.51cto.com/u_15080020/4188117
测试草稿
INTERFACE=ens3f1np1
PCI_ADDR=$(ethtool -i ${INTERFACE}|grep "bus-info"|awk '{print $2}')
SIZE=1M_all_cpu
RW=write
1下io前后记录中断次数
#前:
cat /proc/interrupts|grep -E "$PCI_ADDR"| awk '{for(i=65; i<=NF; i++){ $i="" }; print $0 }'| column -t > cpu-irq-${SIZE}-${RW}-0.txt
#后:
cat /proc/interrupts|grep -E "$PCI_ADDR"| awk '{for(i=65; i<=NF; i++){ $i="" }; print $0 }'| column -t > cpu-irq-${SIZE}-${RW}-1.txt
2计算
paste cpu-irq-${SIZE}-${RW}-0.txt cpu-irq-${SIZE}-${RW}-1.txt > uinte.txt #把前后两个文档横向合并
cat uinte.txt|awk '{print $1,$66-$2,$67-$3,$68-$4,$69-$5,$70-$6,$71-$7,$72-$8,$73-$9,$74-$10,$75-$11,$76-$12,$77-$13,$78-$14,$79-$15,$80-$16,$81-$17,$82-$18,$83-$19,$84-$20,$85-$21,$86-$22,$87-$23,$88-$24,$89-$25,$90-$26,$91-$27,$92-$28,$93-$29,$94-$30,$95-$31,$96-$32,$97-$33,$98-$34,$99-$35,$100-$36,$101-$37,$102-$38,$103-$39,$104-$40,$105-$41,$106-$42,$107-$43,$108-$44,$109-$45,$110-$46,$111-$47,$112-$48,$113-$49,$114-$50,$115-$51,$116-$52,$117-$53,$118-$54,$119-$55,$120-$56,$121-$57,$122-$58,$123-$59,$124-$60,$125-$61,$126-$62,$127-$63,$128-$64}' |column -t|tr ':' ' ' > cpu-irq-${SIZE}-${RW}-result.txt #列相减(后面的统计减去前面的统计)cat cpu-irq-1M_all_cpu-write-result.txt|awk '{ for(i=36;i<=96;i++){$i=""} {print $0}}'|column -t
cat cpu-irq-1M_all_cpu-write-result.txt|awk '{ for(i=1;i<=35;i++){$i=""} {print $0}}'|column -t
cat cpu-irq-1M_all_cpu-write-result.txt|awk '{ for(i=1; i<=2; i++){ $i="" }; for(i=7; i<=NF;i++){ $i="" }; print $0 }'|column -t
65+2 -
LCXSTR="cat uinte.txt|awk '{print \$1";
for i in {2..64};do after=$(($i+64));LCXSTR=${LCXSTR}",\$${after}-\$$i";done
$LCXSTR=$LCXSTR"}'"
echo $LCXSTR
LCXSTR="";
for i in {1..96};do LCXSTR=$LCXSTR",${i}";done
echo $LCXSTR
测试-中断查看、绑定和设置
================================================================================irqbalance 设置
查看守护进程的运行状态:systemctl status irqbalance
关闭守护进程:systemctl stop irqbalance
取消进程,使其开机不会重启:systemctl disable irqbalance
================================================================================网卡参数设置
查看和设置网卡使用的队列数量
仅针对收包
ethtool -l ens3f1np1 #查看网卡队列的数量
ethtool -L ens3f1np1 #设置网卡队列的数量
ethtool -L ens3f1np1 rx 8
ethtool -L ens3f1np1 tx 8
ethtool -L ens3f1np1 combined 8
队列有几种:RX、TX、Combined 等。有些网卡,只支持 Combined 队列(发送和接收公用,这种叫做组合队)
*小写 l 查看,大写 L 为设置
[root@node32 2023-3-14-test]# ethtool -L ens3f1np1 combined 8
[root@node32 2023-3-14-test]# ethtool -l ens3f1np1
Channel parameters for ens3f1np1:
Pre-set maximums:
RX: n/a
TX: n/a
Other: n/a
Combined: 63
Current hardware settings:
RX: n/a
TX: n/a
Other: n/a
Combined: 8
[root@node32 2023-3-14-test]#
查看和设置网卡的队列长度
ethtool -g ens3f1np1 #查看网卡队列的长度,Pre-set maximums:支持的最大值,Current hardware settings:当前设置的值
ethtool -G ens3f1np1 rx 4096 #设置网卡队列的长度
*小写 l 查看,大写 L 为设置
注意:
①:并不是所有网卡都支持通过 ethtool 查看和修改网卡队列长度。
②:这个操作,同样会关闭和启动网卡,所以,和这个网卡相关的连接也会中断。
查看和设置网卡的RSS 哈希 (数据包到队列的哈希映射)/设置权重
查看:
ethtool -x ens3f1np1
设置权重
设置所有的中断在前N个 RX queue 之间均匀的分布
ethtool -X ethx equal N
用 ethtool -X 设置自定义权重
sudo ethtool -X eth0 weight 6 2
*以上命令分别给 rx queue 0 和 rx queue 1 不同的权重:6 和 2,因此 queue 0 接收到的数量更 多。注意 queue 一般是和 CPU 绑定的,因此这也意味着相应的 CPU 也会花更多的时间片在收包 上。
sudo ethtool -X ens1f0np0 weight 8 4 2 1 #给前4个队列设置权重 8 4 2 1
sudo ethtool -X ens1f0np0 weight 2 1 2 2 3 3 2 4 #给前8个队列设置权重 2 1 2 2 3 3 2 4
设置哈希字段
调整 RX 哈希字段 for network flows
查看
1). rss hash function
获取tcp4 hash方式 默认开启5元组hash
#ethtool -n ens3f1np1 rx-flow-hash tcp4
TCP over IPV4 flows use these fields for computing Hash flow key:
IP SA
IP DA
L4 bytes 0 & 1 [TCP/UDP src port] #L4层的第0和第1个字节--既uint16 src port
L4 bytes 2 & 3 [TCP/UDP dst port] #L4层的第2和第3个字节--既uint16 dst port
设置
ethtool -N ens3f1np1 rx-flow-hash tcp4 sdfn
s Hash on Src address
d Hash on Dst address
f Hash on bytes 0 and 1 of the Layer 4 header of the rx packet.
n Hash on bytes 2 and 3 of the Layer 4 header of the rx packet.
设置 upd4基于5元组hash 默认是关闭
# ethtool -N eth2 rx-flow-hash udp4 sdfn
================================================================================中断队列查看
====查看某个网卡的中断和队列
INTERFACE=ens3f1np1
PCI_ADDR=$(ethtool -i ${INTERFACE}|grep "bus-info"|awk '{print $2}')
cat /proc/interrupts|grep -E "${INTERFACE}|$PCI_ADDR"|awk '{print $1,$NF}'
[root@node33 ~]#
1335: ens3f0np0-0
1336: ens3f0np0-1
1337: ens3f0np0-2
1338: ens3f0np0-3
11383: ens3f0np0-48
……
1393: ens3f0np0-58
1394: ens3f0np0-59
1395: ens3f0np0-60
1396: ens3f0np0-61
1397: ens3f0np0-62
====查看所有网卡的中断和队列
#查看网口中断的CPU绑定情况(interrupts 文件中网口以PCI地址显示)lcx
for if in $(ifconfig|grep -E "eno|ens|enp|bond" -A 1|grep -w "inet" -B 1|awk -F ":" '{print $1}'|grep -vE "\--|inet"); \
do \
echo "eth:${if}=============================";\
PCI_ADDR=$(ethtool -i ${if}|grep "bus-info"|awk '{print $2}');\
cat /proc/interrupts | grep -E "${if}|${PCI_ADDR}" | cut -d: -f1 | while read i; do echo -ne irq":$i\t bind_cpu: "; \
cat /proc/irq/$i/smp_affinity_list; done | sort -n -t' ' -k3;\
done
====查看所有网卡的中断号-队列-绑定的CPU
**拷贝下面的,贴入窗口,生成getEthIrqBind.sh脚本,执行脚本+网卡名:getEthIrqBind.sh ens3f1np1
cat > getEthIrqBind.sh << "EOF"
INTERFACE=$1
if [[ "$1" == "" ]];then
echo "please input interface.
excample:./$(basename $0) eth0,
sort by col 1:./$(basename $0) eth0 1
sort by col 2:./$(basename $0) eth0 2"
exit 1
fi
if [[ "$2" != "" ]];then
sort_col=$2
else
sort_col=1
fi
oldIFS=$IFS;IFS=$'\n'
#可能中断文件里面可能按网卡名显示也可能按PCI显示:
PCI_ADDR=$(ethtool -i ${INTERFACE}|grep "bus-info"|awk '{print $2}')
IRQ_LIST=($(cat /proc/interrupts|grep -E "${INTERFACE}|${PCI_ADDR}"|awk '{print $1,$NF}'))
echo "irq: queue: bind_cpu:"
for line in ${IRQ_LIST[@]}
do
irq=$(echo "$line"|awk -F":" '{print $1}' )
queue=$(echo "$line"|awk -F":" '{print $2}' )
queue=$(echo ${queue}|awk -F "@" '{print $1}')
echo "$irq $queue $(cat /proc/irq/$irq/smp_affinity_list)"
done| sort -n -k${sort_col}|column -t;
IFS=$oldIFS
EOF
chmod +x getEthIrqBind.sh
./getEthIrqBind.sh ens3f1np1
================================================================================中断绑定
#把指定网口ETH的中断号 均匀绑定到CPU_LIST指定的CPU lcx
cat > ./balance.sh << 'EOF'
if [[ "$1" == "" ]];then
echo "please input interface.
excample:./$(basename $0) eth0"
exit 1
fi
ETH=$1
PCI_ADDR=$(ethtool -i ${ETH}|grep "bus-info"|awk '{print $2}')
IRQ_LIST=($(cat /proc/interrupts|grep -E "${ETH}|${PCI_ADDR}"|awk '{print $1,$NF}'|awk -F ':' '{print $1}'))
fi
if [[ ${#IRQ_LIST[@]} -eq 0 ]] ;then
echo "I can't find irq number list."
fi
CPU_LIST=(40 41 62 63) #<-----------------------------------CPU_LIST
index=0
cpu_num=${#CPU_LIST[@]}
for it in ${IRQ_LIST[@]}
do
((index++))
cpu_list_index=$((${index}%${cpu_num}))
#echo "irq:$it --bind-to--> cpu:${CPU_LIST[${cpu_list_index}]}" #show result,but not really set
echo ${CPU_LIST[${cpu_list_index}]} > /proc/irq/${it}/smp_affinity_list
done
EOF
chmod +x ./balance.sh
复制粘贴生成脚本后,执行 ./balance.sh 网口名 如: ./balance.sh eth0
================================================================================数据分析
===========64 CPU 中断数据截取和统计
INTERFACE=ens3f1np1
PCI_ADDR=$(ethtool -i ${INTERFACE}|grep "bus-info"|awk '{print $2}')
SIZE=1M_4_cpu
RW=write-47
1下io前后记录中断次数
#前:
cat /proc/interrupts|grep -E "$PCI_ADDR"| awk '{for(i=65; i<=NF; i++){ $i="" }; print $0 }'| column -t > cpu-irq-${SIZE}-${RW}-0.txt
#后:
cat /proc/interrupts|grep -E "$PCI_ADDR"| awk '{for(i=65; i<=NF; i++){ $i="" }; print $0 }'| column -t > cpu-irq-${SIZE}-${RW}-1.txt
*解释:awk '{for(i=65; i<=NF; i++){ $i="" }; print $0 }' 65列之后的列置为空,既只取65列之前的列。
2计算
paste cpu-irq-${SIZE}-${RW}-0.txt cpu-irq-${SIZE}-${RW}-1.txt > uinte.txt #把前后两个文档横向合并
cat uinte.txt|awk '{print $1,$66-$2,$67-$3,$68-$4,$69-$5,$70-$6,$71-$7,$72-$8,$73-$9,$74-$10,$75-$11,$76-$12,$77-$13,$78-$14,$79-$15,$80-$16,$81-$17,$82-$18,$83-$19,$84-$20,$85-$21,$86-$22,$87-$23,$88-$24,$89-$25,$90-$26,$91-$27,$92-$28,$93-$29,$94-$30,$95-$31,$96-$32,$97-$33,$98-$34,$99-$35,$100-$36,$101-$37,$102-$38,$103-$39,$104-$40,$105-$41,$106-$42,$107-$43,$108-$44,$109-$45,$110-$46,$111-$47,$112-$48,$113-$49,$114-$50,$115-$51,$116-$52,$117-$53,$118-$54,$119-$55,$120-$56,$121-$57,$122-$58,$123-$59,$124-$60,$125-$61,$126-$62,$127-$63,$128-$64}' |column -t|tr ':' ' ' > cpu-irq-${SIZE}-${RW}-result.txt #列相减(后面的统计减去前面的统计)
查看:
#显示前35列
cat cpu-irq-1M_all_cpu-write-result.txt|awk '{ for(i=34;i<=95;i++){$i=""} {print $0}}'|column -t
#显示35列之后
cat cpu-irq-1M_all_cpu-write-result.txt|awk '{ for(i=1;i<=33;i++){$i=""} {print $0}}'|column -t
#显示3到6列
cat cpu-irq-1M_all_cpu-write-result.txt|awk '{ for(i=1; i<=2; i++){ $i="" }; for(i=7; i<=NF;i++){ $i="" }; print $0 }'|column -t
===========4 CPU 中断数据截取和统计
INTERFACE=ens3f1np1
#PCI_ADDR=$(ethtool -i ${INTERFACE}|grep "bus-info"|awk '{print $2}')
PCI_ADDR=ens3f1np1
SIZE=1M_4_cpu
RW=write-54-8K-hash-sdnf
#前:
cat /proc/interrupts|grep -E "$PCI_ADDR"|awk '{print $1,$(40+2),$(41+2),$(62+2),$(63+2)}'|column -t > cpu40-41-62-63irq-${SIZE}-${RW}-0.txt
#后:
cat /proc/interrupts|grep -E "$PCI_ADDR"|awk '{print $1,$(40+2),$(41+2),$(62+2),$(63+2)}'|column -t > cpu40-41-62-63irq-${SIZE}-${RW}-1.txt
#*解释lcx:
#PCI_ADDR 获取网卡的pci地址。awk '{print $1,$(31+2),$(63+2),$(95+2),$(127+2)}' 表示打印第一列(中断号),CPU31,CPU63,CPU95,CPU127的中断统列(CPU从0开始,所以CPU31 为$(31+2)。
#2计算
paste cpu40-41-62-63irq-${SIZE}-${RW}-0.txt cpu40-41-62-63irq-${SIZE}-${RW}-1.txt > uinte.txt #把前后两个文档横向合并lcx
cat uinte.txt|awk '{print $1,$7-$2,$8-$3,$9-$4,$10-$5}' |column -t|tr ':' ' ' > cpu40-41-62-63irq-${SIZE}-${RW}-result.txt #列相减(后面的统计减去前面的统计lcx)
cat cpu40-41-62-63irq-${SIZE}-${RW}-result.txt
================================================================================CPU统计
mpstat -P ALL 2 30 查看所有的CPU使用情况,2秒采集一次,采集30次