一、课程介绍
- 环境搭建
- urllib和BeautifulSoup
- 存储数据到MySQL
- 常见文档读取(TXT、PDF)
- 使用爬虫要注意什么
1. 前导课程

2. 可做的相关内容
- 购物比价网
- 综合搜索网
- 统计QQ用户的兴趣爱好
- 搜索引擎
二、环境搭建
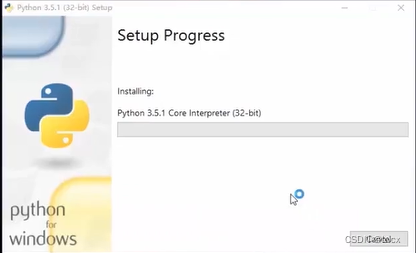
1. 下载并安装Python
2. 安装BeautifulSoup4
1. Linux安装命令
sudo apt-get install python-bs4
2. Mac安装命令
sudo easy_install pip
pip install beautifulsoup4
3. Windows安装命令
pip install beautifulsoup4    # python2环境
# 或者是
pip3 install beautifulsoup4   # python3环境

3. 检查是否安装成功
- 在命令行中分别输入以下命令:
python    # 检查Python是否安装成功
from urllib.request import urlopen   # 检查urllib模块是否存在
from bs4 import BeautifulSoup     # 检查bs4模块是否存在
如下图所示: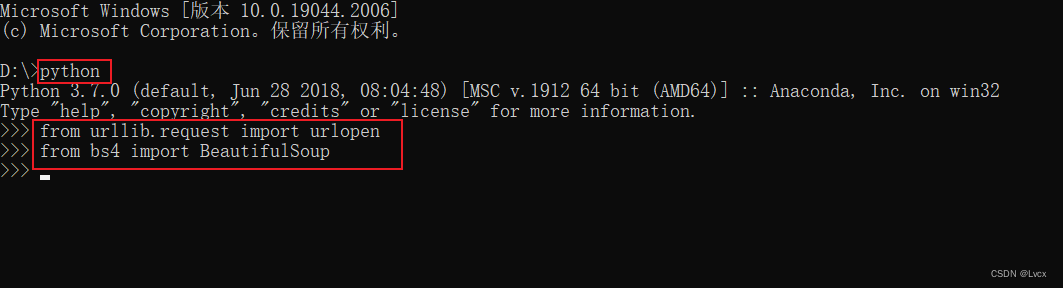
三条命令都未出现错误提示说明环境已经准备好了。
三、urllib和BeautifulSoup
- urllib是Python3.x中提供的一些列操作URL的库,它可以轻松模拟用户使用浏览器访问网页。
1. urllib的用法
1. 具体步骤
# 1. 导入urllib库的request模块
from urllib import request

# 2. 请求URL
resp = request.urlopen('http://www.baidu.com')

# 3. 使用响应对象输出数据
print(resp.read().decode("utf-8"))
2. 简单urllib的get方法的完整示例
from bs4 import BeautifulSoup   # 导入BeautifulSoup模块
from urllib import request    # 导入urllib.request的urlopen模块

url = "http://www.baidu.com/"
resp = request.urlopen(url)
print(resp.read().decode("utf-8"))
打印的效果如下:

3. 模拟真实浏览器
1. 携带User-Agent头
from urllib import request

url = "http://www.baidu.com"
key = "User-Agent"
value = "Mozilla/5.0 (Windows NT 10.0; Win64; x64) AppleWebKit/537.36 (KHTML, like Gecko) Chrome/105.0.0.0 Safari/537.36 Edg/105.0.1343.42"
req = request.Request(url)
req.add_header(key, value)
resp = request.urlopen(req)
print(resp.read().decode("utf-8"))
运行程序,同样能打印出结果:

4. 使用post方法发送请求的步骤
# 1. 导入urllib库下面的parse
from urllib import parse

# 2. 使用urlencode生成post数据
postData = parse.urlencode([
	(key1, val1),
	(key2, val2),
	(keyn, valn)
])

# 3. 使用postData发送post请求
request.urlopen(req, data=postDate.encode('utf-8'))

# 4. 得到请求状态
resp.status

# 5. 得到服务器的类型
resp.reason
5. 示例:urllib使用post方法请求台湾高铁网
from urllib import request
from urllib.request import urlopen
from urllib import parse

url = "https://m.thsrc.com.tw/TimeTable/Search"
headers = {


    'User-Agent':'Mozilla/5.0 (X11; Fedora; Linux x86_64) AppleWebKit/537.36 (KHTML, like Gecko) Chrome/58.0.3029.110 Safari/537.36'
}

# # 代理IP,由快代理提供
# proxy = '124.94.203.122:20993'
# proxy_values = "%(ip)s" % {'ip': proxy}
# proxies = {"http": proxy_values, "https": proxy_values}
#
# # 设置代理
# handler = request.ProxyHandler(proxies)
# opener = request.build_opener(handler)

data = {


    "SearchType": "S",
    "Lang": "TW",
    "StartStation": "NanGang",
    "EndStation": "ZuoYing",
    "OutWardSearchDate": "2022/10/18",
    "OutWardSearchTime": "14:30",
    "ReturnSearchDate": "2022/10/18",
    "ReturnSearchTime": "14:30",
    "DiscountType": ""
}
data = parse.urlencode(data).encode("utf8")    # 对参数进行编码
req = request.Request(url=url, data=data, headers=headers, method="POST")    # 请求处理
resp = request.urlopen(req)
# resp = opener.open(req).read()    # 使用代理用这种方式请求

print(resp.read().decode("utf-8"))
出现拒绝访问时参考文章:https://blog.csdn.net/kdl_csdn/article/details/103989024
运行效果:

拓展示例:用requests模块实现
import requests

headers = {


    "User-Agent": "Mozilla/5.0 (Windows NT 10.0; Win64; x64) AppleWebKit/537.36 (KHTML, like Gecko) Chrome/105.0.0.0 Safari/537.36 Edg/105.0.1343.42"
}
url = "https://m.thsrc.com.tw/TimeTable/Search"
params = {


    "SearchType": "S",
    "Lang": "TW",
    "StartStation": "NanGang",
    "EndStation": "ZuoYing",
    "OutWardSearchDate": '2022/10/18',
    "OutWardSearchTime": "14:00",
    "ReturnSearchDate": "2022/10/18",
    "ReturnSearchTime": "14:00",
    "DiscountType": ""
}

resp = requests.post(url=url, headers=headers, params=params)
# print(resp.status_code)     # 200
print(resp.text)
运行效果:

测试发送请求的爬虫工具:postman、fildder。
2. BeautifulSoup的使用
1. 解析器的优缺点对比
| 解析器 | 使用方法 | 优势 | 劣势 |
|---|---|---|---|
| Python标准库 | BeautifulSoup(markup, “html.parser”) | 1. Python的内置标准库; 2. 执行速度适中; 3. 文档容错能力强 |
Python 2.7.3 or(3.2.2)前的版本中文档容错能力差。 |
| lxml HTML解析器 | BeautifulSoup(markup, “lxml”) | 1. 速度快; 2. 文档容错能力强。 |
需要安装C语言库。 |
| lxml XML解析器 | BeautifulSoup(markup, [“lxml”, “xml”]) BeautifulSoup(markup, “xml”) |
1. 速度快; 2. 唯一支持XML的解析器。 |
需要安装C语言库。 |
| html5lib解析器 | BeautifulSoup(markup, “html5lib”) | 1. 最好的容错性; 2. 以浏览器的方式解析文档; 3. 生成HTML5格式的文档。 |
1. 速度慢; 2. 不依赖外部扩展。 |
2. 几个简单的浏览结构化数据的方法
soup.title    # 获取第一个title标签
# <title>The Dormouse's story</title>

soup.title.name    # 获取第一个title标签名字
# u'title'

soup.title.string   # 获取第一个title标签内的文本内容
# u'The Dormoouse's story'

soup.title.parent.name    # 获取第一个title标签父元素的名字
# u'head'

soup.p    # 获取第一个p标签
# <p class="title"><b>The Dormouse's story</b></p>

soup.p['class']    # 获取第一个p标签的class属性值
# u'title'

soup.a    # 获取第一个a标签
# <a class="sister" href="http://example.com/elsie" id="link1">Elsie</a>

soup.find_all('a')     # 获取所有a标签
"""
[<a class="sister" href="http://example.com/elsie" id="link1">Elsie</a>,
<a class="sister" href="http://example.com/lacie" id="link2">Lacie</a>,
<a class="sister" href="http://example.com/tillie" id="link3">Tillie</a>
]
"""

soup.find(id="link3")  # 获取第一个id值为link3的标签
# <a class="sister" href="http://example.com/tillie" id="link3">Tillie</a>
3. 测试BeautifulSoup中常用的方法
from bs4 import BeautifulSoup as bs

html_doc = """
<html><head><title>The Dormouse's story</title></head>
<body>
<p class="title"><b>The Dormouse's story</b></p>

<p class="story">Once upon a time there were three little sisters; and their names were
<a href="http://exampleScom/elsie" class="sister" id="link1">Elsie</a>,
<a href="http://example.com/lacie" class="sister" id="link2">Lacie</a> and
<a href="http://example.com/tillie" class="sister" id="link3">Tillie</a>;
and they lived at the bottom of a well </p>

<p class="story">...</p>
"""

soup = bs(html_doc, "html.parser")

# print(soup.prettify())

print(soup.title.string)   # 获取title标签的内容
print(soup.a)    # 获取第一个a标签
print(soup.find(id="link2"))    # 获取id=“link2”的元素
print(soup.find(id="link2").string)    # 获取id=“link2”的元素的内容(string要获取的内容中不含有标签才行)
print(soup.find(id="link2").get_text())    # 获取id=“link2”的元素的内容
print(soup.find_all("a"))     # 获取所有的a标签
print(soup.findAll("a"))    # 获取所有的a标签
print([item.string for item in soup.findAll("a")])    # 获取所有的a标签的文本内容   # 列表推导式
print(soup.find("p", {

    "class": "story"})) # 获取class为story的p标签
print(soup.find("p", {

    "class": "story"}).get_text())   # 获取class为story的p标签的内容
print(soup.find("p", {

    "class": "story"}).string)  # 获取class为story的p标签的内容 由于获取到的p标签中还含有别的标签,所以无法用string,否则返回None。

print()
import re
# 使用正则表达式
for tag in soup.find_all(re.compile("^b")):    # 查找以b开头的标签名
    print(tag.name)

# 查找所有a标签中href属性为“http://...”这样的a标签
data = soup.findAll("a", href=re.compile(r"^http://example.com/"))
print(data)
data2 = soup.findAll("a", href=re.compile(r"^http://example\.com/"))
print(data2)

# 文档:https://www.crummy.com/software/BeautifulSoup/bs4/doc.zh/#id28
运行结果:

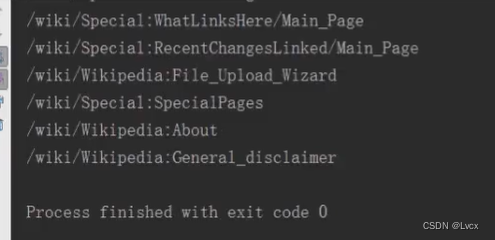
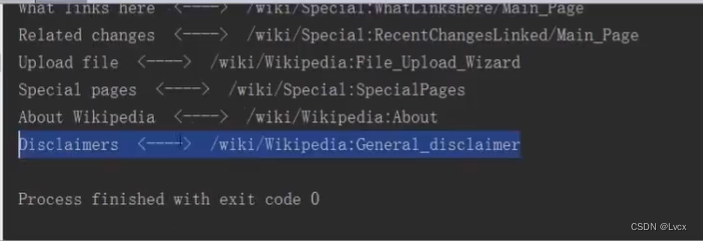
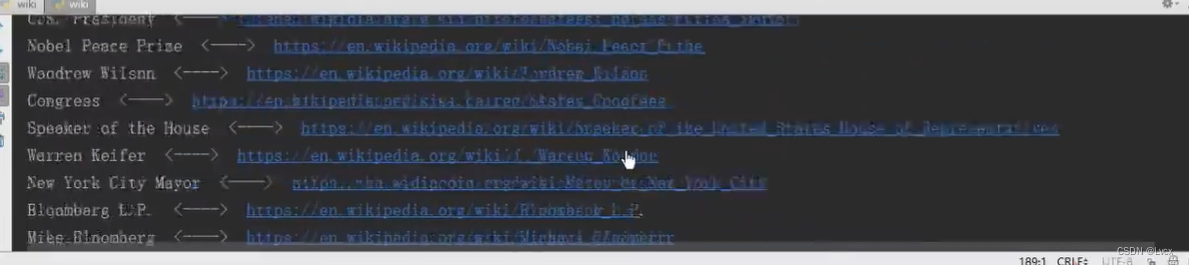
4. 示例:获取维基百科词条信息(该示例仅做参考,功能已失效)
from urllib.request import urlopen
from bs4 import BeautifulSoup
import re

# 请求URL并把结果用utf-8编码
resp = urlopen("https://en.wikipedia.org/wiki/Main_Page").read().decode("utf-8")
# 使用BeautifulSoup解析
soup = BeautifulSoup(resp, "html.parser")
# 获取所有以/wiki/开头的a标签的href属性
listUrls = soup.findAll("a", href=re.compile("^/wiki/"))
# 输出所有词条对应的名称和URL
for url in listUrls:
	if not re.search("\.(jpg|JPG)$", url['href']):    # 过滤掉以.JPG或.jpg结尾的图片URL
		# print(url['href'])     # 输出不完整的url
		# print(url.get_text(), "<--->", url['href'])    # 输出对应名字和不完整的url
		print(url.get_text(), "<---->", "https://en.wikipedia.org" + url['href'])    # 输出对应名字和完整的url
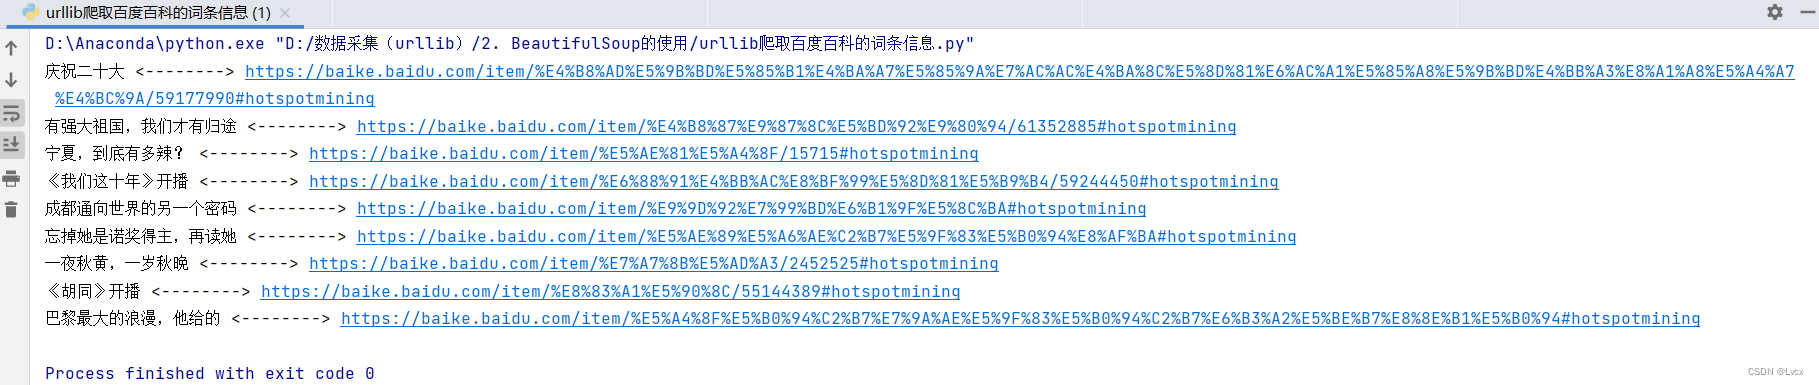
5. 示例:获取百度百科的词条和链接
from urllib.request import urlopen
from bs4 import BeautifulSoup
import re

# 词条来源的url地址
url = "https://baike.baidu.com/"
# 请求url,并把结果用utf-8编码
resp = urlopen(url).read().decode("utf-8")
# 使用BeautifulSoup解析
soup = BeautifulSoup(resp, "html.parser")
# 获取所有以class="card_cnt_tit"的div
list_divs = soup.findAll("div", {

    "class": "card_cnt_tit"})
# 根据源码中的规律,我们先找到包裹词条a标签的div
for div in list_divs:
    # 再在div标签中用正则表达式中过滤出a标签
    a = div.find("a", href=re.compile(r"^https://"))
    # 输出词条的名称和链接
    print(a.string, "<-------->", a['href'])
运行结果:
四、存储数据到MySQL
1. 环境准备
- 需要安装pymysql模块:
pip install pymysql
2. 存入MySQL数据库的使用方法
# 1. 引入开发包
import pymysql.cursors

# 2. 获取数据库链接
connection = pymysql.connect(
	host="localhost",
	user="root",
	password="123456",
	db="baikeurl",
	charset="utf8mb4")

# 3. 获取会话指针
connection.cursor()

# 4. 执行SQL语句
cursor.execute(sql, (参数1, 参数2, ..., 参数n))

# 5. 提交
connection.commit()

# 6. 关闭
connection.close()
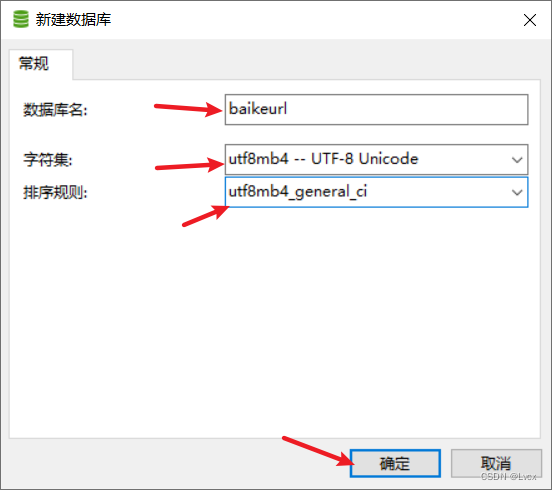
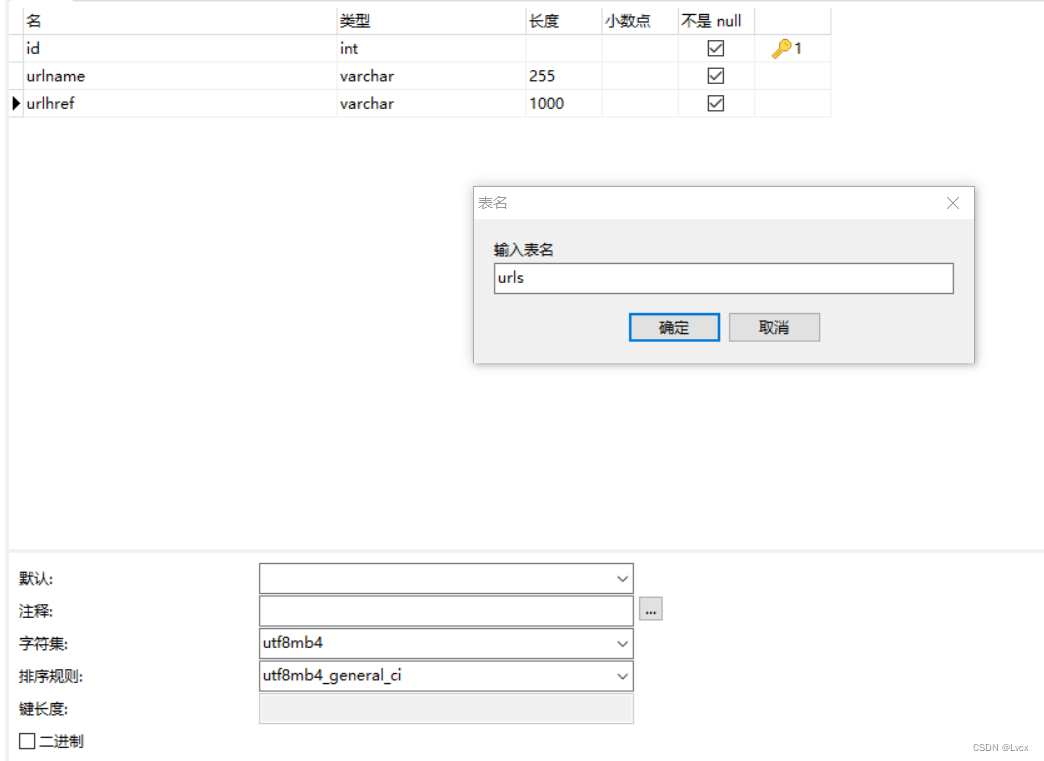
3. 示例:将上一示例的数据存入MySQL数据库
1. 利用Navicat创建数据库和数据表
创建数据库:
在数据库中创建数据表:
2. 修改前面的示例代码,将数据加入数据库
完整代码:
from urllib.request import urlopen
from bs4 import BeautifulSoup
import re
import pymysql.cursors

# 词条来源的url地址
url = "https://baike.baidu.com/"
# 请求url,并把结果用utf-8编码
resp = urlopen(url).read().decode("utf-8")
# 使用BeautifulSoup解析
soup = BeautifulSoup(resp, "html.parser")
# 获取所有以class="card_cnt_tit"的div
list_divs = soup.findAll("div", {

    "class": "card_cnt_tit"})
# 根据源码中的规律,我们先找到包裹词条a标签的div
for div in list_divs:
    # 再在div标签中用正则表达式中过滤出a标签
    a = div.find("a", href=re.compile(r"^https://"))
    # 输出词条的名称和链接
    print(a.string, "<-------->", a['href'])

    # 获取数据库链接
    connection = pymysql.connect(host="localhost",
                                 user="root",
                                 password="123456",
                                 database="baikeurl",
                                 charset="utf8mb4")
    try:
        # 获取会话指针
        with connection.cursor() as cursor:
            # 创建sql语句
            sql = "insert into `urls` (`urlname`, `urlhref`)values(%s, %s)"
            # 执行sql语句
            cursor.execute(sql, (a.get_text(), a['href']))
            # 提交
            connection.commit()
    finally:
        connection.close()
运行效果:


4. 从MySQL数据库读取的使用方法
# 1. 引入开发包
import pymysql.cursors

# 2. 获取数据库链接
connection = pymysql.connect(
	host="localhost",
	user="root",
	password="123456",
	db="baikeurl",
	charset="utf8mb4")

# 3. 获取会话指针
connection.cursor()

# 4.1 得到总记录数
cursor.execute()

# 4.2 查询下一行
cursor.fetchchone()

# 4.3 得到指定条数的数据
cursor.fetchmany(size=None)

# 4.4 得到全部
cursor.fetchall()

# 5. 关闭链接
connection.close()
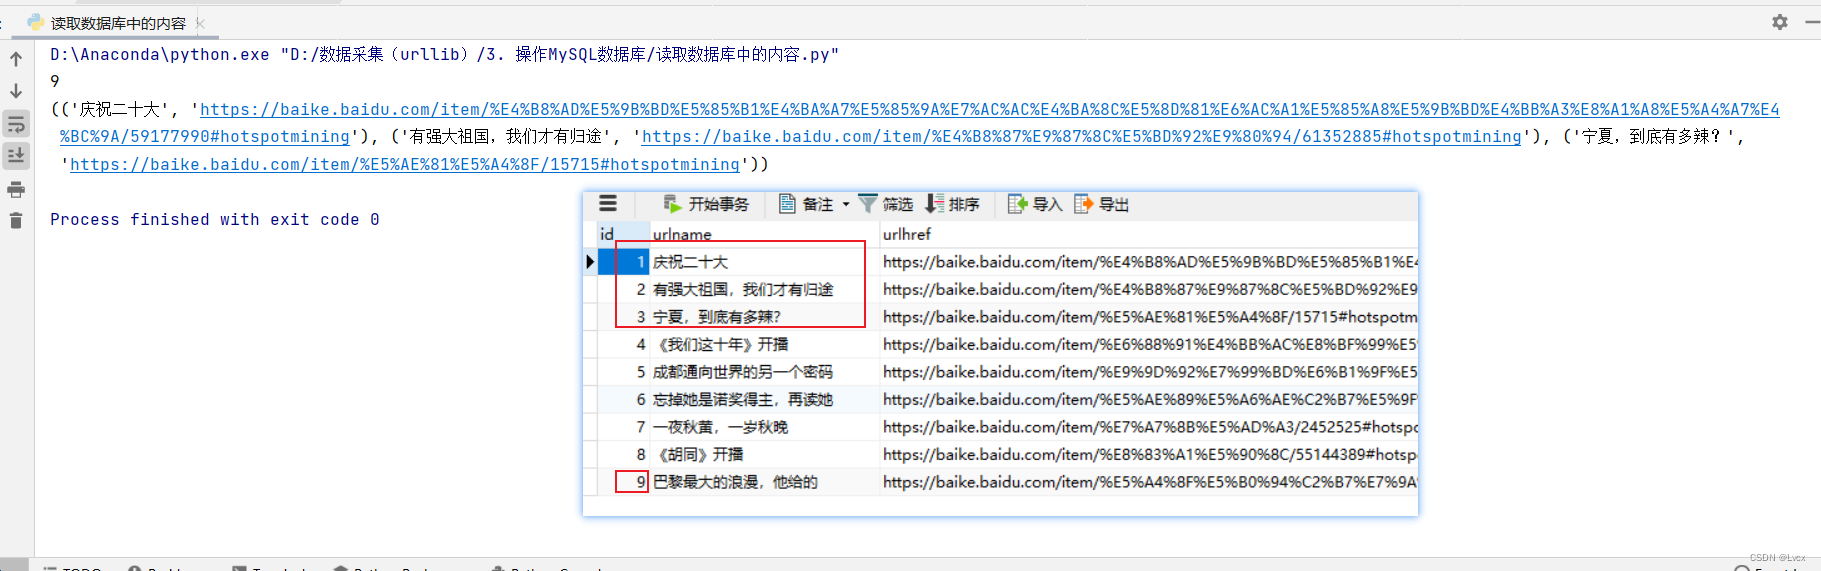
5. 示例:查询MySQL数据库中的内容
# 导入模块
import pymysql.cursors

# 获取数据库连接
connection = pymysql.connect(host="localhost",
                                user="root",
                                password="123456",
                                database="baikeurl",
                                charset="utf8mb4")
try:
    # 获取会话指针
    with connection.cursor() as cursor:
        # 查询语句
        sql = "select urlname, urlhref from urls where id is not null"
        # 查询共有几条记录
        count = cursor.execute(sql)
        print(count)   # 9

        # 查询数据
        result = cursor.fetchmany(size=3)    # 获取前三条数据
        # result = cursor.fetchall()    # 获取所有数据
        print(result)
finally:
    connection.close()
运行结果对照数据库中的数据如下:
五、常见文档读取(TXT、PDF)
- 读取txt文档(用urlopen()方法读取)
- 读取PDF文档(使用第三方模块pdfminer3k读取)
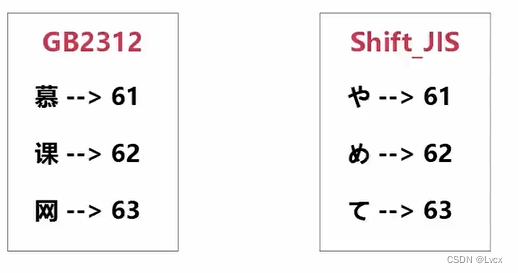
1. 一些语言字符出现乱码的原因
- 计算机只能处理0和1两个数字,所以想要处理文本,必须把文本变成0和1这样的数字,最早的计算机使用八个0和1来表示一个字节,所以最大能够表示的整数是255=11111111.如果想要表示更大的数,就必须使用更多的字节。
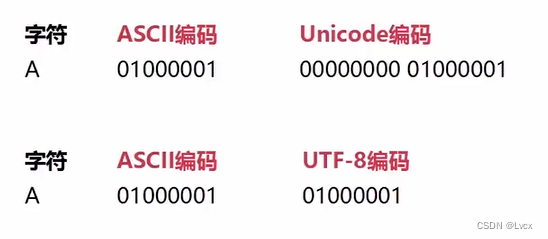
- 由于计算机是由美国人发明的,所以最早只有127个字符被编写进计算机,也就是常见的阿拉伯数字,字母大小写,以及键盘上的符号。这个编码被称为ASCII编码,比如大写的字母A的ASCII编码为65,65这个数字再被转换成二进制01000001,就是计算机真处理的东西。
- 很显然,ASCII编码没办法表示我们的中文,于是中国就制定了自己的GB2312编码,并且兼容ASCII编码,那么问题来了,使用GB2312编码的文字,慕课网三个字,假设编码分别是61、62、63,那么在ASCII码表中可能是键盘上的@符号,或者是其他东西。
而Unicode编码将所有语言整合到了一起:
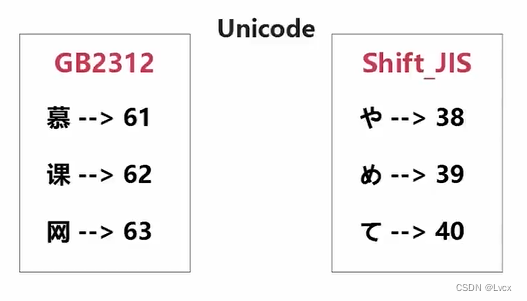
Unicode编码的体积要更大一些:
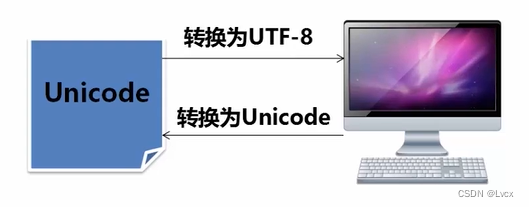
文件在系统间会进行编码转换:(utf-8打开可以节省空间,Unicode保存可以最大化兼容)
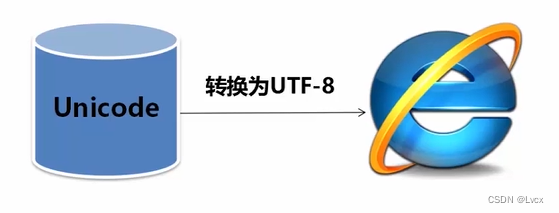
服务器也会先将Unicode编码转换成utf-8编码后再传给浏览器,可减轻浏览器负担:
- Python3字符串默认使用Unicode编码,所以Python3支持多语言。
- 以Unicode表示的str通过encode()方法可以编码为指定的bytes。
- 如果bytes使用ASCII编码,遇到ASCII码表没有的字符会以\x##表示,此时只用‘\x##’.decode(‘utf-8’) 就可以了。
2. 读取txt
from urllib.request import urlopen
# 百度robots协议:https://www.baidu.com/robots.txt

url = "https://www.baidu.com/robots.txt"
html = urlopen(url)

print(html.read().decode('utf-8'))
3. 读取PDF文件
1. 安装pdfminer3k模块
下载安装pdfminer3k模块:
pip install pdfminer3k

另一种方式,或者是直接去网上下载包,然后解压包,进入包目录(目录中有setup.py文件),使用如下命令直接安装:
python setup.py install
2. 检查pdfminer3k模块是否安装成功
python

import pdfminer

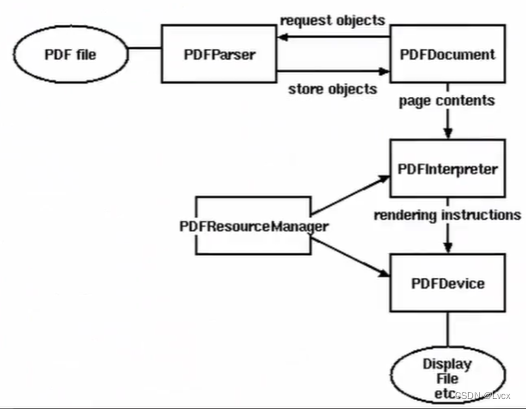
3. 读取PDF文档的流程
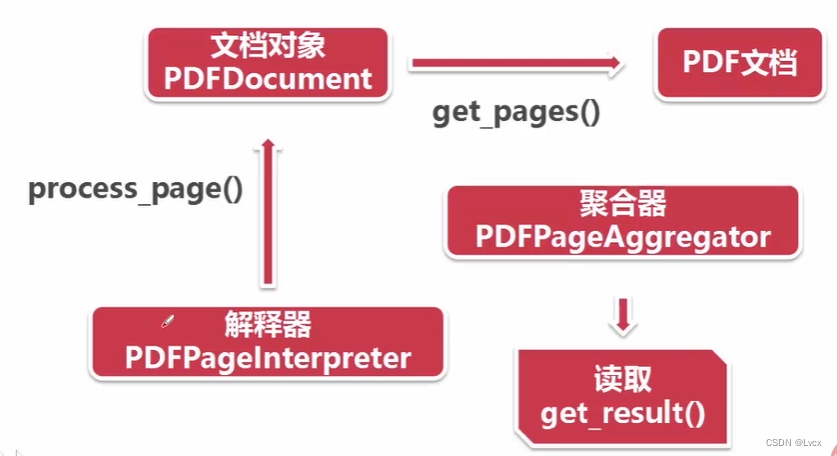
以上流程的完整图示如下:
4. 读取pdf文件
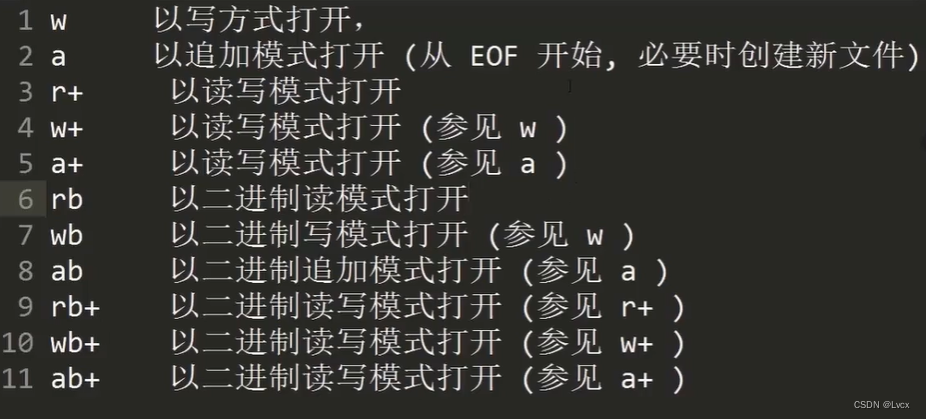
打开的模式参考:
示例:读取本地PDF
# 导入需要用到的包:
from pdfminer.converter import PDFPageAggregator
from pdfminer.layout import LAParams
from pdfminer.pdfparser import PDFParser, PDFDocument
from pdfminer.pdfinterp import PDFResourceManager, PDFPageInterpreter
from pdfminer.pdfdevice import PDFDevice

# 获取文档对象:
fp = open("Automatic Detection.pdf", "rb")    # 以二进制只读方式打开

# 创建一个与文档关联的解释器
parser = PDFParser(fp)

# PDF文档的对象
doc = PDFDocument()

# 连接解释器和文档对象
parser.set_document(doc)
doc.set_parser(parser)

# 初始化文档
doc.initialize("")      # 由于文档没有密码,所以里面的密码参数设置为空字符串

# 创建PDF资源管理器
resource = PDFResourceManager()

# 创建参数分析器
laparam = LAParams()

# 创建一个聚合器
device = PDFPageAggregator(resource, laparams=laparam)

# 创建PDF页面解释器
interpreter = PDFPageInterpreter(resource, device)

# 使用文档对象得到页面的集合
for page in doc.get_pages():
    # 使用页面解释器来读取
    interpreter.process_page(page)

    # 使用聚合器来获得内容
    layout = device.get_result()

    # 获得布局内容
    for out in layout:     # 利用循环输出布局的每一项
        # 避免报错:AttributeError: 'LTFigure' object has no attribute 'get_text'
        if hasattr(out, "get_text"):
            print(out.get_text())
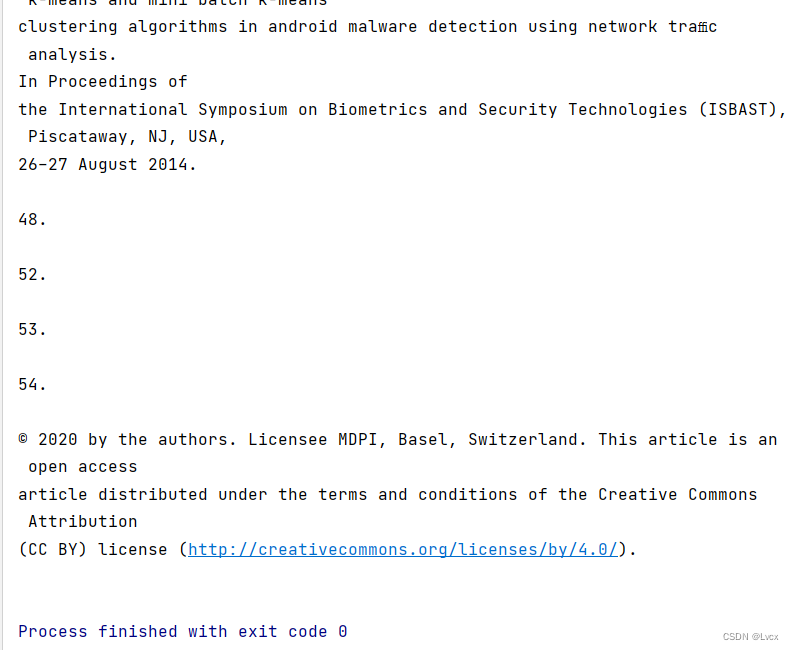
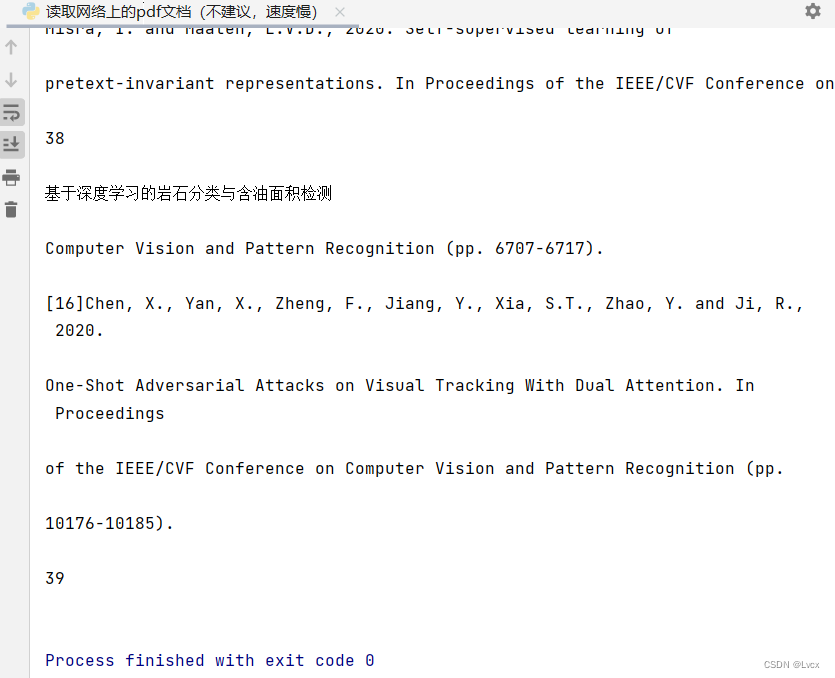
运行结果:
无法解析的部分会被标红:

示例:读取网上的PDF
from pdfminer.converter import PDFPageAggregator
from pdfminer.layout import LAParams
from pdfminer.pdfparser import PDFParser, PDFDocument
from pdfminer.pdfinterp import PDFResourceManager, PDFPageInterpreter
from pdfminer.pdfdevice import PDFDevice
from urllib.request import urlopen

# 获取文档对象
# 参考pdf:https://www.tipdm.org/u/cms/www/202107/28162910tww9.pdf
# fp = open("Automatic Detection.pdf", "rb")    # 以二进制只读方式打开
fp = urlopen("https://www.tipdm.org/u/cms/www/202107/28162910tww9.pdf")    # 以二进制只读方式打开

# 创建一个与文档关联的解释器
parser = PDFParser(fp)

# PDF文档的对象
doc = PDFDocument()

# 连接解释器和文档对象
parser.set_document(doc)
doc.set_parser(parser)

# 初始化文档
doc.initialize("")      # 由于文档没有密码,所以里面的密码参数设置为空字符串

# 创建PDF资源管理器
resource = PDFResourceManager()

# 创建参数分析器
laparam = LAParams()

# 创建一个聚合器
device = PDFPageAggregator(resource, laparams=laparam)

# 创建PDF页面解释器
interpreter = PDFPageInterpreter(resource, device)

# 使用文档对象得到页面的集合
for page in doc.get_pages():
    # 使用页面解释器来读取
    interpreter.process_page(page)

    # 使用聚合器来获得内容
    layout = device.get_result()

    # 获得布局内容
    for out in layout:     # 利用循环输出布局的每一项
        # 避免报错:AttributeError: 'LTFigure' object has no attribute 'get_text'
        if hasattr(out, "get_text"):
            print(out.get_text())
六、使用爬虫需要注意什么
注意事项
- Robots协议(也称为爬虫协议、机器人协议等)的全称是“网络爬虫排除标准”,网站通过Robots协议告诉搜索引擎哪些页面可以抓取,哪些页面不能抓取。
- User-agent:表示指定爬虫*为通配符。
- Disallow:不允许访问。
- Allow:允许访问。
- Robots协议一般是针对搜索引擎的,对用户的爬虫不太限制。
不能做的行为
- 网站服务协议条款明确禁止使用爬虫,并且对方检测到你的行为,通过某种途径通知停止这种行为。
- 使用分布式多线程爬虫,给对方的服务器带来了庞大的负担,影响对方正常用户使用,甚至对对方服务器造成实质伤害。
- 故意使用爬虫消耗对方的服务器,黑客性质的恶意攻击。
同时满足以上三个条件,则属于侵犯对方的固定资产,如果单单违反爬虫协议,而没有满足其他两个条件,则不属于违法。所以请限制你的爬虫,避免在高峰期采集。
场景分析
场景一
- 遍历某个小网站的所有内容。
一定要在晚上网站比较空闲的时间(晚3到早8)进行。
场景二
- 搜寻一个相关的内容,爬取了几万个网站。
最好快速爬取,不要在一个网站上有过多的停留。
如果要遍历一个网站的所有内容,那么要对爬虫做一些限制,因为遍历一个大型网站,会侵犯别人的知识版权。
爬取部分内容可以,但是不要遍历。
场景三
- 遍历如慕课网这种大型网站。
最好不要遍历这种很多人常用的网站,造成网站负担过重会导致网站崩溃。
七、课程总结
环境搭建
- Python3
- BeautifulSoup4
urllib和BeautifulSoup
- urllib
- 使用urlopen请求链接
- 使用add_header(key, value)方法添加请求头
- 使用decode对结果进行编码
- 使用Request(url)获得请求对象
- 使用parser.urlencode()生成post数据
- 使用urlopen(req, data=postData.encode(‘utf-8’))
- BeautifulSoup
- 使用BeautifulSoup(html, “html.parser”)解析HTML
- 查找一个节点:soup.find(id=‘imooc’)
- 查找多个节点:soup.findAll(‘a’)
- 使用正则表达式匹配:soup.findAll(‘a’, href=re.compile(exp))
存储数据到MySQL数据库
- 获取数据库连接:connection = pymysql.connect(host=‘localhost’, user=‘root’, password=‘123456’, db=‘db’, charset=‘utf8md4’)
- 使用connection.cursor()获取会话指针
- 使用cursor.ececute(sql, (参数1, 参数2, …,参数n))执行sql
- 提交connection.commit()
- 关闭连接connection.close()
- 使用cursor.execute()获得查询出多少条记录
- 使用cursor.fetchone()获取下一行记录
- 使用cursor.fetchmany(size=10)获取指定数量的记录
- 使用cursor.fetchall()获得全部的记录
常见文档读取(TXT、PDF)
- 乱码的原因,以及解决方案
- 使用pdfminer3k读取PDF文档
使用爬虫需要注意什么
- 爬虫协议文件robots.txt
- User-agent:表示指定爬虫*为通配符
- Disallow:不允许访问
- Allow:允许访问
- 如何找到网站robots协议:在网站根网址后输入robots.txt
文章笔记参考课程:https://www.imooc.com/video/12622
代码资源:https://download.csdn.net/download/ungoing/86790114