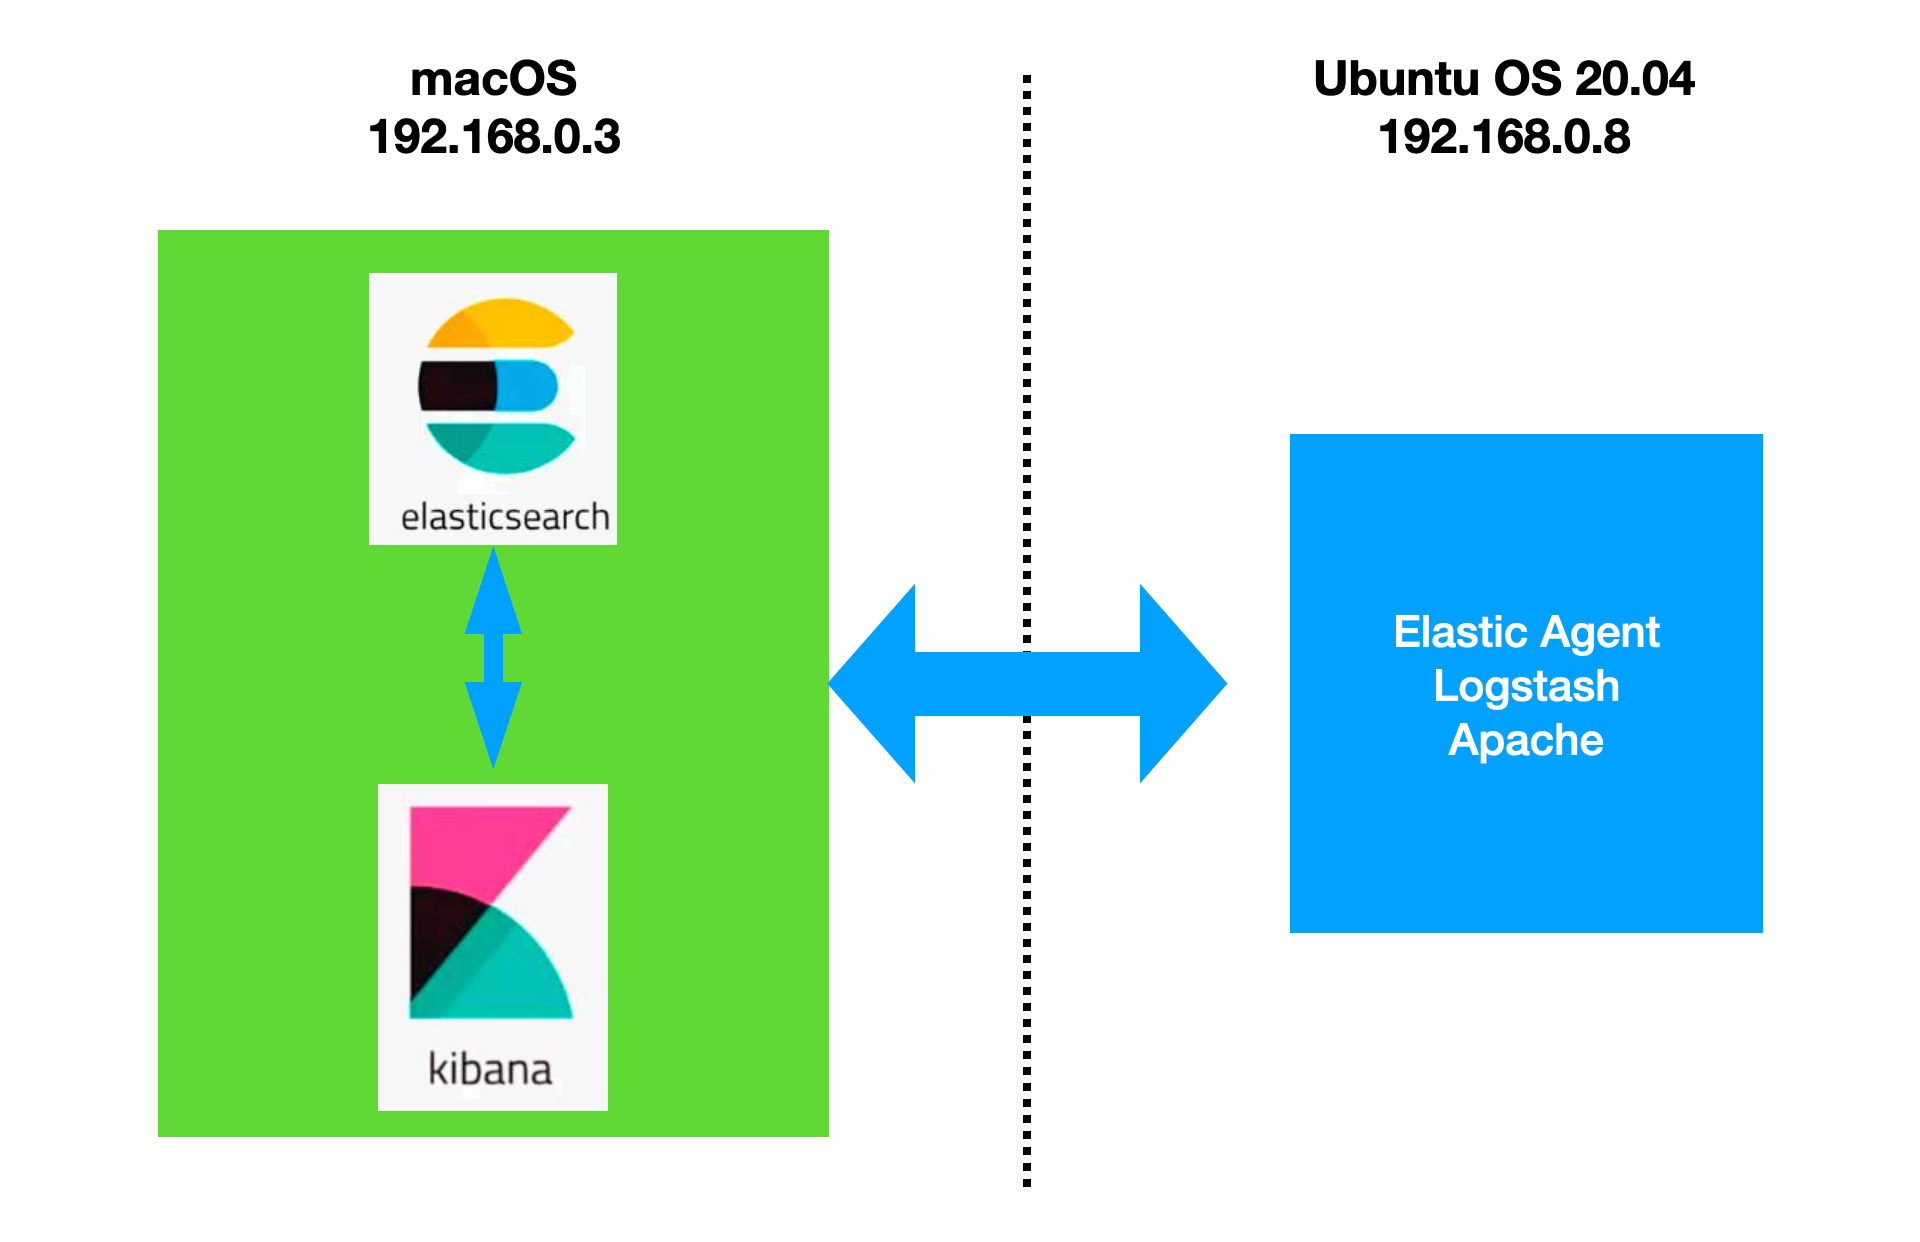
在我之前的文章 “Observability:如何把 Elastic Agent 采集的数据输入到 Logstash 并最终写入到 Elasticsearch”,我详细介绍了如何使用 Elastic Agents 采集数据并把数据通过 Logstash 发送至 Elasticsearch。细心的开发者可能注意到从 Elastic Agents 到 Logstash 直接的链接它不是加密的。这个在实际的使用中可能会有安全的隐患。那么我们该如何配置这个链接之间的安全呢?

要将数据从 Elastic Agent 安全地发送到 Logstash,你需要配置传输层安全性 (TLS)。 使用 TLS 可确保你的 Elastic Agent 将加密数据发送到受信任的 Logstash 服务器,并且你的 Logstash 服务器从受信任的 Elastic Agent 客户端接收数据。
我还是使用之前文章里的配置来进行展示:
前提条件
- 确保你的订阅级别支持输出到 Logstash。
- 在 Windows 上,将队列服务器的端口 8220 和 Logstash 的端口 5044 添加到 Windows 高级防火墙的入站端口规则。
- 如果你要连接到自我管理的 Elasticsearch 集群,则需要用于签署 Elasticsearch 集群 HTTP 层证书的 CA 证书。 有关更多信息,请参阅 Elasticsearch 安全文档。
生成自定义证书和私钥
你可以使用通常使用的任何过程来生成 PEM 格式的证书。 此处显示的示例使用 Elasticsearch 提供的 certutil 工具。
1)生成证书颁发机构 (CA)。 如果你想使用现有的 CA,请跳过此步骤。
./bin/elasticsearch-certutil ca --pem$ pwd
/Users/liuxg/elastic/elasticsearch-8.8.1
$ ./bin/elasticsearch-certutil ca --pem
This tool assists you in the generation of X.509 certificates and certificate
signing requests for use with SSL/TLS in the Elastic stack.
The 'ca' mode generates a new 'certificate authority'
This will create a new X.509 certificate and private key that can be used
to sign certificate when running in 'cert' mode.
Use the 'ca-dn' option if you wish to configure the 'distinguished name'
of the certificate authority
By default the 'ca' mode produces a single PKCS#12 output file which holds:
* The CA certificate
* The CA's private key
If you elect to generate PEM format certificates (the -pem option), then the output will
be a zip file containing individual files for the CA certificate and private key
Please enter the desired output file [elastic-stack-ca.zip]:
$ ls
LICENSE.txt bin elastic-stack-ca.zip logs
NOTICE.txt config jdk.app modules
README.asciidoc data lib plugins
$ unzip elastic-stack-ca.zip
Archive: elastic-stack-ca.zip
creating: ca/
inflating: ca/ca.crt
inflating: ca/ca.key 此命令创建一个 zip 文件,其中包含 CA 证书和用于签署证书的密钥。 解压 zip 文件:
2)生成由你的 CA 签名的客户端 SSL 证书。 例如:
./bin/elasticsearch-certutil cert \
  --name client \
  --ca-cert /path/to/ca/ca.crt \
  --ca-key /path/to/ca/ca.key \
  --pem
我们在 Ubuntu OS 机器上运行如下的命令并获得相应的信息:

$ pwd
/Users/liuxg/elastic/elasticsearch-8.8.1
$ ./bin/elasticsearch-certutil cert \
>   --name client \
>   --ca-cert ./ca/ca.crt \
>   --ca-key ./ca/ca.key \
>   --pem
This tool assists you in the generation of X.509 certificates and certificate
signing requests for use with SSL/TLS in the Elastic stack.

The 'cert' mode generates X.509 certificate and private keys.
    * By default, this generates a single certificate and key for use
       on a single instance.
    * The '-multiple' option will prompt you to enter details for multiple
       instances and will generate a certificate and key for each one
    * The '-in' option allows for the certificate generation to be automated by describing
       the details of each instance in a YAML file

    * An instance is any piece of the Elastic Stack that requires an SSL certificate.
      Depending on your configuration, Elasticsearch, Logstash, Kibana, and Beats
      may all require a certificate and private key.
    * The minimum required value for each instance is a name. This can simply be the
      hostname, which will be used as the Common Name of the certificate. A full
      distinguished name may also be used.
    * A filename value may be required for each instance. This is necessary when the
      name would result in an invalid file or directory name. The name provided here
      is used as the directory name (within the zip) and the prefix for the key and
      certificate files. The filename is required if you are prompted and the name
      is not displayed in the prompt.
    * IP addresses and DNS names are optional. Multiple values can be specified as a
      comma separated string. If no IP addresses or DNS names are provided, you may
      disable hostname verification in your SSL configuration.


    * All certificates generated by this tool will be signed by a certificate authority (CA)
      unless the --self-signed command line option is specified.
      The tool can automatically generate a new CA for you, or you can provide your own with
      the --ca or --ca-cert command line options.


By default the 'cert' mode produces a single PKCS#12 output file which holds:
    * The instance certificate
    * The private key for the instance certificate
    * The CA certificate

If you specify any of the following options:
    * -pem (PEM formatted output)
    * -multiple (generate multiple certificates)
    * -in (generate certificates from an input file)
then the output will be be a zip file containing individual certificate/key files

Please enter the desired output file [certificate-bundle.zip]:

Certificates written to /Users/liuxg/elastic/elasticsearch-8.8.1/certificate-bundle.zip

This file should be properly secured as it contains the private key for
your instance.
After unzipping the file, there will be a directory for each instance.
Each instance has a certificate and private key.
For each Elastic product that you wish to configure, you should copy
the certificate, key, and CA certificate to the relevant configuration directory
and then follow the SSL configuration instructions in the product guide.

For client applications, you may only need to copy the CA certificate and
configure the client to trust this certificate.
$ unzip certificate-bundle.zip
Archive:  certificate-bundle.zip
   creating: client/
  inflating: client/client.crt
  inflating: client/client.key
3)生成由你的 CA 签名的 Logstash SSL 证书。 例如:
./bin/elasticsearch-certutil cert \
  --name logstash \
  --ca-cert /path/to/ca/ca.crt \
  --ca-key /path/to/ca/ca.key \
  --dns your.host.name.here \
  --ip 192.0.2.1 \
  --pem
针对我的情况:
$ pwd
/Users/liuxg/elastic/elasticsearch-8.8.1
$ ls
LICENSE.txt            ca                     data                   logs
NOTICE.txt             certificate-bundle.zip elastic-stack-ca.zip   modules
README.asciidoc        client                 jdk.app                plugins
bin                    config                 lib
$ rm certificate-bundle.zip
remove certificate-bundle.zip? y
$ ./bin/elasticsearch-certutil cert \
>   --name logstash \
>   --ca-cert ./ca/ca.crt \
>   --ca-key ./ca/ca.key \
>   --dns ubuntu2004 \
>   --ip 192.168.0.8 \
>   --pem
This tool assists you in the generation of X.509 certificates and certificate
signing requests for use with SSL/TLS in the Elastic stack.

The 'cert' mode generates X.509 certificate and private keys.
    * By default, this generates a single certificate and key for use
       on a single instance.
    * The '-multiple' option will prompt you to enter details for multiple
       instances and will generate a certificate and key for each one
    * The '-in' option allows for the certificate generation to be automated by describing
       the details of each instance in a YAML file

    * An instance is any piece of the Elastic Stack that requires an SSL certificate.
      Depending on your configuration, Elasticsearch, Logstash, Kibana, and Beats
      may all require a certificate and private key.
    * The minimum required value for each instance is a name. This can simply be the
      hostname, which will be used as the Common Name of the certificate. A full
      distinguished name may also be used.
    * A filename value may be required for each instance. This is necessary when the
      name would result in an invalid file or directory name. The name provided here
      is used as the directory name (within the zip) and the prefix for the key and
      certificate files. The filename is required if you are prompted and the name
      is not displayed in the prompt.
    * IP addresses and DNS names are optional. Multiple values can be specified as a
      comma separated string. If no IP addresses or DNS names are provided, you may
      disable hostname verification in your SSL configuration.


    * All certificates generated by this tool will be signed by a certificate authority (CA)
      unless the --self-signed command line option is specified.
      The tool can automatically generate a new CA for you, or you can provide your own with
      the --ca or --ca-cert command line options.


By default the 'cert' mode produces a single PKCS#12 output file which holds:
    * The instance certificate
    * The private key for the instance certificate
    * The CA certificate

If you specify any of the following options:
    * -pem (PEM formatted output)
    * -multiple (generate multiple certificates)
    * -in (generate certificates from an input file)
then the output will be be a zip file containing individual certificate/key files

Please enter the desired output file [certificate-bundle.zip]:

Certificates written to /Users/liuxg/elastic/elasticsearch-8.8.1/certificate-bundle.zip

This file should be properly secured as it contains the private key for
your instance.
After unzipping the file, there will be a directory for each instance.
Each instance has a certificate and private key.
For each Elastic product that you wish to configure, you should copy
the certificate, key, and CA certificate to the relevant configuration directory
and then follow the SSL configuration instructions in the product guide.

For client applications, you may only need to copy the CA certificate and
configure the client to trust this certificate.
$ unzip certificate-bundle.zip
Archive:  certificate-bundle.zip
   creating: logstash/
  inflating: logstash/logstash.crt
  inflating: logstash/logstash.key
4)将 Logstash 密钥转换为 pkcs8。 例如,在 Linux 上运行:
openssl pkcs8 -inform PEM -in logstash.key -topk8 -nocrypt -outform PEM -out logstash.pkcs8.key$ pwd
/Users/liuxg/elastic/elasticsearch-8.8.1
$ cd logstash/
$ openssl pkcs8 -inform PEM -in logstash.key -topk8 -nocrypt -outform PEM -out logstash.pkcs8.key
$ ls
logstash.crt logstash.key logstash.pkcs8.key将这些文件存储在安全的位置。我们通过如下的命令来把需要的文件拷贝到 Logstash 的安装目录中去:
$ pwd
/Users/liuxg/elastic/elasticsearch-8.8.1/logstash
$ scp logstash.crt parallels@ubuntu2004:/home/parallels/logstash/logstash-8.8.1/certs
logstash.crt                                                 100% 1188     3.0MB/s   00:00
$ scp logstash.pkcs8.key parallels@ubuntu2004:/home/parallels/logstash/logstash-8.8.1/certs
logstash.pkcs8.key                                           100% 1708     1.2MB/s   00:00
$ pwd
/Users/liuxg/elastic/elasticsearch-8.8.1
$ cd ca/
$ ls
ca.crt ca.key
$ scp ca.crt parallels@ubuntu2004:/home/parallels/logstash/logstash-8.8.1/certs
ca.crt 上述命令在 macOS 上运行。我们在 Ubuntu OS 中进行查看:
parallels@ubuntu2004:~/logstash/logstash-8.8.1/certs$ pwd
/home/parallels/logstash/logstash-8.8.1/certs
parallels@ubuntu2004:~/logstash/logstash-8.8.1/certs$ ls
ca.crt  logstash.crt  logstash.pkcs8.key
我们也把 client 相应的证书拷贝到 Ubuntu OS 里去:
$ pwd
/Users/liuxg/elastic/elasticsearch-8.8.1
$ cd ca/
$ ls
ca.crt ca.key
$ scp ca.crt parallels@ubuntu2004:/home/parallels/fleet/elastic-agent-8.8.1-linux-arm64/certs
ca.crt                                                       100% 1200   890.5KB/s   00:00
$ cd ..
$ cd client/
$ ls
client.crt client.key
$ scp client.crt parallels@ubuntu2004:/home/parallels/fleet/elastic-agent-8.8.1-linux-arm64/certs
client.crt                                                   100% 1143   873.4KB/s   00:00
$ scp client.key parallels@ubuntu2004:/home/parallels/fleet/elastic-agent-8.8.1-linux-arm64/certs
client.key                                                   100% 1675     1.2MB/s   00:00
我们可以在 Ubuntu OS 里进行查看:
parallels@ubuntu2004:~/fleet/elastic-agent-8.8.1-linux-arm64/certs$ pwd
/home/parallels/fleet/elastic-agent-8.8.1-linux-arm64/certs
parallels@ubuntu2004:~/fleet/elastic-agent-8.8.1-linux-arm64/certs$ ls
ca.crt  client.crt  client.key
配置 Logstash 管道
提示:如果你已经创建了 Logstash elastic-agent-pipeline.conf 管道并将其添加到 pipelines.yml,请跳到示例配置并根据需要修改管道配置。
在 Logstash 配置目录中,打开 pipelines.yml 文件并添加以下配置。 替换你的文件的路径。
- pipeline.id: elastic-agent-pipeline
  path.config: "/etc/path/to/elastic-agent-pipeline.conf"
在 elastic-agent-pipeline.conf 文件中,添加管道配置。 请注意,Elastic Cloud 上的 Elasticsearch 服务所需的配置与自管理 Elasticsearch 集群不同。 如果你复制了 Fleet 中显示的配置,请根据需要进行调整。
我们参照之前文章 “安装独立的 Elastic Agents 并采集数据 - Elastic Stack 8.0” 的例子,我们通过解压缩的方式来安装 Logstash:
logstash.conf
input {
  elastic_agent {
    port => 5044
    ssl => true
    ssl_certificate_authorities => ["/home/parallels/logstash/logstash-8.8.1/certs/ca.crt"]
    ssl_certificate => "/home/parallels/logstash/logstash-8.8.1/certs/logstash.crt"
    ssl_key => "/home/parallels/logstash/logstash-8.8.1/certs/logstash.pkcs8.key"
    ssl_verify_mode => "force_peer"
  }
}

output {
   stdout {}

   elasticsearch {
      hosts => ["https://192.168.0.3:9200"]
      index => "data-%{+YYYY.MM.dd}"
      ssl => true
      ilm_enabled => true
      user => "elastic"
      password => "z5nxTriCD4fi7jSS=GFM"
      ca_trusted_fingerprint => "783663875df7ae1daf3541ab293d8cd48c068b3dbc2d9dd6fa8a668289986ac2"
    }
}
请注意在上面,我们使用了 pkcs8 格式的证书。这个在 Elastic 官方文档中指出。
在上面,我们把之前生成的证书拷贝到 Ubuntu OS 机器中,并进行相应的配置。配置完毕后,我们就使用如下的命令来进行启动:
./bin/logstash -f logstash.conf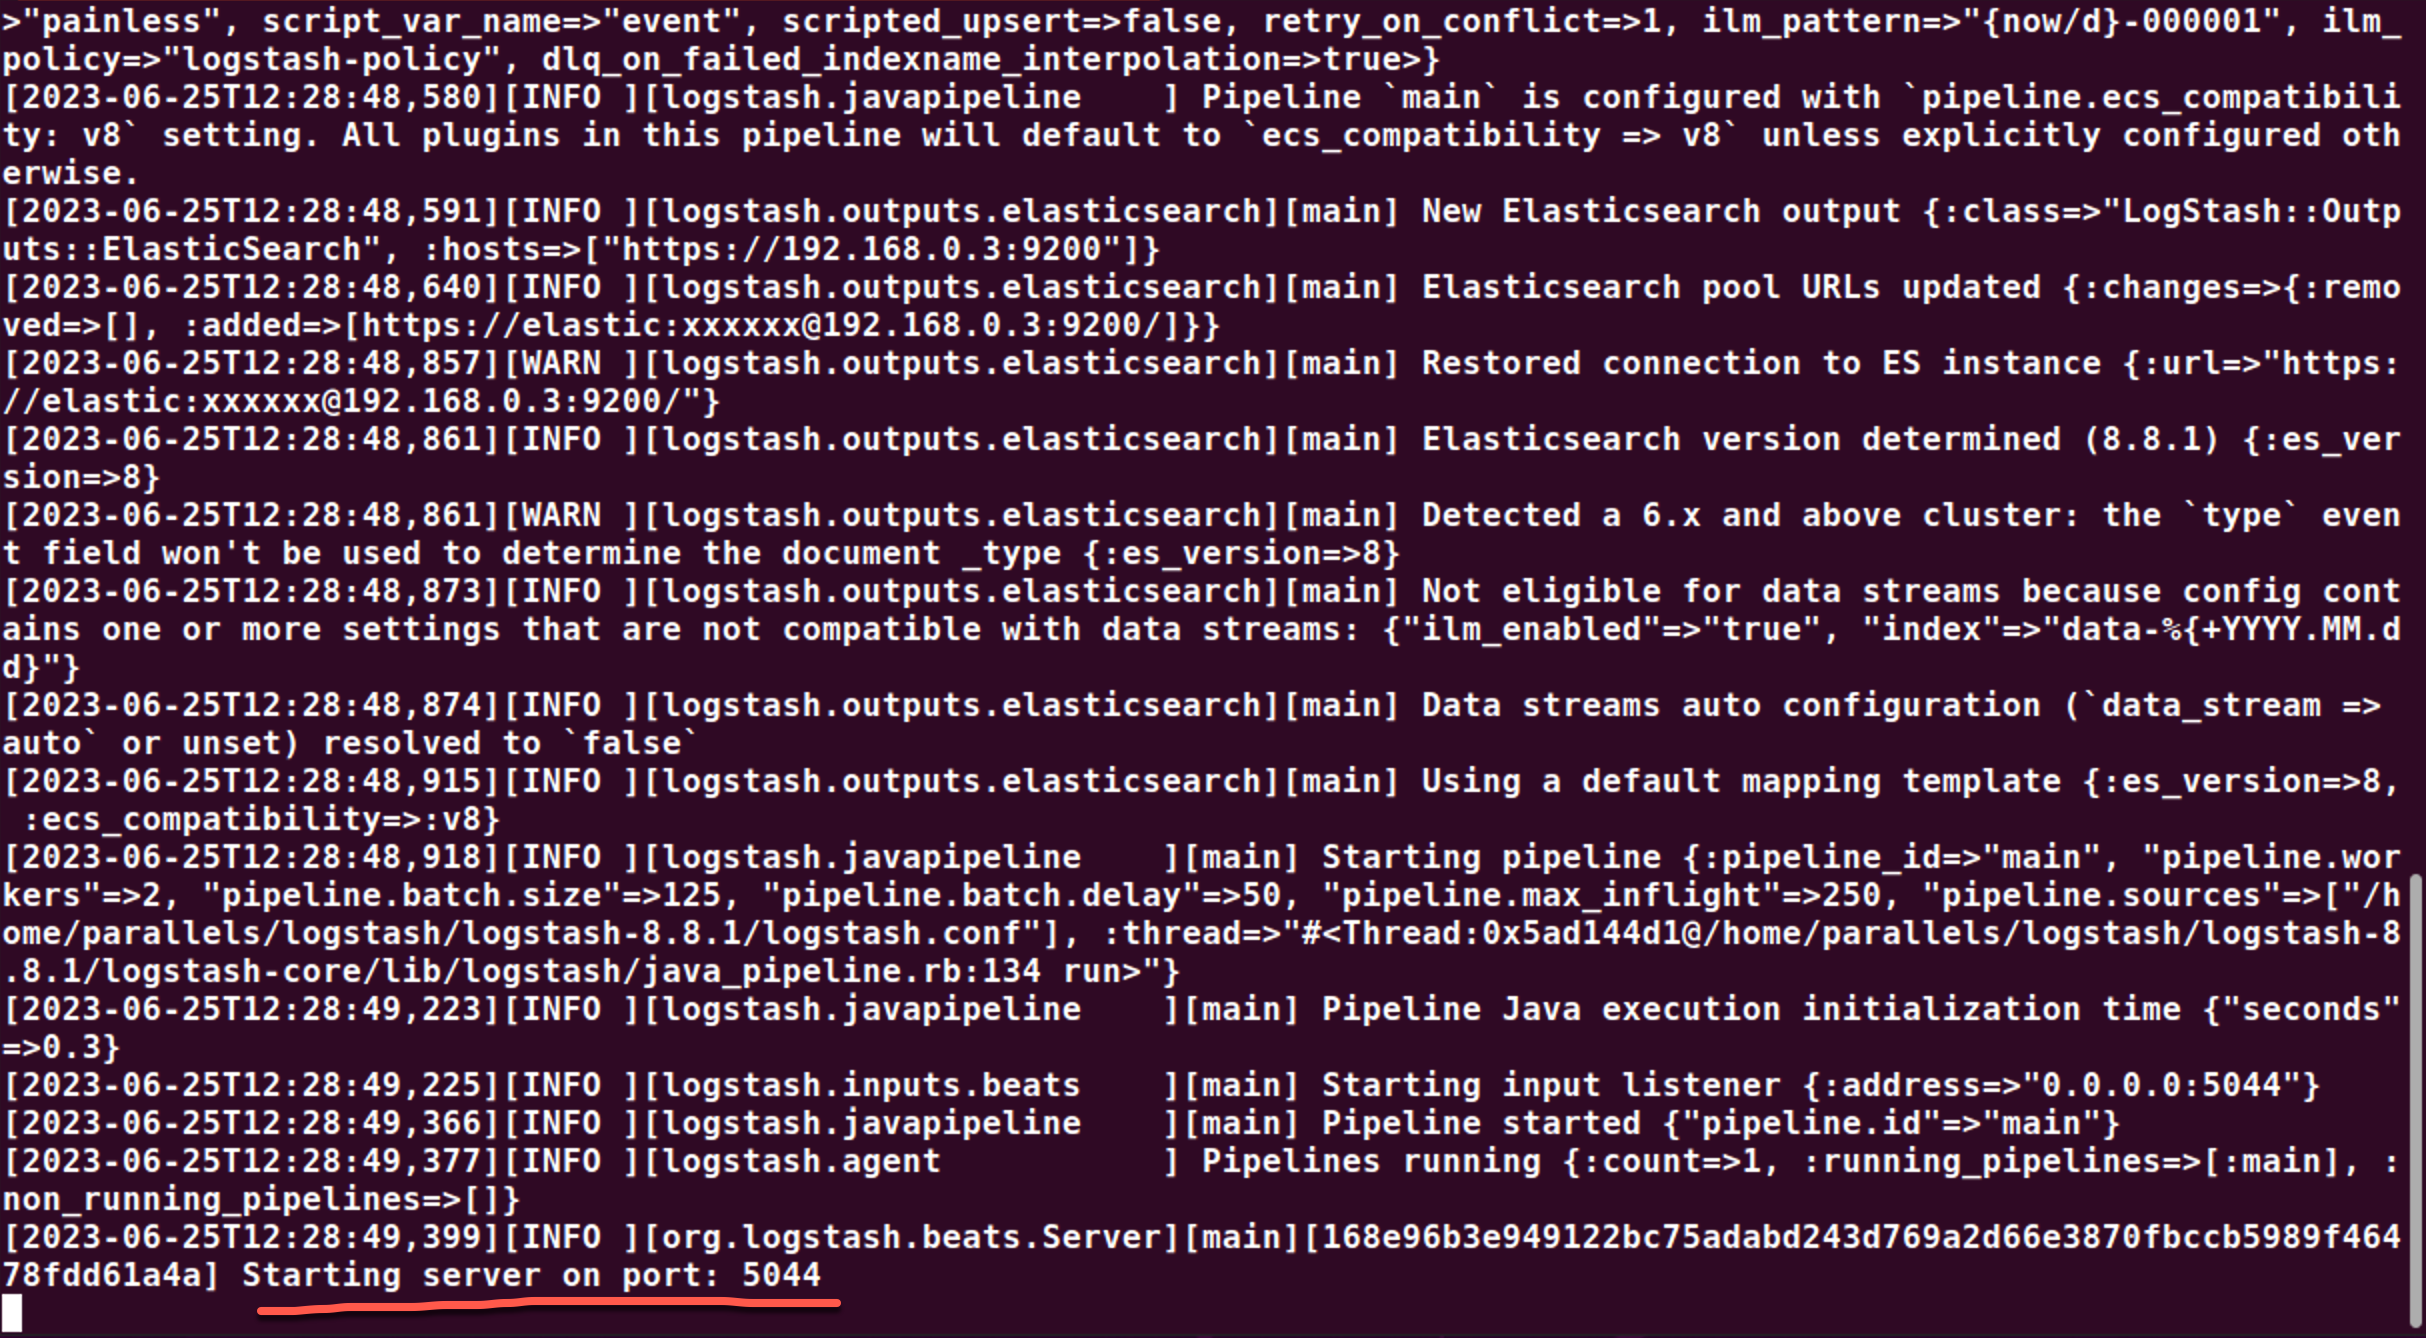
一旦 Logstash 被成功地运行起来了,我们就可以来配置 elastic-agent.yml 文件。请参考之前的文章 “Observability:如何把 Elastic Agent 采集的数据输入到 Logstash 并最终写入到 Elasticsearch” 来了解如何在 standalone 模式下获得 elastic-agent.yml 文件的配置。我们需要针对它的 output 部分进行配置:
elastic-agent.yml
outputs:
  default:
    type: logstash
    hosts: ["192.168.0.8:5044"]
    ssl.enabled: true
    ssl.certificate: "/home/parallels/fleet/elastic-agent-8.8.1-linux-arm64/certs/client.crt"
    ssl.key: "/home/parallels/fleet/elastic-agent-8.8.1-linux-arm64/certs/client.key"
    ssl.certificate_authorities: ["/home/parallels/fleet/elastic-agent-8.8.1-linux-arm64/certs/ca.crt"]
    # ssl.verification _mode: "none"
请注意上面的证书文件是在上面的部分生成,并通过 scp 的方法拷贝过来的。
除了上面的配置方法之外,我们还可以通过如下的方式来进行配置:
elastic-agent.yml
outputs:
  default:
    type: logstash
    hosts: ["192.168.0.8:5044"]
    ssl.enabled: true
    ssl.certificate: |
        -----BEGIN CERTIFICATE-----
        MIIDITCCAgmgAwIBAgIVAIM1GqVt3OuMATFeE0WnC1oy6NIqMA0GCSqGSIb3DQEB
        CwUAMDQxMjAwBgNVBAMTKUVsYXN0aWMgQ2VydGlmaWNhdGUgVG9vbCBBdXRvZ2Vu
        ZXJhdGVkIENBMB4XDTIzMDYyNTE0NTM0MloXDTI2MDYyNDE0NTM0MlowETEPMA0G
        A1UEAxMGY2xpZW50MIIBIjANBgkqhkiG9w0BAQEFAAOCAQ8AMIIBCgKCAQEA8+3M
        zbfXZMtrAtwVfA4YqKY7kKG5CTYkg30nUQLjnYyQxZIW8uiUceLmGWCOmsA7q6V/
        TiMIQt8BQ4QufJxfPZKxh5JxdstClrQde0IxvkI3/uLsYvQXuKBSrVTGG4MAcMQ6
        ELeDbAvx9UdjnP2JDYmDKn/dsR5Ba2En8Pf0LHsQtocKBQ/Cgvc+KdPF2k+1178c
        qqZYJNNKVo1VkvIKO+tw1rvEO844mgGxmiw6OinCbfpbVbslTfq6Ei/hTKLO4pCN
        MH2dYFCvVaWgFTs7E89HB43+8n0VLuhtVTpNZ1eFUB9mLAzzXQic+DX1oaHt9qBE
        FXgBpOXOaGbdZdOdcwIDAQABo00wSzAdBgNVHQ4EFgQUF9W0KNnRZF6lZq7M+9Ds
        GY0/8zgwHwYDVR0jBBgwFoAUvybvHTp1FnykQfXeFTTArmhDlL8wCQYDVR0TBAIw
        ADANBgkqhkiG9w0BAQsFAAOCAQEA0/qr+b/IgBJ4fexS9Fvi6yan6etug+2/EZRf
        AQpE2NwD2A/FNeA2GL5p5tvDMfPlxvFNRDGUIpMUeUw+oK1F04MFEmAC5kH80alK
        x4j3wWY6ZtdT4p+XuLqKesxH+ArodlY2oWkfqxRWjDpw6MBI426/bsTps+UiBEg4
        unW/9koH8C6WBBraDH7VT3vboM6Bx/bgbHeDxAdyMrxT1BUttaj0uWInQFbtm43i
        WsfKlyaP45tez1hFWp9kD9HmFmOTOgld9KKCewGWjl/NJrcMK76Q5K1ibC++Afpu
        YceIrRzoGb4SHYpIqFGoWgBhE5hYSJ+/G3W2j2aZadWm/9yLsw==
        -----END CERTIFICATE-----

    ssl.key: |
        -----BEGIN RSA PRIVATE KEY-----
        MIIEpAIBAAKCAQEA8+3MzbfXZMtrAtwVfA4YqKY7kKG5CTYkg30nUQLjnYyQxZIW
        8uiUceLmGWCOmsA7q6V/TiMIQt8BQ4QufJxfPZKxh5JxdstClrQde0IxvkI3/uLs
        YvQXuKBSrVTGG4MAcMQ6ELeDbAvx9UdjnP2JDYmDKn/dsR5Ba2En8Pf0LHsQtocK
        BQ/Cgvc+KdPF2k+1178cqqZYJNNKVo1VkvIKO+tw1rvEO844mgGxmiw6OinCbfpb
        VbslTfq6Ei/hTKLO4pCNMH2dYFCvVaWgFTs7E89HB43+8n0VLuhtVTpNZ1eFUB9m
        LAzzXQic+DX1oaHt9qBEFXgBpOXOaGbdZdOdcwIDAQABAoIBABONOv4+PxiIKYKo
        K1yvMJDMCjg0jkVLvq9/Z5hZt+7X5n6/j/FWbReXzUO5dpS21dGTSVn0+uOJRmun
        +6XnTsb7rBkmxstzzVmRBE/t5VjPq/dVLwdbc09MInRcOCjaXj2rrM/MNc+CQZmc
        aEKcG9Em9YmBiD57I1k9B1uMNFkgOA3J8zBL1UI4dCzW0otYEAvkvgC1bhOc4hZe
        Im5EguAHPz5yflc5+IFw/iImL5f66tHDuXUTxlMnSY/Fozl34nyxSIVdkD5I1vsC
        Ph9imQcyt2ikR/g+aINnSPOEYYTczebnpJ82xafygrJHNG0ovdLEL21OdMyrhkYZ
        zdG9VZECgYEA/KcB18gt81I9LPY1wV9hvgDvTiUxbSNDmiOnzahlXIKyMJz8rMrN
        sqO5E7j9F3BMCjNCjftL7gmSxJCLS8wCQ7J/cA2V8luMsATg28rwrLvyUjLcynbj
        r2M+6jIEf+IeuPO23SDwgJNjdy2MK6D2Hb1NXNpdJm/DMdf+4LqCHVsCgYEA9ykz
        9Sl8H4BfThrcR+uGPjaVn5GFi/j8bbadK7EYS3MKZ3isxyQulwwwkBS6rI03TXfz
        PzSne+/fFDS7GWueD3j78+yo6uqXZIskIgYgPBcPK+581bfdZLuKgAc4ez7Vidpo
        df7PmeLVHopjSQjZrEg8bWumU/bi0kmLB9n/g8kCgYEAzyp5/l+sHfpvIzD3vwng
        8ZV+pAsnTiA+TGO0MpREGOkqB2aSYXUh2bsaBSwIi3GPSEXj6twF1LeQ2xDSx2IO
        8Uep602YiFO9No+peVAcrOanufLuzC1UYPn2Gr7MpbfaDTn51bQuwJ8aThzQ9O1V
        IemZR+vduaim23YLDmagTkUCgYEA8vPAjBwkU77XcCo9IEEnK15yg3EDSk0MrTgV
        lQ426GuD7aQUiohJd9bWobqOqPEDTJY9OIMko1JuASm4RMuhimoNmH+op4rEGGQh
        t4Q4CXlNQ4zhjx92c/9ZrHHsllF0jFZx2pMINKdhgOzdnbwiZBR5ucFYtS55VeZO
        0P/8B+kCgYA/PxzmM0Zw3lkg137SReu0yKQTcxPJN9jAZEf6CFJH9cfj8lz/y8Ww
        Q/pck51GskOgTrevTNFKig/Ey73fh+Igv2cv2TFFOD9kyl/G7TzU/37yAjqw27hG
        WQjG/XFVXcnun37hABL6mo+9Up83P/VuHDmFcFbq5ieaj4xxnLYg7A==
        -----END RSA PRIVATE KEY-----

    ssl.certificate_authorities:
      - |
        -----BEGIN CERTIFICATE-----
        MIIDSjCCAjKgAwIBAgIVAL6DjfaZpmvUvgvD1oLrSW+MS2SzMA0GCSqGSIb3DQEB
        CwUAMDQxMjAwBgNVBAMTKUVsYXN0aWMgQ2VydGlmaWNhdGUgVG9vbCBBdXRvZ2Vu
        ZXJhdGVkIENBMB4XDTIzMDYyNTE0NTMwN1oXDTI2MDYyNDE0NTMwN1owNDEyMDAG
        A1UEAxMpRWxhc3RpYyBDZXJ0aWZpY2F0ZSBUb29sIEF1dG9nZW5lcmF0ZWQgQ0Ew
        ggEiMA0GCSqGSIb3DQEBAQUAA4IBDwAwggEKAoIBAQD8wWK4d0D6bCKs7tv3Aw9z
        51XmG6V3qovUcYaIQsNsCO+/oN/58zwI4YpGnx/p1f+LINW/TrQ17iK1sIiuHSTt
        EC/nModLB/zworoKzfazDWWPgFi50d3e2FhkoiBSia5hoWKuFdnvRjUHC5cX+i4K
        jDQFtK8uBueZI8js4X8JUC3XHBgQbt7e5Wb7a/8lWnTMAB+F7kiZrc/3KrVARRlk
        P9MkTxF3109Rm48KfwtK0ENKJX/Ys58p+k4OsDIv45bmPizfPSFiUnZqbdEVroPJ
        HsuP2Y37jwcl5xWFlejTqBkCNwIw5u+qzn/WVy4SlfaodgIuRVUiNH7rMGemhsuF
        AgMBAAGjUzBRMB0GA1UdDgQWBBS/Ju8dOnUWfKRB9d4VNMCuaEOUvzAfBgNVHSME
        GDAWgBS/Ju8dOnUWfKRB9d4VNMCuaEOUvzAPBgNVHRMBAf8EBTADAQH/MA0GCSqG
        SIb3DQEBCwUAA4IBAQAf5zqnTJqy2xFCzFv11YyOQ3aso8tlr55nnpDecdpcMu5k
        ++HcUCL9ahMBvRYiOHJC9rQzxCHzE0IIgmoGlk2A9Bul65ti5ry3uAjAhG2Ld77v
        idX//HsFM3A4HMV2UemonvEKFYFengc+st76E3+au40t7QOUSAHCHMdSeeY4VYiv
        lop6neQ/DYUCKysyHNnj8nwrUoAT7LfBECeE4JpE5Gp5NgYIYuBtF4hn3PTf5lSt
        05gl72ME/1ILyxuXroqOA2B9rvMlrt/8Uwmp7usggdo8mtsTM4O6ccUmLHTubnhv
        +eaVWHoOU4LU+YrhqgqpFlbjcJ5JG1wyovaieDt4
        -----END CERTIFICATE-----

    #ssl.verification _mode: "none"
在上面,我们通过粘贴的方式来进行的。这个方法的好处是它和文件的路径没有关系了。特别值得注意的是 ssl.key 它是 RSA PRIVATE KEY 格式的而不是和 logstash.conf 中 elastic-agent input 输入中所需要的 pkcs8 格式的。
等我们配置完后,我们可以通过如下的命令来进行运行:
sudo ./elastic-agent installparallels@ubuntu2004:~/fleet/elastic-agent-8.8.1-linux-arm64$ pwd
/home/parallels/fleet/elastic-agent-8.8.1-linux-arm64
parallels@ubuntu2004:~/fleet/elastic-agent-8.8.1-linux-arm64$ sudo ./elastic-agent install
Elastic Agent will be installed at /opt/Elastic/Agent and will run as a service. Do you want to continue? [Y/n]:y
Do you want to enroll this Agent into Fleet? [Y/n]:n我们可以通过如下的命令来查看 elastic-agent 的状态:
service elastic-agent status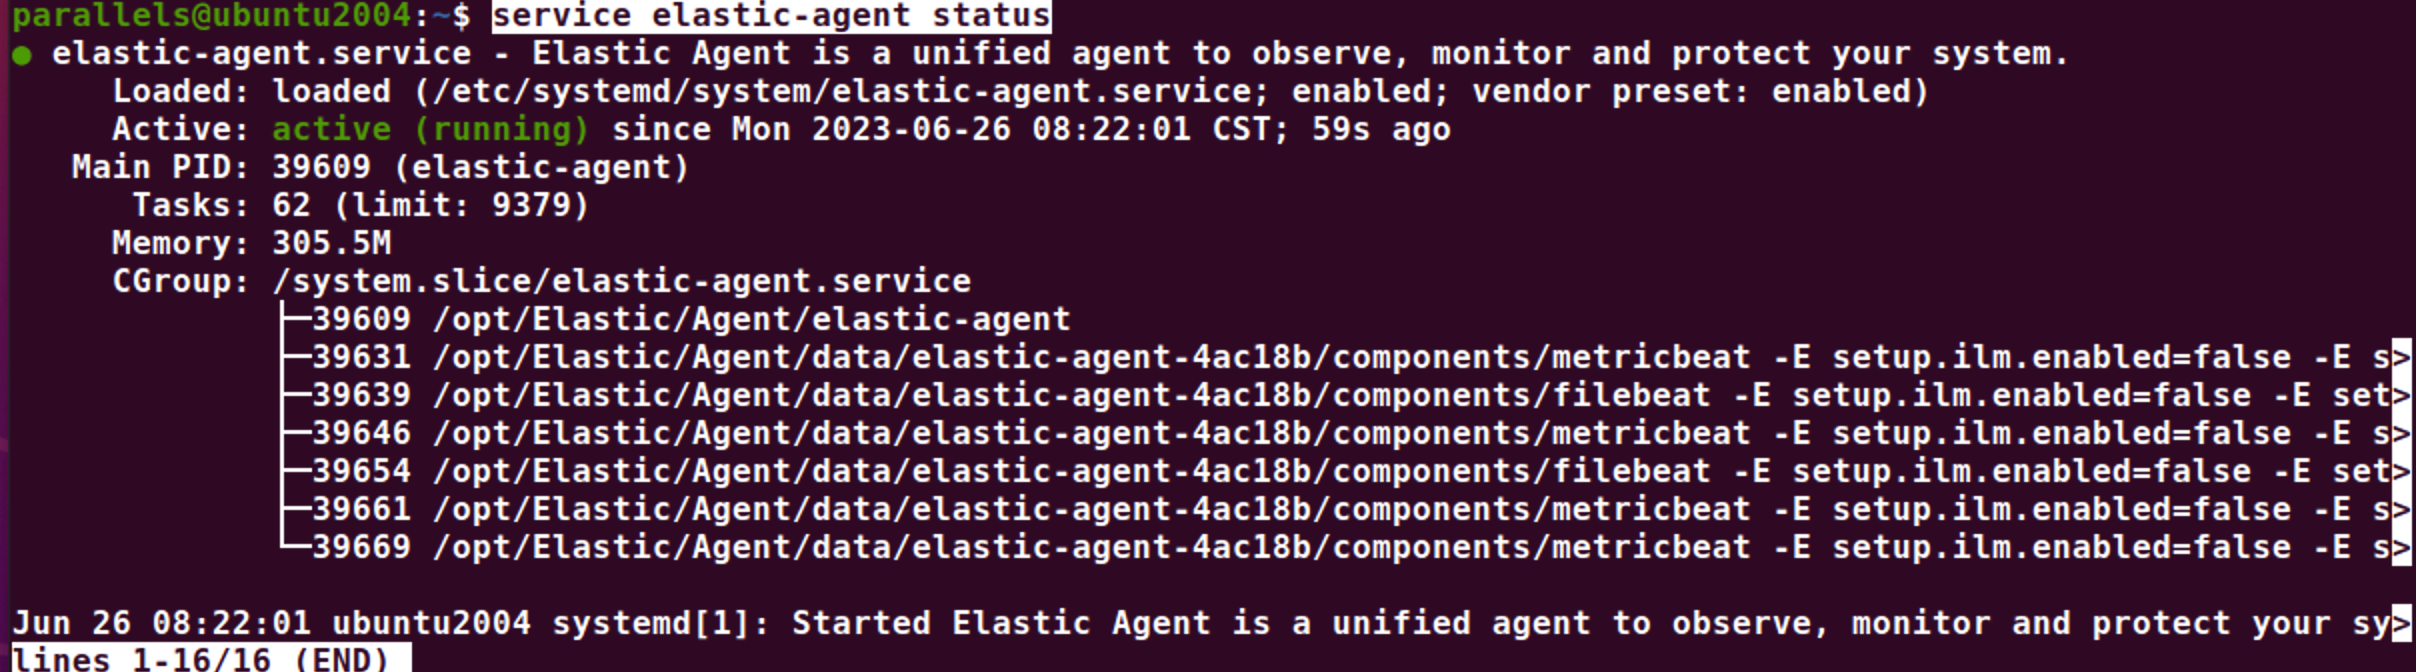
在过程中如果有遇到错误信息,我们可以通过如下的方法来查看 elastic-agent 的日志信息:
arallels@ubuntu2004:~$ su
Password:
root@ubuntu2004:/home/parallels# cd /opt/Elastic/Agent/
root@ubuntu2004:/opt/Elastic/Agent# ls
certs          elastic-agent-20230626-1.ndjson  elastic-agent.paste.yml      fleet.enc       NOTICE.txt
data           elastic-agent-20230626.ndjson    elastic-agent.reference.yml  fleet.enc.lock  README.md
elastic-agent  elastic-agent.back.yml           elastic-agent.yml            LICENSE.txt     vault
root@ubuntu2004:/opt/Elastic/Agent# cd data/elastic-agent-4ac18b/logs
root@ubuntu2004:/opt/Elastic/Agent/data/elastic-agent-4ac18b/logs# ls
elastic-agent-20230626.ndjson  elastic-agent-watcher-20230626.ndjson
root@ubuntu2004:/opt/Elastic/Agent/data/elastic-agent-4ac18b/logs# cat elastic-agent-20230626.ndjson
{"log.level":"info","@timestamp":"2023-06-26T00:22:02.151Z","log.origin":{"file.name":"cmd/run.go","file.line":236},"message":"APM instrumentation disabled","log":{"source":"elastic-agent"},"ecs.version":"1.6.0"}
{"log.level":"info","@timestamp":"2023-06-26T00:22:02.151Z","log.origin":{"file.name":"application/application.go","file.line":49},"message":"Gathered system information","log":{"source":"elastic-agent"},"ecs.version":"1.6.0"}
{"log.level":"info","@timestamp":"2023-06-26T00:22:02.174Z","log.origin":{"file.name":"application/application.go","file.line":55},"message":"Detected available inputs and outputs","log":{"source":"elastic-agent"},"inputs":["uwsgi/metrics","apache/metrics","nginx/metrics","cloudbeat","container","gcp-pubsub","docker/metrics","mqtt","gcp/metrics","kafka/metrics","synthetics/tcp","entity-analytics","gcs","netflow","kibana/metrics","cloudbeat/cis_eks","cloudbeat/vuln_mgmt_aws","endpoint","cometd","windows/metrics","mssql/metrics","oracle/metrics","activemq/metrics","zookeeper/metrics","synthetics/icmp","azure-eventhub","kafka","aws/metrics","awsfargate/metrics","memcached/metrics","statsd/metrics","cloudfoundry","tcp","azure/metrics","iis/metrics","aws-cloudwatch","haproxy/metrics","apm","logstash/metrics","mongodb/metrics","pf-elastic-symbolizer","cel","o365audit","redis","linux/metrics","lumberjack","redis/metrics","cloudfoundry/metrics","audit/system","audit/file_integrity","cloudbeat/cis_k8s","winlog","http/metrics","synthetics/browser","http_endpoint","unix","elasticsearch/metrics","postgresql/metrics","system/metrics","jolokia/metrics","rabbitmq/metrics","cloud_defend/control","aws-s3","log","udp","enterprisesearch/metrics","packet","vsphere/metrics","pf-host-agent","pf-elastic-collector","journald","syslog","syncgateway/metrics","fleet-server","traefik/metrics","stan/metrics","filestream","beat/metrics","nats/metrics","prometheus/metrics","containerd/metrics","sql/metrics","synthetics/http","osquery","azure-blob-storage","docker","kubernetes/metrics","audit/auditd","cloudbeat/cis_aws","httpjson","mysql/metrics","etcd/metrics"],"ecs.version":"1.6.0"}
{"log.level":"info","@timestamp":"2023-06-26T00:22:02.174Z","log.origin":{"file.name":"capabilities/capabilities.go","file.line":54},"message":"Capabilities file not found in /opt/Elastic/Agent/capabilities.yml","log":{"source":"elastic-agent"},"ecs.version":"1.6.0"}
{"log.level":"info","@timestamp":"2023-06-26T00:22:02.174Z","log.origin":{"file.name":"application/application.go","file.line":61},"message":"Determined allowed capabilities","log":{"source":"elastic-agent"},"ecs.version":"1.6.0"}
我们可以在 Logstash 运行的界面中看到如下的信息:

它表明我们的配置是成功的。
我们可以在 Kibana 中查看所收集到的数据:
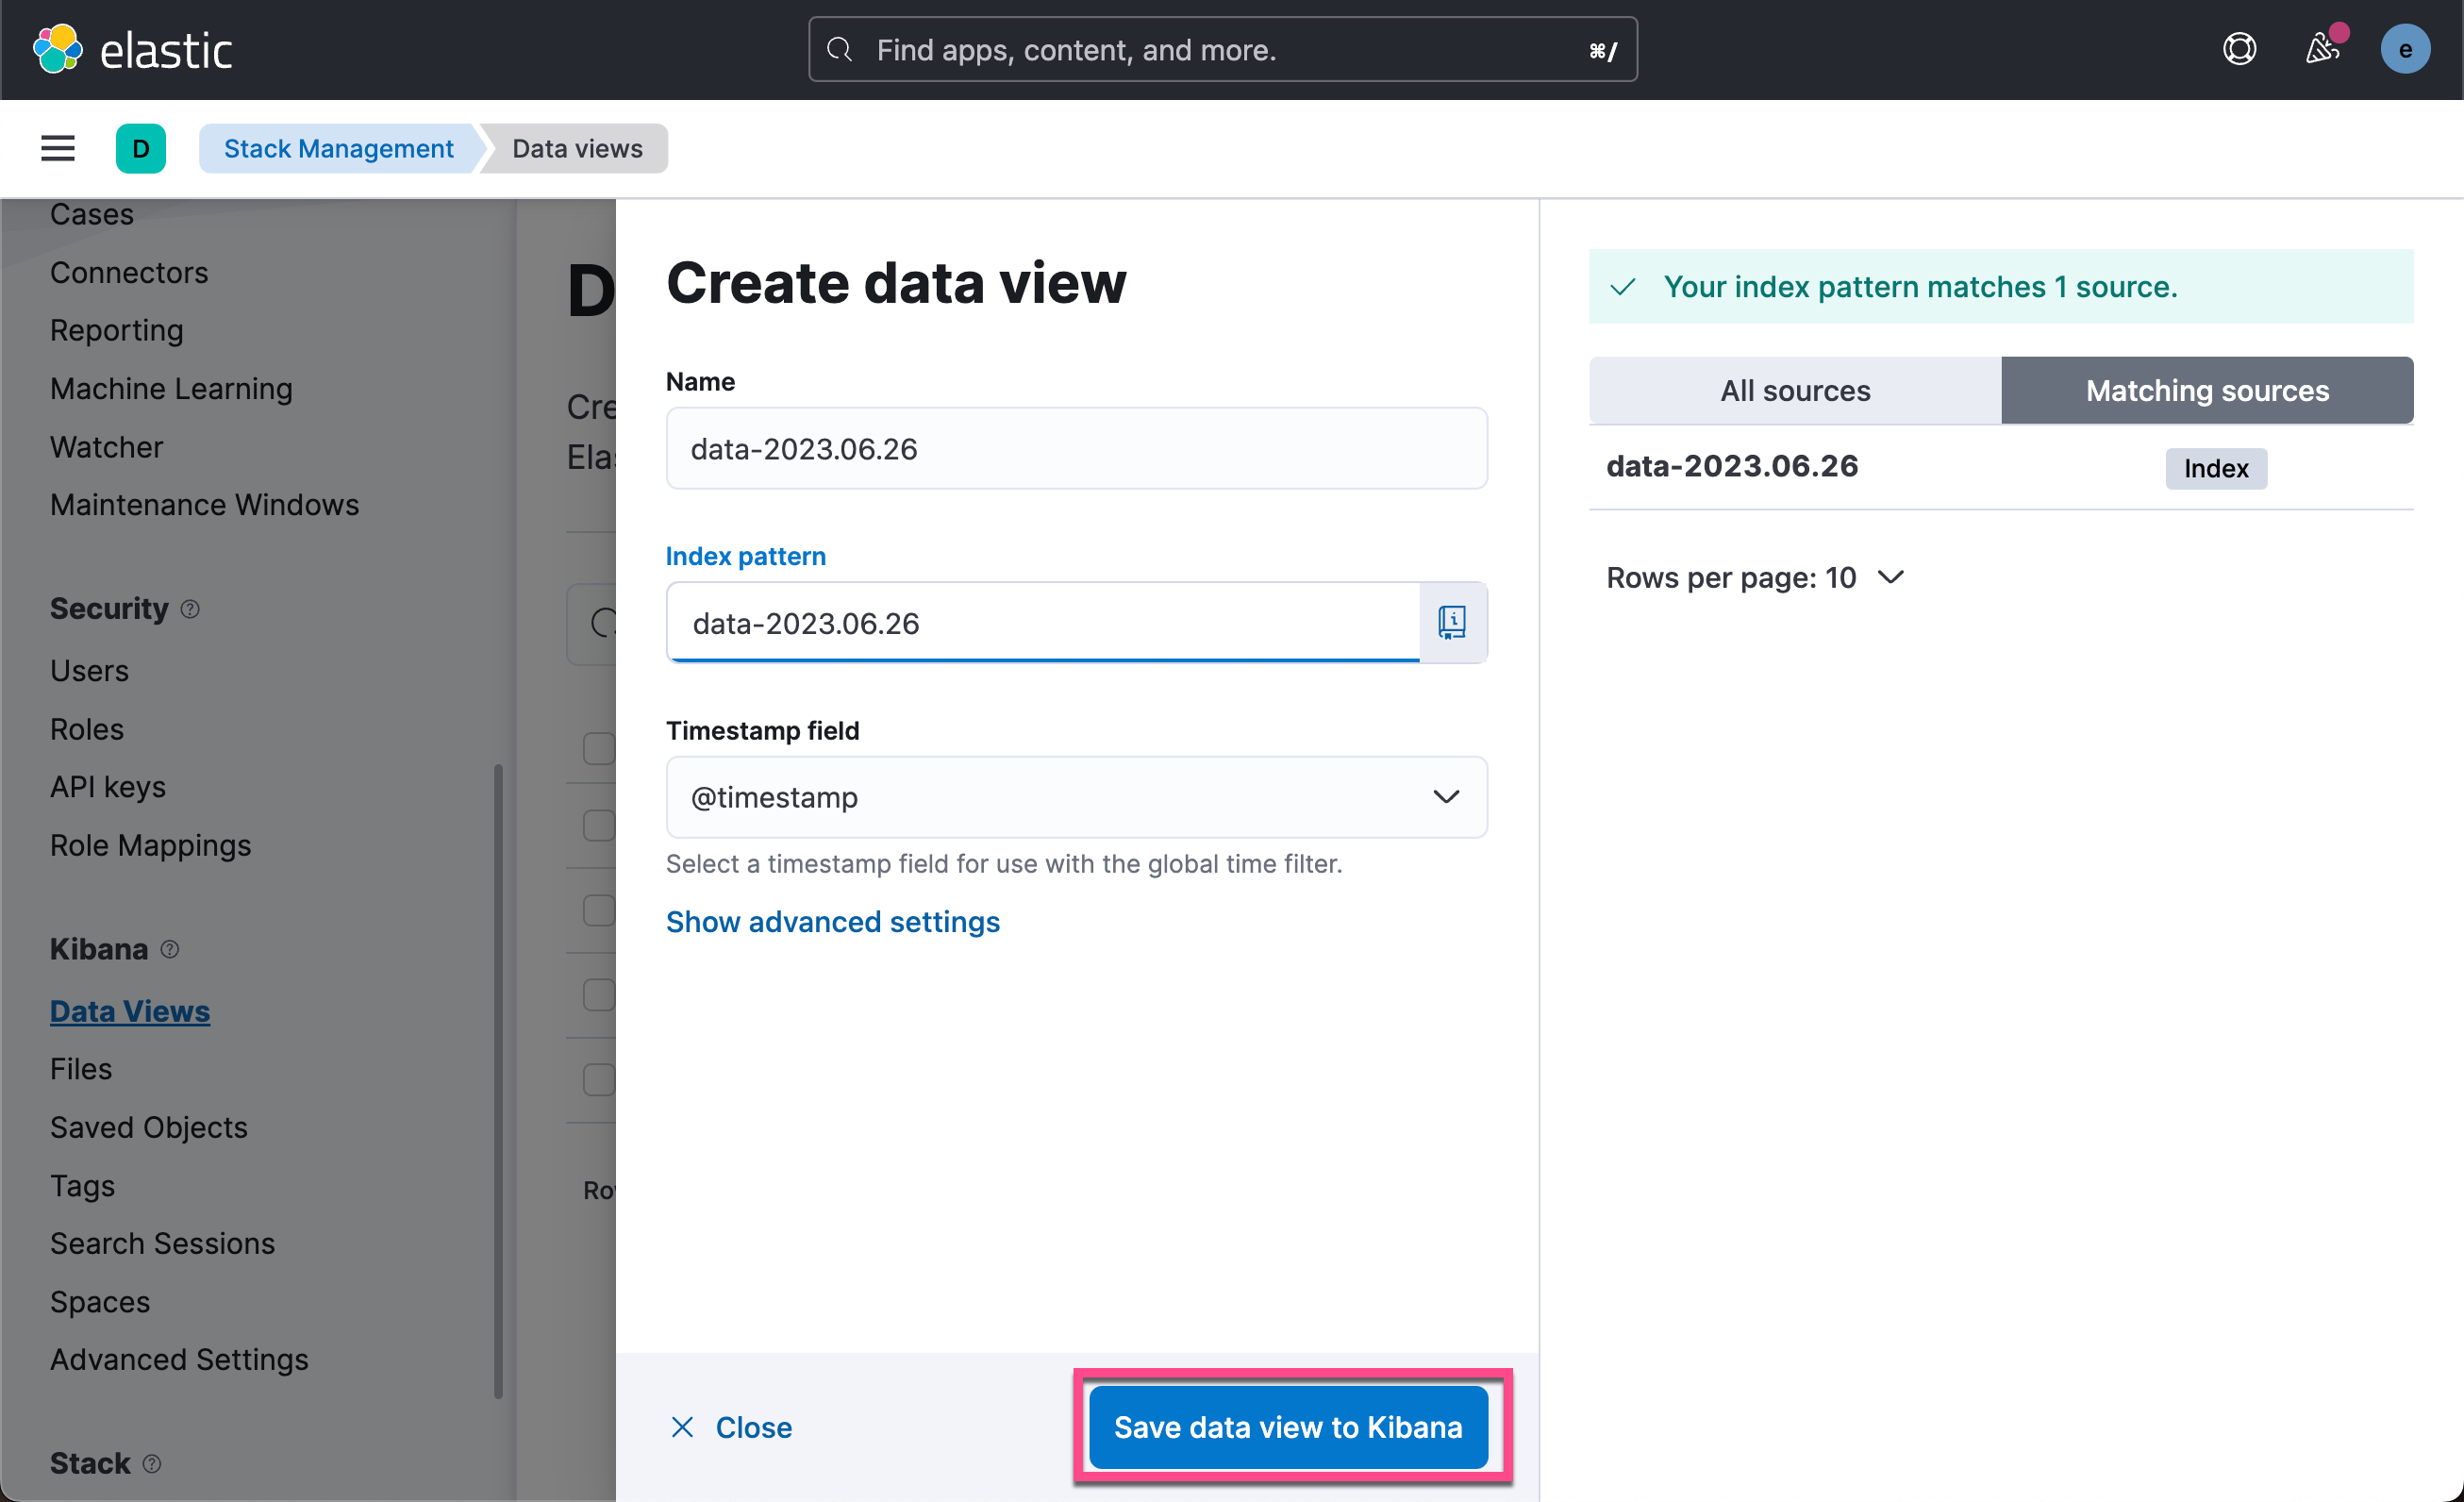
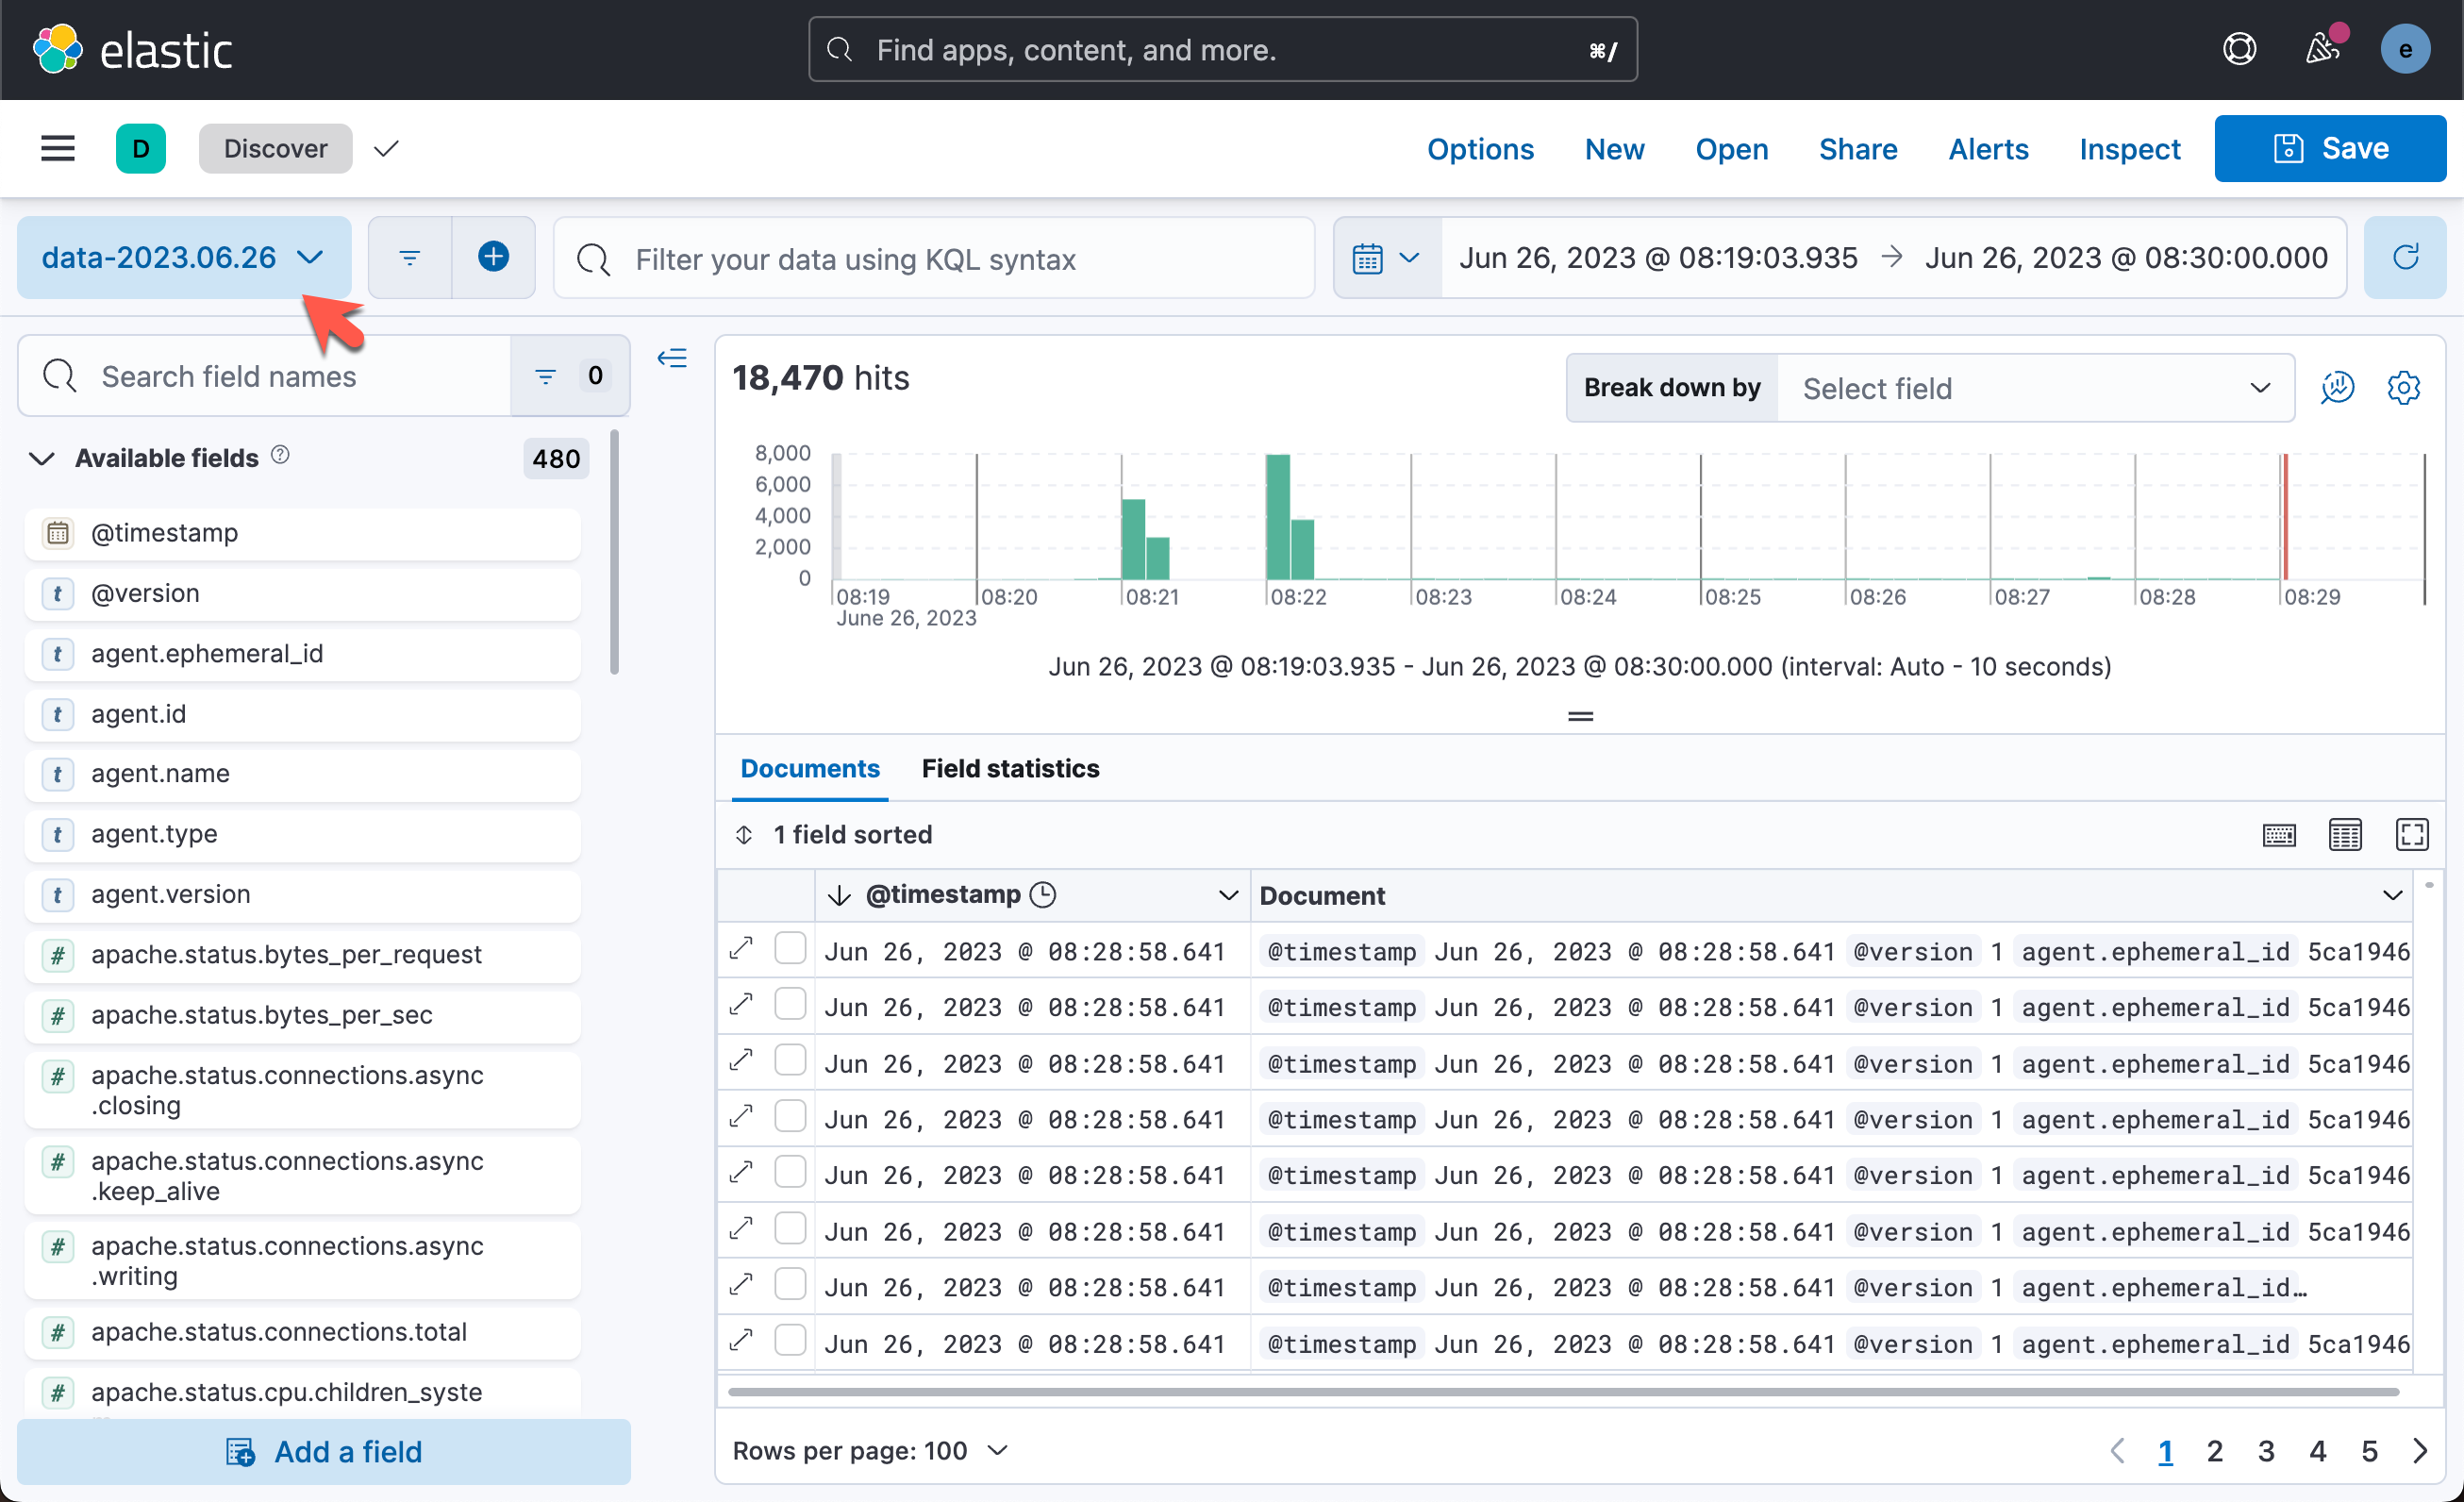

这样我们就完成了从 Elastic Agent 到 Logstash 的安全连接。
更多阅读: