目录
③示例2:
一、Ansible介绍
(一)简介
1、Ansible是一个配置管理和配置工具,它使用SSH 连接到服务器并运行配置好的任务,服务器上只需要开启ssh,所有工作都交给client 端的ansible 负责。
2、当我们有批量部署的需求时,我们可以自己写脚本,但是更推荐使用 Ansible。使用 Ansible 无需编码只需要配置 yaml 文件,并且 Ansible 已经内置了幂等性、并发度控制等功能,大大减少了批量部署时的工作量。
3、ansible是新出现的自动化运维工具,基于Python开发,集合了众多运维工具(puppet、cfengine、chef、func、fabric)的优势,实现了批量系统配置、批量程序部署、批量运行命令等功能。
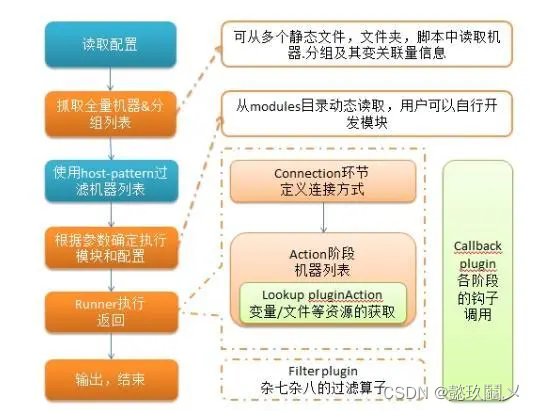
4、ansible是基于模块工做的,自己没有批量部署的能力。真正具备批量部署的是ansible所运行的模块,ansible只是提供一种框架。主要包括:
(1)、链接插件connection plugins:负责和被监控端实现通讯;
(2)、host inventory:指定操做的主机,是一个配置文件里面定义监控的主机;
(3)、各类模块核心模块、command模块、自定义模块;
(4)、借助于插件完成记录日志邮件等功能;
(5)、playbook:剧本执行多个任务时,非必需可让节点一次性运行多个任务。
github地址: https://github.com/ansible/ansible/
官网地址: https://docs.ansible.com
在线playbook分享平台: https://galaxy.ansible.com
(二)特性
1、no agents:不须要在被管控主机上安装任何客户端;
2、no server:无服务器端,使用时直接运行命令便可;
3、modules in any languages:基于模块工做,可以使用任意语言开发模块;
4、yaml,not code:使用yaml语言定制剧本playbook;
5、ssh by default:基于SSH工做;
6、strong multi-tier solution:可实现多级指挥。
(三)优势
1、轻量级,无需在客户端安装agent,更新时,只需在操做机上进行一次更新便可;
2、批量任务执行能够写成脚本,并且不用分发到远程就能够执行;
3、使用python编写,维护更简单,ruby语法过于复杂;
4、支持sudo。
(四)基本架构

1、核心引擎:即ansible
2、核心模块(core modules):
这些都是ansible自带的模块,ansible模块资源分发到远程节点使其执行特定任务或匹配一个特定的状态。
3、自定义模块(custom modules):
若是核心模块不足以完成某种功能,能够添加自定义模块。
4、插件(plugins):
完成模块功能的补充,借助于插件完成记录日志、邮件等功能
5、剧本(playbook):
定义ansible任务的配置文件,能够将多个任务定义在一个剧本中,由ansible自动执行,剧本执行支持多个任务,能够由控制主机运行多个任务,同时对多台远程主机进行管理。
6、playbook是ansible的配置、部署和编排语言,能够描述一个你想要的远程系统执行策略,或一组步骤的通常过程。若是ansible模块做为你的工做室工具,playbook就是设计方案。在基本层面上,剧本能够用于管理配置和部署远程机器。在更高级的应用中,能够序列多层应用及滚动更新,并能够把动做委托给其余主机,与监控服务器和负载平衡器交互。
7、链接插件(connection plugins):
ansible基于链接插件链接到各个主机上,负责和被管理节点实现通讯。虽然ansible是使用ssh链接到各被管理节点,但它还支持其余的链接方法,因此须要有链接插件。
8、主机清单(host inventory):
定义ansible管理的主机策略,默认是在ansible的hosts配置文件中定义被管节点,同时也支持自定义动态主机清单和指定配置文件路径。
9、ansible采用paramiko协议库(Fabric也使用这个),经过ssh或者ZeroMQ等链接主机。ansible在控制主机主机将ansible模块经过ssh协议(或者Kerberos、LDAP)推送到被管节点执行,执行完以后自动删除。控制主机与被管理节点之间支持local、SSH、ZeroMQ三种链接方式,默认使用基于SSH的链接。在规模较大的状况下使用ZeroMQ链接方式会明显改善执行速度。
(五)任务执行模式
1、ansible系统由控制主机对被管节点的操做方式可分为两类,即ad-hoc和playbook。
2、 ad-hoc模式使用单个模块,支持批量执行单条命令。
3、playbook模式是ansible的主要管理方式,经过多个task集合完成一类功能,能够简单的理解为经过组合多条ad-hoc操做的配置文件。
(六)ansible与其余配置管理软件的对比
技术特性比较:
| 项目 | Puppet | Saltstack | Ansible |
| 开发语言 | Ruby | Python | Python |
| 是否有客户端 | 是 | 是 | 否 |
| 是否支持二次开发 | 不支持 | 支持 | 支持 |
| 服务器与远程机器是否相互验证 | 是 | 是 | 是 |
| 服务器与远程机器通讯是否加密 | 是,标准SSL协议 | 是,使用AES加密 | 是,使用OpenSSH |
| 是否提供WEB UI | 提供 | 提供 | 提供,可是商业版本 |
| 配置文件格式 | Ruby语法 | YAML | YAML |
| 命令行执行 | 不支持,但能够经过配置模块实现 | 支持 | 支持 |
二、ansible组件介绍
(一)ansible inventory
在大规模的配置管理工做中咱们须要管理不一样业务的机器,这些机器的信息都存放在ansible的inventory组件里。在咱们工做中配置部署针对的主机必须先存放在inventory里,这样才能使用ansible对它进行操做。默认ansible的inventory是一个静态的ini文件/etc/ansible/hosts。亦可经过ANSIBLE_HOSTS环境变量指定或者命令运行时用-i参数临时设置。
(二)参考示例
定义主机和主机组
1、100.0.0.1 ansible_ssh_pass='123456'
2、100.0.0.2 ansible_ssh_pass='123456'
3、[docker]
4、100.0.0.1[1:3]
5、[docker:vars]
6、ansible_ssh_pass='123456'
7、[ansible:children]
8、docker
第1、2行定义一个主机,指定ssh登陆密码
第3行定义了一个叫docker的组
第4行定义了docker组下面四个主机从100.0.0.11-100.0.0.13
第5、6行定义了docker组的ssh登陆密码
第7、8行定义了ansible组,ansible组包含docker组
(三)inventory内置参数
| 参考 | 解释 | 例子 |
| ansible_ssh_host | 将要链接的远程主机名.与你想要设定的主机的别名不一样的话,可经过此变量设置. | ansible_ssh_host=192.169.1.123 |
| ansible_ssh_port | ssh端口号.若是不是默认的端口号,经过此变量设置. | ansible_ssh_port=5000 |
| ansible_ssh_user | 默认的 ssh 用户名 | ansible_ssh_user=cxpadmin |
| ansible_ssh_pass | ssh 密码(这种方式并不安全,咱们强烈建议使用 --ask-pass 或 SSH 密钥) | ansible_ssh_pass=’123456’ |
| ansible_sudo_pass | sudo 密码(这种方式并不安全,咱们强烈建议使用 --ask-sudo-pass) | ansible_sudo_pass=’123456’ |
| ansible_sudo_exe | sudo 命令路径(适用于1.8及以上版本) | ansible_sudo_exe=/usr/bin/sudo |
| ansible_connection | 与主机的链接类型.好比:local, ssh 或者 paramiko. Ansible 1.2 之前默认使用 paramiko.1.2 之后默认使用 'smart','smart' 方式会根据是否支持 ControlPersist, 来判断'ssh' 方式是否可行. | ansible_connection=local |
| ansible_ssh_private_key_file | ssh 使用的私钥文件.适用于有多个密钥,而你不想使用 SSH 代理的状况. | ansible_ssh_private_key_file=/root/key |
| ansible_shell_type | 目标系统的shell类型.默认状况下,命令的执行使用 'sh' 语法,可设置为 'csh' 或 'fish'. | ansible_shell_type=zsh |
| ansible_python_interpreter | 目标主机的 python 路径.适用于的状况: 系统中有多个 Python, 或者命令路径不是"/usr/bin/python",好比 \*BSD, 或者 /usr/bin/python 不是 2.X 版本的 Python.咱们不使用 "/usr/bin/env" 机制,由于这要求远程用户的路径设置正确,且要求 "python" 可执行程序名不可为 python之外的名字(实际有可能名为python26). |
ansible_python_interpreter=/usr/bin/python2.6 |
| ansible_*_interpreter | 定义其余语言解释器 | ansible_*_interpreter=/usr/bin/ruby |
| ansible_sudo | 定义sudo用户 | ansible_sudo=cxpadmin |
注:从ansible2.0开始, ansible_ssh_user, ansible_ssh_host, ansible_ssh_port已经改变为ansible_user, ansible_host, ansible_port。
具体参考官网 http://docs.ansible.com/ansible/latest/intro_inventory.html
(四)ansible ad-hoc命令
咱们常常会经过命令行的形式使用ansible模块,ansible自带不少模块,能够直接使用这些模块。目前ansible已经自带了200+个模块,咱们可使用ansible-doc -l显示全部自带模块,还可使用ansible-doc 模块名,查看模块的介绍以及案例。须要注意的是,若是使用ad-hoc命令,ansible的一些插件功能就没法使用,好比loop facts功能等。
命令用法:ansible <host-pattern> [options]
(五)经常使用模块介绍
1、ping模块
ping模块的做用与其名相同,即判断远程主机的网络是否畅通
示例:ansible cluster_hosts -m ping
2、copy模块
copy模块在ansible里的角色就是把ansible执行机器上的文件拷贝到远程节点上。与fetch模块相反的操做。
①经常使用模块参数
| 参数名 | 是否必须 | 默认值 | 选项 | 说明 |
| src | no | 用于定位ansible执行的机器上的文件,须要绝对路径。若是拷贝的是文件夹,那么文件夹会总体拷贝,若是结尾是”/”,那么只有文件夹内的东西被考过去。一切的感受很像rsync | ||
| content | no | 用来替代src,用于将指定文件的内容,拷贝到远程文件内 | ||
| dest | yes | 用于定位远程节点上的文件,须要绝对路径。若是src指向的是文件夹,这个参数也必须是指向文件夹 | ||
| backup | no | no | yes/no | 备份远程节点上的原始文件,在拷贝以前。若是发生什么意外,原始文件还能使用。 |
| directory_mode | no | 这个参数只能用于拷贝文件夹时候,这个设定后,文件夹内新建的文件会被拷贝。而老旧的不会被拷贝 | ||
| follow | no | no | yes/no | 当拷贝的文件夹内有link存在的时候,那么拷贝过去的也会有link |
| force | no | yes | yes/no | 默认为yes,会覆盖远程的内容不同的文件(可能文件名同样)。若是是no,就不会拷贝文件,若是远程有这个文件 |
| group | no | 设定一个群组拥有拷贝到远程节点的文件权限 | ||
| mode | no | 等同于chmod,参数能够为“u+rwx or u=rw,g=r,o=r” | ||
| owner | no | 设定一个用户拥有拷贝到远程节点的文件权限 |
②示例:将文件copy到测试主机
| 1 2 3 4 5 6 7 8 9 10 11 12 13 14 15 16 17 18 19 20 21 22 23 24 25 26 27 28 29 30 |
[root@node1 ansible]# ansible testservers -m copy -a 'src=/root/install.log dest=/tmp/install.log owner=testuser group=testgroup' 192.168.100.131 | success >> { "changed": true, "checksum": "7b3626c84bb02d12472c03d2ece878fdc4756c94", "dest": "/tmp/install.log", "gid": 1100, "group": "testgroup", "md5sum": "c7d8a01a077940859e773b7770d2e07e", "mode": "0644", "owner": "testuser", "size": 9458, "src": "/root/.ansible/tmp/ansible-tmp-1456387213.94-229503410500766/source", "state": "file", "uid": 1000 } 192.168.100.132 | success >> { "changed": true, "checksum": "7b3626c84bb02d12472c03d2ece878fdc4756c94", "dest": "/tmp/install.log", "gid": 1100, "group": "testgroup", "md5sum": "c7d8a01a077940859e773b7770d2e07e", "mode": "0644", "owner": "testuser", "size": 9458, "src": "/root/.ansible/tmp/ansible-tmp-1456387213.94-186055595812050/source", "state": "file", "uid": 1000 } |
③示例:copy 前先备份
| 1 2 3 4 5 6 7 8 9 10 11 12 13 14 15 16 17 18 19 20 21 22 23 24 25 26 27 28 29 30 31 32 33 34 35 36 37 38 39 40 41 42 43 |
[root@node1 ansible]# echo "test " >> /root/install.log [root@node1 ansible]# ansible testservers -m copy -a 'src=/root/install.log dest=/tmp/install.log owner=testuser group=testgroup backup=yes' 192.168.100.132 | success >> { "backup_file": "/tmp/install.log.2016-02-25@16:01:26~", "changed": true, "checksum": "b5da7af32ad02eb98f77395b28f281a965b4c1f5", "dest": "/tmp/install.log", "gid": 1100, "group": "testgroup", "md5sum": "d39956add30a18019cb5ad2381a0cd43", "mode": "0644", "owner": "testuser", "size": 9464, "src": "/root/.ansible/tmp/ansible-tmp-1456387285.87-128685659798967/source", "state": "file", "uid": 1000 } 192.168.100.131 | success >> { "backup_file": "/tmp/install.log.2016-02-25@16:01:26~", "changed": true, "checksum": "b5da7af32ad02eb98f77395b28f281a965b4c1f5", "dest": "/tmp/install.log", "gid": 1100, "group": "testgroup", "md5sum": "d39956add30a18019cb5ad2381a0cd43", "mode": "0644", "owner": "testuser", "size": 9464, "src": "/root/.ansible/tmp/ansible-tmp-1456387285.86-134452201968647/source", "state": "file", "uid": 1000 } [root@node1 ansible]# ansible testservers -m raw -a 'ls -lrth /tmp/install*' 192.168.100.131 | success | rc=0 >> -rw-r--r-- 1 root root 9.3K 2 25 16:00 /tmp/install.log.2016-02-25@16:01:26~ -rw-r--r-- 1 testuser testgroup 9.3K 2 25 16:01 /tmp/install.log 192.168.100.132 | success | rc=0 >> -rw-r--r-- 1 root root 9.3K 2 25 16:00 /tmp/install.log.2016-02-25@16:01:26~ -rw-r--r-- 1 testuser testgroup 9.3K 2 25 16:01 /tmp/install.log |
④示例:将目录copy过去
| 1 2 3 4 5 6 7 8 9 10 11 12 13 14 15 16 17 18 19 20 21 22 23 24 25 26 27 28 29 30 31 32 33 34 35 36 37 38 39 40 41 42 43 44 45 46 47 48 49 50 51 52 53 54 55 56 57 |
[root@node1 ansible]# tree testdir testdir ├── a │ ├── e │ │ └── ansible.cfg │ ├── f │ └── g ├── b │ ├── e │ ├── f │ └── g └── c ├── ansible.cfg ├── e ├── f └── g [root@node1 ansible]# ansible testservers -m copy -a 'src=/etc/ansible/testdir dest=/tmp/ owner=testuser group=testgroup backup=yes' 192.168.100.131 | success >> { "changed": true, "dest": "/tmp/", "src": "/etc/ansible/testdir" } 192.168.100.132 | success >> { "changed": true, "dest": "/tmp/", "src": "/etc/ansible/testdir" } [root@node1 ansible]# ansible testservers -m command -a 'tree /tmp/testdir' 192.168.100.131 | success | rc=0 >> /tmp/testdir |-- a | `-- e | `-- ansible.cfg |-- b | `-- e | `-- hosts `-- c `-- ansible.cfg 5 directories, 3 files 192.168.100.132 | success | rc=0 >> /tmp/testdir |-- a | `-- e | `-- ansible.cfg |-- b | `-- e | `-- hosts `-- c `-- ansible.cfg 5 directories, 3 files |
注意:发现有文件的目录copy成功,空的目录没有copy过去
⑤经常使用参数返回值
| 参数名 | 参数说明 | 返回值 | 返回值类型 | 样例 |
| src | 位于ansible执行机上的位置 | changed | string | /home/httpd/.ansible/tmp/ansible-tmp-1423796390.97-147729857856000/source |
| backup_file | 将原文件备份 | changed and if backup=yes | string | /path/to/file.txt.2015-02-12@22:09~ |
| uid | 在执行后,拥有者的ID | success | int | 100 |
| dest | 远程节点的目标目录或文件 | success | string | /path/to/file.txt |
| checksum | 拷贝文件后的checksum值 | success | string | 6e642bb8dd5c2e027bf21dd923337cbb4214f827 |
| md5sum | 拷贝文件后的md5 checksum值 | when supported | string | 2a5aeecc61dc98c4d780b14b330e3282 |
| state | 执行后的状态 | success | string | file |
| gid | 执行后拥有文件夹、文件的群组ID | success | int | 100 |
| mode | 执行后文件的权限 | success | string | 0644 |
| owner | 执行后文件全部者的名字 | success | string | httpd |
| group | 执行后文件全部群组的名字 | success | string | httpd |
| size | 执行后文件大小 | success | int | 1220 |
3、shell模块
它负责在被ansible控制的节点(服务器)执行命令行。shell 模块是经过/bin/sh进行执行,因此shell 模块能够执行任何命令,就像在本机执行同样。
①经常使用参数
| 参数 | 是否必须 | 默认值 | 选项 | 说明 |
| chdir | no | 跟command同样的,运行shell以前cd到某个目录 | ||
| creates | no | 跟command同样的,若是某个文件存在则不运行shell | ||
| removes | no | 跟command同样的,若是某个文件不存在则不运行shell |
②示例1:
让全部节点运行somescript.sh并把log输出到somelog.txt。
$ ansible -i hosts all -m shell -a "sh somescript.sh >> somelog.txt"
③示例2:
先进入somedir/ ,再在somedir/目录下让全部节点运行somescript.sh并把log输出到somelog.txt。
$ ansible -i hosts all -m shell -a "somescript.sh >> somelog.txt" chdir=somedir/
④示例3:
先cd到某个须要编译的目录,执行condifgure而后,编译,而后安装。
$ ansible -i hosts all -m shell -a "./configure && make && make insatll" chdir=/xxx/yyy/
4、command模块
command 模块用于运行系统命令。不支持管道符和变量等("<", ">", "|", and "&"等),若是要使用这些,那么可使用shell模块。在使用ansible中的时候,默认的模块是-m command,从而模块的参数不须要填写,直接使用便可。
①经常使用参数
| 参数 | 是否必须 | 默认值 | 选项 | 说明 |
| chdir | no | 运行command命令前先cd到这个目录 | ||
| creates | no | 若是这个参数对应的文件存在,就不运行command | ||
| executable | no | 将shell切换为command执行,这里的全部命令须要使用绝对路径 | ||
| removes | no | 若是这个参数对应的文件不存在,就不运行command |
②示例1:
#ansible 命令调用command: ansible -i hosts all -m command -a "/sbin/shutdown -t now"
ansible命令行调用-m command模块 -a表示使用参数 “”内的为执行的command命令,该命令为关机。
那么对应的节点(192.168.10.12,127.152.112.13)都会执行关机。
③示例2:
# Run the command if the specified file does not exist. ansible -i hosts all -m command -a "/usr/bin/make_database.sh arg1 arg2 creates=/path/to/database"
利用creates参数,判断/path/to/database这个文件是否存在,存在就跳过command命令,不存在就执行command命令。
5、raw模块
raw模块的功能与shell和command相似。但raw模块运行时不须要在远程主机上配置python环境。
示例:
在10.1.1.113节点上运行hostname命令
ansible 10.1.1.113 -m raw-a 'hostname|tee'
6、fetch模块
文件拉取模块主要是将远程主机中的文件拷贝到本机中,和copy模块的做用刚刚相反,而且在保存的时候使用hostname来进行保存,当文件不存在的时候,会出现错误,除非设置了选项fail_on_missing为yes
①经常使用参数
| 参数 | 必填 | 默认值 | 选项 | 说明 |
| Dest | Yes | 用来存放文件的目录,例如存放目录为backup,源文件名称为/etc/profile在主机pythonserver中,那么保存为/backup/pythonserver/etc/profile | ||
| Fail_on_missing | No | No | Yes/no | 当源文件不存在的时候,标识为失败 |
| Flat | No | 容许覆盖默认行为从hostname/path到/file的,若是dest以/结尾,它将使用源文件的基础名称 | ||
| Src | Yes | 在远程拉取的文件,而且必须是一个file,不能是目录 | ||
| Validate_checksum | No | Yes | Yes/no | 当文件fetch以后进行md5检查 |
②示例1
fetch一个文件保存,src表示为远程主机上须要传送的文件路径,dest表示为本机上的路径,在传送过来的文件,是按照IP地址进行分类,而后路径是源文件的路径。在拉取文件的时候,必须拉取的是文件,不能拉取文件夹。
[root@ansibleserver ~]# ansible pythonserver -m fetch -a "src=/root/123 dest=/root"
SSH password:
192.168.1.60 | success >> {
"changed": true,
"dest": "/root/192.168.1.60/root/123",
"md5sum": "31be5a34915d52fe0a433d9278e99cac",
"remote_md5sum": "31be5a34915d52fe0a433d9278e99cac"
}
③示例2:
指定路径目录进行保存。在使用参数为flat的时候,若是dest的后缀名为/,那么就会保存在目录中,而后直接保存为文件名;当dest后缀不为/的时候,那么就会直接保存为kel的文件。主要是在于dest是否已/结尾,从而来区分这是个目录仍是路径。
[root@ansibleserver ~]# ansible pythonserver -m fetch -a "src=/root/Ssh.py dest=/root/kel/ flat=yes"
SSH password:
192.168.1.60 | success >> {
"changed": true,
"dest": "/root/kel/Ssh.py",
"md5sum": "63f8a200d1d52d41f6258b41d7f8432c",
"remote_md5sum": "63f8a200d1d52d41f6258b41d7f8432c"
}
7、file模块
主要用来设置文件、连接、目录的属性,或者移除文件、连接、目录,不少其余的模块也会包含这种做用,例如copy,assemble和template。
①经常使用参数
| 参数 | 必填 | 默认 | 选项 | 说明 |
| Follow | No | No | Yes/no | 这个标识说明这是系统连接文件,若是存在,应该遵循 |
| Force | No | No | Yes/no | 强制建立连接在两种状况下:源文件不存在(过会会存在);目标存在可是是文件(建立连接文件替代) |
| Group | No | 文件所属用户组 | ||
| Mode | No | 文件所属权限 | ||
| Owner | No | 文件所属用户 | ||
| Path | Yes | 要控制文件的路径 | ||
| Recurse | No | No | Yes/no | 当文件为目录时,是否进行递归设置权限 |
| Src | No | 文件连接路径,只有状态为link的时候,才会设置,能够是绝对相对不存在的路径 | ||
| State | No | File | File/link Directory Hard/touch Absent |
若是是目录不存在,那么会建立目录;若是是文件不存在,那么不会建立文件;若是是link,那么软连接会被建立或者修改;若是是absent,那么目录下的全部文件都会被删除,若是是touch,会建立不存在的目录和文件 |
②示例1:
设置文件属性。文件路径为path,表示文件路径,设定所属用户和所属用户组,权限为0644。文件路径为path,使用文件夹进行递归修改权限,使用的参数为recurse表示为递归。
[root@ansibleserver ~]# ansible pythonserver -m file -a "path=/root/123 owner=kel group=kel mode=0644"
SSH password:
192.168.1.60 | success >> {
"changed": true,
"gid": 500,
"group": "kel",
"mode": "0644",
"owner": "kel",
"path": "/root/123",
"size": 294,
"state": "file",
"uid": 500
}
[root@ansibleserver ~]# ansible pythonserver -m file -a "path=/tmp/kel/ owner=kel group=kel mode=0644 recurse=yes"
SSH password:
192.168.1.60 | success >> {
"changed": true,
"gid": 500,
"group": "kel",
"mode": "0644",
"owner": "kel",
"path": "/tmp/kel/",
"size": 4096,
"state": "directory",
"uid": 500
}
③示例2:
建立目录。建立目录,使用的参数主要是state为directory。
[root@ansibleserver ~]# ansible pythonserver -m file -a "path=/tmp/kel state=directory mode=0755"
SSH password:
192.168.1.60 | success >> {
"changed": true,
"gid": 0,
"group": "root",
"mode": "0755",
"owner": "root",
"path": "/tmp/kel",
"size": 4096,
"state": "directory",
"uid": 0
}
④示例3:
修改权限。直接使用mode来进行修改权限。
[root@ansibleserver ~]# ansible pythonserver -m file -a "path=/tmp/kel mode=0444"
SSH password:
192.168.1.60 | success >> {
"changed": true,
"gid": 0,
"group": "root",
"mode": "0444",
"owner": "root",
"path": "/tmp/kel",
"size": 4096,
"state": "directory",
"uid": 0
}
⑤示例4:
建立软链接。 src表示已经存在的文件,dest表示建立的软链接的文件名,最后的state状态为link。
root@ansibleserver tmp]# ansible pythonserver -m file -a "src=/tmp/1 dest=/tmp/2 owner=kel state=link"
SSH password:
192.168.1.60 | success >> {
"changed": true,
"dest": "/tmp/2",
"gid": 0,
"group": "root",
"mode": "0777",
"owner": "kel",
"size": 6,
"src": "/tmp/1",
"state": "link",
"uid": 500
}
8、yum模块
Yum(全称为 Yellow dog Updater, Modified)是一个在Fedora和RedHat以及CentOS中的Shell前端软件包管理器。即安装包管理模块。
①经常使用参数
| 参数名 | 是否必须 | 默认值 | 选项值 | 参数说明 |
| conf_file | no | 设定远程yum执行时所依赖的yum配置文件 | ||
| disable_gpg_check | no | No | Yes/No | 在安装包前检查包,只会影响state参数为present或者latest的时候 |
| list | No | 只能由ansible调用,不支持playbook,这个干啥的你们都懂 | ||
| name | Yes | 你须要安装的包的名字,也能如此使用name=python=2.7安装python2.7 | ||
| state | no | present | present/latest/absent | 用于描述安装包最终状态,present/latest用于安装包,absent用于remove安装包 |
| update_cache | no | no | yes/no | 用于安装包前执行更新list,只会影响state参数为present/latest的时候 |
②示例1:
安装httpd包
ansible host31 -m yum -a “name=httpd”
host31 | SUCCESS => {
“changed”: true,
“msg”: “”,
“rc”: 0,
“results”: [ xxxxx ]
③示例2:
删除httpd包
ansible host31 -m yum -a "name=httpd state=absent" host31 | SUCCESS => { "changed": true, "msg": "", "rc": 0, "results": [ xxxx ]
9、service模块
service模块其实就是linux下的service命令。用于service服务管理。
①经常使用参数
| 参数名 | 是否必须 | 默认值 | 选项 | 说明 |
| enabled | no | yes/no | 启动os后启动对应service的选项。使用service模块的时候,enabled和state至少要有一个被定义 | |
| name | yes | 须要进行操做的service名字 | ||
| state | no | stared/stoped/restarted/reloaded | service最终操做后的状态。 |
②示例1:
启动服务。
ansible host31 -m service -a "name=httpd state=started" host31 | SUCCESS => { "changed": true, "name": "httpd", "state": "started" }
③示例2:
中止服务。
ansible host31 -m service -a "name=httpd state=stopped" host31 | SUCCESS => { "changed": true, "name": "httpd", "state": "stopped" }
④示例3:
设置服务开机自启动。
[root@host31 ~]# ansible host31 -m service -a "name=httpd enabled=yes state=restarted" host31 | SUCCESS => { "changed": true, "enabled": true, "name": "httpd", "state": "started" }
10、cron模块
①cron模块用于管理计划任务。
| 参数名 | 是否必须 | 默认值 | 选项 | 说明 |
| backup | 对远程主机上的原任务计划内容修改以前作备份 | |||
| cron_file | 若是指定该选项,则用该文件替换远程主机上的cron.d目录下的用户的任务计划 | |||
| day | 日(1-31,*,*/2,……) | |||
| hour | 小时(0-23,*,*/2,……) | |||
| minute | 分钟(0-59,*,*/2,……) | |||
| month | 月(1-12,*,*/2,……) | |||
| weekday | 周(0-7,*,……) | |||
| job | 要执行的任务,依赖于state=present | |||
| name | 该任务的描述 | |||
| special_time | 指定何时执行,参数:reboot,yearly,annually,monthly,weekly,daily,hourly | |||
| state | 确认该任务计划是建立仍是删除 | |||
| user | 以哪一个用户的身份执行 |
②示例:
ansible test -m cron -a 'name="a job for reboot" special_time=reboot job="/some/job.sh"'
ansible test -m cron -a 'name="yum autoupdate" weekday="2" minute=0 hour=12 user="root
ansible test -m cron -a 'backup="True" name="test" minute="0" hour="5,2" job="ls -alh > /dev/null"'
ansilbe test -m cron -a 'cron_file=ansible_yum-autoupdate state=absent'
11、user模块
user模块是请求的是useradd, userdel, usermod三个指令。
①经常使用参数
| 参数名 | 是否必须 | 默认值 | 选项 | 说明 |
| home | 指定用户的家目录,须要与createhome配合使 | |||
| groups | 指定用户的属组 | |||
| uid | 指定用的uid | |||
| password | 指定用户的密码 | |||
| name | 指定用户名 | |||
| createhome | 是否建立家目录 yes|no | |||
| system | 是否为系统用户 | |||
| remove | 当state=absent时,remove=yes则表示连同家目录一块儿删除,等价于userdel -r | |||
| state | 是建立仍是删除 | |||
| shell | 指定用户的shell环境 |
指定password参数时,不能使用明文密码,由于后面这一串密码会被直接传送到被管理主机的/etc/shadow文件中,因此须要先将密码字符串进行加密处理。而后将获得的字符串放到password中便可。不一样的发行版默认使用的加密方式可能会有区别,具体能够查看/etc/login.defs文件确认,centos 6.5版本使用的是SHA512加密算法。
②示例1:
目的:在指定节点上建立一个用户名为nolinux,组为nolinux的用户
命令:ansible 10.1.1.113 -m user -a 'name=nolinux groups=nolinux state=present'
③示例2:
删除用户
命令:ansible 10.1.1.113 -m user -a 'name=nolinux groups=nolinux state=absent remove=yes'
12、group模块
goup模块请求的是groupadd, groupdel, groupmod 三个指令。
参数参考ansible-hoc group
示例:
目的:在全部节点上建立一个组名为nolinux,gid为2014的组
命令:ansible all -m group -a 'gid=2014 name=nolinux'
13、script模块
script模块将控制节点的脚本执行在被控节点上。
示例:
[root@host31 ~]# ansible host32 -m script -a /tmp/hello.sh host32 | SUCCESS => { "changed": true, "rc": 0, "stderr": "", "stdout": "this is test from host32\r\n", "stdout_lines": [ "this is test from host32" ->执行结果 ] }
14、get_url模块
该模块主要用于从http、ftp、https服务器上下载文件(相似于wget)
①经常使用参数
| 参数名 | 是否必须 | 默认值 | 选项 | 说明 |
| sha256sum | 下载完成后进行sha256 check; | |||
| timeout | 下载超时时间,默认10s | |||
| url | 下载的URL | |||
| url_password、url_username | 主要用于须要用户名密码进行验证的状况 | |||
| use_proxy | 是事使用代理,代理需事先在环境变动中定义 |
②示例:
目的:将 http://10.1.1.116/favicon.ico文件下载到指定节点的/tmp目录下
命令:ansible 10.1.1.113 -m get_url -a 'url= http://10.1.1.116/favicon.ico dest=/tmp'
15、synchronize模块
①使用rsync同步文件。
| 参数名 | 是否必须 | 默认值 | 选项 | 说明 |
| archive | 归档,至关于同时开启recursive(递归)、links、perms、times、owner、group、-D选项都为yes ,默认该项为开启 | |||
| checksum | 跳过检测sum值,默认关闭 | |||
| compress | 是否开启压缩 | |||
| copy_links | 复制连接文件,默认为no ,注意后面还有一个links参数 | |||
| delete | 删除不存在的文件,默认no | |||
| dest | 目录路径 | |||
| dest_port | dest_port:默认目录主机上的端口 ,默认是22,走的ssh协议 | |||
| dirs | 传速目录不进行递归,默认为no,即进行目录递归 | |||
| rsync_opts | rsync参数部分 | |||
| set_remote_user | 主要用于/etc/ansible/hosts中定义或默认使用的用户与rsync使用的用户不一样的状况 | |||
| mode | push或pull 模块,push模的话,通常用于从本机向远程主机上传文件,pull 模式用于从远程主机上取文件 |
②示例1:
目的:将主控方/root/a目录推送到指定节点的/tmp目录下
命令:ansible 10.1.1.113 -m synchronize -a 'src=/root/a dest=/tmp/ compress=yes'
delete=yes 使两边的内容同样(即以推送方为主)
compress=yes 开启压缩,默认为开启
--exclude=. Git 忽略同步. git结尾的文件
因为模块,默认都是推送push。所以,若是你在使用拉取pull功能的时候,能够参考以下来实现
mode=pull 更改推送模式为拉取模式
③示例2:
目的:将10.1.1.113节点的/tmp/a目录拉取到主控节点的/root目录下
命令:ansible 10.1.1.113 -m synchronize -a 'mode=pull src=/tmp/a dest=/root/'
④示例3:
因为模块默认启用了archive参数,该参数默认开启了recursive, links, perms, times, owner,group和-D参数。若是你将该参数设置为no,那么你将中止不少参数,好比会致使以下目的递归失败,致使没法拉取
16、其余模块:
mount模块:配置挂载点
unarchive模块:解压文件模块
三、核心模块playbook介绍
ansible的playbook的文件格式为YAML格式,因此但愿你们在学习playbook以前先对YAML语法有必定的了解,不然在运行playbook的过程当中会常常碰到莫名其妙的语法错误。
这边以一个例子简单介绍一下playbook。
示例目的:指定一个主机名,对这个主机进行配置操做。
先展现目录结构
config-ansible
|___config_hosts.yml
|___roles
|___config_hosts
|___tasks
|___main.yml
|___config.yml
总共3个YAML文件,其中config_hosts.yml为总入口,在这个文件里调用roles/config_hosts/tasks目录下的脚本。执行命令ansible-playbook config_hosts.yml 运行剧本。
config_hosts.yml内容为
1. ---
2. - hosts: node1
3. roles:
4. - config_hosts
第1行表示该文件是YAML文件,非必须。
第2行定义该playbook针对的目标主机。
第三、4行指定角色目录,具体操做在角色中定义。
main.yml的内容为
1. ---
2. - include: config.yml
第2行指定此roles要导入的task文件。
config.yml的内容为
1. ---
2. - name: copy test.file
3. copy:
4. src: /home/test.file
5. dest: /home/test.file
6. owner: root
7. group: root
8. mode: 0777
9. force: yes
10.
11. - name: exec hello world script
12. script: /home/helloworld.sh
13.
14.- name: rm test.file
15. file: path=/home/test.file state=absent
config.yml文件内的代码才是真正执行的任务代码。总共有3个任务,第一个把/home目录的test.file文件拷贝到目标主机的相同路径下,第二个在目标主机执行/home目录下的helloworld.sh,helloworld.sh的内容就是打印一条helloworld信息,第三个任务是使用file模块把目标主机的/home/test.file文件删除。
其实playbook就是各个模块的组装,此处只是抛砖引玉,其余模块在playbook中的使用可自行学习,就再也不介绍循环、条件判断等功能的实现了。