环境搭建
首先以太坊私链有很多种搭建方式,本篇介绍用docker的方式快速搭建测试链,可以用来测试合约、做实验等。不适用于生产环境。
(事先说明openethereum在2022年5月份的时候,已经被不再更新,仅保留现有版本)
利用docker搭建以太坊私链,当然需要装一下docker和docker compose了,具体的docker安装建议去官网进行安装,在我的另一篇文章中有详细介绍(hyperledger fabric 2.4 安装运行测试)。
本文使用的docker镜像是openethereum/openethereum,有兴趣的可以自行了解官网。
openethereum源码官网
https://github.com/openethereum/openethereum
openethereum文档详解
https://openethereum.github.io/Configuring-OpenEthereum
详细安装链接,附在下边
注意,docker和docker-compose和go请从官网安装,不要通过apt安装。(可能会有影响)
docker
配置文件目录
首先创建我们的新的链的目录,并创建相应的数据目录和key目录。其中,newethchain是主要的项目根目录,key文件夹用来存放相应的账户秘钥文件。
mkdir newethchain
cd newethchain
mkdir chaindata
mkdir key
接下来是重点,我们需要创建相应的配置文件来启动并配置OpenEthereum。
以太坊配置
1.第一个是以太坊节点启动的配置文件,也就是我们启动以太坊生成创世区块的配置文件,这里使用我们经常用的一个启动配置就好,实在没有的话,就参考我下边这个配置就好。
附一个简单配置如下:
{


  "name": "newethchain",
  "engine": {


    "instantSeal": {


      "params": {

    }
    }
  },
  "params": {


    "gasLimitBoundDivisor": "0x0400",
    "accountStartNonce": "0x0",
    "maximumExtraDataSize": "0x20",
    "minGasLimit": "0x1388",
    "networkID": "0x11",
    "registrar": "0x0000000000000000000000000000000000001337",
    "eip150Transition": "0x0",
    "eip160Transition": "0x0",
    "eip161abcTransition": "0x0",
    "eip161dTransition": "0x0",
    "eip155Transition": "0x0",
    "eip98Transition": "0x7fffffffffffff",
    "maxCodeSize": 24576,
    "maxCodeSizeTransition": "0x0",
    "eip140Transition": "0x0",
    "eip211Transition": "0x0",
    "eip214Transition": "0x0",
    "eip658Transition": "0x0",
    "eip145Transition": "0x0",
    "eip1014Transition": "0x0",
    "eip1052Transition": "0x0",
    "wasmActivationTransition": "0x0"
  },
  "genesis": {


    "seal": {


      "generic": "0x0"
    },
    "difficulty": "0x20000",
    "author": "0x0000000000000000000000000000000000000000",
    "timestamp": "0x00",
    "parentHash": "0x0000000000000000000000000000000000000000000000000000000000000000",
    "extraData": "0x",
    "gasLimit": "0x7A1200"
  },
  "accounts": {


    "E2612d75e9BEBe8924d1d3e92a0003876eF113fa": {

     "balance": "1000000000000000000000000000" },
    "3e8230dfc38Fb145E10F9484AFdD823DD079FdF2": {

     "balance": "5000000000000000000" }
  }
}
OpenEthereum配置
2.第二步是配置OpenEthereum,将第一步的以太坊创世区块配置引入到openethereum中。openethereum是以docker的形式启动,并不想geth一样用命令行启动,因此我们需要将第一步的配置文件以路径的形式配置在配置文件当中
首先我们创建openethereum的配置文件config.toml。输入以下配置,详细配置见官网,根据自己需要进行配置。
对于配置的详解见网站 https://openethereum.github.io/Configuring-OpenEthereum
对于完整版的配置toml文件详见https://github.com/openethereum/openethereum/blob/main/bin/oe/cli/tests/config.full.toml
特别注意的是,第一个配置是第一步的创世配置,应该写在docker中的路径,这里的路径详见第三步,即可看懂。
[parity]
# 创世配置文件,指定相关的创世配置信息,第一步的配置文件的文件名
chain = "/home/openethereum/.local/share/openethereum/neweth.json"
#base_path = "./chain-data"
#keys_path = "./keys"


[rpc]
interface = "all"
apis = ["all"]
hosts = ["all"]
cors = ["all"]
# necessary for EIP1186 eth_getProof
experimental_rpcs = true
port = 8845

[websockets]
interface = "all"
apis = ["all"]
hosts = ["all"]
origins = ["all"]
port = 8846

[mining]
reseal_min_period = 0
min_gas_price = 0

[footprint]
# Enables Fat DB
fat_db = "on"
docker compose 启动配置
3.这步主要进行dockercompose的配置,我们使用docker compose命令来编排和启动openethereum的docker镜像,主要需要配置配置文件config.toml(第二步的配置文件的文件名),链数据目录chain-data,账户秘钥目录key。这里提供一个简单的配置作为参考,这里需要特别注意的是这一步的配置文件和第二步的配置文件关于开放的端口号要一一对应才行。
version: '3.3'
services:
  openethereum:
    container_name: newethchain
    image: openethereum/openethereum
    volumes:
      - ./:/home/openethereum/.local/share/openethereum
    command: >
      --config /home/openethereum/.local/share/openethereum/config.toml
      --base-path /home/openethereum/.local/share/openethereum/chain-data
      --keys-path /home/openethereum/.local/share/openethereum/key
    ports:
      - 8845:8845
      - 8846:8846
#      - 30002:30002
#      - 30002:30002/udp
到此配置完毕
测试
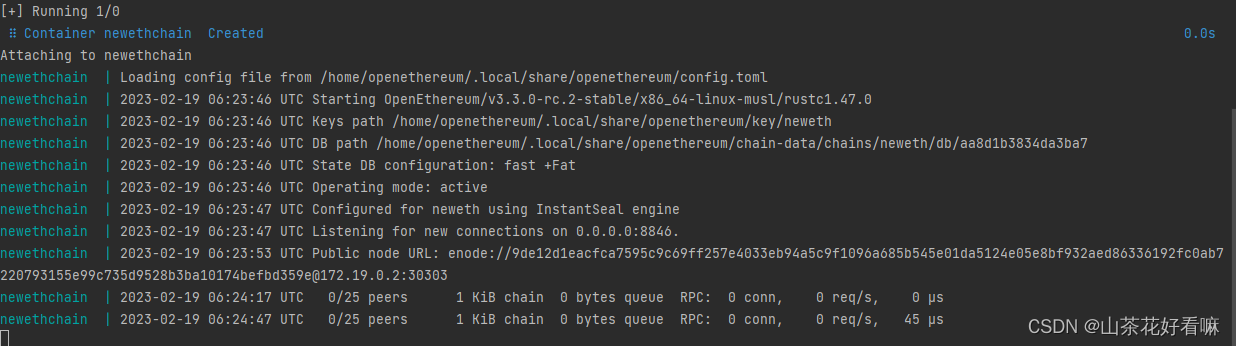
启动docker容器
cd newethchain
sudo docker compose up
添加-d参数可使容器在后台运行
可以看到容器正常启动
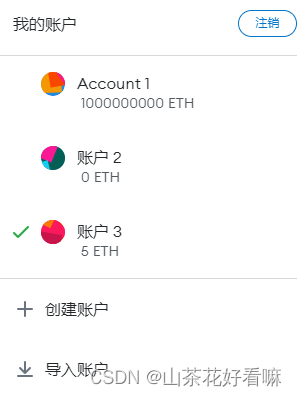
我们可以在配置创世区块时,为我们在metamask中的账户分配初始的ETH。
"accounts": {


    "E2612d75e9BEBe8924d1d3e92a0003876eF113fa": {

     "balance": "1000000000000000000000000000" },
    "3e8230dfc38Fb145E10F9484AFdD823DD079FdF2": {

     "balance": "5000000000000000000" }
  }
此时,我们通过metamask连接我们的私链,即可看到效果。
如果有需要可以自己使用web3.js或者ether.js来进行更加详细的测试
总结
本文的快速以太坊搭建方法,主要用来做实验或者测试合约等使用。如果对链的版本等有特别的需求,那建议还是通过geth或者其他方法来启动一条最新版本的以太坊私链。
有问题欢迎交流。