Canvas简介与基本使用
1. Canvas简介
canvas 是 HTML5 新增的一个标签,可以使用JavaScript来绘制各种图案。
2. Canvas 和 SVG 的区别
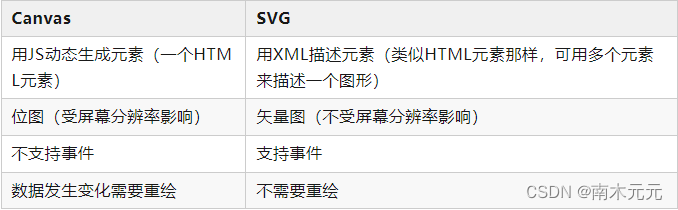
- svg 本质上是一种使用 XML 描述 2D 图形的语言
1.svg 创建的每一个元素都是一个独立的 DOM 元素,可以通过 css 和 JS来操控 dom。
2.修改 svg 中的 DOM 元素,系统会自动进行 DOM 重绘。
- Canvas 通过 JavaScript 来绘制 2D 图形
1.Canvas 只是一个 HTML 元素,其中的图形不会单独创建 DOM 元素,因此不能通过 JS 操控 Canvas 内单独的图形。
2.一旦图形被绘制完成,如果数据发生变化就需要重新绘制。
- 使用场景
如果要展示的数据量比较大,比如一条数据就是一个元素节点,那使用 canvas 会比较合适;
如果用户操作的交互比较多,而且对清晰度有要求(矢量图),那么使用 svg 会比较合适。
3. Canvas基本使用
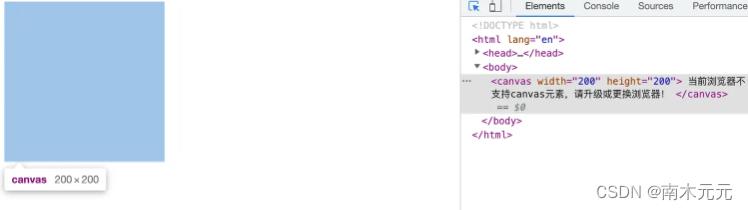
3.1 创建Canvas
<!DOCTYPE html>
<html lang="en">
<head>
  <title>canvas 基本使用</title>
</head>
<body>
  <canvas width="200" height="200">
    当前浏览器不支持canvas元素,请升级或更换浏览器!
  </canvas>
</body>
</html>
- 效果
- 画布大小
canvas 默认画布大小是 300 * 150。
调整画布大小有两种方案:
第一种 : 通过 css 样式 ( 不推荐 )
<html>
<head>
    <style>
        canvas {


            width: 400px;
            height: 400px;
        }
    </style>
</head>
<body>
    <canvas></canvas>
</body>
</html>
使用CSS来定义大小,在绘制时图像会伸缩:如果 CSS 的尺寸与初始画布的比例不一致,它会出现扭曲。
比如本例变成 400px * 400px,那宽度就由 300px 拉伸到 400px,高度由 150px 拉伸到 400px。
第二种 : 通过标签属性 ( 推荐 )
<html>
<head>
    ...
</head>
<body>
    <canvas width="400" height="400"></canvas>
</body>
</html>
所以,使用canvas 元素提供的 width 和 height 两个属性,来设置画布的宽高。
3.2 渲染上下文
创建了一个 Canvas 画布,接下来就是获取到 Canvas 的上下文环境,通过getContext() 获得渲染上下文和绘画功能。
<body>
  <canvas id="canvas"></canvas>
  <script>
    // 获取canvas元素
    var canvas = document.getElementById('canvas');
    // 获取二维渲染上下文
     var ctx = canvas.getContext('2d');
  </script>
</body>
上下文类型:
- 2d:建立一个二维渲染上下文。
- webgl: 创建一个 WebGLRenderingContext 三维渲染上下文对象。
- webgl2:创建一个 WebGL2RenderingContext 三维渲染上下文对象;只在实现 WebGL 版本2 (OpenGL ES 3.0)的浏览器上可用。
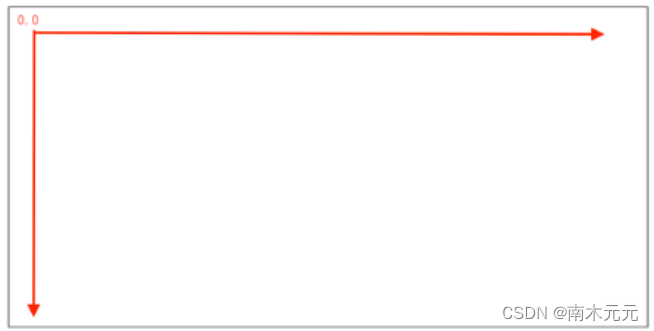
3.3 画布坐标
Canvas 使用的是 W3C 坐标系 ,也就是遵循我们屏幕、报纸的阅读习惯,从上往下,从左往右,左上角为原点。
3.4 绘制直线
最简单的就是绘制一条直线。
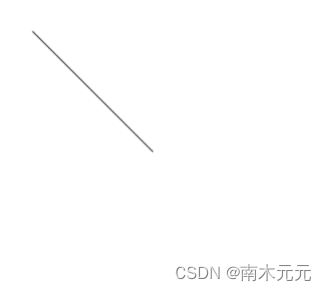
需要用到这3个方法:
- moveTo(x, y):设置初始位置。
- lineTo(x, y):下一个点的坐标 (x, y)。
- stroke():通过线条来绘制图形轮廓。
<canvas id="canvas" width="400" height="400"></canvas>
<script>
  // 获取 canvas 元素
  var canvas = document.getElementById('canvas');
  // 获取绘图上下文
  var ctx = canvas.getContext('2d');
  // 绘制直线
  ctx.moveTo(50, 50);
  ctx.lineTo(200, 200);
  ctx.stroke();
</script>
3.5 绘制三角形
绘制两个三角形,一个是填充的,另一个是描边的。
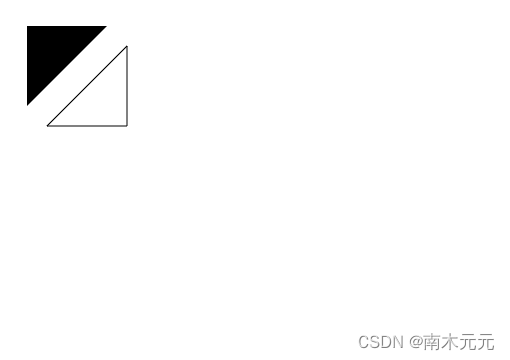
需要用到的方法:
- beginPath():新建一条路径。
- closePath():闭合路径。
- stroke():通过线条来绘制图形轮廓。
- fill():通过填充路径的内容区域生成实心的图形。
<canvas id="canvas" width="400" height="400"></canvas>
<script>
  // 获取 canvas 元素
  var canvas = document.getElementById('canvas');
  // 获取绘图上下文
  var ctx = canvas.getContext('2d');
  // 填充三角形
  ctx.beginPath();
  ctx.moveTo(25, 25);
  ctx.lineTo(105, 25);
  ctx.lineTo(25, 105);
  ctx.fill();

  // 描边三角形
  ctx.beginPath();// 重新开启一个路径
  ctx.moveTo(125, 125);
  ctx.lineTo(125, 45);
  ctx.lineTo(45, 125);
  ctx.closePath();
  ctx.stroke();
</script>
beginPath()重新开启一个路径,后面的线段不会影响前面的线段。
使用填充(fill)时,路径自动闭合,使用描边(stroke)则不会闭合路径。如果没有添加闭合路径closePath()到描边三角形函数中,则只绘制了两条线段,并不是一个完整的三角形。
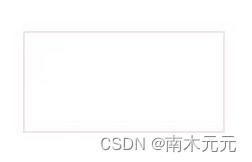
3.6 绘制矩形
可以使用线段来描绘矩形,但 canvas 也提供了 rect() 等方法可以直接生成矩形。
- 使用 strokeRect() 描边矩形
<canvas id="canvas" width="300" height="300" style="border: 1px solid #ccc;"></canvas>
<script>
  const canvas = document.getElementById('canvas')
  const ctx = canvas.getContext('2d')

  ctx.strokeStyle = 'pink'
  ctx.strokeRect(50, 50, 200, 100)	// strokeRect(x, y, width, height)
</script>
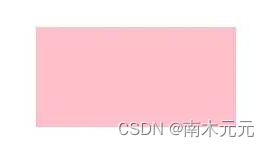
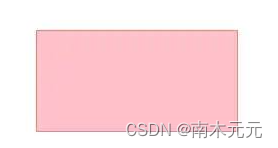
- 使用 fillRect() 填充矩形
<canvas id="canvas" width="300" height="300" style="border: 1px solid #ccc;"></canvas>
<script>
  const canvas = document.getElementById('canvas')
  const ctx = canvas.getContext('2d')

  ctx.fillStyle = 'pink'
  ctx.fillRect(50, 50, 200, 100) // fillRect(x, y, width, height)
</script>
- 使用 rect() 生成矩形
注意:rect() 方法被调用后,还需调用 stroke() 或 fill() 辅助渲染。
<canvas id="canvas" width="300" height="300" style="border: 1px solid #ccc;"></canvas>
<script>
  const canvas = document.getElementById('canvas')
  const ctx = canvas.getContext('2d')

  ctx.strokeStyle = 'red'
  ctx.fillStyle = 'pink'

  ctx.rect(50, 50, 200, 100) // rect(x, y, width, height)

  ctx.stroke()
  ctx.fill()
</script>
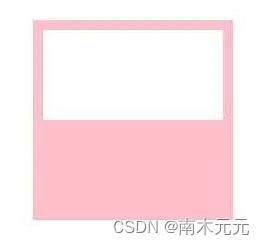
- 使用 clearRect() 清空矩形
<canvas id="canvas" width="300" height="300" style="border: 1px solid #ccc;"></canvas>
<script>
  const canvas = document.getElementById('canvas')
  const ctx = canvas.getContext('2d')

  ctx.fillStyle = 'pink' // 设置填充颜色
  ctx.fillRect(50, 50, 200, 200) // 填充矩形

  ctx.clearRect(60, 60, 180, 90) // 清空矩形
</script>
3.7 绘制文本
语法:
ctx.font = 'font-style font-variant font-weight font-size/line-height font-family'
- strokeText() 方法绘制描边文本
<canvas id="canvas" width="300" height="300" style="border: 1px solid #ccc;"></canvas>
<script>
  const canvas = document.getElementById('canvas')
  const ctx = canvas.getContext('2d')

  ctx.font = '60px Arial'
  cxt.strokeStyle = 'pink' // 设置文本描边颜色
  ctx.strokeText('好运', 30, 90)	//strokeText(text, x, y, maxWidth)
</script>

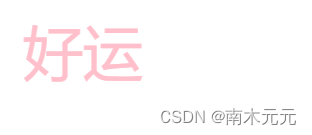
- fillText() 绘制填充文本
<canvas id="canvas" width="300" height="300" style="border: 1px solid #ccc;"></canvas>
<script>
  const canvas = document.getElementById('canvas')
  const ctx = canvas.getContext('2d')

  ctx.font = '60px Arial'
  ctx.font = '60px Arial'
  ctx.fillStyle = 'pink'
  ctx.fillText('好运', 30, 90)
</script>
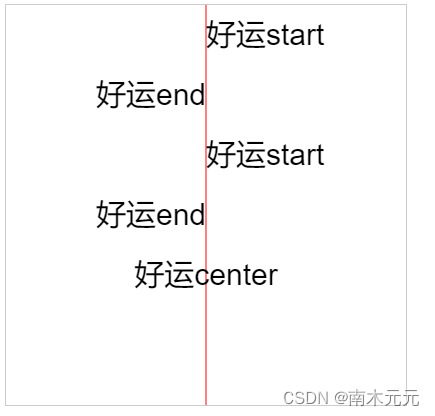
- textAlign设置文字的水平对齐方式
1.start: 默认。在指定位置的横坐标开始。
2.end: 在指定坐标的横坐标结束。
3.left: 左对齐。
4.right: 右对齐。
5.center: 居中对齐。
<canvas id="canvas" width="300" height="300" style="border: 1px solid #ccc;"></canvas>
<script>
  const canvas = document.getElementById('canvas')
  const ctx = canvas.getContext('2d')

  // 参考线
  ctx.moveTo(200, 0)
  ctx.lineTo(200, 400)
  ctx.strokeStyle = 'red'
  ctx.stroke()

  ctx.font = '30px Arial'

  // 横坐标开始位对齐
  ctx.textAlign = 'start' // 默认值,
  ctx.fillText('好运start', 200, 40)

  // 横坐标结束位对齐
  ctx.textAlign = 'end' // 结束对齐
  ctx.fillText('好运end', 200, 100)

  // 横坐标开始位对齐
  ctx.textAlign = 'left' // 默认值,
  ctx.fillText('好运start', 200, 160)

  // 横坐标结束位对齐
  ctx.textAlign = 'right' // 结束对齐
  ctx.fillText('好运end', 200, 220)

  // 居中对齐
  ctx.textAlign = 'center' // 右对齐
  ctx.fillText('好运center', 200, 280)
</script>
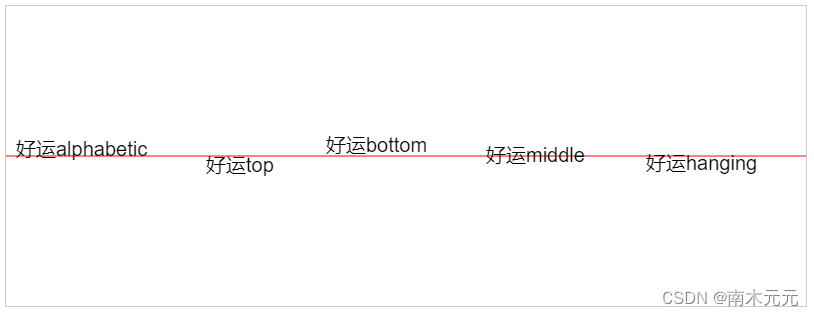
- textBaseline设置文字的垂直对齐方式
1.alphabetic: 默认。文本基线是普通的字母基线。
2.top: 文本基线是 em 方框的顶端。
3.bottom: 文本基线是 em 方框的底端。
4.middle: 文本基线是 em 方框的正中。
5.hanging: 文本基线是悬挂基线。
<canvas id="canvas" width="800" height="300" style="border: 1px solid #ccc;"></canvas>
<script>
  const canvas = document.getElementById('canvas')
  const ctx = canvas.getContext('2d')

  // 参考线
  ctx.moveTo(0, 150)
  ctx.lineTo(800, 150)
  ctx.strokeStyle = 'red'
  ctx.stroke()

  ctx.font = '20px Arial'

  // 默认 alphabetic
  ctx.textBaseline = 'alphabetic'
  ctx.fillText('好运alphabetic', 10, 150)

  // 默认 top
  ctx.textBaseline = 'top'
  ctx.fillText('好运top', 200, 150)

  // 默认 bottom
  ctx.textBaseline = 'bottom'
  ctx.fillText('好运bottom', 320, 150)

  // 默认 middle
  ctx.textBaseline = 'middle'
  ctx.fillText('好运middle', 480, 150)

  // 默认 hanging
  ctx.textBaseline = 'hanging'
  ctx.fillText('好运hanging', 640, 150)
</script>
3.8 绘制图片
使用 drawImage() 方法绘制图片,语法:
drawImage(image, dx, dy)
- image: 要渲染的图片对象。
- dx: 图片左上角的横坐标位置。
- dy: 图片左上角的纵坐标位置。
<canvas id="canvas" width="300" height="300" style="border: 1px solid #ccc;"></canvas>
<script>
  const canvas = document.getElementById('canvas')
  const ctx = canvas.getContext('2d')

  // 1 创建 Image 对象
  const image = new Image()
  // 2 引入图片
  image.src = './images/hz.png'
  // 3 等待图片加载完成
  image.onload = () => {


    // 4 使用 drawImage() 方法渲染图片
    ctx.drawImage(image, 30, 30)
  }
</script>