你好!这里是风筝的博客,
欢迎和我一起交流。
opencv移植:移植opencv到嵌入式arm详细过程
我们要识别检测二维码,还需要一个库:zbar库。
zbar下载:在csdn就有,直接搜索zbar-0.10即可。我就不上传了。
然后我们来开始配置环境:
sudo tar xzvf zbar-0.10.tar.gz
cd zbar-0.10
mkdir tmp
./configure --prefix=$PWD/tmp
$PWD是当前路径,我的路径是/work/system/zbar-0.10/
然后会发现一个问题:
configure: error: in `/work/system/zbar-0.10':
configure: error: Unable to find ImageMagick >= 6.2.6:

No package 'MagickWand' found
这是没有MagickWand的原因,我们可以直接安装MagickWand:
sudo apt-get install imagemagick libmagickwand-dev
但是,千万别执行这条命令,当然,你执行了没事,后面我会讲……
如果执行了。继续configure,还会有错误:
checking for GTK... configure: error: Package requirements (gtk+-2.0 gthread-2.0) were not met:

No package 'gtk+-2.0' found
这是没有gtk的原因,同理,我们也可以安装gtk来解决:
sudo apt-get install libgtk2.0-dev
但是,千万别执行这条命令,当然,你执行了没事,后面我会讲……
如果执行了。继续configure,还会有错误:
checking for PYGTK... configure: error: Package requirements (pygtk-2.0) were not met:

No package 'pygtk-2.0' found
同理,我们也可以解决:
sudo apt-get install python-gtk2-dev
但是,千万别执行这条命令,当然,你执行了没事,后面我会讲……
当时我搞到这,发现要安装的东西太太多了,好像我都用不到啊,尤其是gtk,我都要qt了,还要啥gtk啊。
我就恼了,发现,居然可以设置不编译这些乱七八糟的东西,就不需要安装这些其他东西了:
./configure --prefix=$PWD/tmp/ --without-gtk --without-qt --without-imagemagick --without-python就是这条命令,其他的乱七八糟都不需要,直接就配置好了。
接着,make,发现:
In file included from /usr/include/stdio.h:936:0,
                 from zbar/debug.h:60,
                 from zbar/scanner.c:34:
/usr/include/x86_64-linux-gnu/bits/stdio2.h:139:1: error: expected identifier or ‘(’ before ‘{’ token
 {
好像说的是gcc编译器规则太严的问题,所以需要:export CFLAGS=””
即:
export CFLAGS=""
./configure --prefix=$PWD/tmp/ --without-gtk --without-qt --without-imagemagick --without-python
make
这样应该就没有错误了,接着
make install
就可以在当前目录的tmp目录下发现lib和include的文件了。
最后,你以为这样就可以了吗?天真,坑我都替你们踩好了,,,,,,
这可是要在arm开发板里执行的,配置的时候就不对,如果直接这样安装,我们编译时会发现:
/work/system/zbar-0.10/tmp/lib//libzbar.so: file not recognized: File format not recognized
collect2: ld returned 1 exit status
说的就是libzbar.so这个库的格式不对,因为我们是要进行交叉编译的,所以直接配置时应该设置好:
./configure --prefix=$PWD/tmp/ --without-gtk --without-qt --without-python --without-imagemagick --host=arm-linux这样设置是给arm用的,重新make安装即可!!!
然后就可以使用zbar来解码了,从网上参考了一个简单的识别二维码的code:
zbar.cpp:
#include "zbar.h"
#include "cv.h"
#include "highgui.h"
#include <iostream>

using namespace std;
using namespace zbar;
using namespace cv;

int main(int argc,char*argv[])
{
    ImageScanner scanner;
    // configure the reader
    scanner.set_config(ZBAR_NONE, ZBAR_CFG_ENABLE, 1);
    Mat image = imread("zbar.jpg");
    Mat imageGray;
    cvtColor(image,imageGray,CV_RGB2GRAY);
    if(!imageGray.data)
    {
        cout << "read picture error!\n" << endl;
        return 0;
    }
    int width = imageGray.cols;
    int height = imageGray.rows;
    uchar *raw = (uchar *)imageGray.data;
    Image imageZbar(width, height, "Y800", raw, width * height);
    // scan the image for barcodes
    scanner.scan(imageZbar);
    zbar::Image::SymbolIterator symbol = imageZbar.symbol_begin();
    if(imageZbar.symbol_begin()==imageZbar.symbol_end())
    {
        cout<<"decode failed!\n"<<endl;
    }
    for(;symbol != imageZbar.symbol_end();++symbol)
    {
        cout<<"type:"<<endl<<symbol->get_type_name()<<endl<<endl;
        cout<<"data:"<<endl<<symbol->get_data()<<endl<<endl;
    }
    //imshow("Source Image",image);
    waitKey();
    // clean up
    imageZbar.set_data(NULL,0);
    return 0;
}
编译:
arm-linux-g++ -Wno-psabi -I/usr/local/opencv/install_opencv/include/opencv/ -I/work/system/zbar-0.10/tmp/include/ -L/usr/local/opencv/install_opencv/lib/ -L/work/system/zbar-0.10/tmp/lib/ -L/work/qt/my_qt/lib -lQt5Widgets -lQt5Gui -lQt5Core -lopencv_core -lopencv_highgui -lzbar -lpthread -lrt -o zbar zbar.cpp因为我之前一直opencv的时候选了WITH_QT这个选项,现在我要使用opencv编译时都需要连接到qt的路径和库,有点烦。如果移植opencv时没选WITH_QT的话,默认是WITH_QTK,编译时就不需要加上QT的库和路径的。
这样我们就可以生成一个zbar的可执行文件了,把这个文件和zbar的库和一张二维码图片一起放到arm开发板上:
zbar.jpg:

执行zbar文件:
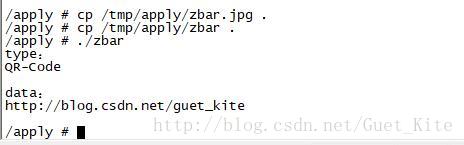
解码成功!