一、在线获取新模块
获取地址:开源版本module | PIGCLOUD (pig4cloud.com)

点击获取,得到代码压缩包,内容如下:

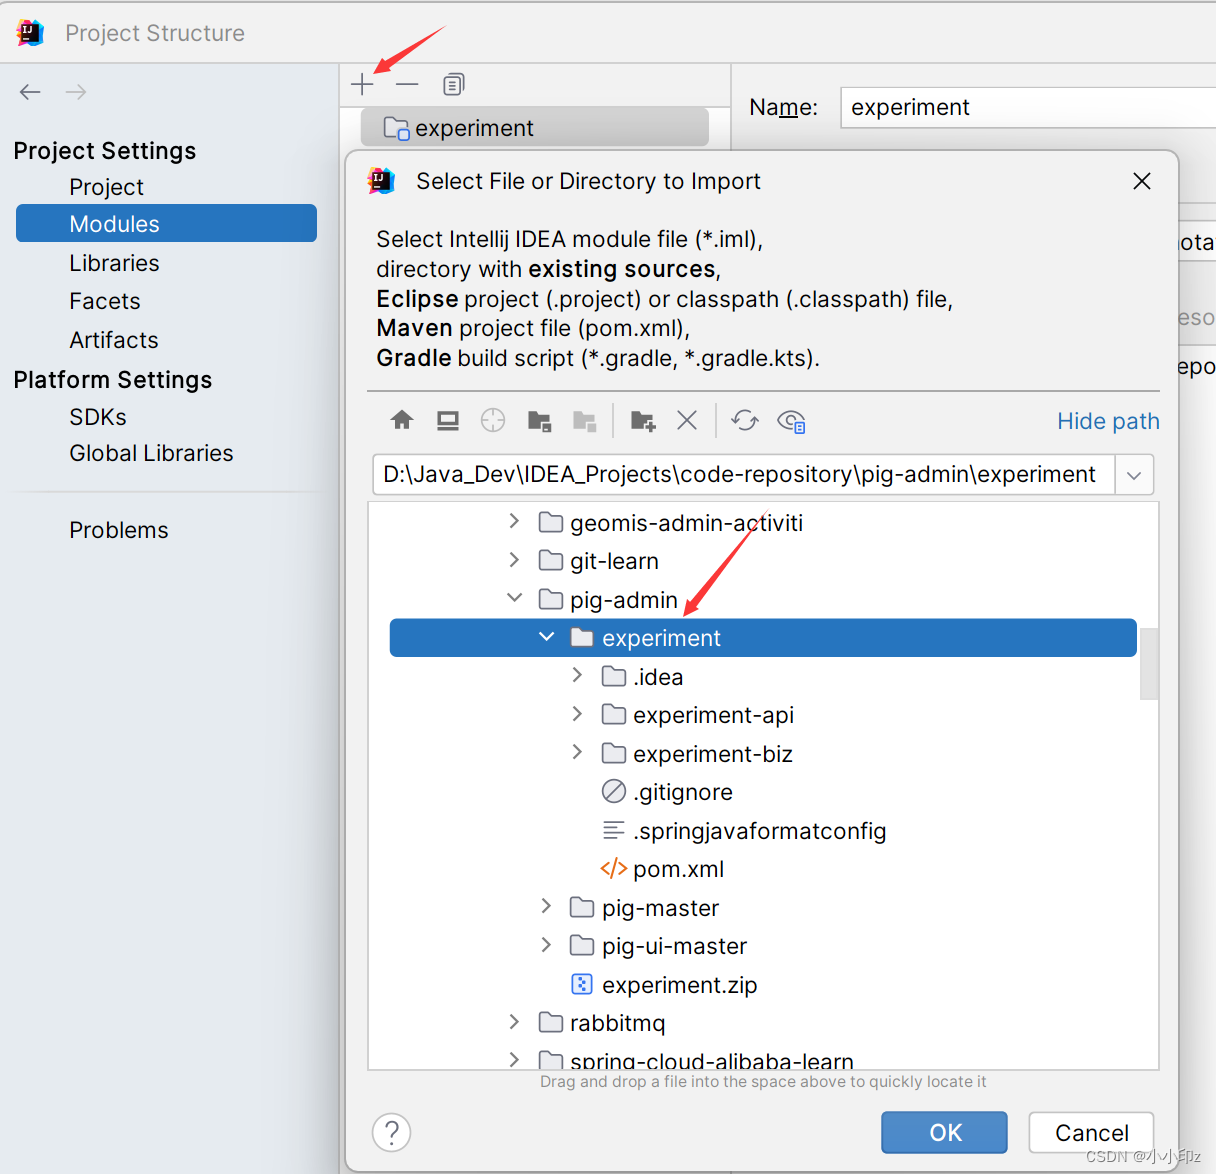
二、导入到主项目中
对于后台代码,打开项目结构,导入刚生成的模块
三、创建测试数据库及表
这里我用的pig提供的,可以自己随便找一个
-- 创建测试库
create database `pig_demo` default character set utf8mb4 collate utf8mb4_general_ci;

USE pig_demo;

SET NAMES utf8mb4;
SET FOREIGN_KEY_CHECKS = 0;

-- 创建测试表
DROP TABLE IF EXISTS `demo`;

CREATE TABLE `demo` (
  `id` bigint NOT NULL COMMENT '主键',
  `username` varchar(255) DEFAULT NULL COMMENT '用户名',
  `nicename` varchar(255) DEFAULT NULL COMMENT '昵称',
  `create_time` datetime DEFAULT NULL COMMENT '创建时间',
  `create_by` varchar(64) DEFAULT NULL COMMENT '创建人',
  `update_time` datetime DEFAULT NULL COMMENT '修改时间',
  `update_by` varchar(64) DEFAULT NULL COMMENT '更新人',
  PRIMARY KEY (`id`)
) ENGINE=InnoDB DEFAULT CHARSET=utf8mb4 ROW_FORMAT=DYNAMIC COMMENT='demo 表';
四、新建数据源
在pig首页的数据源管理,添加刚才创建的数据库 pig_demo,以便后续生成CRUD的代码。
jdbc:mysql://pig-mysql:3306/pig_demo?characterEncoding=utf8&zeroDateTimeBehavior=convertToNull&useSSL=false&useJDBCCompliantTimezoneShift=true&useLegacyDatetimeCode=false&serverTimezone=Asia/Shanghai&allowPublicKeyRetrieval=true
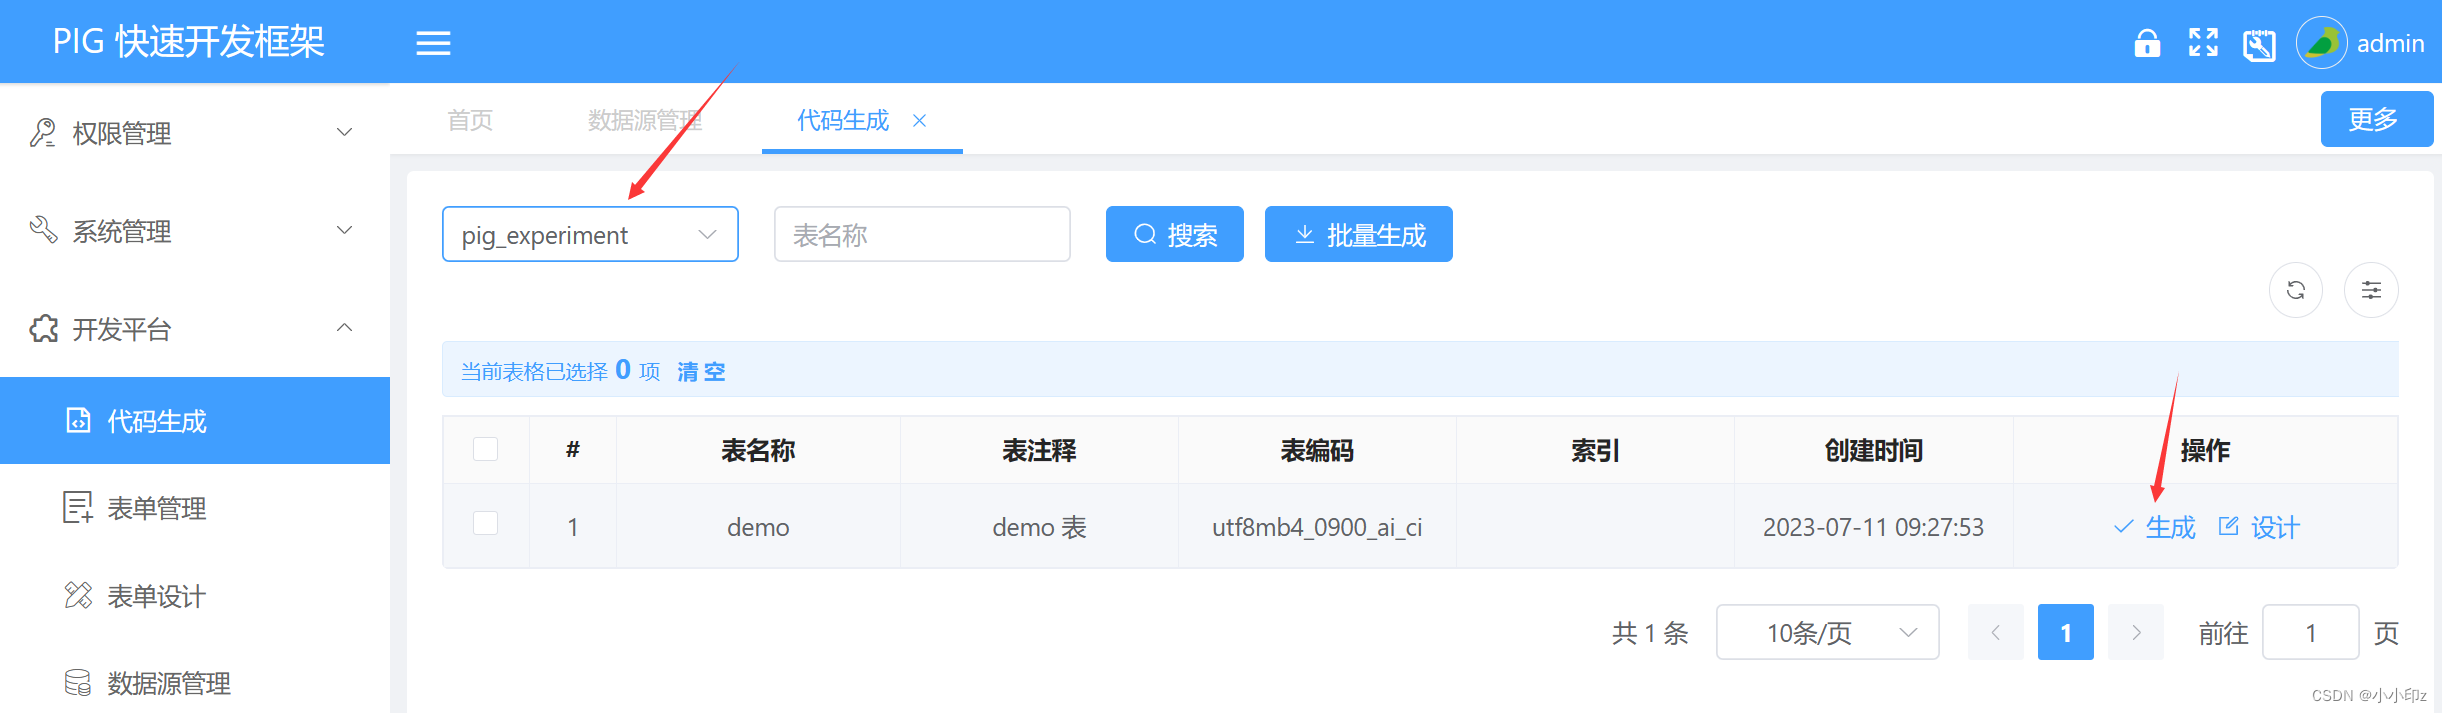
五、生成代码
选择数据源,生成代码:
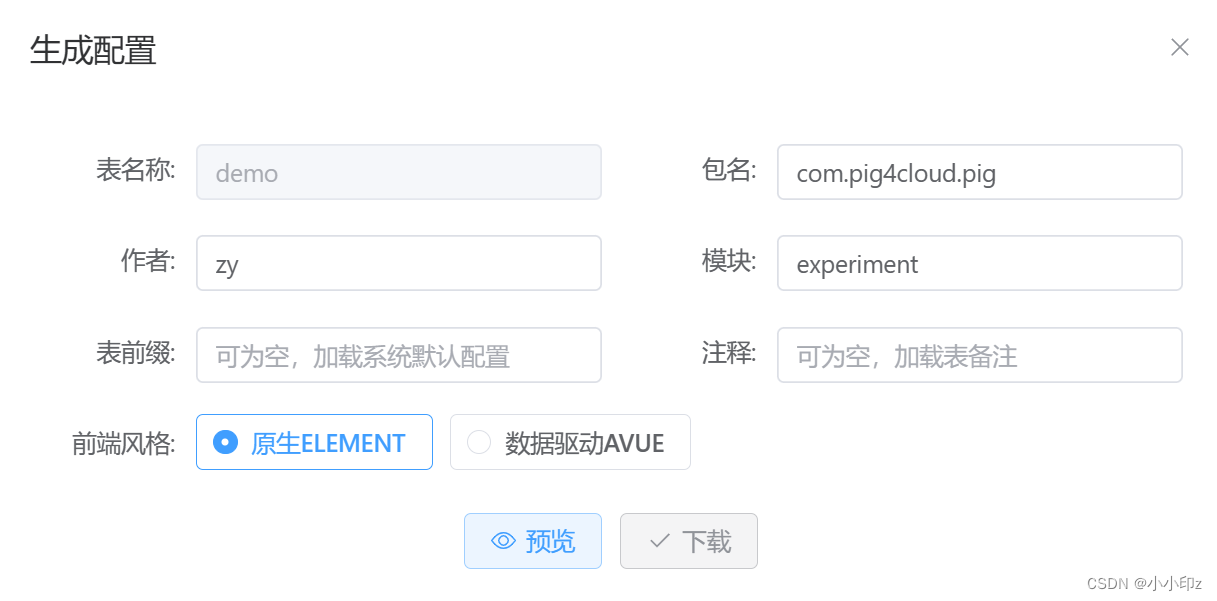
点击下载之后,生成的代码如下:

(1)后端代码导入
将代码生成的demo/pig/src 移动到骨架工程生成 experiment/experiment-biz/src 合并
可以看到对应生成的内容放在:com.pig4cloud.pig.experiment 下(和上面指定的对应)

(2)前端导入
将代码生成的demo/pig-ui/src 移动到原有pig-ui/src 合并
(3)菜单脚本执行
在 pig 库 执行菜单插入
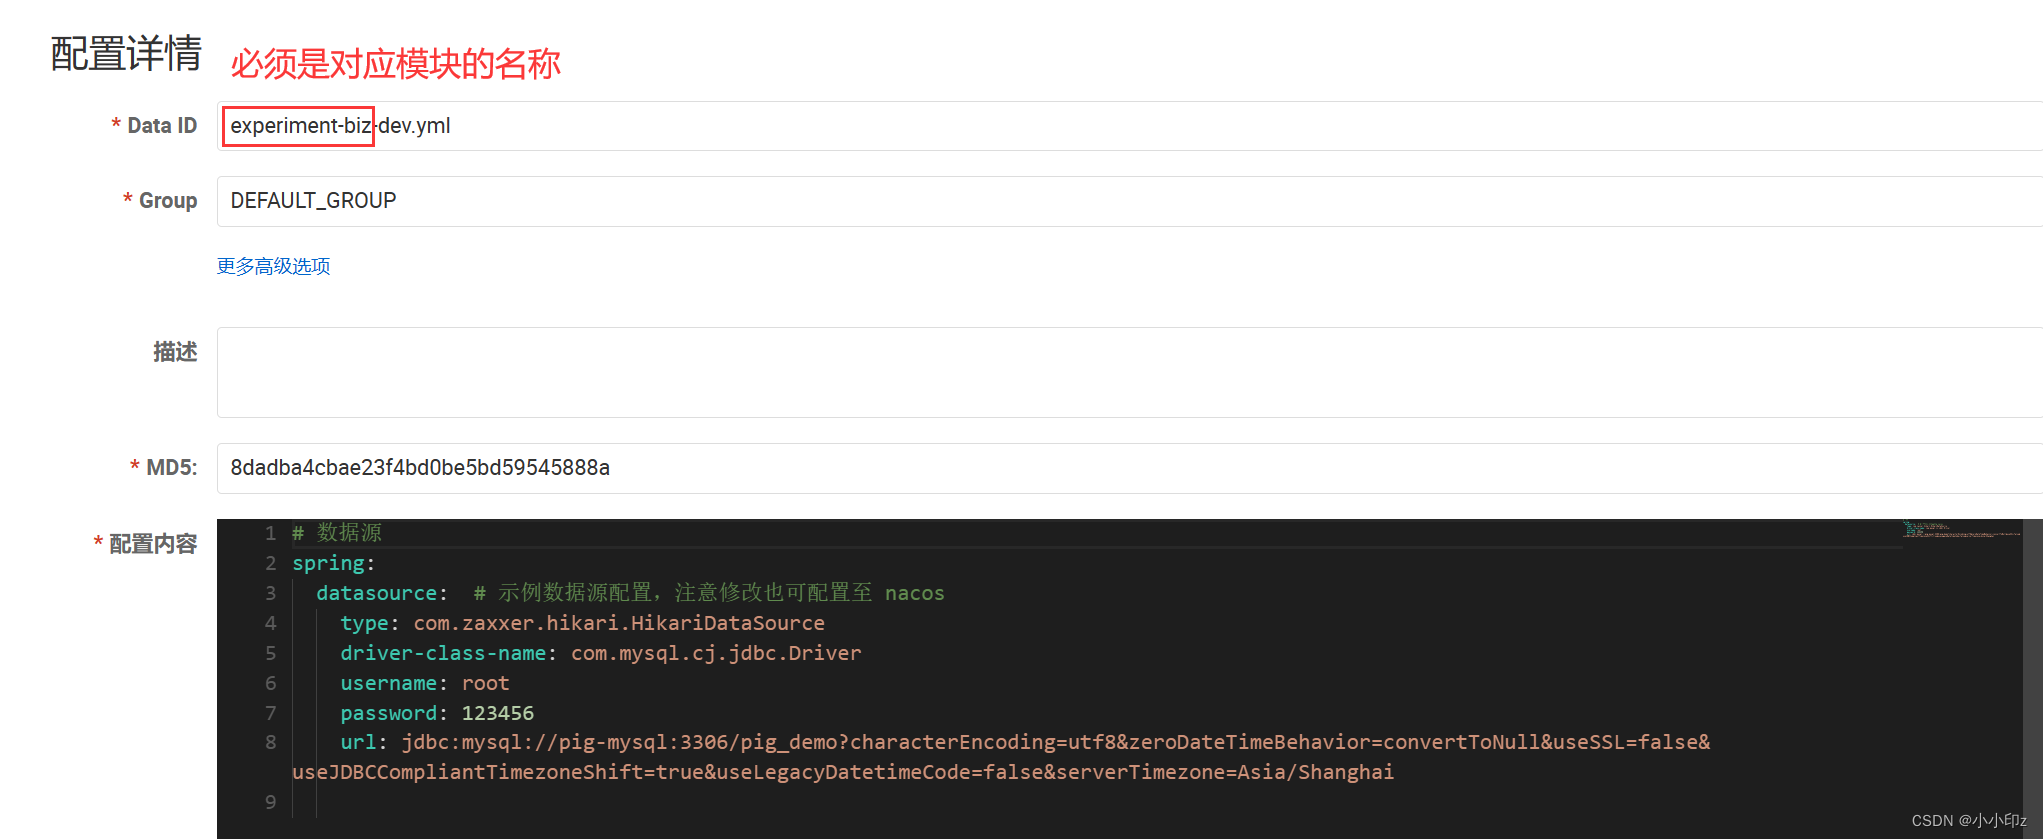
六、检查配置信息
检查数据库用户名、密码等信息
server:
  port: 7001

spring:
  application:
    name: @artifactId@
  cloud:
    nacos:
      username: @nacos.username@
      password: @nacos.password@
      discovery:
        server-addr: ${NACOS_HOST:pig-register}:${NACOS_PORT:8848}
      config:
        server-addr: ${spring.cloud.nacos.discovery.server-addr}
  config:
    import:
      - nacos:[email protected]@.yml
      - nacos:${spring.application.name}[email protected]@.yml
  datasource:  # 示例数据源配置,注意修改也可配置至 nacos
    type: com.zaxxer.hikari.HikariDataSource
    driver-class-name: com.mysql.cj.jdbc.Driver
    username: root
    password: 123456
    url: jdbc:mysql://pig-mysql:3306/pig_demo?characterEncoding=utf8&zeroDateTimeBehavior=convertToNull&useSSL=false&useJDBCCompliantTimezoneShift=true&useLegacyDatetimeCode=false&serverTimezone=Asia/Shanghai
配置文件的datasource部分也可以放到nacos中:
七、配置网关路由
修改nacos中的网关路由配置文件:
spring:
  cloud:
    gateway:
      locator:
        enabled: true
      routes:
        # 认证中心
        - id: pig-auth
          uri: lb://pig-auth
          predicates:
            - Path=/auth/**
          filters:
            # 验证码处理
            - ValidateCodeGatewayFilter
            # 前端密码解密
            - PasswordDecoderFilter
        #UPMS 模块
        - id: pig-upms-biz
          uri: lb://pig-upms-biz
          predicates:
            - Path=/admin/**
          filters:
            # 限流配置
            - name: RequestRateLimiter
              args:
                key-resolver: '#{@remoteAddrKeyResolver}'
                redis-rate-limiter.replenishRate: 100
                redis-rate-limiter.burstCapacity: 200
        # 代码生成模块
        - id: pig-codegen
          uri: lb://pig-codegen
          predicates:
            - Path=/gen/**
        # 固定路由转发配置 无修改
        - id: openapi
          uri: lb://pig-gateway
          predicates:
            - Path=/v3/api-docs/**
          filters:
            - RewritePath=/v3/api-docs/(?<path>.*), /$\{path}/$\{path}/v3/api-docs
        # experiment模块
        - id: pig-experiment
          uri: lb://experiment-biz  #模块的名称
          predicates:
            - Path=/experiment/**  #将请求以experiment开始的都路由到experiment-biz模块下
gateway:
  encode-key: 'thanks,pig4cloud'
  ignore-clients:
    - test
    - client
八、给角色分配权限

关于网关的问题记录:
在微服务架构中,网关(通常是API网关)充当了服务的入口,负责路由请求到相应的微服务。它提供了统一的入口点和路由规则,将客户端的请求转发到正确的服务。
如果你的服务使用了网关作为入口,那么在配置了相应的网关路由之前,直接访问微服务的地址是无法成功请求到的。你需要在网关中配置路由规则,将
/api/experiment/demo/page的请求路由到对应的experiment模块。具体的配置方式取决于你使用的网关工具,例如常用的微服务网关工具包括 Spring Cloud Gateway、Netflix Zuul、Kong 等。
spring:
  cloud:
    gateway:
      locator:
        enabled: true
      routes:
        # experiment模块
        - id: pig-experiment
          uri: lb://experiment-biz  #模块的名称
          predicates:
            - Path=/experiment/**  #将请求以experiment开始的都路由到experiment-biz模块下
当请求路径以 /experiment/** 开头时,网关将把请求转发到 experiment-biz 服务实例上。因此,如果你的实际请求是 http://localhost:8080/api/experiment/demo/page?current=1&size=10,这个请求将被网关转发到 experiment-biz 服务实例上处理。
Q:那我的http://localhost:8080/api/experiment/demo/page?current=1&size=10这个请求发出去之后,会先到网关吗?网关是否也有一个地址呢?还是说网关并没有实际的地址,它只是起到了接收请求再进行路由的工作?
A:
当你发出
http://localhost:8080/api/experiment/demo/page?current=1&size=10这个请求时,它会先到达网关。网关在微服务架构中充当了请求的入口,它接收客户端发出的请求,并根据配置的路由规则将请求转发到相应的微服务实例。
通常情况下,网关本身也有一个地址,客户端通过该地址发送请求。在你的配置中,网关地址是
http://localhost:8080。因此,客户端通过访问http://localhost:8080/api/experiment/demo/page?current=1&size=10来向网关发起请求。网关会根据路由规则匹配请求的路径,并将请求转发到相应的微服务实例。在你的配置中,路由规则将
/api/experiment/demo/page转发到了experiment-biz服务实例。所以,网关既有自己的地址(例如
http://localhost:8080),也负责接收请求、进行路由转发的工作。它起到了请求入口和路由转发的作用。
gateway的配置:
spring:
  cloud:
    gateway:
      locator:
        enabled: true
在Spring Cloud中,spring.cloud.gateway是一个用于构建API网关的模块。在网关配置中,gateway.locator.enabled是一个布尔值,用于指定是否启用网关的定位器(Locator)功能。
网关定位器是Spring Cloud Gateway的一项功能,它允许动态地将请求路由到不同的目标服务。通过启用定位器功能,你可以在运行时动态地配置路由规则,而不需要重启网关服务。这对于动态添加、删除或修改路由非常有用。
当gateway.locator.enabled设置为true时,网关将根据定位器的配置将请求路由到相应的目标服务。如果设置为false,则禁用该功能,网关将使用静态配置的路由规则。