本文参考博文:WPF 自定义图片剪切器 - 头像剪切(扩展与完善、实时截图)
在网上找了好久都找不到合适的截图框架,只能用WPF 自定义图片剪切器 - 头像剪切(扩展与完善、实时截图)_孤夜一点星的博客-CSDN博客_wpf 图片裁剪这篇文章的进行尝试,结果并不能满足我的需求,所以我在这基础上进行了修改,在这谢谢原作者的贡献
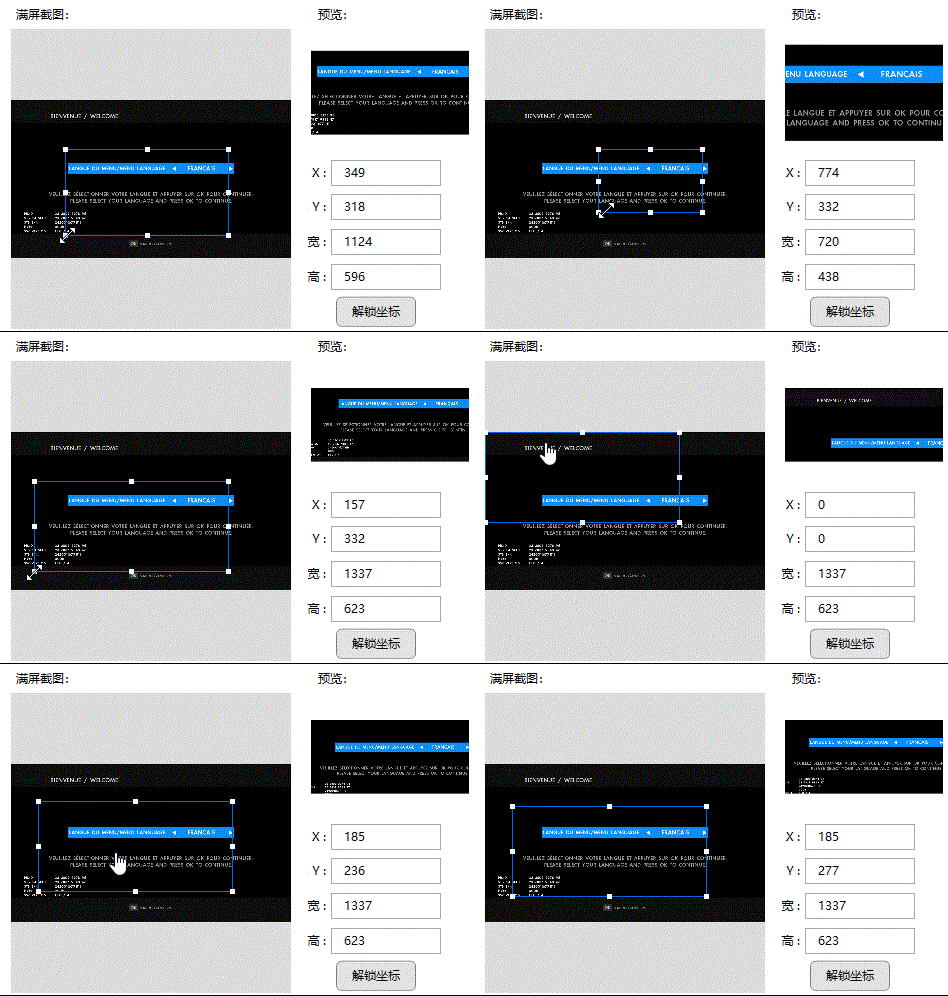
效果展示
展示图片很卡,实际很流畅的

与原作者异同点
1. 将正方形框框改为可变框框,可以做拉伸(这里没有对框框大小做校验,有可能框框宽高会被拉为0或者负数,我知道有这个bug,但我懒得改)
2. 拖动时做了校验,不会将框框拖出图片外
3. 优化了一些算法,让计算更有效率
4. 其他一些优化(如加载时设置边框大小,计算预览图片等)
代码逻辑分析
代码布局由Grid作为容器,将Image图片显示在容器里,自适应填充整个Grid,选择框其实就是一个Border,选择截取的部分其实就是将Border放大缩小和平移,布局文件就这么多,下面是布局文件的代码
<UserControl x:Class="AUTOTest.Widgets.Common.ImageDealer.ImageDealerUnsafe"
             xmlns="http://schemas.microsoft.com/winfx/2006/xaml/presentation"
             xmlns:x="http://schemas.microsoft.com/winfx/2006/xaml"
             xmlns:mc="http://schemas.openxmlformats.org/markup-compatibility/2006"
             xmlns:d="http://schemas.microsoft.com/expression/blend/2008"
             mc:Ignorable="d"
             d:DesignHeight="300" d:DesignWidth="280" Background="Transparent"
             SnapsToDevicePixels="True"
             PreviewMouseDown="UserControl_MouseDown"
             PreviewMouseUp="UserControl_MouseUp"
             MouseLeave="UserControl_MouseLeave"
             PreviewMouseMove="UserControl_MouseMove"
             Loaded="onViewLoad">
    <Grid Name="MainGrid" Height="300" Width="280" Background="#DCDCDC">
        <Image Name="SoureceImage" Stretch="Uniform"></Image>
        <Border Name="ImageArea"  BorderBrush="#046BE1" BorderThickness="1,1,1,1" Panel.ZIndex="5" Margin="100" SizeChanged="ImageArea_SizeChanged">
            <Grid >
                <Rectangle Name="R_LeftUp"    Width="5" Height="5" Margin="-3" VerticalAlignment="Top"    HorizontalAlignment="Left"   Fill="White" Panel.ZIndex="0" Cursor="SizeNWSE"/>
                <Rectangle Name="R_Up"        Width="5" Height="5" Margin="-3" VerticalAlignment="Top"    HorizontalAlignment="Center" Fill="White" Panel.ZIndex="0" Cursor="SizeNS"/>
                <Rectangle Name="R_RightUp"   Width="5" Height="5" Margin="-3" VerticalAlignment="Top"    HorizontalAlignment="Right"  Fill="White" Panel.ZIndex="0" Cursor="SizeNESW"/>
                <Rectangle Name="R_Right"     Width="5" Height="5" Margin="-3" VerticalAlignment="Center" HorizontalAlignment="Right"  Fill="White" Panel.ZIndex="0" Cursor="SizeWE"/>
                <Rectangle Name="R_RightDown" Width="5" Height="5" Margin="-3" VerticalAlignment="Bottom" HorizontalAlignment="Right"  Fill="White" Panel.ZIndex="0" Cursor="SizeNWSE"/>
                <Rectangle Name="R_Down"      Width="5" Height="5" Margin="-3" VerticalAlignment="Bottom" HorizontalAlignment="Center" Fill="White" Panel.ZIndex="0" Cursor="SizeNS"/>
                <Rectangle Name="R_LeftDown"  Width="5" Height="5" Margin="-3" VerticalAlignment="Bottom" HorizontalAlignment="Left"   Fill="White" Panel.ZIndex="0" Cursor="SizeNESW"/>
                <Rectangle Name="R_Left"      Width="5" Height="5" Margin="-3" VerticalAlignment="Center" HorizontalAlignment="Left"   Fill="White" Panel.ZIndex="0" Cursor="SizeWE"/>
            </Grid>
        </Border>

    </Grid>
</UserControl>
布局写好了,我们看下怎么控制布局文件的,首先考虑缩放选取框的大小,当鼠标拖动某个选取点时,根据选取点的不同,重新计算Border的X,Y或者Width,Height,例如拖动右下测的点时,需要更新框的高度和宽度,而拖动上面的点时 ,只需要更新Y即可,下面是我的拖动代码
/// <summary> 计算区域圆点及宽高 </summary>
/// <param name="MouseButtonLocate">鼠标相对背景MainGrid位置</param>
/// <param name="IsRectangle">是否正方形</param>
/// <returns>NULL 或 具体值</returns>
private RectangleAreaModel CalculatedArea(Point MouseButtonLocate, bool IsRectangle, Point Locate)
{
	//边框宽度
	double BorderWidth = this.BorderWidth;
	//整体宽度
	double RectWidth = ImageArea.ActualWidth;
	//整体高度
	double RectHeight = ImageArea.ActualHeight;

	//裁剪区域
	Point OriginalPoint = new Point(0, 0);//圆点坐标
	Point TheoryPoint = new Point(0, 0);  //理论坐标
	double TheoryWidth = 0;   //理论宽度
	double TheoryHeight = 0;  //理论高度
	switch (MouseLocation)
	{
		case MouseLocationEnum.Left:
			{
				Cursor = Cursors.SizeWE;
				TheoryWidth = RectWidth + (Locate.X - MouseButtonLocate.X);
				TheoryHeight = RectHeight;
				TheoryPoint = new Point(MouseButtonLocate.X, Locate.Y);
			}
			break;
		case MouseLocationEnum.LeftUp:
			{
				Cursor = Cursors.SizeNWSE;
				TheoryWidth = RectWidth + (Locate.X - MouseButtonLocate.X);
				TheoryHeight = RectHeight + (Locate.Y - MouseButtonLocate.Y);
				TheoryPoint = new Point(MouseButtonLocate.X, MouseButtonLocate.Y);
			}
			break;
		case MouseLocationEnum.Up:
			{
				Cursor = Cursors.SizeNS;
				TheoryWidth = RectWidth;
				TheoryHeight = RectHeight + (Locate.Y - MouseButtonLocate.Y);
				TheoryPoint = new Point(Locate.X, MouseButtonLocate.Y);
			}
			break;
		case MouseLocationEnum.RightUp:
			{
				Cursor = Cursors.SizeNESW;
				TheoryWidth = MouseButtonLocate.X - Locate.X;
				TheoryHeight = RectHeight + (Locate.Y - MouseButtonLocate.Y);
				TheoryPoint = new Point(Locate.X, MouseButtonLocate.Y);
			}
			break;
		case MouseLocationEnum.Right:
			{
				Cursor = Cursors.SizeWE;
				TheoryWidth = MouseButtonLocate.X - Locate.X;
				TheoryHeight = RectHeight;
				TheoryPoint = new Point(Locate.X, Locate.Y);
			}
			break;
		case MouseLocationEnum.RightDown:
			{
				Cursor = Cursors.SizeNWSE;
				TheoryHeight = MouseButtonLocate.Y - Locate.Y;
				TheoryWidth = MouseButtonLocate.X - Locate.X;
				TheoryPoint = new Point(Locate.X, Locate.Y);
			}
			break;
		case MouseLocationEnum.Down:
			{
				Cursor = Cursors.SizeNS;
				TheoryHeight = MouseButtonLocate.Y - Locate.Y;
				TheoryWidth = RectWidth;
				TheoryPoint = new Point(Locate.X, Locate.Y);
			}
			break;
		case MouseLocationEnum.LeftDown:
			{
				Cursor = Cursors.SizeNESW;
				TheoryWidth = RectWidth + (Locate.X - MouseButtonLocate.X);
				TheoryHeight = MouseButtonLocate.Y - Locate.Y;
				TheoryPoint = new Point(MouseButtonLocate.X, Locate.Y);
			}
			break;
		default:
			return null;
	}
	return new RectangleAreaModel()
	{
		X = TheoryPoint.X,
		Y = TheoryPoint.Y,
		Width = TheoryWidth,
		Height = TheoryHeight
	};
}
接下来我们考虑整体平移时的逻辑,平移只是X,Y变了而已,选取框的宽高还是不变的,所以逻辑比较简单,鼠标的X,Y偏移多少,我们的边框也偏移多少,当然了我们不能忽略边界计算,超出边界后还是不能拖动的,下面是拖动时的代码
else if (Action == MouseActionEx.DragMove)//拖动
{
	double Left = MouseDownLocate.X + (MousePoint.X - MouseDownPoint.X);
	double Top = MouseDownLocate.Y + (MousePoint.Y - MouseDownPoint.Y);
	//不能超出边界区域 超出后纠正
	// 左边距
	double leftMargin = MaxMargin + (MainGrid.ActualWidth - SoureceImage.ActualWidth) / 2;
	// 上边距
	double topMargin = MaxMargin + (MainGrid.ActualHeight - SoureceImage.ActualHeight) / 2;
	// 右边距
	double rightMargin = SourceImagePoint.X + SoureceImage.ActualWidth;
	// 下边距
	double bottomMargin = SourceImagePoint.Y + SoureceImage.ActualHeight;
	// 选择框加边框宽
	double selectAreaWidth = ImageArea.ActualWidth + MaxMargin;
	// 选择框加边框高
	double selectAreaHeight = ImageArea.ActualHeight + MaxMargin;
	if (Left < leftMargin)
		Left = leftMargin;
	if (Top < topMargin)
		Top = topMargin;
	if (Left + selectAreaWidth > rightMargin)
		Left = rightMargin - selectAreaWidth;
	if (Top + selectAreaHeight > bottomMargin)
		Top = bottomMargin - selectAreaHeight;
	ImageArea.Width = ImageArea.ActualWidth;
	ImageArea.Height = ImageArea.ActualHeight;

	ImageArea.SetValue(HorizontalAlignmentProperty, HorizontalAlignment.Left);
	ImageArea.SetValue(VerticalAlignmentProperty, VerticalAlignment.Top);
	ImageArea.SetValue(MarginProperty, new Thickness(Left, Top, 0, 0));

	CutImage();
}
最主要的问题解决了,我们的功能基本就完成了,剩下的就是按比例去截图而已,之前的作者由于套了一层UI,所以,我就没怎么改,也时套了一层,我们只需要调用套的那一层就可以了,我们看看套用的那一层UI界面
<UserControl x:Class="AUTOTest.Widgets.Common.ImageDealer.ImageDealer"
             xmlns="http://schemas.microsoft.com/winfx/2006/xaml/presentation"
             xmlns:x="http://schemas.microsoft.com/winfx/2006/xaml"
             xmlns:mc="http://schemas.openxmlformats.org/markup-compatibility/2006"
             xmlns:d="http://schemas.microsoft.com/expression/blend/2008"
             mc:Ignorable="d"
             d:DesignHeight="300" d:DesignWidth="280" Background="Transparent"
             SnapsToDevicePixels="True"
             Loaded="UserControl_Loaded">
    <Grid Name="MainGrid" MinHeight="300" MinWidth="280" />

</UserControl>
我将UI的逻辑修改了下,之前的太复杂了,我用也用不上,看也看不懂,现在就一个截图的接口,一个设置图片的接口,也就是说可以更换图片的,总体代码很简单,看方法名就知道是干什么的,如果要扩展的话就在这个类里面扩展就可以
    public partial class ImageDealer : UserControl
    {
        public static readonly RoutedEvent OnCutImagingEventHandler = EventManager.RegisterRoutedEvent("OnCutImaging", RoutingStrategy.Bubble, typeof(RoutedEventHandler), typeof(ImageDealer));

        #region 私有字段
        /// <summary> 截图控件 </summary>
        private ImageDealerUnsafe _ImageDealerControl = new ImageDealerUnsafe();
        /// <summary> 图片源 </summary>
        private BitmapImage _BitSource;
        #endregion

        #region 公共字段

        /// <summary> 图片源 </summary>
        public BitmapImage BitSource
        {
            get { return _BitSource; }
            set
            {
                _BitSource = value;
                _ImageDealerControl.BitSource = value;
            }
        }

        /// <summary> 截图事件 </summary>
        public event RoutedEventHandler OnCutImaging
        {
            add { AddHandler(OnCutImagingEventHandler, value); }
            remove { RemoveHandler(OnCutImagingEventHandler, value); }
        }

        #endregion

        #region ==方法==

        public ImageDealer()
        {
            InitializeComponent();
            _ImageDealerControl.OnCutImage += OnCutImage;
        }

        /// <summary> 手动设置范围 </summary>
        public void setImageAreaParemater(double x, double y, double width, double height)
        {
            _ImageDealerControl.setImageAreaParemater(x,y,width,height);
        }


        //外部截图
        public void CutImage()
        {
            if (IsLoaded == true || _ImageDealerControl == null)
                _ImageDealerControl.CutImage();
            else
                throw new Exception("尚未创建视图时无法截图!");
        }

        //截图回调
        private void OnCutImage(CutImgInfo cutImgInfo)
        {
            // BitmapSource bit
            RaiseEvent(new RoutedEventArgs(OnCutImagingEventHandler, cutImgInfo));
        }

        //加载完成
        private void UserControl_Loaded(object sender, RoutedEventArgs e)
        {
            if (MainGrid.Children.Contains(_ImageDealerControl) == false)
                MainGrid.Children.Add(_ImageDealerControl);
        }

        #endregion
    }
其实我们的功能很简单,但是用的时候要让自己写还是比较烦的,我将它记录下来,防止日后会用到,或者小伙伴会用到,也将代码上传了,需要的小伙伴可以去下载