今天终于将MIPI Camera在web端显示出来了,其实很简单的事情,但是因为一个网络的问题,自己研究了好几天,查遍了论坛所有帖子,最后还是在地平线专家们的指导下,发现问题所在。
言归正传,将自己的过程记录下来。
在系统正常启动,串口登录之后,
想要在web端显示,需要以下准备工作。
一,确认摄像头F37正确接到开发板上。
1.5.8. MIPI摄像头
开发板提供1路MIPI CSI接口(接口2),可实现MIPI摄像头的接入。目前开发板配件提供了2种规格的摄像头模组,以满足不同用户的功能需求。模组型号、规格如下:
| 序号 | Sensor | 分辨率 | FOV | I2C 设备地址 |
|---|---|---|---|---|
| 1 | GC4663 | 400W | H:104 V:70 D:113 | 0x29 |
| 2 | JXF37 | 200W | H:62 V:37 D:68 | 0x40 |
摄像头模组通过24pin异面FPC排线跟开发板连接,注意排线两端蓝面向上插入连接器。
重要提示:严禁在开发板未断电的情况下插拔摄像头,否则非常容易烧坏摄像头模组。
以JXF37摄像头模组为例,安装完成后如下图:

安装完成后,用户可以通过i2cdetect命令确认模组I2C地址能否正常检测到。如检测不到,用户需要检查FPC排线连接是否正常。成功探测到I2C地址时,log打印如下所示:
# 首先使能sensor的24MHz主时钟
sunrise@ubuntu:~# sudo bash -c "echo 1 > /sys/class/vps/mipi_host0/param/snrclk_en"
sunrise@ubuntu:~# sudo bash -c "echo 24000000 > /sys/class/vps/mipi_host0/param/snrclk_freq"
# 执行 i2cdetect 命令探测, 其中显示的 40 即F37这颗sensor的i2c设备地址
sunrise@ubuntu:~# sudo i2cdetect -y -r 1
     0  1  2  3  4  5  6  7  8  9  a  b  c  d  e  f
00:          -- -- -- -- -- -- -- -- -- -- -- -- --
10: -- -- -- -- -- -- -- -- -- -- -- -- -- -- -- --
20: -- -- -- -- -- -- -- -- -- -- -- -- -- -- -- --
30: -- -- -- -- -- -- -- -- -- -- -- UU -- -- -- --
40: 40 -- -- -- -- -- -- -- -- -- -- -- -- -- -- --
50: -- -- -- -- -- -- -- -- -- -- -- -- -- -- -- --
60: -- -- -- -- -- -- -- -- -- -- -- -- -- -- -- --
70: -- -- -- -- -- -- -- --
二,确认PC可以通过网络访问开发板。(以WIFI为例)
1,连接WFI
扫描wifi:
sudo nmcli device wifi rescan列出WIFI列表:
nmcli device wifi list
连接WiFi:
sudo wifi_connect "wifi名" "密码"2,SSH远程登录
SSH登录
用户在PC机上,可以通过SSH连接实现开发板命令行的远程登录。SSH连接的创建方式,主要有终端软件、PC机命令行两种方式。下面介绍两种连接方法的创建步骤。
终端软件
目前常用终端工具有Putty、SecureCRT、MobaXterm等,用户可根据自身使用习惯来选择。不同工具的端口配置流程基本类似,下面以MobaXterm为例,介绍新建SSH连接过程:
-
打开
MobaXterm工具,点击Session,然后选择SSH -
输入开发板IP地址,例如
192.168.1.10 -
选中
specify username,输入sunrise -
点击OK后,输入用户名、密码即可完成登录
三,TogetherROS及ROS2 package安装
1. TogetherROS通过DEB包安装
前提:
-
已完成2.1章节环境准备工作
-
旭日X3派能够正常访问互联网
-
旭日X3派能够远程ssh
注意:这里使用的旭日X3派IP为10.64.61.241,安装时需要根据自己的旭日X3派IP进行替换
登录旭日X3派
ssh [email protected]
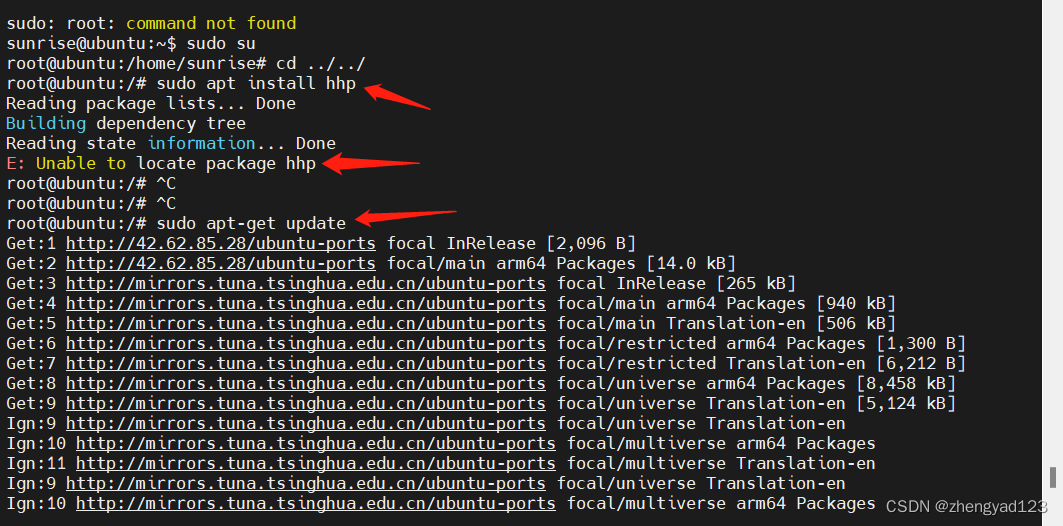
安装HHP.deb包,sudo apt install hhp
root@ubuntu:~# sudo apt install hhp
Reading package lists... Done
Building dependency tree
Reading state information... Done
The following NEW packages will be installed:
  hhp
0 upgraded, 1 newly installed, 0 to remove and 52 not upgraded.
Need to get 384 MB of archives.
After this operation, 512 MB of additional disk space will be used.
Get:1 http://42.62.85.28/ubuntu-ports focal/main arm64 hhp arm64 1.0.1 [384 MB]
Fetched 384 MB in 6min 43s (954 kB/s)
Selecting previously unselected package hhp.
(Reading database ... 110406 files and directories currently installed.)
Preparing to unpack .../archives/hhp_1.0.1_arm64.deb ...
Unpacking hhp (1.0.1) ...
Setting up hhp (1.0.1) ...
Generating locales (this might take a while)...
  en_US.ISO-8859-1... done
  en_US.UTF-8... done
Generation complete.
查看/opt目录下文件
root@ubuntu:/userdata# ls /opt/
tros
可以看到HorizonHobotPlatform(HHP)已安装在/opt目录下
注意:安装软件时,执行命令sudo apt install hhp,出现如下错误:
E: Unable to locate package hhp
解决方法:
sudo apt-get update 就好了
2,ROS2 package 安装
前提:已成功安装TogetherROS
TogetherROS与ROS foxy版本接口完全兼容,能够复用ROS丰富工具包,这里以安装和使用ROS foxy版本ros-foxy-image-transport为例介绍如何在TogetherROS中使用ROS package。
1 添加ROS apt源
添加ROS apt源
sudo apt update && sudo apt install curl gnupg2 lsb-release
sudo curl -sSL https://raw.githubusercontent.com/ros/rosdistro/master/ros.key  -o /usr/share/keyrings/ros-archive-keyring.gpg
echo "deb [arch=$(dpkg --print-architecture) signed-by=/usr/share/keyrings/ros-archive-keyring.gpg] http://packages.ros.org/ros2/ubuntu $(source /etc/os-release && echo $UBUNTU_CODENAME) main" | sudo tee /etc/apt/sources.list.d/ros2.list > /dev/null
更新apt仓库
sudo apt update
2 安装packages
sudo apt install ros-foxy-image-transport
sudo apt install ros-foxy-image-transport-plugins
3 建立软连接
cd /opt/tros
## 使用/opt/tros目录下的create_soft_link.py创建ROS package至TogetherROS的软连接
sudo python3 create_soft_link.py --foxy /opt/ros/foxy/ --tros /opt/tros/
使用ROS2 package
与ROS使用一样
source /opt/tros/local_setup.bash
ros2 run image_transport list_transports
运行结果如下,展示了image_transport package支持的图像格式
root@ubuntu:/opt/tros# ros2 run image_transport list_transports
Declared transports:
image_transport/compressed
image_transport/compressedDepth
image_transport/raw
image_transport/theora

Details:
----------
"image_transport/compressed"
 - Provided by package: compressed_image_transport
 - Publisher:
      This plugin publishes a CompressedImage using either JPEG or PNG compression.

 - Subscriber:
      This plugin decompresses a CompressedImage topic.

----------
"image_transport/compressedDepth"
 - Provided by package: compressed_depth_image_transport
 - Publisher:
      This plugin publishes a compressed depth images using PNG compression.

 - Subscriber:
      This plugin decodes a compressed depth images.

----------
"image_transport/raw"
 - Provided by package: image_transport
 - Publisher:
      This is the default publisher. It publishes the Image as-is on the base topic.

 - Subscriber:
      This is the default pass-through subscriber for topics of type sensor_msgs/Image.

----------
"image_transport/theora"
 - Provided by package: theora_image_transport
 - Publisher:
      This plugin publishes a video packet stream encoded using Theora.

 - Subscriber:
      This plugin decodes a video packet stream encoded using Theora.
四,准备完成,开启程序
启动 web_service 服务
在使用 web 展示之前,确保板子与个人PC机处于同一网段,并且PC可以访问板子的IP。
执行如下命令启动web service
cd /app/ai_inference/05_web_display_camera_sample/
sudo sh ./start_nginx.sh
sudo python3 ./mipi_camera_web.py


在这里出现了以下错误:
root@ubuntu:/app/ai_inference/05_web_display_camera_sample# sudo python3 ./mipi_camera_web.py

[C][6444][08-08][20:43:17:400][configuration.cpp:51][EasyDNN]EasyDNN version: 0.3.5

[BPU_PLAT]BPU Platform Version(1.3.1)!

[HBRT] set log level as 0. version = 3.13.27

ioctl read error, ret = -1 error = 121

keros_i2c_read failed

ioctl write error, ret = -1 error = 121

keros_i2c_write failed

ioctl write error, ret = -1 error = 121

keros_i2c_write failed

ioctl read error, ret = -1 error = 121

keros_i2c_read failed

ioctl read error, ret = -1 error = 121

keros_i2c_read failed

ioctl read error, ret = -1 error = 121

keros_i2c_read failed

ioctl read error, ret = -1 error = 121

keros_i2c_read failed

ioctl read error, ret = -1 error = 121

keros_i2c_read failed

[000:000] (keros_util.cpp:99): keros_authentication failed, ret = 0

[000:000] (configuration.cpp:147): Keros key init failed.

[DNN] Runtime version = 1.8.4_(3.13.27 HBRT)

[HorizonRT] The model builder version = 1.5.2

[ERROR][sensor][f37_utility.c:253] not support mode 0

[ERROR]["LOG"][utility/hb_cam_utility.c:909] sensor_init fail

[ERROR]["LOG"][utility/hb_cam_utility.c:1004] hb_sensor_init_process fail

[ERROR]["mipi"][mipi/hb_mipi_api.c:225] hb_cam_utility_ex error!

[ERROR]["LOG"][/home/hobot/1-work/08_bsp/hbre/hb_ubuntu/hb_vio_python/x3_sdk/x3_sdk_swap/src/x3_vio_vin.c:100] hb mipi init sensor error!

[ERROR]["LOG"][/home/hobot/1-work/08_bsp/hbre/hb_ubuntu/hb_vio_python/x3_sdk/x3_sdk_swap/src/x3_vio_vin.c:224] x3_sensor_init error!

2022/08/08 20:43:17.561 ERROR [x3_cam_init][0139]x3_vin_init failed, -1
解决方法: 重新启动程序,显示成功
