一.webpack基本配置
基本步骤:
-
(1).进入项目目录生成package.json文件
npm init -
(2).安装webpack和webpack-cli(脚手架)
npm install --save-dev webpack webpack-cli
如果npm安装过慢可以使用cnpm
cnpm install --save-dev webpack webpack-cli
安装cnpm淘宝镜像
npm i -g cnpm --registry=https://registry.npm.taobao.org -
(3).执行命令
npx webpack真正开发中npx命令很少用,这一步可以跳过直接执行步骤4
-
(4).配置package.json文件
"script":{"build":"webpack --config webpack.config.js"}
在根目录建立一个webpack.config.js文件

执行命令
npm run build -
(5)配置webpack.config.js文件
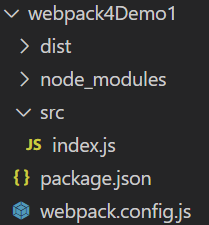
1.在根目录下建立src文件夹,此文件夹下有index.js文件。如下所示:
2.webpack.config.js文件编写let path=require('path'); module.exports={ entry:'./src/index.js', output:{ filename:'bundle.js', //打包后的文件名 path:path.resolve('dist') //路径必须是一个绝对路径 } }3.如果想要测试
path.resolve('dist')的输出是什么的话,可以采用如下步骤:
(1).webpack.config.js文件编写//webpack是node写出来的,使用node语言。 let path=require('path'); console.log(path.resolve('dist'));(2).在vscode终端打印出
path.resolve('dist')的方法
执行命令
node webpack.config.js
或者npm run build
但是由于我们只是想看到console.log(path.resolve('dist'));的执行结果,因此建议使用node webpack.config.js4.webpack.config.js文件中增添模式
模式默认有两种,一种是production(生产环境,代码压缩),一种是development(开发环境,代码不压缩)。let path=require('path'); module.exports={ mode:'production', entry:'./src/index.js', output:{ filename:'bundle.js', path:path.resolve('dist') //路径必须是一个绝对路径 } }
webpack-dev-server的安装与配置
如果webpack打包项目中没有node_modules这个文件夹,使用命令
npm install就可以将node_modules生成。
webpack-dev-server的安装与配置
1.安装webpack-dev-server:
npm install --save-dev webpack-dev-server
2.执行:
npx webpack-dev-server
一般情况下不这样执行webpack-dev-server,可以跳过这一步直接到步骤3
3.配置package.json文件
"scripts":{


	 "dev": "webpack-dev-server"
}
接着终端执行命令
npm run dev
4.配置webpack.config.js文件
module.exports={


		......此处省略同前面的配置
        devServer:{


            post:8080,
            //端口
            host:'loaclhost',
            //ip地址:loaclhost为本地地址,0.0.0.可以访问网络地址
            progress:true,
            //开启进度条
            contentBase:'./dist',
            //默认打开目录
            //open:true
            //自动打开默认浏览器
            compress:true
            //启动gzip压缩
        }
	}
当后端的接口没有开启跨域,前端无法访问时就需要配置代理来允许跨域:
配置代理解决跨域问题:
 devServer:{


        proxy:{


        	'/api':{


        		target:'http://vueshop.com/api',
        		changeOrigin:true,
        		pathRewrite:{


        			'^/api':''
        		}
        	}
        }
}
那么在根目录下的主页面index.html中:使用JQuery的ajax写法:
$.get('http://vueshop.com/api/home/index',function(res){


	console.log(res);
}
便可以被替换成
$.get('/api/home/index',function(res){


	console.log(res);
}
HTML模板插件
使用html模板插件解决启动webpack-dev-server时必须生成build文件夹
1.安装html-webpack-plugin
npm install --save-dev html-webpack-plugin
2.在根目录下建立一个public文件夹,该文件夹下有index.html文件
2.在webpack.config.js中配置HTML模板插件
let HtmlWebpackPlugin=require('html-webpack-plugin');
//一个数组存放所有插件
plugins:[
	//配置这个模板后contentBase:'./dist'不生效
	new HtmlWebpackPlugin({


		//关联模板html文件
		template:'./public/index.html',
		filename:'index.html',
		//折叠换成true不换行
		minify:{


			collapseWhitespace:true
		},
		//生产环境下生成hash戳
		hash:true
	})
]
多页面(MPA)配置
主要是进行webpack.config.js的更改
1.多入口
entry:{


	index:'./src/index.js',
	admin:'./src/admin.js'
}
2.输出配置
output:{


	filename:"[name].js",
	//如果是多页面应用不能写死需要用到[name]自动获取入口的home和admin
	//这里我们想要在dist目录的子目录的话可以写成static/js/[name].js
	path:path.resolve("dist"),
	//路径必须是一个绝对路径
	publicPath:"/"
	//npm run build之后的公共路径
	//倘若项目发布需要localhost:8081/demo/index.html和localhost:8081/demo/admin.html页面而不是localhost:8081页面,那么就需要设置公共路径也就是写成publicPath:'/demo/'
}
3.配置html模板插件
plugins:[
	 new HtmlWebpackPlugin({


            template:'./public/index.html',
            filename:'index.html',
            chunks:["index"],
            //这样index.html就只会引用index.js。从而解决了index.html页面中既有index.js又有admin.js的问题
            minify:{


                collapseWhitespace:true
            },
            hase:true
      }),
       new HtmlWebpackPlugin({


            template:'./public/admin.html',
            filename:'admin.html',
            chunks:["admin"],
            minify:{


                collapseWhitespace:true
            },
            hase:true
       })
]
4.执行命令
我们可以做一个模拟项目发布的服务器的效果。
执行命令npm install -g serve便可以安装服务器
执行命令npm run build
5.项目目录如下:
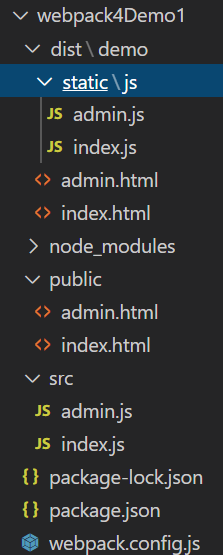
6.执行命令serve就会出现服务器弹窗
loaders配置加载css样式
1.安装css loader
执行命令
npm install --save-dev css-loader style-loader mini-css-extract-plugin
css-loader可以解析@import这种语法
style-loader可以把css插入到head标签中
mini-css-extract-plugin可以抽离样式让index.html里面的css样式变成link引入
2.建立目录如下所示:
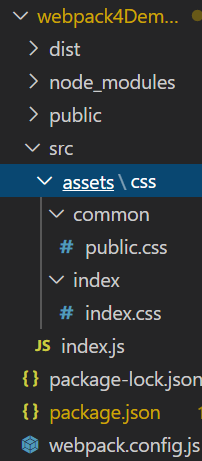
src目录下的index.js文件中引入css文件,可以使用
require('./assets/css/index/index.css');或者
import './assets/css/index/index.css';来引入
通常情况下使用import方式的比较多
src/assets/css/index/index.css中想要引用src/assets/css/common/public.css文件,使用
@import '../common/public.css';
3.配置css loader
loader是有顺序的默认从右向左执行,从下往上执行。
loader可以写成字符串:use:‘css-loader’,写成数组[‘css-loader’],写成对象[{loader:‘css-loader’}]。对象的好处是可以传好多参数。
在webpack.config.js中写
let MiniCssExtractPlugin=require('mini-css-extract-plugin');
plugins:[
	new MiniCssExtractPlugin({


		filename:'static/css/main.css'
	})
]
module:{


	rules:[{


		test:/\.css$/,
		use:[
			MiniCssExtractPlugin.loader,
			{


				loader:'css-loader'
			}
		]
	}]
}
4.执行命令
npm run dev和
npm run build即可
二.遇到的问题
问题一:在vscode中npm init之后报错:

完整错误:Problems loading reference ‘https://json.schemastore.org/package’: Unable to load schema from ‘https://json.schemastore.org/package’: Request vscode/content failed unexpectedly without providing any details.
解决方案:
文件-首选项-设置-应用程序 - proxy Authorization。点击如图:
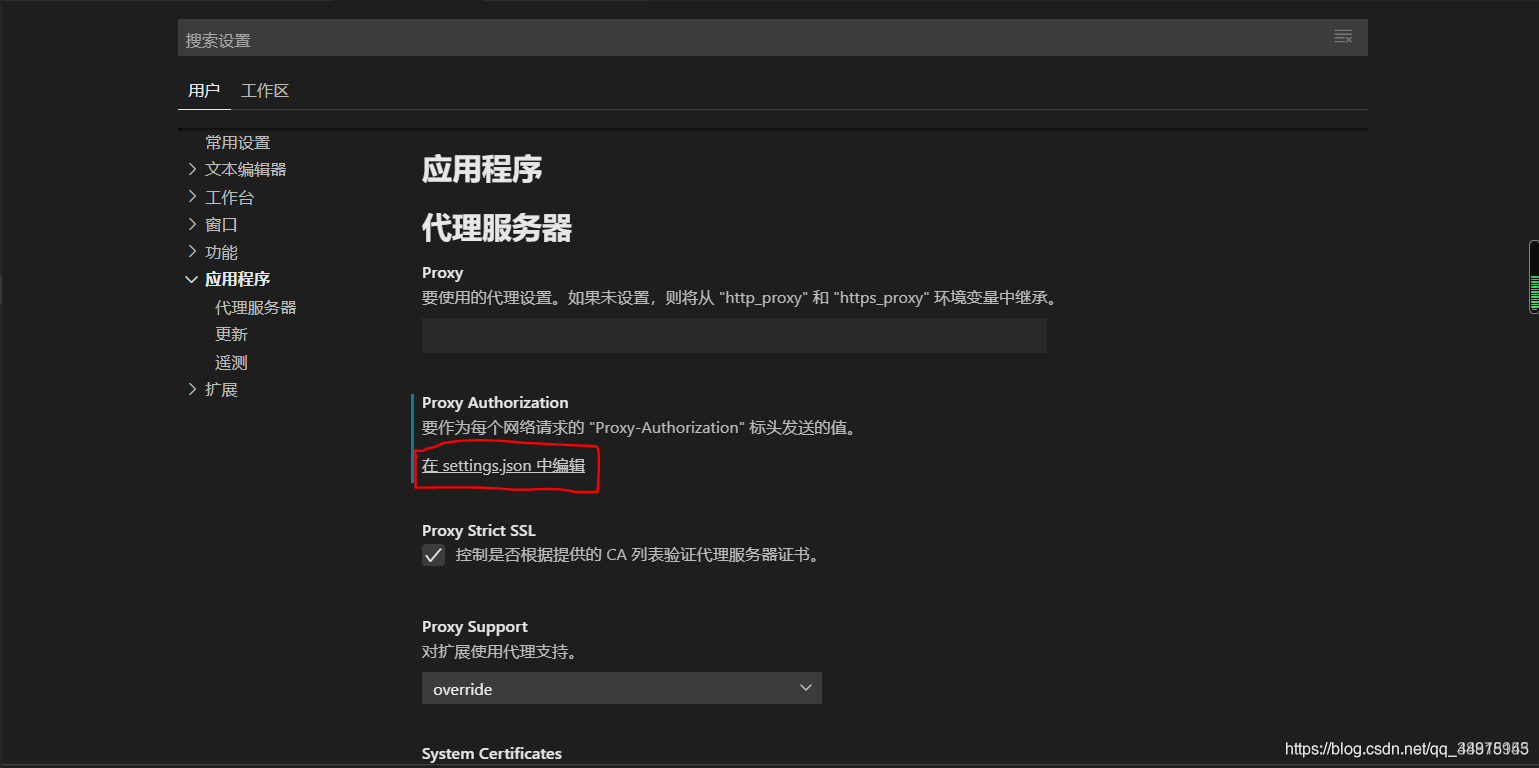
在settings.json中添加,最后重启项目:
"http.proxyAuthorization": "false"
问题二:
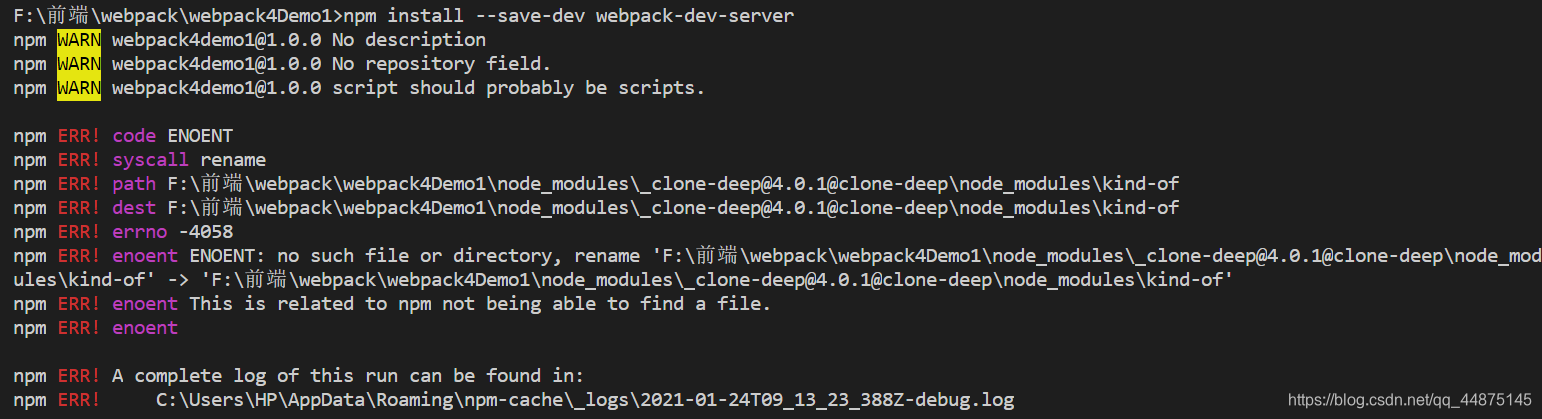
解决方案:
删除目录中的node_modules文件夹
执行命令
npm install
问题三:

出错现象描述:
Error: Cannot find module ‘webpack-cli/bin/config-yargs’
这个报错是我在安装webpack-dev-server之后命令行使用的时候出现的,
按理这里应该出现我打包完成并且启动服务的,但是却有了报错。
出错原因:
查阅了其他人的解决,发现是因为webpack-cli的新版本对webpack-dev-server版本的不兼容:
我安装的版本是
node -v —— v12.13.0
npm -v —— v6.12.0
webpack -v —— “^5.17.0”
webpack-cli -v —— “^4.4.0”
webpack-dev-server -v —— “^3.11.2”
解决方案:
降低webpack-cli的版本为 "^3.3.12"即可
也就是需要执行命令:
npm i [email protected] -D
问题四:
DeprecationWarning: Compilation.assets will be frozen in future, all modifications are deprecated.
出现原因:这是 html-webpack-plugin 引起的
解决方案:
npm uninstall html-webpack-plugin
npm install -D html-webpack-plugin@next