添加开机自动任务,可以省去开机后手动输入初始化命令的操作
一、方式1
run-parts方式,也就是rc.local的方式(这种方式有时候不生效,按照4中的配置就好了)
1、Linux Deploy配置
1.点击右下角的设置图标进入设置界面
2.划到“初始化”那块,“启用”打上勾
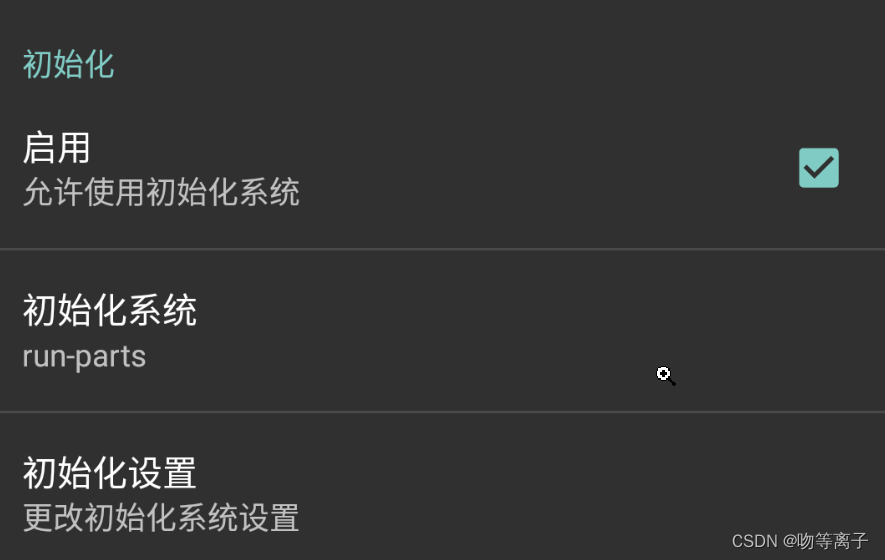
选项“run-parts”
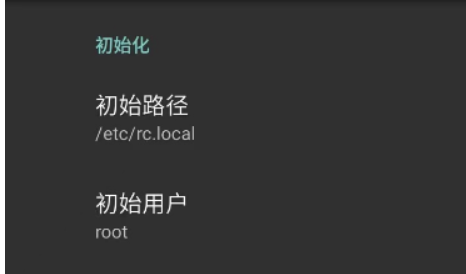
初始化路径: /etc/rc.local
2、编写配置文件
1、自行创建 /etc/rc.local 添加以下默认内容(在 exit 0 之前加入自定义内容,第一行不可删除)
#!/bin/sh -e
#
# rc.local
#
# This script is executed at the end of each multiuser runlevel.
# Make sure that the script will "exit 0" on success or any other
# value on error.
#
# In order to enable or disable this script just change the execution
# bits.
#
# By default this script does nothing.
exit 02.执行以下命令确保 rc.local 开机自启
sudo chown root:root /etc/rc.local
sudo chmod 755 /etc/rc.local
3、例子
rc.local文件
#!/bin/sh -e
#
# rc.local
#
# This script is executed at the end of each multiuser runlevel.
# Make sure that the script will "exit 0" on success or any other
# value on error.
#
# In order to enable or disable this script just change the execution
# bits.
#
# By default this script does nothing.
#启动宝塔
bt start
#启动nginx
/etc/init.d/nginx start
exit 0实现功能:设置宝塔和nginx自启动

4、rc.local不被执行
这种方式有时候重启后rc.local并不会被执行,打开初始化设置,将里面的异步处理去掉勾选就好了

二、方式2
使用sysv的初始化方式(初始化较慢)

同样异步处理勾选去掉
1、使用update-rc.d添加开机自启动脚本步骤
1. 进入开机启动目录 cd /etc/init.d
我们使用
ls命令,会发现里面有一些文件。这些文件就是在开机启动时自动运行的程序2.创建开机启动脚本 vi sunny.sh(这个文件有格式要求)
3.赋予执行权限 chmod +x /etc/init.d/ sunny.sh
4.设置开机自启 update-rc.d sunny.sh defaults
在脚本最前面添加必填项,不添加的话会报错
insserv: warning: script 'xx.sh' missing LSB tags insserv: warning: script 'xx.sh' missing LSB tags insserv: Default-Start undefined, assuming empty start runlevel(s) for script `xx.sh' insserv: Default-Stop undefined, assuming empty stop runlevel(s) for script `xx.sh'2、脚本规范
参数说明:LSBInitScripts
#!/bin/sh
### BEGIN INIT INFO
# Provides:          xx
# Required-Start:    $all
# Required-Stop:     $all
# Default-Start:     2 3 4 5
# Default-Stop:      0 1 6
# Short-Description: starts xx
# Description:       starts the xx
### END INIT INFO
开机启动项文件的一个模板:
#!/bin/sh

### BEGIN INIT INFO
# Provides: [程序名称,唯一]
# Required-Start: $network $remote_fs $local_fs
# Required-Stop: $network $remote_fs $local_fs
# Default-Start: 2 3 4 5
# Default-Stop: 0 1 6
# Short-Description: [启动项的简短说明]
# Description: [启动项的完整说明]
### END INIT INFO

[需要执行的命令]

exit 0在这个模板中,Provides 是唯一的,也就是在所有的开机启动项中,Provides不能有任何同名冲突。Short-Description 和 Description 随心情写。需要执行的命令,按照正常的Bash Shell书写方式书写即可。
友情提示:需要后台静默运行的程序,请使用 nohup [需要执行的命令] >/dev/null 2>&1 & 方式来启动!
最后的 exit 0 请不要删除!这个是返回正常退出信号的一个传值!
那么,我们设想我们需要创建一个名为 MyTest 的开机启动项,并要求其在开机时在 /root/mytest.txt 文件中写入一句话:“Hello Linux World !”,根据上面的模板,我们需要修改成这个样子:
#!/bin/sh

### BEGIN INIT INFO
# Provides: MyTest
# Required-Start: $network $remote_fs $local_fs
# Required-Stop: $network $remote_fs $local_fs
# Default-Start: 2 3 4 5
# Default-Stop: 0 1 6
# Short-Description: MyTest
# Description: MyTest Test Program
### END INIT INFO

echo "Hello Linux World !" >> /root/mytest.txt

exit 0
之后将文件保存,关闭编辑器。接下来,我们将刚才编辑好的 MyTest 文件加上可执行的属性(如果不加属性,启动脚本将无法运行):
chmod +x MyTest然后,将这个启动脚本加入开机启动项中:
update-rc.d MyTest defaults然后重新启动系统,或者命令行执行 /etc/init.d/MyTest ,执行启动脚本,然后使用 cat /root/mytest.txt,验证文件是否正确创建。
删除我们刚才创建的开机启动项
update-rc.d -f MyTest remove3、例子
1、编写脚本
这里使用ngrok自启动脚本验证:开机自动启动 · Sunny-Ngrok说明文档

/etc/init.d/sunny 启动脚本代码
#!/bin/sh -e
### BEGIN INIT INFO
# Provides:          ngrok.cc
# Required-Start:    $network $remote_fs $local_fs
# Required-Stop:     $network $remote_fs $local_fs
# Default-Start:     2 3 4 5
# Default-Stop:      0 1 6
# Short-Description: autostartup of ngrok for Linux
### END INIT INFO

NAME=sunny
DAEMON=/usr/local/bin/$NAME
PIDFILE=/var/run/$NAME.pid

[ -x "$DAEMON" ] || exit 0

case "$1" in
  start)
      if [ -f $PIDFILE ]; then
        echo "$NAME already running..."
        echo -e "\033[1;35mStart Fail\033[0m"
      else
        echo "Starting $NAME..."
        start-stop-daemon -S -p $PIDFILE -m -b -o -q -x $DAEMON -- clientid 隧道id || return 2
        echo -e "\033[1;32mStart Success\033[0m"
    fi
    ;;
  stop)
        echo "Stoping $NAME..."
        start-stop-daemon -K -p $PIDFILE -s TERM -o -q || return 2
        rm -rf $PIDFILE
        echo -e "\033[1;32mStop Success\033[0m"
    ;;
  restart)
    $0 stop && sleep 2 && $0 start
    ;;
  *)
    echo "Usage: $0 {start|stop|restart}"
    exit 1
    ;;
esac
exit 0
把代码里面的【隧道id】替换成自己的隧道id
2、设置开机启动
Ubuntu、树莓派、Debian系列的系统
cd /etc/init.d
sudo update-rc.d sunny defaults 90    #加入开机启动
sudo update-rc.d -f sunny remove  #取消开机启动
Centos 7以下操作系统
sudo chkconfig --add sunny     #添加系统服务
sudo chkconfig --del sunny    #删除系统服务
sudo chkconfig --list        #查看系统服务
sudo chkconfig sunny on     #设置开机启动
sudo chkconfig sunny off     #设置取消启动
service sunny start         #启动
service sunny stop             #关闭
service sunny restart         #重启
Centos安装 start-stop-daemon
wget http://developer.axis.com/download/distribution/apps-sys-utils-start-stop-daemon-IR1_9_18-2.tar.gz
tar -xzvf apps-sys-utils-start-stop-daemon-IR1_9_18-2.tar.gz
# 然后进入解压之后的路径 一直 cd 到start-stop-daemon.c在的目录
cc start-stop-daemon.c -o start-stop-daemon
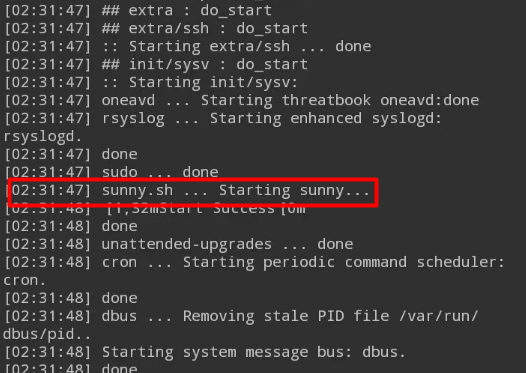
cp start-stop-daemon /usr/bin/start-stop-daemon3、重启效果
在这里将sunny换成了sunny.sh