Spring Boot简易增删改查(CRUD)案例
Error creating bean with name ‘dataSource‘ defined in class path resource解决办法
SpringBoot启动项目报错 Consider defining a bean of type ‘xxx‘ in your configuration
1 Java各个层级的关系
Domain层(POJO、Enity)
DAO层(也称为mapper层)
Service层
Controller层
1.1 Domain层(POJO、Enity)
Domain层,通常就是用于放置这个系统中,与数据库中的表对应起来的Java Bean的。
一、Java Bean是一种代码规范,当某一个类同时满足下面的三个条件时,那么此类就满足Java Bean规范。
1.书写类时类中的属性全部使用private修饰
2.类中必须有一个无参构造方法。
3.为每个属性提供get/set方法。
二、POJO(Plain Ordinary Java Object):普通的Java对象,其实就是简单的Java Bean实体类,对应数据库里的某一张表,POJO里的每一个属性都和该表中的字段一 一对应。POJO最明显的特点,大致如下:
1.书写类时类中的属性全部使用private修饰;
2.类中必须有一个无参构造方法;
3.然后针对每个参数都定义了get和set方法作为访问的接口;
4.类中除了构造方法、get/set方法外不能够有其他的方法。
三、VO(value object):值对象,又称表现层对象,对应展示界面的数据对象。比如一个前台展示的数据列表,这个列表中的姓名和用户名分别是存在于两个表中的数据,此时数据显示时查询语句用到了多表查询sql,查询出来的数据包含了两个表的字段,此时使用一个Java Bean实体类无法存储返回结果中两个表的数据字段,因此将这两个表中使用到的字段或属性重新封装为一个新的Java Bean,这个Java Bean就叫做VO。通俗来说,vo就是一个自定义的、多个表的属性或字段的集合。
四、Entity层,顾名思义就是实体层,放置一个个实体,及其相应的set、get方法。如果想要对数据库进行一些操作(比如说读取)的话,就要先写entity层。
怎么写entity层?
1.理解业务需求,分析需要从数据库中读取哪些字段;
2.根据这些字段写对应属性,写完后[自动生成get、set方法]。
1.2 DAO层(也称为mapper层)
DAO(Data Access Object)就是写一个类,把访问数据库的代码封装起来,DAO在数据库与业务逻辑(Service)之间。Dao是数据访问层,Dao的作用是封装对数据库的访问:增删改查,不涉及业务逻辑,只是达到按某个条件获得指定数据的要求。
持久层,通常放置执行sql语句的接口类,和数据库打交道,负责执行特定的业务逻辑,例如数据库操作、数据转换等。
对数据库的操作都在DAO中完成 ,如数据库的增删改查。
1.3 Service层
业务层,通常是调用数据层的接口,组织业务逻辑功能,例如数据库操作、数据转换等,根据业务需求对数据层发起调用。通常也是要实现一个接口类方便调用。
Service层会调用DAO层和Domain层,Service层也会对数据进行一定的处理,比如条件判断和数据筛选等等。
为什么service层要使用接口来定义有以下几点好处:
在java中接口是多继承的,而类是单继承的,如果你需要一个类实现多个service,你用接口可以实现,用类定义service就没那么灵活。
要提供不同的数据库的服务时,我们只需要面对接口用不同的类实现即可,而不用重复地定义类。
1.4 Controller层
表现层,通常是要调用Service层中的接口,实现接口的方法。控制器负责接收请求并将其转发给对应的视图或服务进行处理。它通常负责处理请求的路由和参数验证。
Controller层会调用前面三层,Controller层一般会和前台的js文件进行数据的交互, Controller层是前台数据的接收器,后台处理好的数据也是通过Controller层传递到前台显示的。
2 增删改查案例
2.1 基础配置
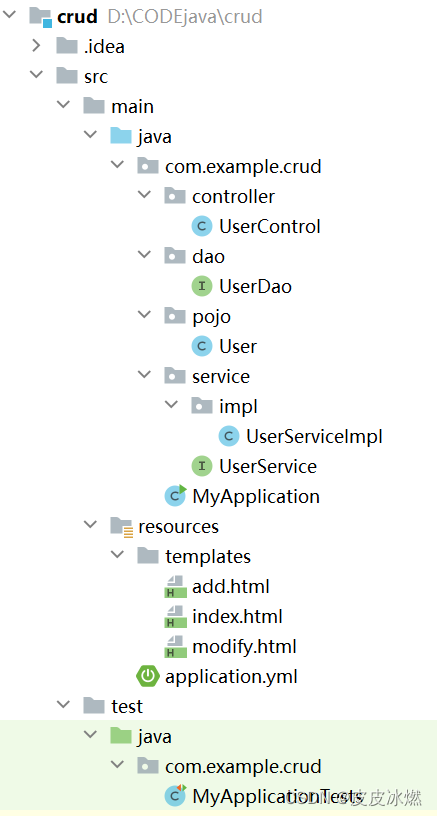
2.1.1 项目架构
Spring Boot。
前端采用html + thymeleaf模板代替jsp。
.
├── src
│   ├── main
│   │   ├── java
│   │   │   └── com.example
│   │   │       └── crud                          --业务功能模块 即 CRUD
│   │   │           ├── controller                --Controller层
│   │   │           │    └── UserControl
│   │   │           ├── dao                       --Dao层
│   │   │           │    └── UserDao              --Dao层接口
│   │   │           ├── pojo                      --数据模型
│   │   │           │    └── User                 --请求体
│   │   │           ├── service                   --Service层
│   │   │           │    ├── impl                 --Service层接口的实现
│   │   │           │    │    └── UserServiceImpl
│   │   │           │    └── UserService          --Service层接口
│   │   │           └── MyApplication.java          --启动类
│   │   └── resources
│   │       ├── static                            --静态资源
│   │       ├── templates                          --模板
│   │              ├── add.html                   --增加用户页面
│   │              ├── index.html                 --主页面
│   │              └── modify.html                --修改用户页面
└── pom.xml                                       --项目依赖
2.1.2 数据库
一、数据库test
二、建表语句
CREATE TABLE `user` (
  `id` int NOT NULL AUTO_INCREMENT,
  `username` varchar(50) DEFAULT NULL,
  `password` varchar(50) DEFAULT NULL,
  PRIMARY KEY (`id`)
);
三、插入数据
id,username,password
1,lily,1111
2,lucy,2222
3,lilei,3333
2.1.3 配置文件application.yml
spring:
  web:
    resources:
      static-locations: classpath:/static/,classpath:/templates/
  datasource:
    url: jdbc:mysql://localhost:3306/test
    username: root
    password: bigdata
    driver-class-name: com.mysql.cj.jdbc.Driver
  mvc:
    hiddenmethod:
      filter:
        enabled: true
  freemarker:
    cache: false # 页面不加载缓存,修改即使生效
mybatis:
  configuration:
    map-underscore-to-camel-case: true # 下划线驼峰设置
    log-impl: org.apache.ibatis.logging.stdout.StdOutImpl   # 打印SQL语句
2.1.4 配置文件pom.xml
<parent>
    <groupId>org.springframework.boot</groupId>
    <artifactId>spring-boot-starter-parent</artifactId>
    <version>2.4.5</version>
    <relativePath/>
</parent>

<dependencies>
    <dependency>
        <groupId>org.springframework.boot</groupId>
        <artifactId>spring-boot-starter-web</artifactId>
    </dependency>
    <dependency>
        <groupId>org.mybatis.spring.boot</groupId>
        <artifactId>mybatis-spring-boot-starter</artifactId>
        <version>2.2.0</version>
    </dependency>
    <dependency>
        <groupId>org.springframework.boot</groupId>
        <artifactId>spring-boot-starter-thymeleaf</artifactId>
    </dependency>
    <dependency>
        <groupId>org.springframework.boot</groupId>
        <artifactId>spring-boot-starter-test</artifactId>
        <scope>test</scope>
    </dependency>
    <dependency>
        <groupId>mysql</groupId>
        <artifactId>mysql-connector-java</artifactId>
        <scope>runtime</scope>
    </dependency>
</dependencies>
2.2 POJO
包pojo下包含实体类User。
实体类有三个私有成员变量:id,username,password。
这三个属性分别与数据库test中的表user相对应。
实体类User包含带参构造方法、无参构造方法、三个属性对应的get和set方法,另外还包含一个重写的toString方法。
2.2.1 实体类User.java
package com.example.crud.pojo;

public class User {


    private Integer id;
    private String username;
    private String password;

    public Integer getId() {


        return id;
    }

    public void setId(Integer id) {


        this.id = id;
    }

    public String getUsername() {


        return username;
    }

    public void setUsername(String username) {


        this.username = username;
    }

    public String getPassword() {


        return password;
    }

    public void setPassword(String password) {


        this.password = password;
    }
    //有参构造方法
    public User(Integer id,String username,String password) {


        this.id=id;
        this.username=username;
        this.password=password;
    }
    // 无参构造方法
    public User() {


    }

    @Override
    public String toString() {


        return "User{id=" + id +
                ", username='" + username + '\'' +
                ", password='" + password + '\'' +
                '}';
    }
}
2.3 Dao
包dao下包含接口UserDao。
注解@Mapper用于修饰接口UserDao。
注解@Insert、@Delete、@Update、@Select用于修饰接口内的方法(增删改查)。
2.3.1 接口UserDao.java
package com.example.crud.dao;
import com.example.crud.pojo.User;
import org.apache.ibatis.annotations.*;
import java.util.List;

@Mapper
public interface UserDao {


    //查询全部数据
    @Select("select * from user")
    public List<User> findAll();

    //新增数据
    @Insert("insert into user (username, password) values (#{username}, #{password})")
    public int save(User user);

    //删除数据
    @Delete("delete from user where id=#{id}")
    public int delete(int id);

    //根据ID查找用户
    @Select("select * from user where id=#{id}")
    public User get(int id);

    //根据ID更新用户数据
    @Update("update user set username=#{username},password=#{password} where id=#{id}")
    public int updateById(User user);
}
2.4 Service
包service下包含包impl和Service层的接口UserService。
其中,包impl包含Service层接口的实现类UserServiceImpl。
Service层既需要调用Dao层接口,又需要提供接口给Controller层的类进行调用。
2.4.1 接口UserService.java
package com.example.crud.service;
import com.example.crud.pojo.User;
import java.util.List;

public interface UserService {


    //查询全部数据
    public List<User> findAll();

    //新增数据
    public int save(User user);

    //删除数据
    public int delete(int id);

    //根据ID查找
    public User get(int id);

    //更新数据
    public int updateById(User user);

}
2.4.2 接口实现类UserServiceImpl.java
package com.example.crud.service.impl;

import com.example.crud.dao.UserDao;
import com.example.crud.pojo.User;
import com.example.crud.service.UserService;
import org.springframework.beans.factory.annotation.Autowired;
import org.springframework.stereotype.Service;

import java.util.List;

@Service
public class UserServiceImpl implements UserService {


    @Autowired
    private UserDao userDao;

    @Override
    public List<User> findAll() {


        return userDao.findAll();
    }

    @Override
    public int save(User user) {


        return userDao.save(user);
    }

    @Override
    public int delete(int id) {


        return userDao.delete(id);
    }

    @Override
    public User get(int id) {


        return userDao.get(id);
    }

    @Override
    public int updateById(User user) {


        return userDao.updateById(user);
    }

}
2.5 Controller
包controller包含类UserControl。
注解@Controller用于修饰类UserControl。
注解@Autowired表示自动注入Service层提供的接口,供Controller层使用。
2.5.1 UserControl.java
package com.example.crud.controller;

import com.example.crud.pojo.User;
import com.example.crud.service.UserService;
import org.springframework.beans.factory.annotation.Autowired;
import org.springframework.stereotype.Controller;
import org.springframework.ui.Model;
import org.springframework.web.bind.annotation.*;

import javax.servlet.http.HttpServletRequest;
import javax.servlet.http.HttpServletResponse;
import java.io.IOException;
import java.util.List;
import java.util.Map;

@Controller
public class UserControl {


    @Autowired
    private UserService userService;

    //查询所有用户数据
    @GetMapping("/index.html")
    public String userList(Map<String, List> result) {


        List<User> users = userService.findAll();
        result.put("users", users);
        return "index";
    }

    //新增数据
    @PostMapping("/add")
    public String save(User user) {


        userService.save(user);
        return "redirect:/index.html";
    }

    //删除数据
    @RequestMapping("/delete/{id}")
    public String delete(@PathVariable int id, HttpServletResponse servletResponse) throws IOException {


        userService.delete(id);
        System.out.println("----delete方法执行----");
        return "redirect:/index.html";
    }

    //根据id修改用户数据
    @GetMapping("/updatePage/{id}")
    public String updatePage(Model model, @PathVariable int id) {


        User users = userService.get(id);
        model.addAttribute("users", users);
        return "modify";
    }

    @PutMapping("/update")
    public String updateUser(Model model, User user, HttpServletRequest request) {


        String id = request.getParameter("id");
        User userById = userService.get(Integer.parseInt(id));
        userService.updateById(user);
        System.out.println(user);
        return "redirect:/index.html";
    }

}
2.6 前端页面
包resources下的包templates下有三个html文件。
删除按钮添加了οnclick="return confirm(‘确定删除?’)"防止误操作。
2.6.1 主页面index.html
<!DOCTYPE html>
<html lang="en" xmlns:th="http://www.thymeleaf.org">
<head>
<meta charset="UTF-8">
<title>用户信息主页面</title>
<!-- 引入 Bootstrap -->
<link href="https://cdn.bootcss.com/bootstrap/3.3.7/css/bootstrap.min.css" rel="stylesheet">
</head>
<style>
a{
color: #ffffff;
}
h1{
/*文字对齐*/
text-align: center;
}
button{
height: 50px;
width: 50px;
background-color: cornflowerblue;
}
.parent{
display: flex;
justify-content: center;
align-items: center;
}
.btn{
width: auto;
}
</style>
<body>
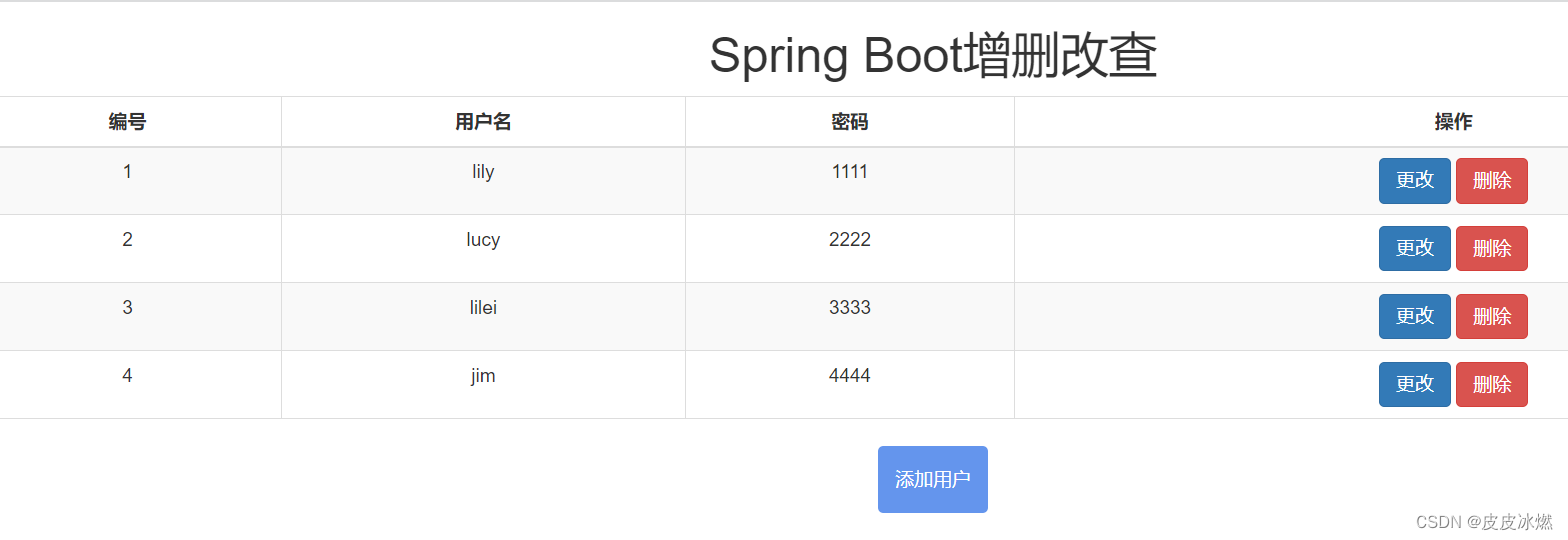
<h1>Spring Boot增删改查</h1>
<!--table-striped:斑马线格式,table-bordered:带边框,table-hover:鼠标悬停高亮-->
<table class="table table-striped table-bordered table-hover text-center">
<thead>
<tr style="text-align:center">
<!--th标签定义html表格中的表头单元格-->
<th style="text-align:center">编号</th>
<th style="text-align:center">用户名</th>
<th style="text-align:center">密码</th>
<th style="text-align:center">操作</th>
</tr>
</thead>
<!--tr标签定义html表格中的所有行-->
<!--遍历集合,如果被遍历的变量user为null或者不存在,则不会进行遍历,也不会报错-->
<tr th:each="user:${users}">
<!--td标签定义html表格中的标准单元格-->
<td th:text="${user.id}"></td>
<td th:text="${user.username}"></td>
<td th:text="${user.password}"></td>
<td>
<!--a标签用来定义超链接 href表示超链接-->
<a class="btn btn-primary" th:href="@{'/updatePage/'+${user.id}}">更改</a>
<a class="btn btn-danger" th:href="@{'/delete/'+${user.id}}" onclick="return confirm('确定删除?')">删除</a>
</td>
</tr>
</table>
<div class="parent">
<button type="button" class="btn btn-block"><a href="/add.html">添加用户</a></button>
</div>
</body>
</html>
2.6.2 添加用户页面add.html
<!DOCTYPE html>
<html lang="en" xmlns:th="http://www.thymeleaf.org">
<head>
  <meta charset="UTF-8">
  <title>添加用户页面</title>
  <link href="https://cdn.bootcss.com/bootstrap/3.3.7/css/bootstrap.min.css" rel="stylesheet">
</head>

  <body>
  <div style="width:600px;height:100%;margin-left:350px;margin-top: 180px;">
    <form action="/add" method="post">
      <!--form-control给input添加这个class后就会使用bootstrap自带的input框-->
      用户名:<input class="form-control" type="text" th:value="${username}" name="username"><br>
      <!--注意参数的拼接-->
      密 码:<input class="form-control" type="text" th:value="${password}" name="password"><br>
      <button class="btn btn-primary btn-lg btn-block">保存</button>
    </form>
  </div>
  </body>
</html>
2.6.3 更改用户信息界面modify.html
<!DOCTYPE html>
<html lang="en" xmlns:th="http://www.thymeleaf.org">
<head>
  <meta charset="UTF-8">
  <title>更改用户信息界面</title>
  <link href="https://cdn.bootcss.com/bootstrap/3.3.7/css/bootstrap.min.css" rel="stylesheet">
</head>
<body>

<div style="width:600px;height:100%;margin-left:350px;margin-top: 180px;">
  <form action="/update" method="post">
    <!-- rest风格中的更新是put请求,所以这块先使用post请求,然后隐藏起来改为put请求-->
    <input name="_method" type="hidden" value="put">
    ID:<input class="form-control"  type="text" th:value="${user.id}" name="id"><br>
    用户名:<input class="form-control" type="text" th:value="${user.username}" name="username"><br>
    密 码:<input class="form-control" type="text" th:value="${user.password}" name="password"><br>
    <button class="btn btn-primary btn-lg btn-block" type="submit">提交</button>
  </form>
</div>

</body>
</html>
2.7 启动类MyApplication
package com.example.crud;

import org.springframework.boot.SpringApplication;
import org.springframework.boot.autoconfigure.SpringBootApplication;

@SpringBootApplication
public class MyApplication {


    public static void main(String[] args) {


        SpringApplication.run(MyApplication.class, args);
    }
}
2.8 测试类MyApplicationTests
package com.example.crud;

import com.example.crud.dao.UserDao;
import org.junit.jupiter.api.Test;
import org.springframework.beans.factory.annotation.Autowired;
import org.springframework.boot.test.context.SpringBootTest;

@SpringBootTest
public class MyApplicationTests {


    @Autowired
    private UserDao userDao;
    @Test
    void contextLoads(){


        System.out.println(userDao.findAll());
    }
}
3 运行