友情提醒
先看文章目录,大致了解知识点结构,直接点击文章目录可以跳转到文章指定位置。
第一章、路由简介
1.1)什么是路由
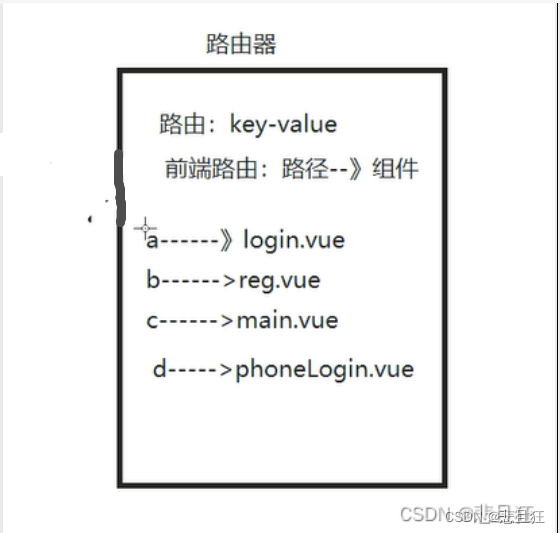
①一个路由就是一组映射关系(key - value) ,key 为路径,value 可能是 function(方法)或 component(组件)。
②路由的分类:
1、后端路由:例如:@RequestMapping,理解:value 是 function(方法), 用于处理客户端提交的请求。工作过程:服务器接收到一个请求时, 根据请求路径找到匹配的函数来处理请求, 返回响应数据。
2、前端路由:router,理解:value 是 component(组件),用于展示页面内容。工作过程:当浏览器的路径改变时, 对应的组件就会显示。
1.2)安装路由插件
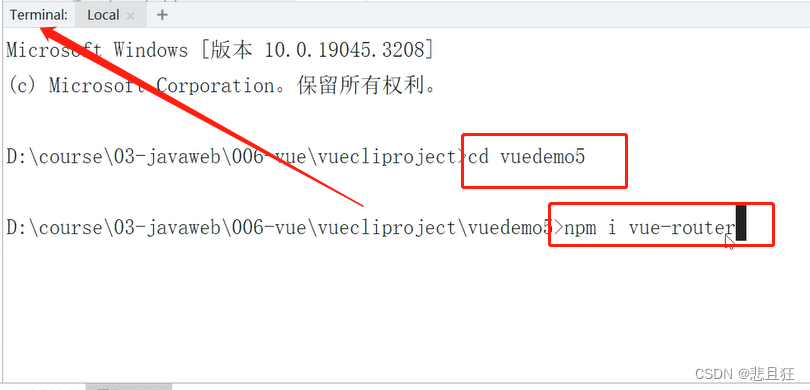
①在Terminal执行命令
命令:npm i vue-router
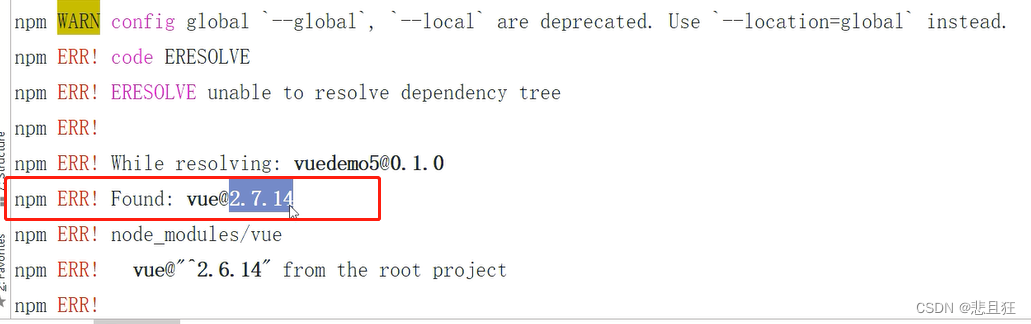
②报错了,因为默认安装了4版本的 vue-router,该版本只能在vue3中使用
Vue2中我们应该安装3版本的vue-router
③执行安装3版本的命令,安装成功
命令:npm i vue-router@3

第二章、自定义路由器
2.1)创建路由器文件index.js文件

2.2)index.js文件中配置路由信息
//我们在这里写路由信息
//引入路由包
import VueRouter from "vue-router"
//引入组件地址
import LoginDemo from "../components/Login"
import RegDemo from "../components/Reg"
import CodeLogin from "../components/login/CodeLogin"
import PhoneLogin from "../components/login/PhoneLogin"
import Main from "../components/Main"
//创建路由器对象
export  default  new VueRouter({


    //配置路由信息  routes  多组路由信息
    routes:[
        //配置默认加载组件
        {


            path:"/",//当请求是跟路径请求是  直接发起/loginPath请求
            redirect:"/loginPath"
        },
        //路由的信息写在路由对象中
        {


            //一级路径  在跟路径下直接访问  需要加载到app.vue中
            path:"/loginPath",//某个组件的访问路径  /代表根路径 http://ip:port/loginPath
            //对应的组件
            component:LoginDemo,
            children:[//配置当前路由的子路由
                {


                    //二级三级路由不能写/前缀
                    path:"codeLoginPath",//该路由是二级路由  由一级路由发起  /loginPath/codeLoginPath
                    name:"codeLoginName",//当前二级的名字
                    component:CodeLogin
                },
                {


                    path:"phoneLoginPath",
                    component:PhoneLogin
                }
            ]
        },
        {


            path:"/regPath",
            component:RegDemo
        },
        {


            path:"/mainPath",
            component:Main
        }
    ],
    //路由器是前端路由  为了和后台请求区别  当前请求访问的是前端组件
    //mode属性可以设置不显示#路径前缀
    mode:"history" //默认mode是hash  浏览器路径中会有#   设置为history 就不再显示#
})
第三章、使用路由器
3.1)在main.js文件中将路由器绑定到Vue对象
当把路由器绑定到Vue对象,其下所有组件都拥有路由器功能
import Vue from 'vue'
import App from './App.vue'
//把路由器绑定到vue对象身上
//1 引入路由器组件
import VueRouter from "vue-router"
//2 引入我们自己写的路由器js文件
import MyRouter from "./router/index"
//3 让vue对象有路由器功能
Vue.use(VueRouter)
Vue.config.productionTip = false

new Vue({


  render: h => h(App),
  //把我们写好的路由器  放在vue对象上
  Router:MyRouter,
  data(){


    console.log("这是vue对象:",this)
    return{

    }
  }
}).$mount('#app')
3.2)在App.vue根组件上发起路由请求
通过在组件上发起路由请求,并指明此路由对应的一般组件加载到哪里(指明加载到App.vue根组件上还是加载到一般组件上)
<template>
  <div id="app">
      <!--通过发起路由请求  加载对应的组件,在index.js配置了映射-->
      <!--<a href="/loginPath">登录</a>
      <a>注册</a>
      <hr/>-->
      <!--router-link是路由连接请求  它会被vue对象编译成a标签-->
      <router-link to="/loginPath">登录</router-link>
      <router-link to="/regPath">注册</router-link>
      <hr/>
      <!--router-view指路由连接请求对应的组件展示位置-->
     <router-view></router-view><!--  一级路由展示位置  -->
  </div>
</template>

<script>
export default {


  name: 'App',
}
</script>
<style>
</style>
2.5)一级路由对应的三个组件
2.5.1)login.vue
将一级路由组件加载到根路由
<template>
    <div>
        <center>
            <router-link to="/loginPath/codeLoginPath">账号密码登录</router-link>
            <router-link to="/loginPath/phoneLoginPath">手机号登录</router-link>/
            <router-link to="/mainPath">去首页</router-link>
            <br/>
            <router-link :to="{name:'codeLoginName'}">根据名字账号密码登录</router-link>/
            <router-link to="/loginPath/phoneLoginPath">手机号登录</router-link>
            <button @click="goToMain()">去首页</button>
            <hr/>
            <router-view></router-view><!--  二级路由展示位置 -->
        </center>
    </div>
</template>

<script>
    export default {


        name: "LoginDemo",
        data(){


            console.log("这是loginDemo的VC对象:",this)
            return{

    }
        },
        methods:{


            goToMain(){


                //使用路由跳转到首页
               //this.$router.push("/mainPath") // push是加入一个新路径
                alert("通过this.$router进行路由跳转")
                this.$router.replace("/mainPath")//替换当前路径
            }
        }
    }
</script>

<style scoped>

</style>
2.5.2)reg.vue
<template>
    <div>
        <center>
            <h1>欢迎使用注册组件</h1>
            <from>
                账号:<input type="text" name="loginCode"/><br/>
                密码:<input type="text" name="loginPwd"/><br/>
                <input type="button" value="注册"/><br/>
            </from>
            <a>去登录</a>
        </center>
    </div>
</template>

<script>
    export default {


        name: "RegDemo"
    }
</script>

<style scoped>

</style>
2.5.3)main.vue
<template>
    <div>
        <h1>欢迎XXX访问首页</h1>
    </div>
</template>

<script>
    export default {


        name: "MainDemo"
    }
</script>

<style scoped>

</style>
2.6)二级路由对应的组件
将二级路由组件加载到一级路由组件
2.6.1)CodeLogin.vue
<template>
    <div>
        <h1>账号密码登录组件</h1>
        <form>
            账号:<input type="text" name="loginCode"/><br/>
            密码:<input type="text" name="loginPwd"/><br/>
            <input type="button" value="登录"/><br/>
        </form>
       <router-link to="/regPath">去注册</router-link>
    </div>
</template>

<script>
    export default {


        name: "CodeLogin"
    }
</script>

<style scoped>

</style>
2.6.2)PhoneLogin.vue
<template>
    <div>
        <h1>手机验证码登录组件</h1>
        <form>
            账号:<input type="text" name="loginCode"/><br/>
            密码:<input type="text" name="loginPwd"/><br/>
            <input type="button" value="登录"/><br/>
        </form>
        <router-link to="/regPath">去注册</router-link>
        <hr/>
        <!--加载三级路由组件-->
        <router-view></router-view><!--  三级路由展示位置 -->
    </div>
</template>

<script>
    export default {


        name: "PhoneLogin"
    }
</script>

<style scoped>

</style>
第三章、路由组件的细节
3.1)路由组件的命名
在index.js配置路由的名字
children:[//配置当前路由的子路由
                {


                    //二级三级路由不能写/前缀
                    path:"codeLoginPath",//该路由是二级路由  由一级路由发起  /loginPath/codeLoginPath
                    name:"codeLoginName",//当前二级的名字
                    //对应的组件
                    component:CodeLogin
                },
                {


                    path:"phoneLoginPath",
                    component:PhoneLogin
                }
            ]
        }
用名字替代路径
<router-link to="/loginPath/codeLoginPath">账号密码登录</router-link>
            <router-link to="/loginPath/phoneLoginPath">手机号登录</router-link>/
            <router-link to="/mainPath">去首页</router-link>
            <br/>
            <router-link :to="{name:'codeLoginName'}">账号密码登录</router-link>/
            <router-link to="/loginPath/phoneLoginPath">手机号登录</router-link>
            <button @click="goToMain()">去首页</button>
3.2)路由的跳转方式
普通的跳转方式
<router-link to="/mainPath">去首页</router-link>
给按钮添加点击事件:@click
<button @click="goToMain()">去首页</button>
通过点击事件,替换当前路径,或加入新路径。
 methods:{


            goToMain(){


                //使用路由跳转到首页
                //this.$router.push("/mainPath") // push是加入一个新路径
                alert("通过this.$router进行路由跳转")
                this.$router.replace("/mainPath")//替换当前路径
            }
        }
第四章、路由守卫
4.1)路由守卫简介
①路由守卫是对所有路由请求进行前置和后置拦截的方法
②路由守卫是一组可以监听路由变化并控制路由跳转的函数,可以用来在路由跳转前/后对页面进行权限验证、状态拦截等操作,从而增强页面交互的安全性和可控性。
③路由守卫包括全局守卫、单个路由独享的守卫和组件内守卫三种类型。主要学习全局路由守卫
4.2)在index.js文件配置全局路由守卫
import VueRouter from "vue-router"
import Main from "../components/Main"

const MyVueRouter = new VueRouter({


    routes:[
        {


            path:"/",
            redirect:"/loginPath"
        },
        {


            path:"/loginPath",
            component:()=>import("../components/Login.vue"),
            meta:{


                titleName:"登录"
            }
        },
        {


            path:"/mainPath",
            component:Main,
            meta:{


                //meta属性 是我们自定义属性 你想写什么就写什么
                love:false,
                titleName:"首页"
            },
            //独享路由守卫  只有前置路由守卫
            beforeEnter:((to, from, next)=>{


                console.log("独享路由守卫to:",to)
                console.log("独享路由守卫from:",from)
                console.log("独享路由守卫next:",next)
                //可以根据to的name  path来判断是否放行   组件较多使用meta来提供标识
                if(to.meta.love=="true"){


                    next();
                }else{


                    next("/loginPath");//强行去登录页面
                }
            })
        },
        {


            path:"/empPath",
            component:()=>import("../components/Emp.vue"),
            meta:{


                titleName:"员工管理"
            }
        }
    ],
    mode:"history"
});
//全局路由守卫
//前置路由守卫  每一个路由请求请求路由器时  前置路由守卫都会进行拦截
MyVueRouter.beforeEach(function(to,from,next){


    //to:你要访问哪个路由
    //from:你这个请求从哪来
    //next:是否让该请求通过
    console.log("我是全局前置路由守卫,只要有人发起对路由器的路由请求 我都能监听到")
    console.log("你这个请求从哪来:from:",from)
    console.log("你要到哪去:to:",to)
    console.log("next有什么用:next:",next)
    //当有人访问mainPath  需要验证账号是否登录
    if(to.meta.love==false){


        alert("没有登录不能访问首页");
    }else{


        next();//放行函数
    }
})
//全局路由后置守卫
MyVueRouter.afterEach(function(to,from){


    console.log("我是后置路由守卫,你从哪来 from:",from)
    console.log("我是后置路由守卫,你到哪来 to:",to)
    //一般我们在后置路由守卫中修改页面的title值
    window.document.title=to.meta.titleName
})
//对外声明该路由器对象
export default MyVueRouter
4.3)独享路由守卫和组件内守卫(了解)
4.3.1)独享路由守卫
① 含义:某一个路由独有的路由守卫,api 名字是 beforeEnter
单个路由独享的守卫是指只针对单个路由定义的函数,可以用来对该路由进行特殊的控制和操作。比全局守卫更细粒度。
②beforeEnter(to, from, next):在路由跳转前执行,和全局前置守卫的用法一样,但是只对当前路由有效。
③独享路由守卫只有 beforeEnter ,没有 后置守卫
beforeEnter 和 全局后置守卫 可以同时使用,不冲突!
{


//这个组件的访问路径
path:"/login",
component:LoginDemo,
    children:[
        {


            path:"codeLogin",
            component:()=>import("../components/CodeLogin"),
            meta:{

    isAuth:true},
            beforeEnter:((to, from, next)=>{


                console.log("独享路由守卫to:",to)
                console.log("独享路由守卫from:",from)
                console.log("独享路由守卫next:",next)
                //可以根据to的name  path来判断是否放行   组件较多使用meta来提供标识
                if(to.meta.isAuth){


                    next();
                }else{


                    next("/login");//强行去登录页面
                }
            })
        },
4.3.1)组件路由守卫
①组件内路由守卫,就是在组件内部编写代码,实现权限管理 ,如果组件里面有自己单独的权限逻辑,可以使用这两个路由守卫
②进入守卫:通过路由规则,进入该组件时被调用
beforeRouteEnter (to, from, next) { },
③离开守卫:通过路由规则,离开该组件时被调用
beforeRouteLeave (to, from, next) { }
<template>
  <div>
    我是User的内容
  </div>
</template>

<script>
export default {


  name:'UserDemo',
  // 进入守卫:通过路由规则,进入该组件时被调用
  beforeRouteEnter (to, from, next) {


    console.log("beforeRouteEnter被调用")
    if(to.meta.isAuth){


      if(localStorage.getItem('username') === "大郎"){


        next()
      }else{


        alert('用户名不正确,没有权限查看!')
      }
    }else{


      next()
    }
  },
  //离开守卫:通过路由规则,离开该组件时被调用
  beforeRouteLeave (to, from, next) {


    console.log("beforeRouteLeave被调用",to,from)
    next()
  }
}
</script>
<style scoped>
</style>