文章目录
1.spring cache简介
Spring Cache是Spring框架提供的对缓存使用的抽象类,Spring从3.1版本开始提供Cache和CacheManager来统一管理不同的缓存插件,它使用注解的方式实现,避免了代码的侵入性,使业务代码和操作缓存的代码分离。支持集成的插件从CacheType中可以看到:
public enum CacheType {


	GENERIC,
	JCACHE,
	EHCACHE,
	HAZELCAST,
	INFINISPAN,
	COUCHBASE,
	REDIS,
	CAFFEINE,
	SIMPLE,
	NONE

}
2.spring cache集成redis
项目中使用redis比较多,此处实现集成redis的过程。
(1)引入依赖
在pom.xml中引入需要的依赖,此处使用spring cloud项目实现,版本号在父工程中定义,子工程中引入具体需要的依赖。
父工程pom.xml引入依赖,指定版本号:
   <!--指定版本号-->
   <properties>
        <spring.boot.version>2.3.3.RELEASE</spring.boot.version>
        <lombok.version>1.18.20</lombok.version>
    </properties>

   <dependencies>
        <dependency>
            <groupId>org.projectlombok</groupId>
            <artifactId>lombok</artifactId>
            <version>${lombok.version}</version>
        </dependency>
        <!--使用redis时需要此jar包-->
        <dependency>
            <groupId>org.apache.commons</groupId>
            <artifactId>commons-pool2</artifactId>
        </dependency>
   </dependencies>

   <!--使用dependencyManagement来管理版本号,子项目依赖parent后,不需要添加版本号,达到版本号的统一控制-->
   <dependencyManagement>
        <dependencies>
            <!--spring boot依赖jar-->
            <dependency>
                <groupId>org.springframework.boot</groupId>
                <artifactId>spring-boot-starter-parent</artifactId>
                <version>${spring.boot.version}</version>
                <type>pom</type>
                <scope>import</scope>
            </dependency>
   </dependencyManagement>
子工程pom.xml引入需要的依赖:
    <!--继承了父项目,不需要添加版本号-->
    <dependency>
        <groupId>org.springframework.boot</groupId>
        <artifactId>spring-boot-starter-web</artifactId>
    </dependency>

    <!--spring cache-->
    <dependency>
        <groupId>org.springframework.boot</groupId>
        <artifactId>spring-boot-starter-cache</artifactId>
    </dependency>

    <!--redis依赖-->
    <dependency>
        <groupId>org.springframework.boot</groupId>
        <artifactId>spring-boot-starter-data-redis</artifactId>
    </dependency>
(2)配置连接信息
在yml或者properties配置文件中配置上服务的端口信息、连接redis信息、spring cache配置信息。application.yml配置:
#配置端口
server:
  port: 8090

#配置连接redis的信息
spring:
  redis:
    database: 1
    host: 127.0.0.1
    port: 6379
    password:
    timeout: 3000
    lettuce:
      pool:
        max-active: 20
        max-idle: 10
        max-wait: -1
        min-idle: 0

  #配置spring cache
  cache:
    #配置缓存组件类型,分为generic、jcache、ehcache、hazelcast、infinispan、couchbase、redis、caffeine、simple、none
    type: redis
    #组件类型选择redis后,对操作redis的一些配置信息
    redis:
      #是否允许存空值,防止缓存穿透
      cache-null-values: true
      #缓存失效时间
      time-to-live: -1
      #存到redis中是否使用key前缀
      use-key-prefix: true
      #key前缀
      key-prefix: abc
(3)配置spring cache配置类
创建一个配置类,用于配置CacheManager管理器,以及添加到redis数据value的序列化方式、对象序列化的格式处理、设置过期时间、是否允许前缀、前缀的拼接等。使用@EnableCaching注解标识开启spring cache,可以在配置类中声明也可以在Application启动类中声明。
//声明配置类
@Configuration
//开启spring cache
@EnableCaching
//添加缓存配置类,yml或者properties中配置的cache相关信息,使用CacheProperties接收,从这里引入,可以直接使用里面的字段值
@EnableConfigurationProperties(CacheProperties.class)
public class CacheConfig{


    //创建缓存管理类,@Primary标识当有多个CacheManager管理器时,默认以这个为主
    //redisConnectionFactory为连接redis的工厂,在子类中已经创建并且使用@Bean标识
    //CacheProperties为配置的spring cache相关信息,类被@ConfigurationProperties修饰
    @Bean
    @Primary
    public CacheManager cacheManager(RedisConnectionFactory redisConnectionFactory,CacheProperties cahceProperties){


        return RedisCacheManager.builder(redisConnectionFactory)
                .cacheDefaults(redisCacheConfiguration(cahceProperties,null))
                .build();
    }

    //设置rediscacheConfiguration配置类,根据配置的失效时间等属性进行配置
    public RedisCacheConfiguration redisCacheConfiguration(CacheProperties cahceProperties,Long ttl) {


        //使用Jackson2JsonRedisSerializer的方式类序列化值
        Jackson2JsonRedisSerializer jackson2JsonRedisSerializer = new Jackson2JsonRedisSerializer(Object.class);
        ObjectMapper om = new ObjectMapper();
        om.setVisibility(PropertyAccessor.ALL, JsonAutoDetect.Visibility.ANY);
        om.activateDefaultTyping(LaissezFaireSubTypeValidator.instance , ObjectMapper.DefaultTyping.NON_FINAL, JsonTypeInfo.As.WRAPPER_ARRAY);
        om.configure(DeserializationFeature.FAIL_ON_UNKNOWN_PROPERTIES, false);

        //添加时间日期格式的处理
        JavaTimeModule javaTimeModule = new JavaTimeModule();
        DateTimeFormatter dtf = DateTimeFormatter.ofPattern("yyyy-MM-dd HH:mm:ss");
        javaTimeModule.addSerializer(LocalDateTime.class,
                new LocalDateTimeSerializer(dtf));
        javaTimeModule.addDeserializer(LocalDateTime.class,
                new LocalDateTimeDeserializer(dtf));
        om.registerModule(javaTimeModule);

        jackson2JsonRedisSerializer.setObjectMapper(om);
        //获取RedisCacheConfiguration,对它进行新值的设置,默认序列化值使用SerializationPair.fromSerializer(new JdkSerializationRedisSerializer(classLoader))
        //这里设置序列化值的方式与redisTemple保持一致,也必须保持一致,否则有些使用spring cache存再使用redisTemple来取的时候,格式就会存在问题
        RedisCacheConfiguration config = RedisCacheConfiguration.defaultCacheConfig()
                .serializeValuesWith( RedisSerializationContext.SerializationPair.fromSerializer(
                        jackson2JsonRedisSerializer));

        //获取配置的信息
        CacheProperties.Redis redisProperties = cahceProperties.getRedis();
        //设置过期时间
        if(null == ttl) {

    //传递的参数为空,则使用配置文件中配置的过期时间
            if (null != redisProperties.getTimeToLive()) {


                config = config.entryTtl(redisProperties.getTimeToLive());
            }
        } else {


            config = config.entryTtl(Duration.ofMillis(ttl));
        }

        //是否允许设置为null值
        if (!redisProperties.isCacheNullValues()) {


            config = config.disableCachingNullValues();
        }
        //是否设置前缀
        if (redisProperties.isUseKeyPrefix()) {


            //设置前缀
            if (null != redisProperties.getKeyPrefix()) {


                config = config.computePrefixWith(CacheKeyPrefix.prefixed(redisProperties.getKeyPrefix()));//默认的前缀方式
             } else {

     //不适用前缀
                config = config.computePrefixWith(bulidBasePrefix());
            }
        } else {

      //不适用前缀
            config = config.computePrefixWith(bulidBasePrefix());
        }
        return config;
    }

    //构造不适用前缀时的key格式
    private CacheKeyPrefix bulidBasePrefix() {


        return cacheName -> {


            StringBuilder builder = new StringBuilder();
            builder.append(cacheName);
            return builder.toString();
        };
    }
 }
3.spring cache与redisTemple统一格式
项目集成了spring cache,操作缓存我们都使用spring cache注解的方式,但是有些场景下,我们没法使用spring cache。例如新增一条记录的时候,接口的返回值是执行结果,这个时候就没法使用spring cache来操作缓存,会选择redisTemple操作。这样就会存在redisTemple存spring cache取,或者spring cache存redisTemple取的情况,这个时候就要求两种方式存的格式统一,否则取的时候格式不统一没法转成需要的对象实体。spring cache对一个结果对象实体的存相当于redisTemple这样的方式存:redisTemplate.opsForValue().set(“user:”+id,user)。
创建redis配置类,设置对象序列化的方式与spring cache一致,这样redisTemple和spring cache 交叉存取就没有格式问题:
@Configuration
public class RedisConfig {


    @Bean
    public RedisTemplate<Object, Object> redisTemplate(RedisConnectionFactory factory) {


        RedisTemplate<Object, Object> redisTemplate = new RedisTemplate<>();
        redisTemplate.setConnectionFactory(factory);
        Jackson2JsonRedisSerializer jackson2JsonRedisSerializer = new Jackson2JsonRedisSerializer(Object.class);
        ObjectMapper om = new ObjectMapper();
        om.setVisibility(PropertyAccessor.ALL, JsonAutoDetect.Visibility.ANY);
        om.activateDefaultTyping(LaissezFaireSubTypeValidator.instance , ObjectMapper.DefaultTyping.NON_FINAL, JsonTypeInfo.As.WRAPPER_ARRAY);
        om.configure(DeserializationFeature.FAIL_ON_UNKNOWN_PROPERTIES, false);
        //添加时间日期格式的处理
        JavaTimeModule javaTimeModule = new JavaTimeModule();
        DateTimeFormatter dtf = DateTimeFormatter.ofPattern("yyyy-MM-dd HH:mm:ss");
        javaTimeModule.addSerializer(LocalDateTime.class,
                new LocalDateTimeSerializer(dtf));
        javaTimeModule.addDeserializer(LocalDateTime.class,
                new LocalDateTimeDeserializer(dtf));
        om.registerModule(javaTimeModule);
        jackson2JsonRedisSerializer.setObjectMapper(om);

        // 设置value的序列化规则和 key的序列化规则
        redisTemplate.setKeySerializer(new StringRedisSerializer());
        redisTemplate.setValueSerializer(jackson2JsonRedisSerializer);
        redisTemplate.setHashKeySerializer(new StringRedisSerializer());
        redisTemplate.setHashValueSerializer(jackson2JsonRedisSerializer);
        redisTemplate.afterPropertiesSet();
        return redisTemplate;
    }
}
4.SpEL标签
spring cache提供了一些供我们使用的SpEL上下文数据,可以根据SpEL标签获取到参数值,进行一些动态数据的组装,例如获取到参数id的值,作为redis的key。
| 名称 | 位置 | 描述 | 示例 |
|---|---|---|---|
| methodName | root对象 | 当前被访问的方法名 | #root.methodname |
| method | root对象 | 当前被调用的方法 | #root.method.name |
| target | root对象 | 当前被调用的目标对象实例 | #root.target |
| targetClass | root对象 | 当前被调用的目标对象的类 | #root.targetClass |
| args | root对象 | 当前被调用方法的参数列表 | #root.args[0] |
| caches | root对象 | 当前方法调用使用的缓存列表 | #root.caches[0].name |
| ArgumentName | 执行上下文 | 当前被调用方法的参数,例如findUser(User user),可以通过#user.id获得参数的值 | #user.id |
| result | 执行上下文 | 方法执行后的返回值(仅当方法执行后的判断有效,例如unless=#result==null | #result |
5.Cacheable注解实现
这个注解一般用在查询方法上,表示这个方法有了缓存的功能,方法的返回值会被缓存下来,下一次调用该方法前,会去检查是否缓存中已经有此方法对应key的值,如果有就直接返回,不调用方法;如果没有,则调用方法,并把结果缓存起来。支持配置的属性:
| 属性/方法名 | 说明 |
|---|---|
| value | 缓存名,必填,它指定了缓存存放在哪块命名空间下 |
| cacheNames | 与value等价,两者二选一即可 |
| key | 可选属性,可以使用SpEL标签定义缓存的key |
| keyGenerator | key的生成器,key/keyGenerator二选一即可 |
| cacheManager | 指定缓存管理器,可以定义多个缓存管理器,每个设置不同的特性,例如过期时间 |
| cacheResolver | 指定缓存解析器,可以自定义 |
| condition | 条件符合则缓存 |
| unless | 条件符合则不缓存 |
| sync | 是否使用异步模式,默认为false |
为了处理查询缓存失效的方案:
①缓存穿透:spring cache配置文件的属性cache-null-values:true,允许写入空值。
②缓存击穿:@Cacheable(sync=true),查询加锁。
③缓存雪崩:每个缓存配置不同的过期时间,time-to-live:xxx。
案例:
    @PostMapping(value="getUserById1")
    @Cacheable(cacheNames = "aaaa",key = "#root.args[0]")
    public User getUserById1(Integer id){


        return olapService.getUserById(id);
    }

    @PostMapping(value="getUserById6")
    //unless:SpEL表达式 不满足条件才缓存数据
    @Cacheable(cacheNames = "ffff", key = "#root.args[0]",unless ="#result==null")
    public User getUserById6(Integer id){


        return olapService.getUserById(id);
    }
6.CachePut注解实现
使用该注解标识的方法,每次都会执行,并将返回值存入指定的缓存中,若是之前已经有此key对应的value,则再次执行相当于覆盖,一般用在新增、修改方法上。支持配置的属性:
| 属性/方法名 | 说明 |
|---|---|
| value | 缓存名,必填,它指定了缓存存放在哪块命名空间下 |
| cacheNames | 与value等价,两者二选一即可 |
| key | 可选属性,可以使用SpEL标签定义缓存的key |
| keyGenerator | key的生成器,key/keyGenerator二选一即可 |
| cacheManager | 指定缓存管理器,可以定义多个缓存管理器,每个设置不同的特性,例如过期时间 |
| cacheResolver | 指定缓存解析器,可以自定义 |
| condition | 条件符合则缓存 |
| unless | 条件符合则不缓存 |
案例:
    @PostMapping(value="insertUser")
    //CachePut每次都会执行,并将结果存入缓存中,常用于更新、插入中
    @CachePut(cacheNames = "gggg", key = "#user.id",unless ="#result==null")
    public User insertUser(@RequestBody User user){


        return olapService.insertUser(user);
    }
7.CacheEvict注解实现
使用该注解的方法,会清空指定的缓存,一般用在更新、删除方法上。支持配置的属性:
| 属性/方法名 | 说明 |
|---|---|
| value | 缓存名,必填,它指定了缓存存放在哪块命名空间下 |
| cacheNames | 与value等价,两者二选一即可 |
| key | 可选属性,可以使用SpEL标签定义缓存的key |
| keyGenerator | key的生成器,key/keyGenerator二选一即可 |
| cacheManager | 指定缓存管理器,可以定义多个缓存管理器,每个设置不同的特性,例如过期时间 |
| cacheResolver | 指定缓存解析器,可以自定义 |
| condition | 条件符合则缓存 |
| allEntries | 是否清空所用的缓存,默认为false,如果指定为true,则方法调用后将清空所有命名空间为value或cacheNames配置值的数据 |
| beforeInvocation | 是否在方法执行前就清空,默认为false,如果指定为true,则在方法执行前就会清空缓存 |
案例:
    @PostMapping(value="deleteUser")
    //CacheEvict清空指定的缓存
    @CacheEvict(cacheNames = "gggg", key = "#root.args[0]")
    public boolean deleteUser(Integer id){


        return olapService.deleteUser(id);
    }

    @PostMapping(value="deleteUser1")
    //CacheEvict清空所有cacheNames命名空间下的数据
    @CacheEvict(cacheNames = "gggg", key = "#root.args[0]",allEntries = true)
    public boolean deleteUser1(Integer id){


        return olapService.deleteUser(id);
    }
8.Caching注解实现
该注解可以实现同一个方法上同时使用多种注解,从Caching的源码可以看到支持Cacheable、CachePut、CacheEvict数组。Caching源码:
public @interface Caching {


	Cacheable[] cacheable() default {

    };

	CachePut[] put() default {

    };

	CacheEvict[] evict() default {

    };

}
案例:
   @PostMapping(value="deleteUserCaching")
    //Caching可以同时使用多个缓存,参数为cacheable、put、evict
    @Caching(
        cacheable = {


            @Cacheable(cacheNames = "hhhh",key = "#root.args[0]"),
            @Cacheable(cacheNames = "iiii",key = "#root.args[0]"),
        },
        put = {


            @CachePut(cacheNames = "jjjj", key = "#root.args[0]"),
            @CachePut(cacheNames = "kkkk", key = "#root.args[0]")
        },
        evict = {


            @CacheEvict(cacheNames= "eeee",key = "#root.args[0]"),
            @CacheEvict(cacheNames= "ffff",key = "#root.args[0]"),
        }
    )
    public boolean deleteUserCaching(Integer id){


        return olapService.deleteUser(id);
    }
9.自定义key生成器KeyGenerator
缓存的key可以通过属性key进行配置,也可以使用key生成器进行生成,这样就不用每个key都去具体指定,key和key生成器二选一就行。key生成器使用@Bean修饰,当程序启动的时候,会加载到spring容器中进行管理,需要的时候直接使用即可。配置key生成器,可以放在CacheConfig.java配置类中:
    @Bean
    public KeyGenerator customKeyGenerator(){


        return new KeyGenerator() {


            //根据target类、调用的方法method、传递的参数params组织spring cache的key
            @Override
            public Object generate(Object target, Method method, Object... params) {


                String key = target.getClass().getSimpleName() + "_" + method.getName() + "_" + StringUtils.arrayToDelimitedString(params, "_");
                return key;
            }
        };
    }
使用时通过属性keyGenerator指定key的生成器。
案例:
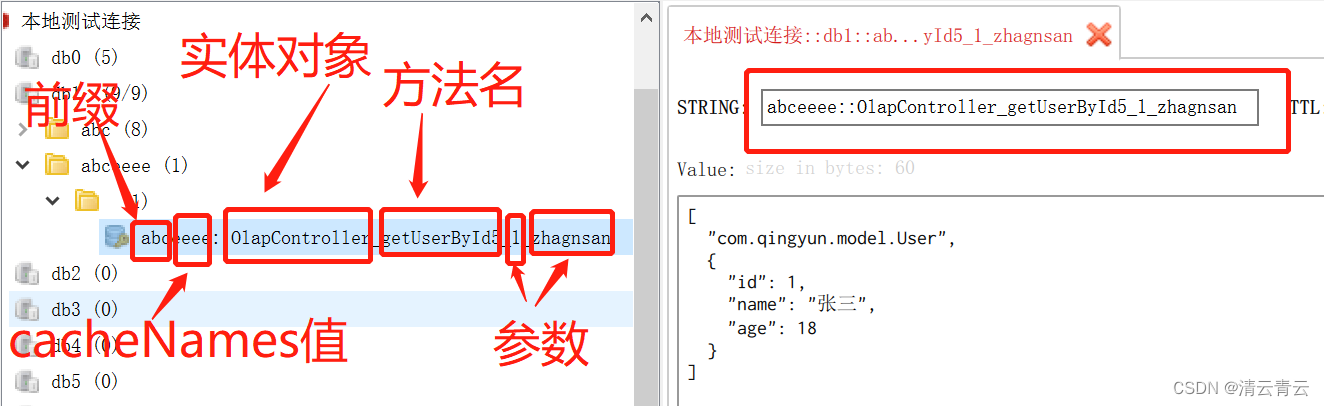
    @PostMapping(value="getUserById5")
    //存到redis的key使用key生成器的方式生成,配置属性key和keyGenerator二选一就行
    @Cacheable(cacheNames = "eeee", keyGenerator = "customKeyGenerator")
    public User getUserById5(Integer id,String name){


        return olapService.getUserById(id);
    }
redis存放情况:
10.自定义前缀CacheKeyPrefix
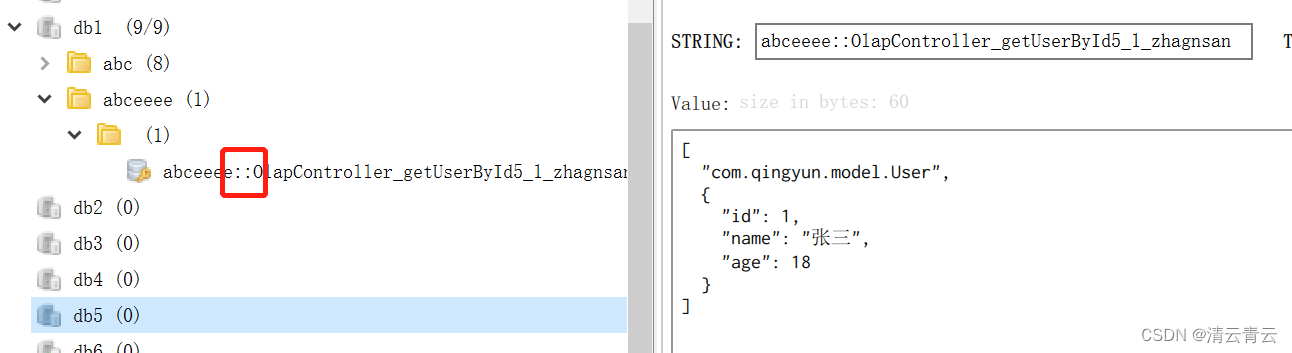
key是否需要加统一的前缀、以及设置统一的前缀字符都可以在yml或properties配置文件中配置,spring.cache.redis.use-key-prefix配置是否使用前缀,值为true则开启;spring.cache.redis.key-prefix配置前缀字符。默认的前缀配置格式为key-prefix+cacheNames的值+::,从CacheKeyPrefix的源码可以看出:
 static CacheKeyPrefix prefixed(String prefix) {


        Assert.notNull(prefix, "Prefix must not be null!");
        return (name) -> {


            return prefix + name + "::";
        };
    }
默认key的格式:
觉得这样的::连接符不美观的话,可以自定义key的格式,在RedisCacheConfiguration配置中,可以重新配置key的格式。
 //添加上前缀,也可以自定义一个方式,默认是keyPrefix::的方式
 config = config.computePrefixWith(bulidPrefix(redisProperties.getKeyPrefix()));

 //重新构建key的连接格式
 private CacheKeyPrefix bulidPrefix(String keyPrefix){


        return (name) -> {


            StringBuffer str = new StringBuffer();
            str.append(keyPrefix);
            str.append(":");
            str.append(name);
            str.append(":");
            return str.toString();
        };
 }
11.多个CacheManager实现不同失效时间
有的时候,我们想为不同的key设置不同的失效时间,例如设置失效时间为一分钟、一个小时、一天等。为了达到这个需求,可以定义不同的CacheManager管理器,当配置缓存的时候,用属性cacheManager来指定选择的CacheManager。
在CacheConfig.java配置类中配置需要的管理器,使用 @Primary注解标识哪个是默认的管理器,这样在不指定CacheManager的时候,会使用默认的管理器。配置不同管理器的实现:
    //创建缓存管理类,@Primary标识当有多个CacheManager管理器时,默认以这个为主
    //redisConnectionFactory为连接redis的工厂,在子类中已经创建并且使用@Bean标识
    //CacheProperties为配置的spring cache相关信息,类被@ConfigurationProperties修饰
    @Bean
    @Primary
    public CacheManager cacheManager(RedisConnectionFactory redisConnectionFactory,CacheProperties cahceProperties){


        return RedisCacheManager.builder(redisConnectionFactory)
                .cacheDefaults(redisCacheConfiguration(cahceProperties,null))
                .build();
    }

    //创建其它缓存管理类,使用的时候,根据cacheManager来指定使用哪个cache管理器,默认使用被 @Primary修饰的。例如:  @Cacheable(cacheNames = "xxxx",key = "#root.args[0]",cacheManager = "cacheManagerOneMinute")
    //这样就可以根据业务需要配置不同的cache管理器,一般用于设置redis不同的失效时间,此为设置失效时间为1分钟
    @Bean
    public CacheManager cacheManagerOneMinute(RedisConnectionFactory redisConnectionFactory,CacheProperties cahceProperties){


        return RedisCacheManager.builder(redisConnectionFactory)
                .cacheDefaults(redisCacheConfiguration(cahceProperties,60000L))
                .build();
    }

    //这样就可以根据业务需要配置不同的cache管理器,一般用于设置redis不同的失效时间,此为设置失效时间为1小时
    @Bean
    public CacheManager cacheManagerOneHour(RedisConnectionFactory redisConnectionFactory,CacheProperties cahceProperties){


        return RedisCacheManager.builder(redisConnectionFactory)
                .cacheDefaults(redisCacheConfiguration(cahceProperties,3600000L))
                .build();
    }
案例:
    @PostMapping(value="getUserById2")
    //指定使用哪种cache管理器,不指定使用默认的
    @Cacheable(cacheNames = "bbbb",key = "#root.args[0]",cacheManager = "cacheManagerOneHour")
    public User getUserById2(Integer id){


        return olapService.getUserById(id);
    }
12.自定义CacheResolver动态设置失效时间
不同的失效时间可以通过配置不同的CacheManager实现,但是不灵活,每次有一个新的失效时间,都得创建一个新的CacheManager。若是每次操作缓存的时候都可以动态的配置失效时间,或者配置今天内有效,这样就特别方便了。spring cache是基于aop实现的,我们也可以基于这个特性来动态设置失效时间。
自定义一个注解,支持配置缓存失效时间、时间单位、是否今天失效(有效时间从操作缓存这一刻到凌晨十二点)。自定义注解CacheExpire:
import java.lang.annotation.ElementType;
import java.lang.annotation.Retention;
import java.lang.annotation.RetentionPolicy;
import java.lang.annotation.Target;
import java.util.concurrent.TimeUnit;

/**
 * cache注解类,可以配置cache失效时间
 */
//此注解作用于方法上
@Target(ElementType.METHOD)
//此注解保留到编译成class文件,加载到jvm中也依然存在
@Retention(RetentionPolicy.RUNTIME)
public @interface CacheExpire {


    /**
     * 失效时间,默认60秒
     */
    public long ttl() default 60L;

    /**
     * 失效单位,默认秒
     */
    public TimeUnit unit() default TimeUnit.SECONDS;

    /**
     * 今天有效,失效时间是从创建这一刻起,到晚上凌晨12点整,是一个动态的时间
     */
    public boolean today() default false;
}
重写CacheResolver缓存处理器的方法,在处理缓存之前,使用反射机制动态的修改RedisCacheConfiguration里面的失效时间,这样就可以随意配置失效时间。新建一个处理器RedisExpireCacheResolver,让其继承SimpleCacheResolver,重写resolveCaches方法,通过拦截执行的方法检查是否配置了自定义注解CacheExpire,配置了CacheExpire注解,则从对应字段取到失效时间,配置了今天失效(today为true),则计算当前这一刻到12点的时长,重新设置失效时间。RedisExpireCacheResolver.java实现代码:
import org.springframework.cache.Cache;
import org.springframework.cache.CacheManager;
import org.springframework.cache.interceptor.CacheOperationInvocationContext;
import org.springframework.cache.interceptor.SimpleCacheResolver;
import org.springframework.data.redis.cache.RedisCache;
import org.springframework.data.redis.cache.RedisCacheConfiguration;
import org.springframework.util.ReflectionUtils;

import java.lang.reflect.Field;
import java.lang.reflect.Method;
import java.time.Duration;
import java.util.*;

/**
 * 使用继承的方式对cache处理器进行扩展
 */
public class RedisExpireCacheResolver extends SimpleCacheResolver {


    public RedisExpireCacheResolver(CacheManager cacheManager) {


        super(cacheManager);
    }

    //重写处理cache的方法
    @Override
    public Collection<? extends Cache> resolveCaches(CacheOperationInvocationContext<?> context) {


        //直接参考父父类AbstractCacheResolver的resolveCaches方法
        //获取当前注解中的缓存名,通过父类进行获取
        Collection<String> cacheNames = getCacheNames(context);
        if (cacheNames == null) {


            return Collections.EMPTY_LIST;
        } else {


            Collection<Cache> result = new ArrayList(cacheNames.size());
            Iterator cacheIterator = cacheNames.iterator();
            while (cacheIterator.hasNext()) {


                String cacheName = (String) cacheIterator.next();
                //通过缓存名从缓存管理器中获取到缓存对象
                Cache cache = this.getCacheManager().getCache(cacheName);
                if (cache == null) {


                    throw new IllegalArgumentException("Cannot find cache named '" + cacheName + "' for " + context.getOperation());
                }
                //跟AbstractCacheResolver的resolveCaches方法比较,只有这里新增解析注解,反射替换RedisCacheConfiguration的处理
                this.parseCacheExpire(cache, context);

                result.add(cache);
            }
            return result;
        }
    }

    /**
     * 通过反射替换cache中的RedisCacheConfiguration类已经设置好的过期时间等的值
     * 解析自定义注解CacheExpire,从注解中获取设置的过期时间,给RedisCacheConfiguration重新赋值
     */
    private void parseCacheExpire(Cache cache, CacheOperationInvocationContext<?> context) {


        Method method = context.getMethod();
        //判断方法是否包含过期时间注解
        if (method.isAnnotationPresent(CacheExpire.class)) {

      //包含CacheExpire注解再处理
            //获取到注解
            CacheExpire cacheExpire = method.getAnnotation(CacheExpire.class);
            Duration duration = null;
            //判断注解是否配置的过期时间为今天
            if(cacheExpire.today()){


                //当配置了过期时间为今天,则计算从这一刻到凌晨12点还有多少时间
                duration = Duration.ofSeconds(getSecondsNextEarlyMorning());
            } else {


                //过期时间为用户自己配置,则根据配置的来创建Duration
                duration = Duration.ofSeconds(cacheExpire.unit().toSeconds(cacheExpire.ttl()));
            }
            //转成RedisCache 这个时候cacheConfig是空的,也就让反射有了可乘之机
            RedisCache redisCache = (RedisCache) cache;
            //获取cache里面的RedisCacheConfiguration
            RedisCacheConfiguration cacheConfiguration = redisCache.getCacheConfiguration();
            //新生成一个configuration
            RedisCacheConfiguration cacheConfig = cacheConfiguration;
            //参数需要对应修改
            cacheConfig = cacheConfig.entryTtl(duration);
            //通过反射获取到类型为RedisCacheConfiguration的字段cacheConfig
            Field field = ReflectionUtils.findField(RedisCache.class, "cacheConfig", RedisCacheConfiguration.class);
            //设置可以访问被private修饰的字段值
            field.setAccessible(true);
            //重新设置替换RedisCacheConfiguration
            ReflectionUtils.setField(field, redisCache, cacheConfig);
        }
    }

    //获取当前时间到第二天凌晨的秒数,用于设置redis失效时间为当天
    private Long getSecondsNextEarlyMorning() {


        Calendar cal = Calendar.getInstance();
        cal.add(Calendar.DAY_OF_YEAR, 1);
        cal.set(Calendar.HOUR_OF_DAY, 0);
        cal.set(Calendar.SECOND, 0);
        cal.set(Calendar.MINUTE, 0);
        cal.set(Calendar.MILLISECOND, 0);
        return (cal.getTimeInMillis() - System.currentTimeMillis()) / 1000;
    }

}
我们需要把自定义的缓存处理类RedisExpireCacheResolver注册到spring容器中,可以在CacheConfig.java中使用@Bean进行标识:
 /**
     * 注册自定义的缓存处理类
     * cacheManager 为使用的缓存管理器
     * 使用CacheResolver来接收,它属于父接口类
     * 使用方式,指明处理器: @Cacheable(cacheNames = "yyyy",key = "#root.args[0]",cacheResolver = "redisExpireCacheResolver")
     */
    @Bean
    public CacheResolver redisExpireCacheResolver(CacheManager cacheManager){


        return new RedisExpireCacheResolver(cacheManager);
    }
在使用时,配置上@CacheExpire注解的值,通过属性cacheResolver来指定使用的缓存处理器。
案例:
    @PostMapping(value="getUserById3")
    //指定使用哪种cache处理器
    @Cacheable(cacheNames = "cccc",key = "#root.args[0]",cacheResolver = "redisExpireCacheResolver")
    //设置过期时间值、单位
    @CacheExpire(ttl = 20,unit = TimeUnit.SECONDS)
    public User getUserById3(Integer id){


        return olapService.getUserById(id);
    }

    @PostMapping(value="getUserById9")
    //指定使用哪种cache处理器
    @Cacheable(cacheNames = "cccc",key = "#root.args[0]",cacheResolver = "redisExpireCacheResolver")
    //设置今天有效
    @CacheExpire(today = true)
    public User getUserById9(Integer id){


        return olapService.getUserById(id);
    }
13.缓存不生效原因
(1)程序启动类或者配置类中没有添加@EnableCaching注解,标识开启cache;
(2)在同一个类中A方法调用B方法,在B方法中使用注解开启缓存,此时缓存不会生效。原因:Spring使用@Cacheable创建缓存是基于AOP代理实现的,类内部的方法调用类内部的缓存方法不会走代理,不走代理就不会创建缓存。
public class xxx{


    public void A(){


        B();//调用类的内部方法,缓存失效
    }

    @Cacheable(cacheNames = "ffff")
    public Object B(){


       return "xx";
    }
}
14.完整核心代码
CacheConfig.java:
import com.fasterxml.jackson.annotation.JsonAutoDetect;
import com.fasterxml.jackson.annotation.JsonTypeInfo;
import com.fasterxml.jackson.annotation.PropertyAccessor;
import com.fasterxml.jackson.databind.DeserializationFeature;
import com.fasterxml.jackson.databind.ObjectMapper;
import com.fasterxml.jackson.databind.jsontype.impl.LaissezFaireSubTypeValidator;
import com.fasterxml.jackson.datatype.jsr310.JavaTimeModule;
import com.fasterxml.jackson.datatype.jsr310.deser.LocalDateTimeDeserializer;
import com.fasterxml.jackson.datatype.jsr310.ser.LocalDateTimeSerializer;
import org.springframework.boot.autoconfigure.cache.CacheProperties;
import org.springframework.boot.context.properties.EnableConfigurationProperties;
import org.springframework.cache.CacheManager;
import org.springframework.cache.annotation.EnableCaching;
import org.springframework.cache.interceptor.CacheResolver;
import org.springframework.cache.interceptor.KeyGenerator;
import org.springframework.context.annotation.Bean;
import org.springframework.context.annotation.Configuration;
import org.springframework.context.annotation.Primary;
import org.springframework.data.redis.cache.CacheKeyPrefix;
import org.springframework.data.redis.cache.RedisCacheConfiguration;
import org.springframework.data.redis.cache.RedisCacheManager;
import org.springframework.data.redis.connection.RedisConnectionFactory;
import org.springframework.data.redis.serializer.Jackson2JsonRedisSerializer;
import org.springframework.data.redis.serializer.RedisSerializationContext;
import org.springframework.util.StringUtils;

import java.lang.reflect.Method;
import java.time.Duration;
import java.time.LocalDateTime;
import java.time.format.DateTimeFormatter;

//声明配置类
@Configuration
//开启spring cache
@EnableCaching
//添加缓存配置类,yml或者properties中配置的cache相关信息,使用CacheProperties接收,从这里引入,可以直接使用里面的字段值
@EnableConfigurationProperties(CacheProperties.class)
public class CacheConfig{


    //创建缓存管理类,@Primary标识当有多个CacheManager管理器时,默认以这个为主
    //redisConnectionFactory为连接redis的工厂,在子类中已经创建并且使用@Bean标识
    //CacheProperties为配置的spring cache相关信息,类被@ConfigurationProperties修饰
    @Bean
    @Primary
    public CacheManager cacheManager(RedisConnectionFactory redisConnectionFactory,CacheProperties cahceProperties){


        return RedisCacheManager.builder(redisConnectionFactory)
                .cacheDefaults(redisCacheConfiguration(cahceProperties,null))
                .build();
    }

    //创建其它缓存管理类,使用的时候,根据cacheManager来指定使用哪个cache管理器,默认使用被 @Primary修饰的。例如:  @Cacheable(cacheNames = "xxxx",key = "#root.args[0]",cacheManager = "cacheManagerOneMinute")
    //这样就可以根据业务需要配置不同的cache管理器,一般用于设置redis不同的失效时间,此为设置失效时间为1分钟
    @Bean
    public CacheManager cacheManagerOneMinute(RedisConnectionFactory redisConnectionFactory,CacheProperties cahceProperties){


        return RedisCacheManager.builder(redisConnectionFactory)
                .cacheDefaults(redisCacheConfiguration(cahceProperties,60000L))
                .build();
    }

    //这样就可以根据业务需要配置不同的cache管理器,一般用于设置redis不同的失效时间,此为设置失效时间为1小时
    @Bean
    public CacheManager cacheManagerOneHour(RedisConnectionFactory redisConnectionFactory,CacheProperties cahceProperties){


        return RedisCacheManager.builder(redisConnectionFactory)
                .cacheDefaults(redisCacheConfiguration(cahceProperties,3600000L))
                .build();
    }

    //设置rediscacheConfiguration配置类,根据配置的失效时间等属性进行配置
    public RedisCacheConfiguration redisCacheConfiguration(CacheProperties cahceProperties,Long ttl) {


        //使用Jackson2JsonRedisSerializer的方式类序列化值
        Jackson2JsonRedisSerializer jackson2JsonRedisSerializer = new Jackson2JsonRedisSerializer(Object.class);
        ObjectMapper om = new ObjectMapper();
        om.setVisibility(PropertyAccessor.ALL, JsonAutoDetect.Visibility.ANY);
        om.activateDefaultTyping(LaissezFaireSubTypeValidator.instance , ObjectMapper.DefaultTyping.NON_FINAL, JsonTypeInfo.As.WRAPPER_ARRAY);
        om.configure(DeserializationFeature.FAIL_ON_UNKNOWN_PROPERTIES, false);

        //添加时间日期格式的处理
        JavaTimeModule javaTimeModule = new JavaTimeModule();
        DateTimeFormatter dtf = DateTimeFormatter.ofPattern("yyyy-MM-dd HH:mm:ss");
        javaTimeModule.addSerializer(LocalDateTime.class,
                new LocalDateTimeSerializer(dtf));
        javaTimeModule.addDeserializer(LocalDateTime.class,
                new LocalDateTimeDeserializer(dtf));
        om.registerModule(javaTimeModule);

        jackson2JsonRedisSerializer.setObjectMapper(om);
        //获取RedisCacheConfiguration,对它进行新值的设置,默认序列化值使用SerializationPair.fromSerializer(new JdkSerializationRedisSerializer(classLoader))
        //这里设置序列化值的方式与redisTemple保持一致,也必须保持一致,否则有些使用spring cache存再使用redisTemple来取的时候,格式就会存在问题
        RedisCacheConfiguration config = RedisCacheConfiguration.defaultCacheConfig()
                .serializeValuesWith( RedisSerializationContext.SerializationPair.fromSerializer(
                        jackson2JsonRedisSerializer));

        //获取配置的信息
        CacheProperties.Redis redisProperties = cahceProperties.getRedis();
        //设置过期时间
        if(null == ttl) {

    //传递的参数为空,则使用配置文件配置的过期时间
            if (null != redisProperties.getTimeToLive()) {


                config = config.entryTtl(redisProperties.getTimeToLive());
            }
        } else {


            config = config.entryTtl(Duration.ofMillis(ttl));
        }

        //是否允许设置为null值
        if (!redisProperties.isCacheNullValues()) {


            config = config.disableCachingNullValues();
        }
        //是否设置前缀
        if (redisProperties.isUseKeyPrefix()) {


            //设置前缀
            if (null != redisProperties.getKeyPrefix()) {


                //添加上前缀,也可以自定义一个方式,默认是kerPrefix::的方式
                config = config.computePrefixWith(bulidPrefix(redisProperties.getKeyPrefix()));  //自定义前缀
                //config = config.computePrefixWith(CacheKeyPrefix.prefixed(redisProperties.getKeyPrefix()));//默认的前缀方式
            } else {

     //不使用前缀
               config = config.computePrefixWith(bulidBasePrefix());
            }
        } else {

         //不使用前缀
            config = config.computePrefixWith(bulidBasePrefix());
        }
        return config;
    }

    /**
     * 自定义前缀
     */
    private CacheKeyPrefix bulidPrefix(String keyPrefix){


        return (name) -> {


            StringBuffer str = new StringBuffer();
            str.append(keyPrefix);
            str.append(":");
            str.append(name);
            str.append(":");
            return str.toString();
        };
    }

    //构造不适用前缀时的key格式
    private CacheKeyPrefix bulidBasePrefix() {


        return cacheName -> {


            StringBuilder builder = new StringBuilder();
            builder.append(cacheName);
            return builder.toString();
        };
    }

    /**
     * 自定义缓存key生成方式
     */
    @Bean
    public KeyGenerator customKeyGenerator(){


        return new KeyGenerator() {


            //根据target类、调用的方法method、传递的参数params组织spring cache的key
            @Override
            public Object generate(Object target, Method method, Object... params) {


                String key = target.getClass().getSimpleName() + "_" + method.getName() + "_" + StringUtils.arrayToDelimitedString(params, "_");
                return key;
            }
        };
    }

    /**
     * 注册自定义的缓存处理类
     * cacheManager 为使用的缓存管理器
     * 使用CacheResolver来接收,它属于父接口
     * 使用方式,指明处理器: @Cacheable(cacheNames = "yyyy",key = "#root.args[0]",cacheResolver = "redisExpireCacheResolver")
     */
    @Bean
    public CacheResolver redisExpireCacheResolver(CacheManager cacheManager){


        return new RedisExpireCacheResolver(cacheManager);
    }
}
CacheExpire.java:
import java.lang.annotation.ElementType;
import java.lang.annotation.Retention;
import java.lang.annotation.RetentionPolicy;
import java.lang.annotation.Target;
import java.util.concurrent.TimeUnit;

/**
 * cache注解类,可以配置cache失效时间
 */
//此注解作用于方法上
@Target(ElementType.METHOD)
//此注解保留到编译成class文件,加载到jvm中也依然存在
@Retention(RetentionPolicy.RUNTIME)
public @interface CacheExpire {


    /**
     * 失效时间,默认60秒
     */
    public long ttl() default 60L;

    /**
     * 失效单位,默认秒
     */
    public TimeUnit unit() default TimeUnit.SECONDS;

    /**
     * 今天有效,失效时间是从当创建这一刻起,到晚上凌晨12点整,是一个动态的时间
     */
    public boolean today() default false;
}
RedisConfig.java:
import com.fasterxml.jackson.annotation.JsonAutoDetect;
import com.fasterxml.jackson.annotation.JsonTypeInfo;
import com.fasterxml.jackson.annotation.PropertyAccessor;
import com.fasterxml.jackson.databind.DeserializationFeature;
import com.fasterxml.jackson.databind.ObjectMapper;
import com.fasterxml.jackson.databind.jsontype.impl.LaissezFaireSubTypeValidator;
import com.fasterxml.jackson.datatype.jsr310.JavaTimeModule;
import com.fasterxml.jackson.datatype.jsr310.deser.LocalDateTimeDeserializer;
import com.fasterxml.jackson.datatype.jsr310.ser.LocalDateTimeSerializer;
import org.springframework.context.annotation.Bean;
import org.springframework.context.annotation.Configuration;
import org.springframework.data.redis.connection.RedisConnectionFactory;
import org.springframework.data.redis.core.RedisTemplate;
import org.springframework.data.redis.serializer.Jackson2JsonRedisSerializer;
import org.springframework.data.redis.serializer.StringRedisSerializer;

import java.time.LocalDateTime;
import java.time.format.DateTimeFormatter;

/**
 * redis配置类
 */
@Configuration
public class RedisConfig {


    @Bean
    public RedisTemplate<Object, Object> redisTemplate(RedisConnectionFactory factory) {


        RedisTemplate<Object, Object> redisTemplate = new RedisTemplate<>();
        redisTemplate.setConnectionFactory(factory);
        Jackson2JsonRedisSerializer jackson2JsonRedisSerializer = new Jackson2JsonRedisSerializer(Object.class);
        ObjectMapper om = new ObjectMapper();
        om.setVisibility(PropertyAccessor.ALL, JsonAutoDetect.Visibility.ANY);
        om.activateDefaultTyping(LaissezFaireSubTypeValidator.instance , ObjectMapper.DefaultTyping.NON_FINAL, JsonTypeInfo.As.WRAPPER_ARRAY);
        om.configure(DeserializationFeature.FAIL_ON_UNKNOWN_PROPERTIES, false);
        //添加时间日期格式的处理
        JavaTimeModule javaTimeModule = new JavaTimeModule();
        DateTimeFormatter dtf = DateTimeFormatter.ofPattern("yyyy-MM-dd HH:mm:ss");
        javaTimeModule.addSerializer(LocalDateTime.class,
                new LocalDateTimeSerializer(dtf));
        javaTimeModule.addDeserializer(LocalDateTime.class,
                new LocalDateTimeDeserializer(dtf));
        om.registerModule(javaTimeModule);
        jackson2JsonRedisSerializer.setObjectMapper(om);

        // 设置value的序列化规则和 key的序列化规则
        redisTemplate.setKeySerializer(new StringRedisSerializer());
        redisTemplate.setValueSerializer(jackson2JsonRedisSerializer);
        redisTemplate.setHashKeySerializer(new StringRedisSerializer());
        redisTemplate.setHashValueSerializer(jackson2JsonRedisSerializer);
        redisTemplate.afterPropertiesSet();
        return redisTemplate;
    }
}
RedisExpireCacheResolver.java:
import org.springframework.cache.Cache;
import org.springframework.cache.CacheManager;
import org.springframework.cache.interceptor.CacheOperationInvocationContext;
import org.springframework.cache.interceptor.SimpleCacheResolver;
import org.springframework.data.redis.cache.RedisCache;
import org.springframework.data.redis.cache.RedisCacheConfiguration;
import org.springframework.util.ReflectionUtils;

import java.lang.reflect.Field;
import java.lang.reflect.Method;
import java.time.Duration;
import java.util.*;

/**
 * 使用继承的方式对cache处理器进行扩展
 */
public class RedisExpireCacheResolver extends SimpleCacheResolver {


    public RedisExpireCacheResolver(CacheManager cacheManager) {


        super(cacheManager);
    }

    //重写处理cache的方法
    @Override
    public Collection<? extends Cache> resolveCaches(CacheOperationInvocationContext<?> context) {


        //直接参考父父类AbstractCacheResolver的resolveCaches方法
        //获取当前注解中的缓存名,通过父类进行获取
        Collection<String> cacheNames = getCacheNames(context);
        if (cacheNames == null) {


            return Collections.EMPTY_LIST;
        } else {


            Collection<Cache> result = new ArrayList(cacheNames.size());
            Iterator cacheIterator = cacheNames.iterator();
            while (cacheIterator.hasNext()) {


                String cacheName = (String) cacheIterator.next();
                //通过缓存名获取到缓存对象
                Cache cache = this.getCacheManager().getCache(cacheName);
                if (cache == null) {


                    throw new IllegalArgumentException("Cannot find cache named '" + cacheName + "' for " + context.getOperation());
                }
                //跟AbstractCacheResolver类的resolveCaches的方法比较,只有这里新增解析注解,反射替换RedisCacheConfiguration
                this.parseCacheExpire(cache, context);

                result.add(cache);
            }
            return result;
        }
    }

    /**
     * 通过反射替换cache中的RedisCacheConfiguration类已经设置好的过期时间等的值
     * 解析注解,从注解中获取新设置的过期时间,给RedisCacheConfiguration重新赋值
     */
    private void parseCacheExpire(Cache cache, CacheOperationInvocationContext<?> context) {


        Method method = context.getMethod();
        //判断方法是否包含过期时间注解
        if (method.isAnnotationPresent(CacheExpire.class)) {

      //包含CacheExpire注解再处理
            //获取到注解
            CacheExpire cacheExpire = method.getAnnotation(CacheExpire.class);
            Duration duration = null;
            //判断注解是否配置的过期时间为今天
            if(cacheExpire.today()){


                //当配置了过期时间为今天,则计算从这一刻到凌晨12点还有多少时间
                duration = Duration.ofSeconds(getSecondsNextEarlyMorning());
            } else {


                //过期时间为用户自己配置,则根据配置的来创建Duration
                duration = Duration.ofSeconds(cacheExpire.unit().toSeconds(cacheExpire.ttl()));
            }
            //转成RedisCache 这个时候cacheConfig是空的,也就让反射有了可乘之机
            RedisCache redisCache = (RedisCache) cache;
            //获取cache里面的RedisCacheConfiguration
            RedisCacheConfiguration cacheConfiguration = redisCache.getCacheConfiguration();
            //新生成一个configuration
            RedisCacheConfiguration cacheConfig = cacheConfiguration;
            //参数需要对应修改
            cacheConfig = cacheConfig.entryTtl(duration);
            //通过反射获取到类型为RedisCacheConfiguration的字段cacheConfig
            Field field = ReflectionUtils.findField(RedisCache.class, "cacheConfig", RedisCacheConfiguration.class);
            //设置可以访问被private修饰的字段值
            field.setAccessible(true);
            //重新设置替换RedisCacheConfiguration
            ReflectionUtils.setField(field, redisCache, cacheConfig);
        }
    }

    //获取当前时间到第二天凌晨的秒数,用于设置redis失效时间为当天
    private Long getSecondsNextEarlyMorning() {


        Calendar cal = Calendar.getInstance();
        cal.add(Calendar.DAY_OF_YEAR, 1);
        cal.set(Calendar.HOUR_OF_DAY, 0);
        cal.set(Calendar.SECOND, 0);
        cal.set(Calendar.MINUTE, 0);
        cal.set(Calendar.MILLISECOND, 0);
        return (cal.getTimeInMillis() - System.currentTimeMillis()) / 1000;
    }

}