前言
粒子特效是一种视觉效果,可以模拟出许多粒子在空间中的运动和变化,形成各种美丽的图案和动态效果。常见的粒子特效包括烟雾、火焰、水流、星空、气泡等,可以在电影、电视、游戏等领域中得到广泛应用。实现粒子特效,需要使用计算机图形学技术,如粒子系统、计算流体力学等。
一、粒子特效案例
1.粒子平面
粒子平面是指在计算机图形学中,用于呈现粒子特效的平面。粒子特效是通过模拟大量的粒子运动和变化来实现的,而为了在视觉上呈现这些粒子,需要将它们以一定的规律排列在一个平面上,使得观众可以看到这些粒子的动态变化。因此,粒子平面常常被用作粒子特效的载体,通过对平面上的粒子进行位置、速度、颜色等的计算和控制,来实现各种不同的粒子效果。在实际应用中,粒子平面可以应用于游戏场景、电影特效、虚拟现实等领域中,为用户带来更加生动的视觉体验。
<!DOCTYPE html>
<html lang="en">
<head>
  <meta charset="UTF-8">
  <title>Title</title>
  <style>
    *{


      margin: 0;
      padding: 0;
    }
  </style>
  <script src="../lib/three/three.js"></script>
</head>
<body>

</body>
</html>

<script>
  const clock = new THREE.Clock()
  // 创建一个场景
  const scene = new THREE.Scene();

  // 创建一个相机 视点
  const camera = new THREE.PerspectiveCamera(45, window.innerWidth / window.innerHeight, 1, 1000);
  // 设置相机的位置
  camera.position.set(0,0,200);
  camera.lookAt(new THREE.Vector3(0,0,0));

  // 创建一个渲染器
  const renderer = new THREE.WebGLRenderer();
  // 设置渲染器尺寸
  renderer.setSize(window.innerWidth, window.innerHeight);

  document.body.appendChild(renderer.domElement);

  renderer.setClearColor(0xffffff);
  // 添加灯光
  const spotLight = new THREE.SpotLight(0xffffff);
  spotLight.position.set(2000,8000,4000);
  scene.add(spotLight);

  createSystemSprite();

  // 创建一个基础的粒子
  function createNormalSprite() {


    for (let i = -5; i < 5; i++) {


      for (let j = -5; j < 5; j++) {


        const material = new THREE.SpriteMaterial({


          color: Math.random() * 0xffffff
        })
        const sprite = new THREE.Sprite(material);
        sprite.position.set(i * 10, j * 10, 0);
        sprite.scale.set(2,2,2);
        scene.add(sprite);
      }
    }
  }

  // 粒子系统来创建粒子
  function createSystemSprite() {


    const geometry = new THREE.Geometry();
    const material = new THREE.PointCloudMaterial({


      size: 4,
      vertexColors: true,
    })

    for (let i = -5; i < 5; i++) {


      for (let j = -5; j < 5; j++) {


        geometry.vertices.push(new THREE.Vector3(i * 10, j * 10, 0))
        geometry.colors.push(new THREE.Color(Math.random() * 0xffffff))
      }
    }

    scene.add(new THREE.PointCloud(geometry, material))
  }

  const animation = () => {


    // 渲染
    renderer.render(scene, camera);

    requestAnimationFrame(animation);
  }
  animation()
</script>
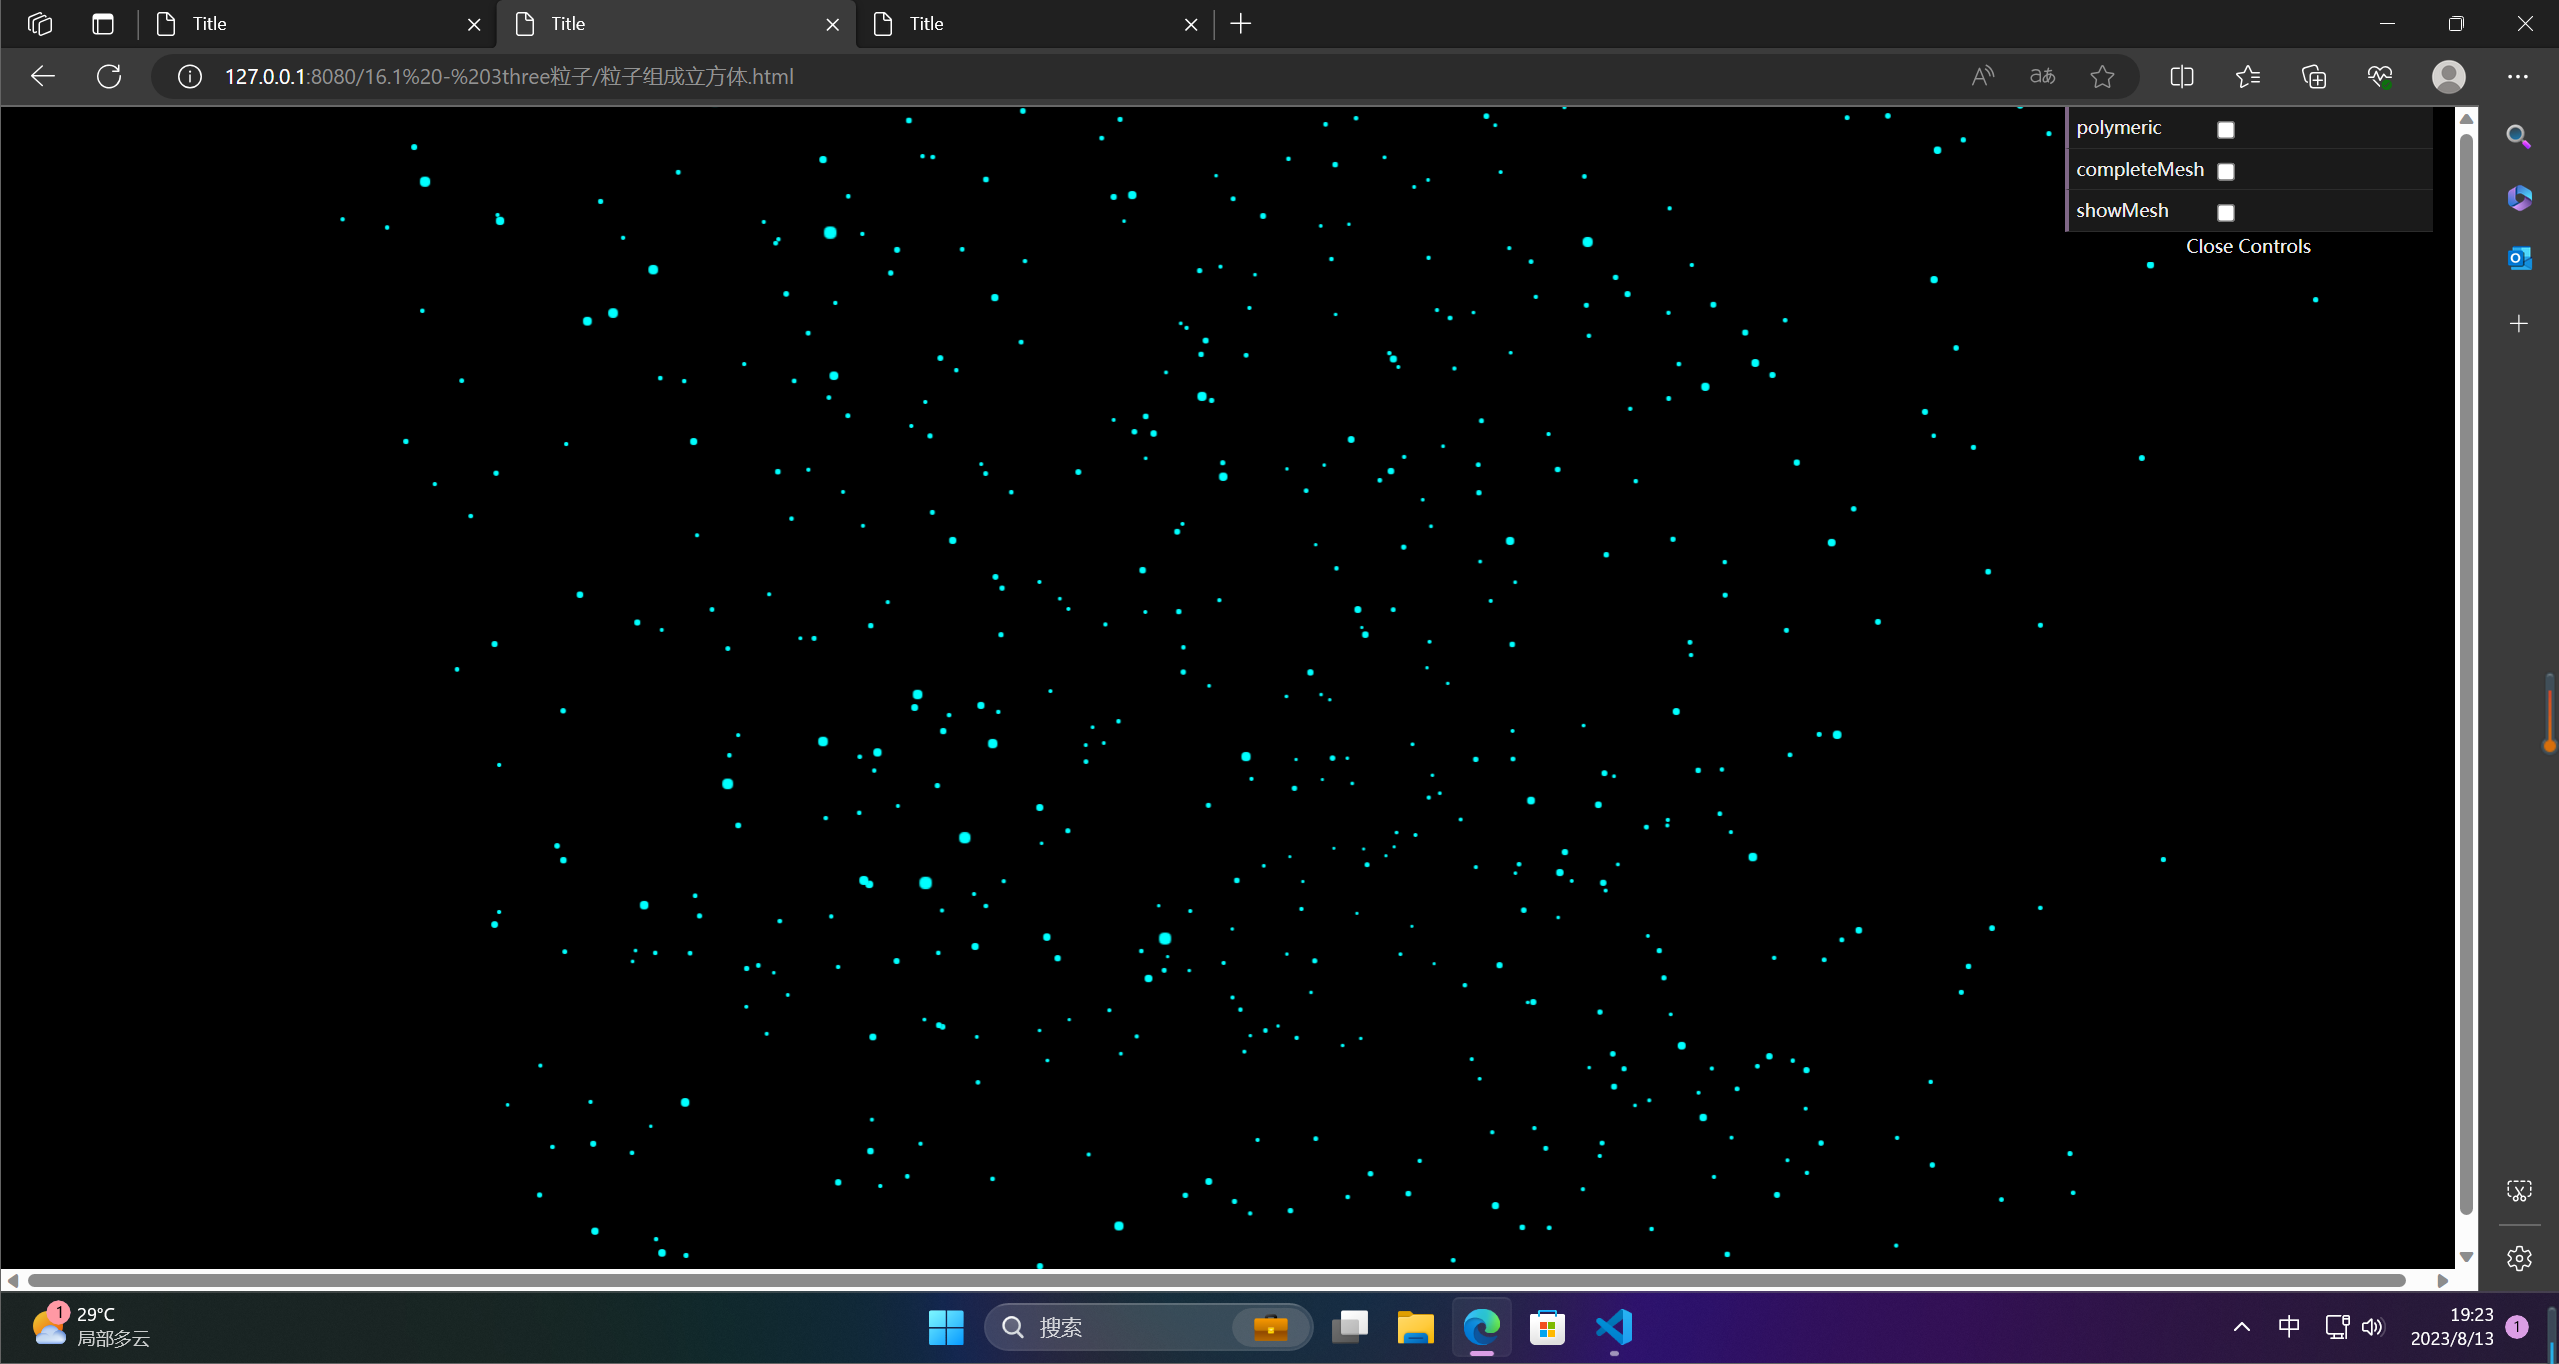
2.粒子立方体
粒子立方体是一个三维的立方体网格,每个网格中包含一个粒子。粒子立方体广泛应用于流体动力学和材料科学等领域,用于模拟流体的运动和材料的行为。 在流体动力学中,粒子立方体被用来模拟流体的粒子。 这些粒子可以在立方体内相互作用,从而模拟流体的动态行为。 在材料科学中,粒子立方体可用于模拟材料的行为,如塑性变形,断裂等。 它也可以用于模拟材料的力学特性,如弹性模量和泊松比等。
<!DOCTYPE html>
<html lang="en">
<head>
  <meta charset="UTF-8">
  <title>Title</title>
  <style>
    *{


      margin: 0;
      padding: 0;
    }
  </style>
  <script src="../lib/three/three.js"></script>
  <script src="../lib/three/tween.min.js"></script>
  <script src="../lib/three/dat.gui.js"></script>
</head>
<body>

</body>
</html>

<script>
  const clock = new THREE.Clock()
  // 创建一个场景
  const scene = new THREE.Scene();

  // 创建一个相机 视点
  const camera = new THREE.PerspectiveCamera(45, window.innerWidth / window.innerHeight, 1, 1000);
  // 设置相机的位置
  camera.position.set(0,30,100);
  camera.lookAt(new THREE.Vector3(0,0,0));

  // 创建一个渲染器
  const renderer = new THREE.WebGLRenderer();
  // 设置渲染器尺寸
  renderer.setSize(window.innerWidth, window.innerHeight);

  document.body.appendChild(renderer.domElement);

  // 添加灯光
  const spotLight = new THREE.SpotLight(0xffffff);
  spotLight.position.set(2000,8000,4000);
  scene.add(spotLight);

  // 创建一个立方体
  const geometry = new THREE.BoxGeometry(10, 10, 10, 10, 10, 10);

  function getSprite() {


    const canvas = document.createElement('canvas')
    const size = 8
    canvas.width = size * 2;
    canvas.height = size * 2;

    const c = canvas.getContext('2d')

    const gradient = c.createRadialGradient(size, size, 0, size, size, size);
    gradient.addColorStop(0.1, 'rgba(0,255,255,1)')

    c.fillStyle = gradient;
    c.arc(size, size, size / 2, 0, Math.PI * 2);
    c.fill();

    const texture = new THREE.Texture(canvas)
    texture.needsUpdate = true;
    return texture;
  }

  // 存储原始坐标
  const indexList = [];

  // 设定当前随机的范围
  const range = 100;

  const controls = {


    polymeric: false, // 是否要组合成立方体
    completeMesh: false, // 组合之后是否要显示立方体
    showMesh: false, // 是否要现在显示立方体
  };

  let cloud;

  function createMesh() {


    cloud = new THREE.Mesh(new THREE.BoxGeometry(10,10,10,10,10,10), new THREE.MeshNormalMaterial())
    scene.add(cloud);
  }

  function createRandomPosition(i) {


    geometry.vertices[i].x = Math.random() * range - range / 2;
    geometry.vertices[i].y = Math.random() * range - range / 2;
    geometry.vertices[i].z = Math.random() * range - range / 2;
  }

  function createPointCloud() {


    let listen = false;
    for (let i = 0; i < geometry.vertices.length; i++) {


      indexList.push({


        x: geometry.vertices[i].x,
        y: geometry.vertices[i].y,
        z: geometry.vertices[i].z
      })
      createRandomPosition(i);

      if (controls.polymeric) {


        const tween = new TWEEN.Tween(geometry.vertices[i]).to(indexList[i], 2000).start();
        if (!listen) {


          listen = true;

          if (controls.completeMesh) {


            tween.onComplete(() => {


              scene.remove(cloud);
              createMesh();
            })
          }
        }
      }
    }


    const material = new THREE.PointCloudMaterial({


      size: 2,
      transparent: true,
      map: getSprite(),
    })

    cloud = new THREE.PointCloud(geometry, material);
    cloud.sortParticles = true;
    scene.add(cloud);
  }

  createPointCloud()

  const gui = new dat.GUI();
  const onChange = () => {


    scene.remove(cloud);
    controls.showMesh ? createMesh() : createPointCloud();
  }
  for (const key in controls) {


    gui.add(controls, key).onChange(onChange);
  }

  const animation = () => {


    scene.rotation.y += 0.01;
    // 渲染
    renderer.render(scene, camera);
    TWEEN.update();

    requestAnimationFrame(animation);
  }
  animation()
</script>
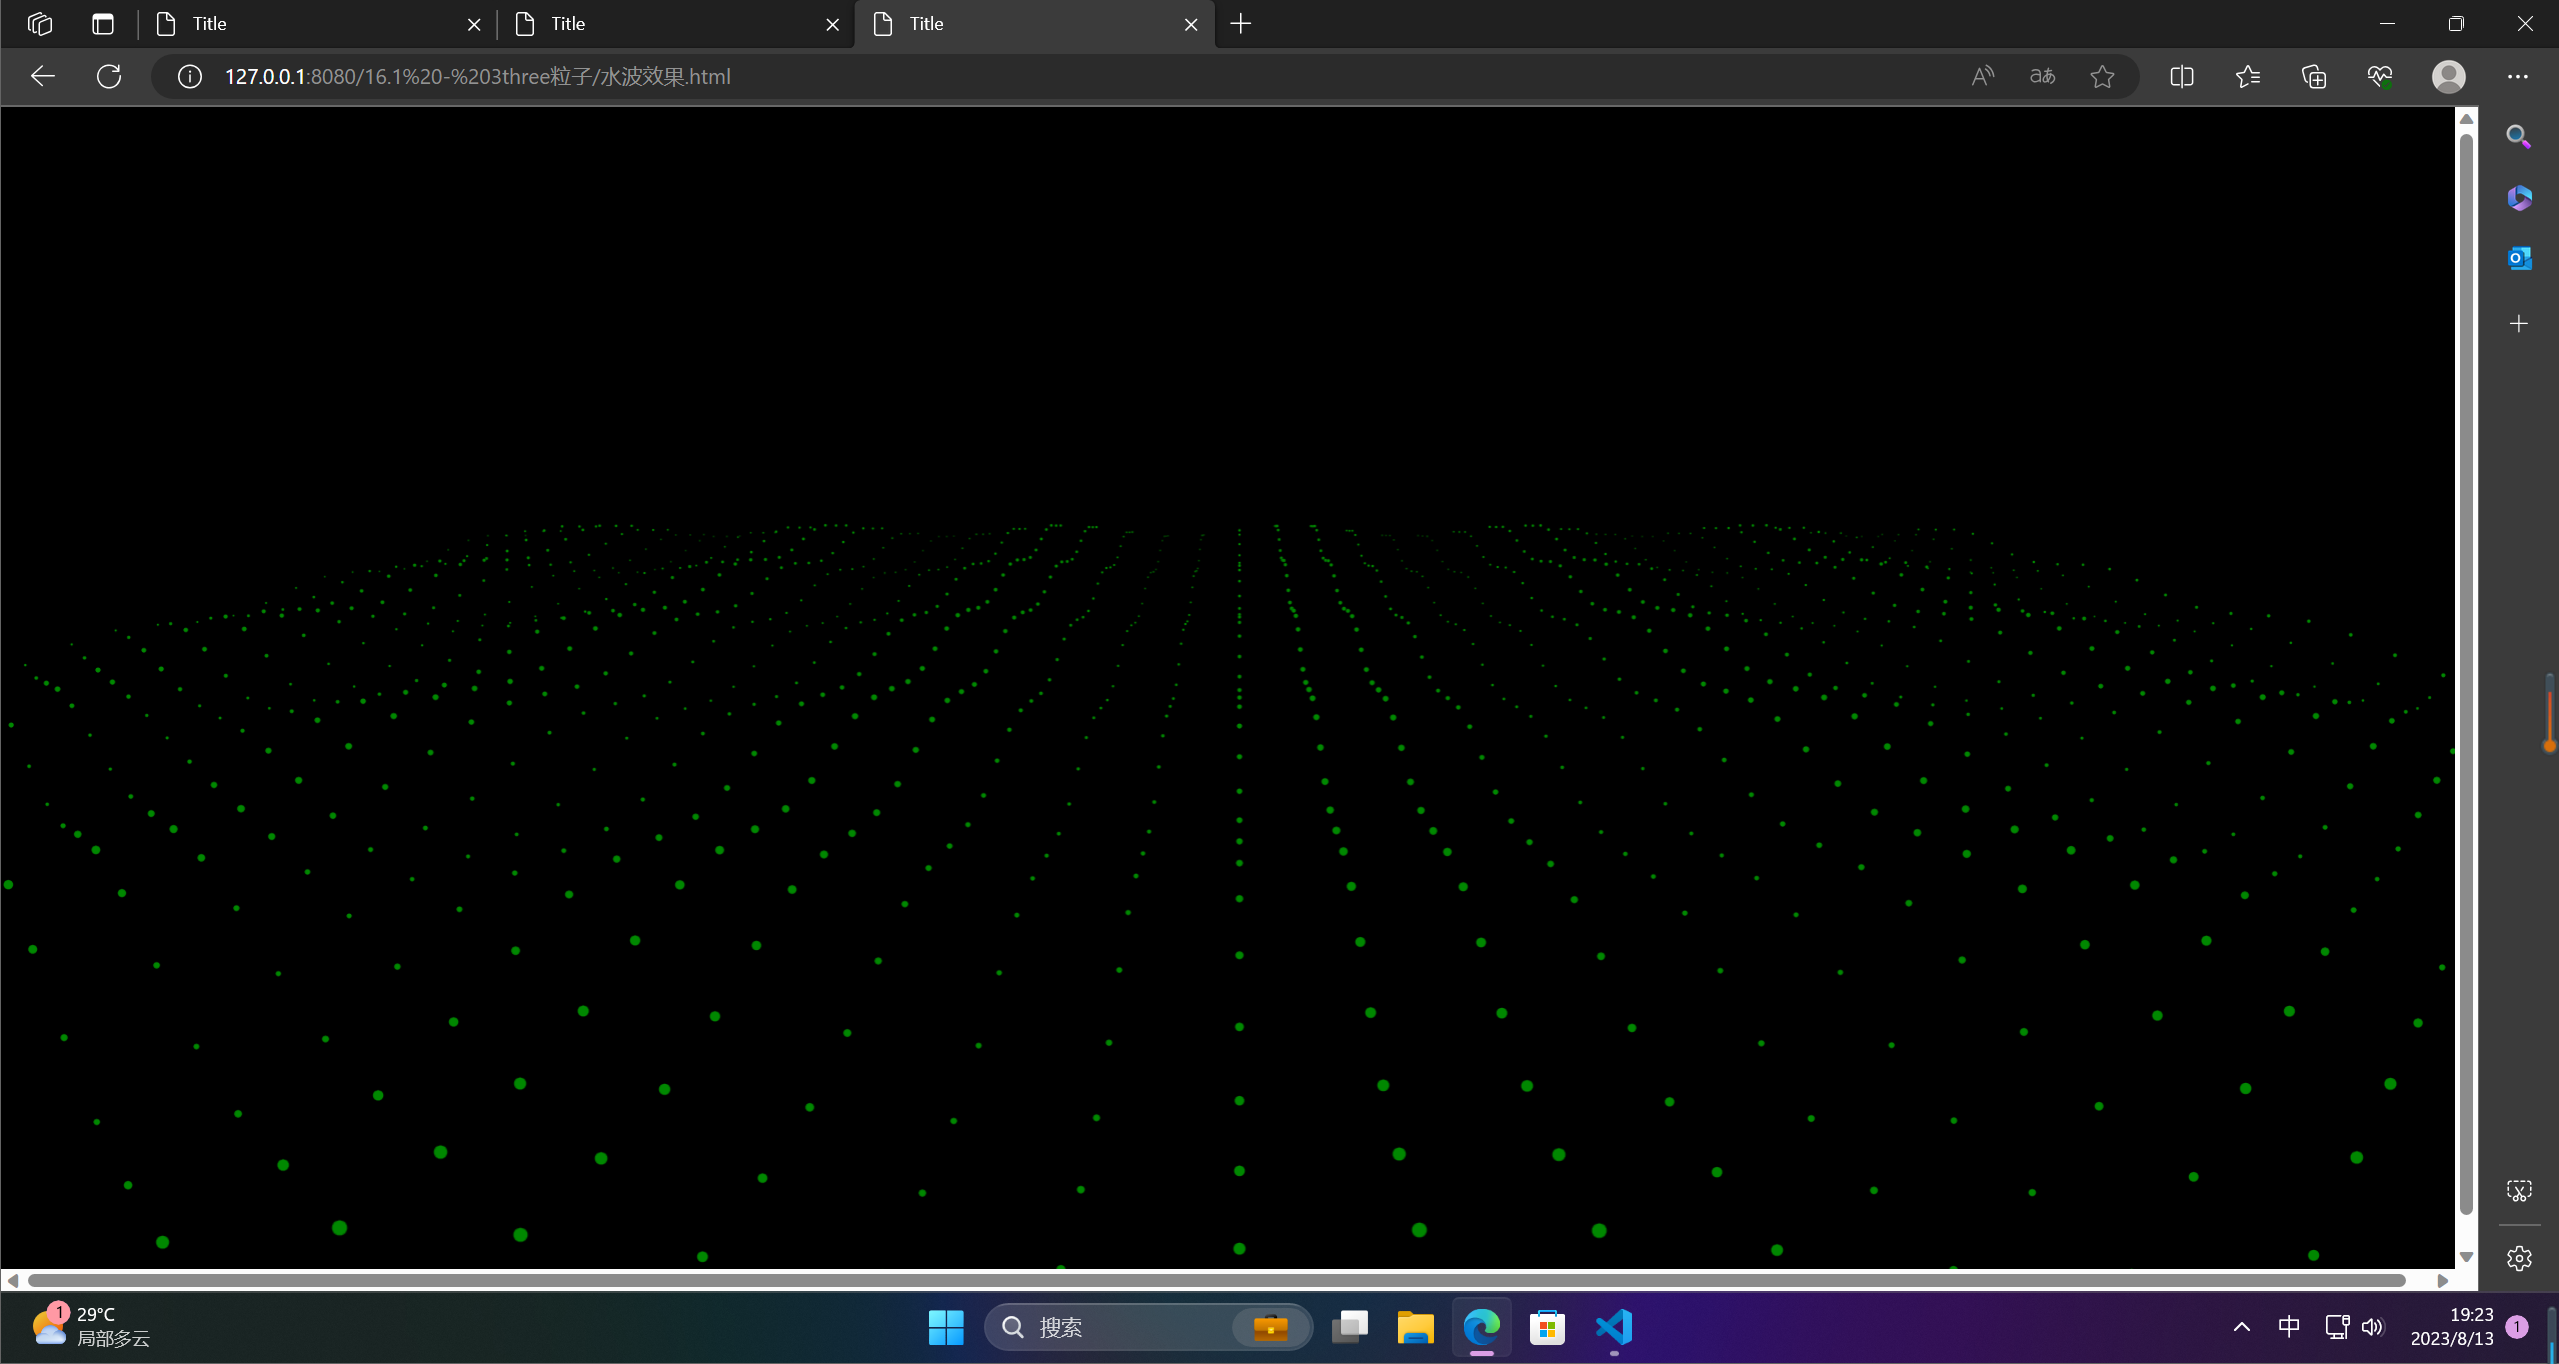
3.水波纹
水波纹是指水面上因为外界因素而产生的波动现象,通常表现为由中心向周围扩散的圆形波纹。水波纹可以由风吹、岸边拍打、水体震动等因素引起。在光线的折射与反射下,水波纹还会呈现出美丽的光影效果。水波纹是一种自然美景,也是很多人喜欢拍摄的主题之一。
<!DOCTYPE html>
<html lang="en">
<head>
  <meta charset="UTF-8">
  <title>Title</title>
  <style>
    *{


      margin: 0;
      padding: 0;
    }
  </style>
  <script src="../lib/three/three.js"></script>
</head>
<body>

</body>
</html>

<script>
  const clock = new THREE.Clock()
  // 创建一个场景
  const scene = new THREE.Scene();

  // 创建一个相机 视点
  const camera = new THREE.PerspectiveCamera(45, window.innerWidth / window.innerHeight, 1, 1000);
  // 设置相机的位置
  camera.position.set(0,50,200);
  camera.lookAt(new THREE.Vector3(0,0,0));

  // 创建一个渲染器
  const renderer = new THREE.WebGLRenderer();
  // 设置渲染器尺寸
  renderer.setSize(window.innerWidth, window.innerHeight);

  document.body.appendChild(renderer.domElement);

  // 添加灯光
  const spotLight = new THREE.SpotLight(0xffffff);
  spotLight.position.set(2000,8000,4000);
  scene.add(spotLight);

  const total = 20;
  const spriteList = [];

  createNormalSprite();

  // 使用canvas贴图来实现圆形
  function getSprite() {


    const canvas = document.createElement('canvas')
    const size = 8
    canvas.width = size * 2;
    canvas.height = size * 2;

    const c = canvas.getContext('2d')

    c.fillStyle = '#00ff00';
    c.arc(size, size, size / 1.5, 0, Math.PI * 2);
    c.fill();

    const texture = new THREE.Texture(canvas)
    texture.needsUpdate = true;
    return texture;
  }

  // 创建一个基础的粒子
  function createNormalSprite() {


    const material = new THREE.SpriteMaterial({


      color: 0x008800,
      map: getSprite(),
    })
    for (let i = -total; i < total; i++) {


      for (let j = -total; j < total; j++) {


        const sprite = new THREE.Sprite(material);
        sprite.position.set(i * 10, 0, j * 10);
        spriteList.push(sprite);
        scene.add(sprite);
      }
    }
  }

  // 变化的速度
  const speed = 0.1;
  // 波浪的高度
  const height = 5;
  // 波浪的幅度
  const step = 0.3;

  let status = 0;

  const animation = () => {


    // 渲染
    renderer.render(scene, camera);

    requestAnimationFrame(animation);

    let index = -1;
    for (let x = 0; x < total * 2; x++) {


      for (let y = 0; y < total * 2; y++) {


        index++;

        spriteList[index].position.y = (Math.sin(x + status) * step) * height + (Math.sin(y + status) * step) * height

        // 缩放系数
        const scaleValue = (Math.sin(x + status) * step) + 1
        spriteList[index].scale.set(scaleValue,scaleValue,scaleValue)
      }
    }

    status += speed;
  }
  animation()
</script>
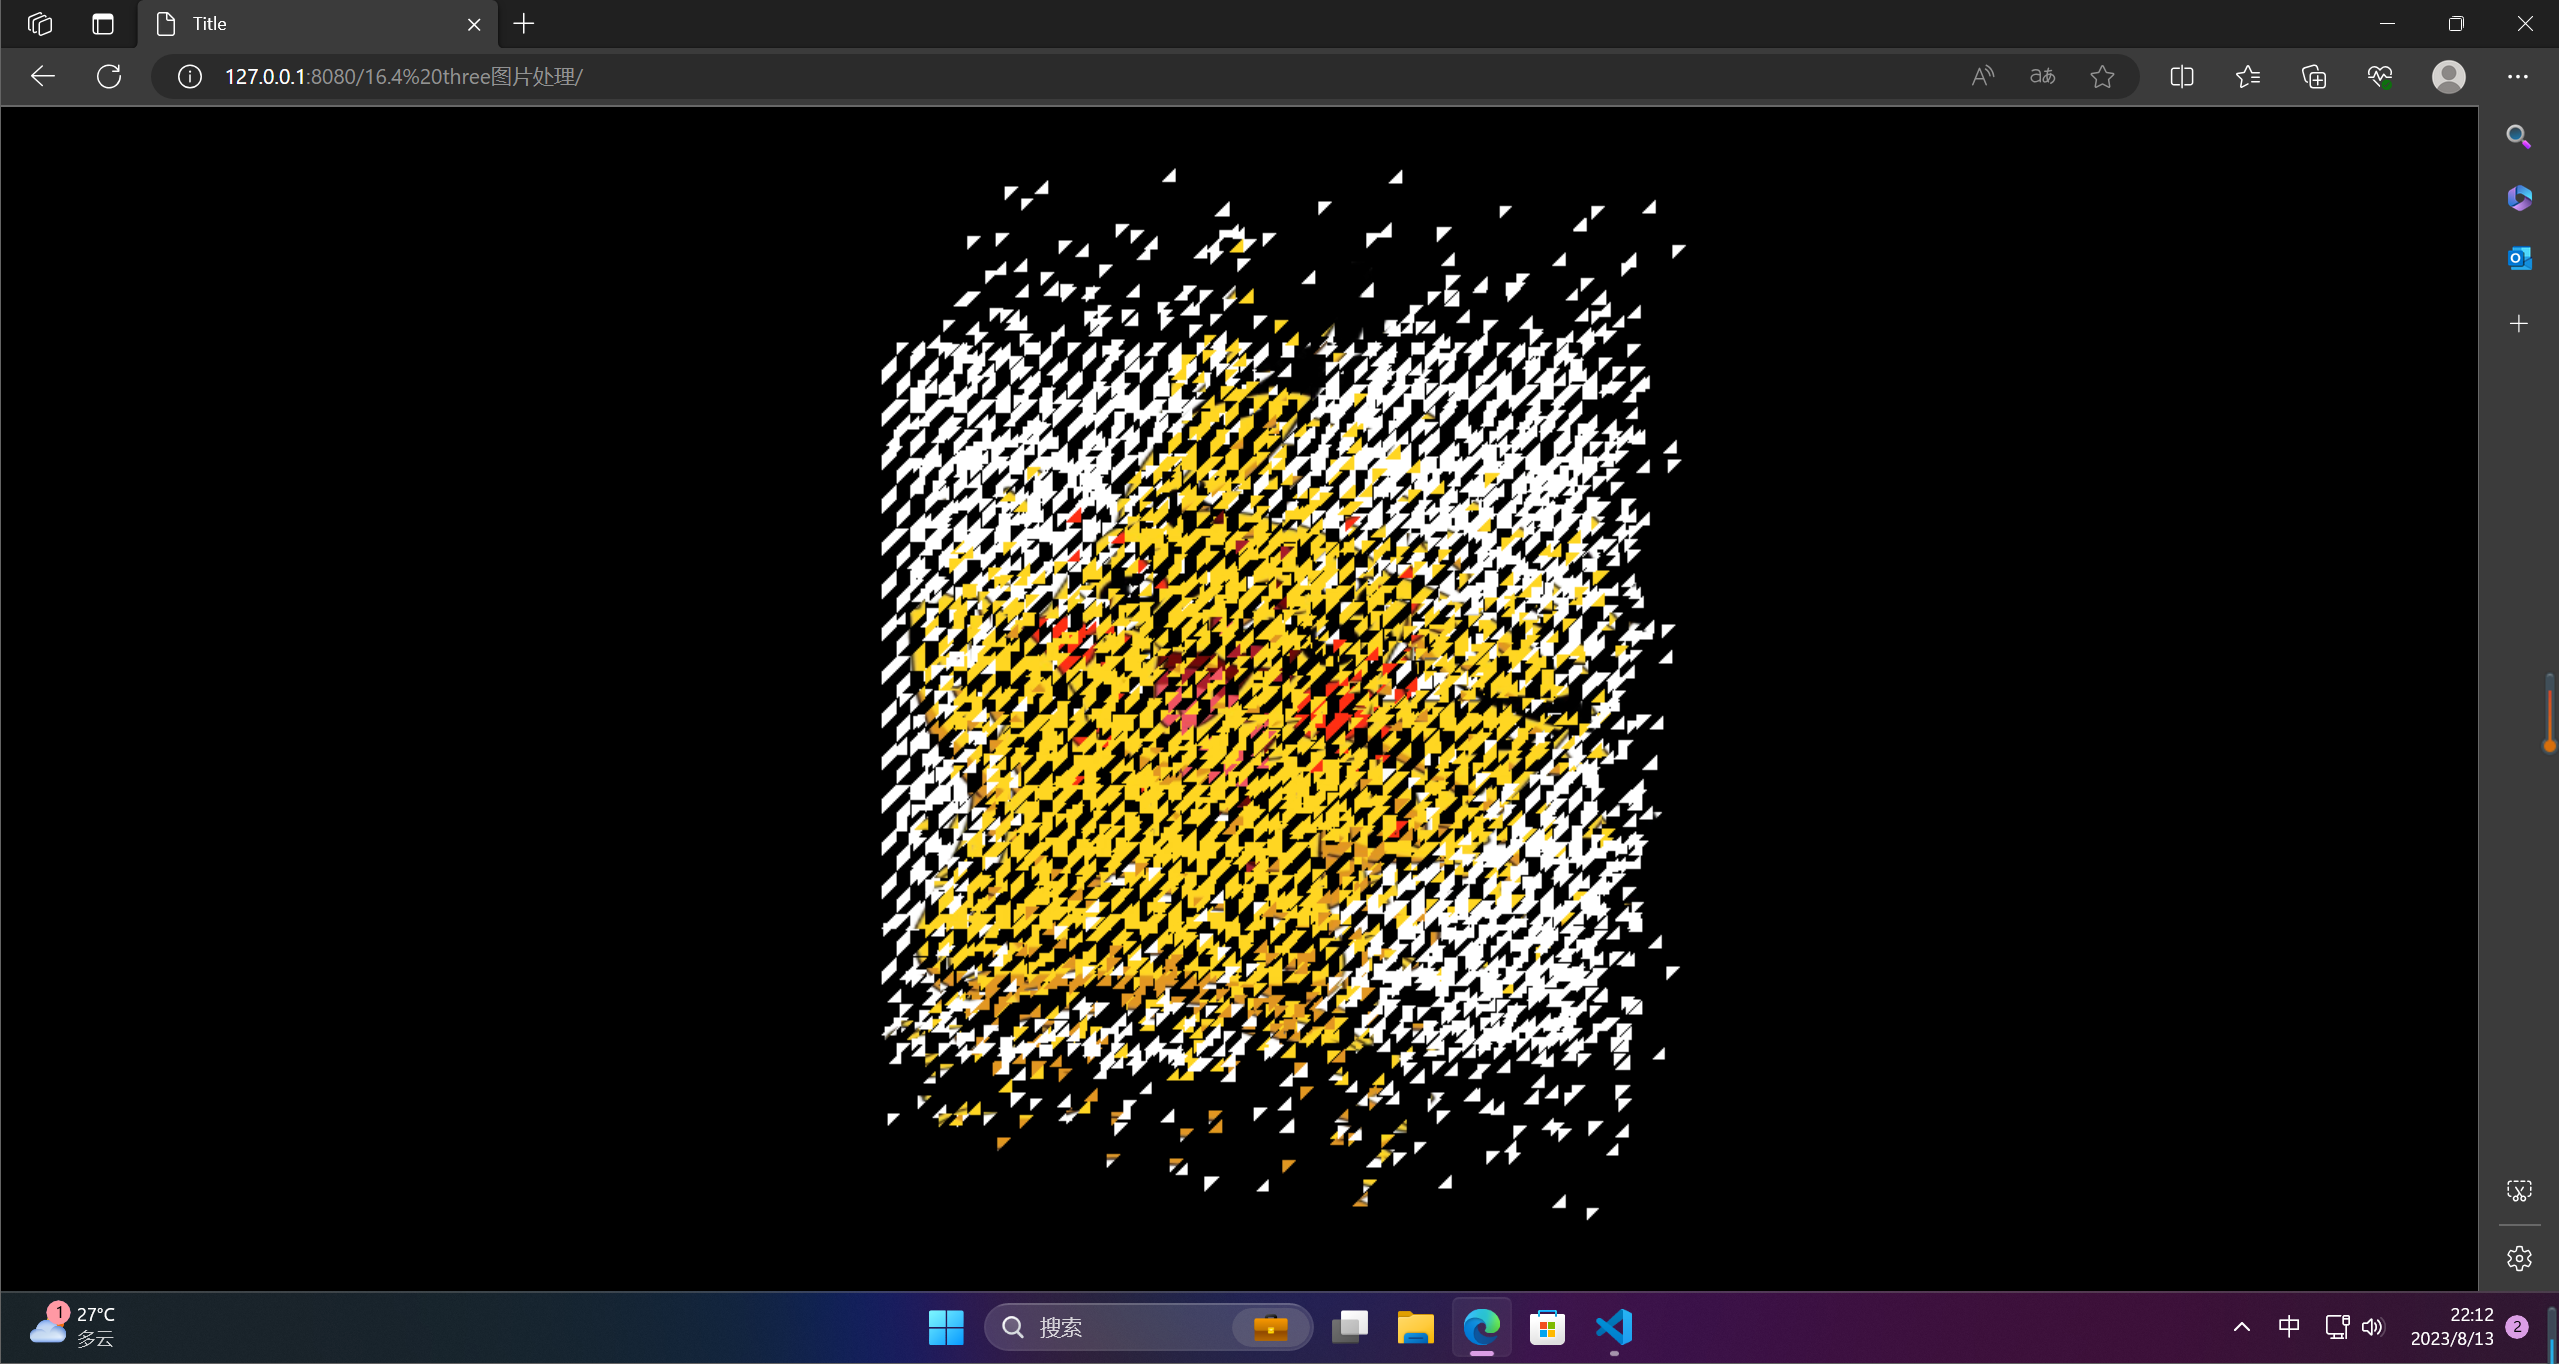
4.图片拆分重组
图片拆分重组是一种图像处理技术,它将一张图片拆分成多个小图片,再重新组合成新的图片。这种技术可以用于图片压缩、图片加密、图片转换等多种应用场景。
在图片拆分重组过程中,一般会将原始图片分成多个小块,每个小块可以是固定大小或者根据某种算法自适应大小。然后,可以通过不同的算法对这些小块进行重组,形成新的图片。比如可以按照某种规律将小块重新排列,或者通过加密算法对小块进行重新组合,从而生成一张新的图片。
图片拆分重组技术可以用于保护个人隐私、图像传输等领域,同时也可以用于美化图片、卡通化处理等应用。
<!DOCTYPE html>
<html lang="en">
<head>
  <meta charset="UTF-8">
  <title>Title</title>
  <style>
    *{


      margin: 0;
      padding: 0;
    }
  </style>
</head>
<body>

</body>
</html>

<script type="module">
  import * as THREE from 'https://cdn.skypack.dev/[email protected]';
  const clock = new THREE.Clock()
  // 创建一个场景
  const scene = new THREE.Scene();

  // 创建一个相机 视点
  const camera = new THREE.PerspectiveCamera(45, window.innerWidth / window.innerHeight, 1, 1000);
  // 设置相机的位置
  camera.position.set(0,0,100);
  camera.lookAt(new THREE.Vector3(0,0,0));


  // 创建一个渲染器
  const renderer = new THREE.WebGLRenderer();
  // 设置渲染器尺寸
  renderer.setSize(window.innerWidth, window.innerHeight);

  document.body.appendChild(renderer.domElement);

  // 添加灯光
  const spotLight = new THREE.SpotLight(0xffffff);
  spotLight.position.set(2000,8000,4000);
  scene.add(spotLight);

  const geometry = new THREE.PlaneGeometry(50,50,50,50)
  const material = new THREE.MeshBasicMaterial({


    map: new THREE.TextureLoader().load('../assets/pikachu.png'),
  })

  const indexList = geometry.index.array;

  const {

       position, normal, uv } = geometry.attributes;

  const p = position.array;
  const n = normal.array;
  const u = uv.array;
  const positionList = []
  const uvList = []
  const normalList = []

  Array.from(indexList).forEach(i => {


    positionList.push(p[i * 3], p[i * 3 + 1], p[i * 3 + 2])

    normalList.push(n[i * 3], n[i * 3 + 1], n[i * 3 + 2])

    uvList.push(u[i * 2], u[i * 2 + 1])
  })

  // 缓冲几何体
  const bufferGeometry = new THREE.BufferGeometry()
  bufferGeometry.setAttribute('position', new THREE.BufferAttribute(new Float32Array(positionList), 3))
  bufferGeometry.setAttribute('originPosition', new THREE.BufferAttribute(new Float32Array(positionList), 3))
  bufferGeometry.setAttribute('normal', new THREE.BufferAttribute(new Float32Array(normalList), 3))
  bufferGeometry.setAttribute('uv', new THREE.BufferAttribute(new Float32Array(uvList), 2))

  const plane = new THREE.Mesh(bufferGeometry, material)
  scene.add(plane)

  // 生成一些配置信息,
  const animate = []
  for (let i = 0; i < positionList.length; i += 9) {


    animate.push({


      // 开始动画的时间
      // 动画的完成程度是多少
      // 每一个动画的起点、终点、和控制点信息
      startTime: null,
      process: 0,
      start: {

      x: 0, y: 0, z: 0},
      end: {

      x: 0, y: 0, z: 0},
      c1: {

       x: Math.random() * 10, y: Math.random() * 40 - 20, z: 0 },
      c2: {

       x: Math.random() * 10, y: Math.random() * 40 - 20, z: 0 },
    })
  }

  // 贝塞尔曲线
  const bezier = (start, c1, c2, end, p) => {


    const result = {

      }
    const key = ['x', 'y', 'z']

    const p1 = p * p * p
    const p2 = p * p * (1 - p)
    const p3 = p * (1 - p) * (1 - p)
    const p4 = (1 - p) * (1 - p) * (1 - p)

    for (const k of key) {


      result[k] =
        start[k] * p4 +
        c1[k] * p3 * 3 +
        c2[k] * p2 * 3 +
        end[k] * p1;
    }

    return result;
  }

  // 是否开始,开始的时间。总的动画时间
  let startTotal = Date.now();
  // 总的进度
  let progress = 0;
  const circle = 2000;
  const animation = () => {


    // 粒子运动
    // 进度
    progress = (Date.now() - startTotal) / circle
    if (progress > 1) {


      progress = 1;
    }

    const x = -50 / 2 + 50 * progress;
    animate.forEach((item,index) => {


      if (!item.startTime && positionList[index * 2] < x) {


        item.startTime = Date.now();
      }

      // 已经开始动画
      if (item.startTime && item.process < 1) {


        item.process = (Date.now() - item.startTime) / circle;
        if (item.process > 1) {


          item.process = 1;
        }

        for (let i = 0; i < 3; i ++) {


          const cIndex = index * 3 + i;

          const originPosition = {


            x: positionList[cIndex * 3],
            y: positionList[cIndex * 3 + 1],
            z: positionList[cIndex * 3 + 2]
          }

          const {

      start, end, c1, c2} = item;
          const bezierPosition = bezier(start, c1, c2, end, item.process);
          const newPosition = {


            x: originPosition.x + bezierPosition.x,
            y: originPosition.y + bezierPosition.y,
            z: originPosition.z + bezierPosition.z,
          }

          bufferGeometry.attributes.position.setXYZ(cIndex, newPosition.x, newPosition.y, newPosition.z);
        }
      }
    })
    plane.geometry = bufferGeometry.clone();

    // 渲染
    renderer.render(scene, camera);

    requestAnimationFrame(animation);
  }
  animation()
</script>