近期公司业务需要,将表格内部的某字段内容两行显示,如果超出两行需要…来显示,在这里,公司用到的ui框架是iview,所以就此将table组件简单的修改一下,其中遇见的几个问题,在此记录一下
1、如何使超过2行显示点点点
misc.js
// 表格中内容超出后 显示... 鼠标移入并tip提示
/**
 * @param {

    *} h
 * @param {

    *} lines 最多显示多少行,超出后显示...
 * @param {

    *} content 显示的内容
 * @returns tip
 * @example {


          key: "vtmName",
          title: "标题",
          align: "center",
            render: (h,params) => {


            return toolTip(h, 2, params.row.vtmName)
            }
        }
 */
export const toolTip = (h, lines, content) => {


    return h('Tooltip', {


        props: {


            placement: 'bottom-start',
            transfer: true
        }
    }, [
        h('span', {


            style: {


                textOverflow: 'ellipsis',
                whiteSpace: 'normal',
                overflow: 'hidden',
                display: '-webkit-box',
                webkitBoxOrient: 'vertical',
                webkitLineClamp: lines + ''
            }
        }, content),
        h('span', {


            slot: 'content',
            style: {


                whiteSpace: 'normal',
                wordBreak: 'break-all'
            }
      }, content)
    ])
}

// 带超链接点击
/**
 * @param {

    *} h
 * @param {

    *} lines 最多显示多少行,超出后显示...
 * @param {

    *} content 显示的内容
 * @param {

    *} url  url链接地址
 * @returns tip
 * @example {


          key: "vtmName",
          title: "标题",
          align: "center",
            render: (h,params) => {


            return toolTipLink(h, 2, params.row.vtmName)
            }
        }
 */
export const toolTipLink = (h, lines, content, url) => {


    return h('Tooltip', {


        props: {


            placement: 'bottom-start',
            transfer: true,
            content: content
        }
    }, [
        h("a", {


            domProps: {


                href: url
            },
            style: {


                textOverflow: 'ellipsis',
                whiteSpace: 'normal',
                overflow: 'hidden',
                display: '-webkit-box',
                webkitBoxOrient: 'vertical',
                webkitLineClamp: lines + ''
            }
        }, content)
    ])
}`
vue中的使用
import {

     toolTip , toolTipLink } from 'msic.js的path'
columns: [
	{


          key: "vtmName"
          title: "标题",
          align: "center",
          render: (h,params) => {


            //我这里是超出2行后显示... , 并提示tip
            return toolTip(h, 2,params.row.vtmName)
            // 带超链接点击的
            //return toolTipLink(h,2,params.row.vtmName, 'https://www.baidu.com跳转的url')
        }
   	},
 ]
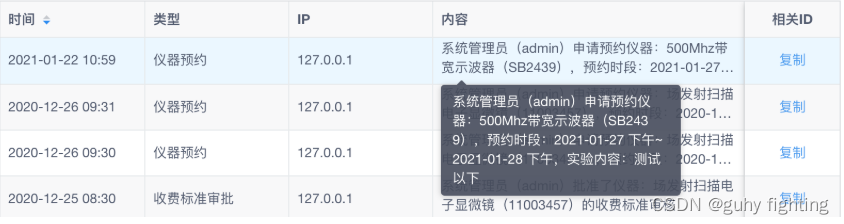
效果如下图所示
2、-webkit-line-clamp兼容性问题(火狐、IE)
-webkit-line-clamp本身不是一个正式的css属性,它目前适用于webkit为内核的浏览器。
所以,当我们需要两行字符,多出的部分用“…”替代的话,那么IE上和低版本的火狐浏览器是存在问题的
解决办法如下:
.content {


  font-size: 14px;
  color: #4A4A4A;
  overflow: hidden;
  line-height: 26px;
  position: relative;
  height: 45px;
}

.content :after {


  content: '...';
  text-align: right;
  position: absolute;
  bottom: 0;
  right: 0;
  width: 1.8em;
  height: 45px;
  background: linear-gradient(to right, rgba(255, 255, 255, 0), rgba(255, 255, 255, 1) 50%);
}
图片中展示部分会有些模糊,这个时候如果Firefox或者chrome等浏览器需要展示比较正常的话,那么就需要严格判断浏览器是否为IE浏览器,如果是那么才用当前的方式进行css样式修改。
用javascript做下兼容性判断:
  var ms_ie = false;
  var ua = window.navigator.userAgent;
  var old_ie = ua.indexOf('MSIE ');
  var new_ie = ua.indexOf('Trident/');
  if ((old_ie > -1) || (new_ie > -1)) {


      ms_ie = true;
  }

  if ( ms_ie ) {


    document.documentElement.className += " ie";
  }
.content {


  font-size: 14px;
  color: #4A4A4A;
  overflow: hidden;
  line-height: 26px;
  position: relative;
  height: 45px;
}

.ie .content :after {


  content: '...';
  text-align: right;
  position: absolute;
  bottom: 0;
  right: 0;
  width: 1.8em;
  height: 45px;
  background: linear-gradient(to right, rgba(255, 255, 255, 0), rgba(255, 255, 255, 1) 50%);
}
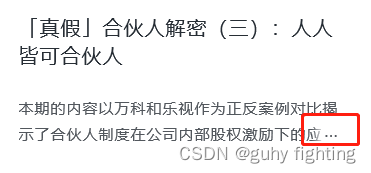
3、扩展性:文字环绕,如下图所示

html
<div class="box">
  <div class="text-overflow">
    <span class="tag">new</span>
    很多文本内容很多文本内容很多文本内容很多文本内容很多文本内容很多文本内容很多文本内容很多文本内容很多文本内容很多文本内容很多文本内容很多文本内容很多文本内容很多文本内容很多文本内容很多文本内容很多文本内容很多文本内容很多文本内容很多文本内容很多文本内容很多文本内容很多文本内容很多文本内容
  </div>
</div>
css
.box {


  width: 200px;
  overflow: hidden;
  display: -webkit-box;
  -webkit-line-clamp: 3;
  -webkit-box-orient: vertical;
}
.text-overflow {


  width: 200px;
  overflow: hidden;
  display: -webkit-box;
  -webkit-line-clamp: 2;
  -webkit-box-orient: vertical;
  font-size: 13px;
  line-height: 1.425;
  background-color: pink;
}
.tag {


  float: right;
  padding: 0 2px;
  color: #fff;
  background-color: #f32600;
  border-radius: 2px;
}