前言
单向数据流,父组件传给子组件的数据,子组件只能展示,不能修改,如果需要修改则需要emit事件让父组件修改
有些时候,一些组件并不是通过input来进行触发事件。也就是说value和input事件在大多数情况下能够适用,但是存在value另有含义,或者不能使用input触发的情况,这时候我们就不能使用v-model进行简写了。
就比如说选择框,绑定的值是checked而不是value,接收事件不是input而是change。
为了解决这个问题,尤雨溪在Vue2.2中,引入了model组件选项,也即是说你可以通过model来指定v-model绑定的值和属性。
vue2组件v-model.
1、vue2中双向绑定单个值(input)
<ChildComponent v-model = "title />
// 实际上是下面这种的简写
<ChildComponent :value = "title"  @input = "title = $event" />
子组件:
<template>
  <input type="text" :value="value" @input = "inputChange">
</template>

<script>
export default {


  name: "CustomInput",
  props: ['value'],
  methods: {


    inputChange(e) {


      this.$emit('input', e.target.value)
    }
  }
}
</script>
父组件:
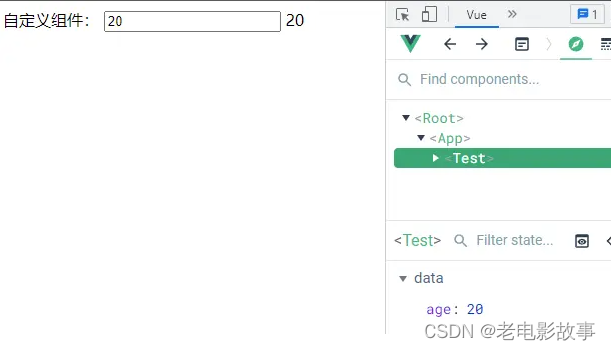
<template>
  <div class="test">
    <span>自定义组件:</span>
    <CustomInput v-model="age"/>
    // 等价
    // <CustomInput :value="age" @input="changeAge"/>
    {

    {

    age}}
  </div>
</template>

<script>
import CustomInput from "./CustomInput";

export default {


  name: "Test",
  components: {


    CustomInput,
  },
  data() {


    return {


      age: 20,
    }
  },
  methods: {


    changeAge(value) {


      this.age = Number(value);
    }
  }
}
</script>
在vue2中,v-model相当于用value传递了绑定值,用@input事件接收了子组件通过$emit传递的参数。
2、vue2中双向绑定单个值(非input 设置model选项)
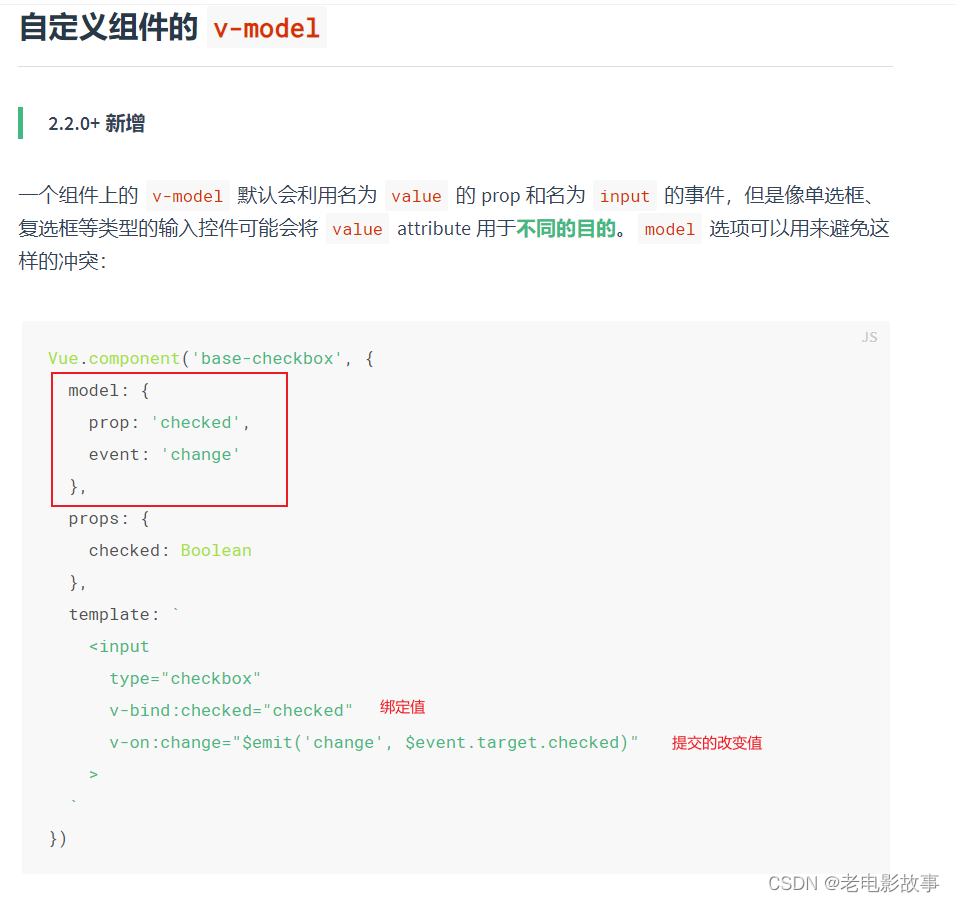
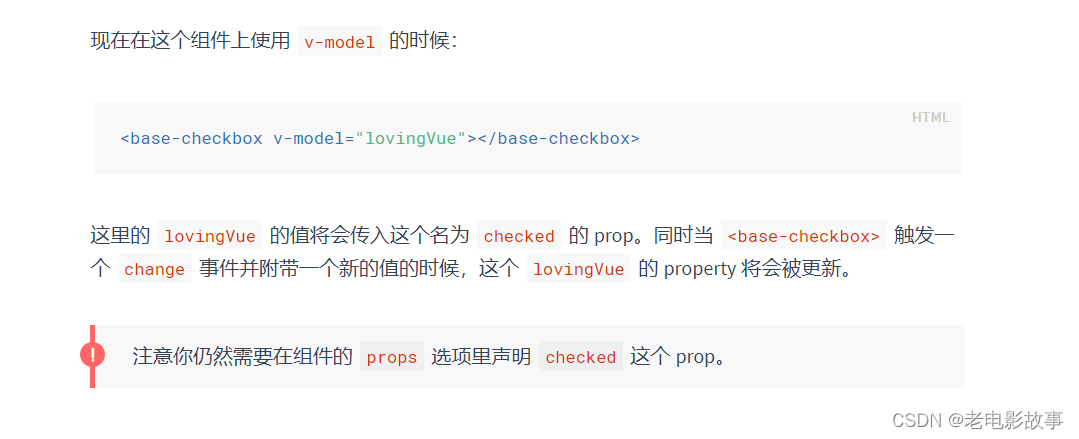
通过上面的代码,我们可以看到通过设置model选项,我们就可以直接使用指定的属性和事件,而不需要必须使用value和input了,value和input可以另外它用了。
3、vue2中双向绑定多个值
但是这样的话写起来很麻烦,而且v-model只能绑定一个值,这样的话我的组件封装不是只能改变一个值了,这样好像也不符合开发。
所以,再看下vue2文档
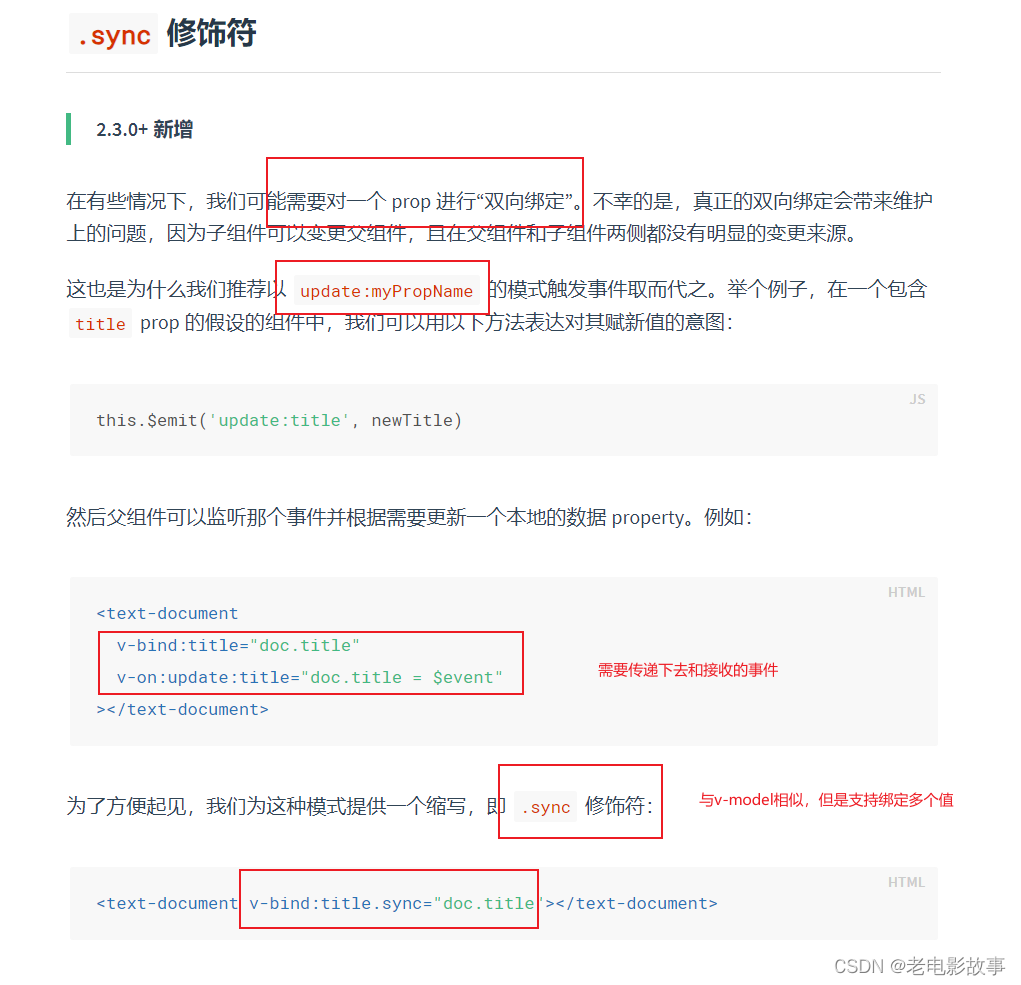
.sync和v-model类似,就是传递值和接收事件的简写。这样的话我们就可以不用写model了。直接告诉我更新哪个值。
注意哦
子组件:
父组件:

所以,绑定多个值,我们可以传递一个obj下去,使用v-bind.sync=‘obj’
再看一个例子:
子组件:
<template>
  <div>
    <input :value="value" @input = "inputChange">
    <input :value="name" @input = "inputNameChange">
  </div>
</template>

<script>
export default {


  name: "CustomInput",
  props: ['value', 'name'],
  methods: {


    inputChange(e) {


      this.$emit('input', e.target.value)
    },
    inputNameChange(e) {


      this.$emit('update:name', e.target.value);
    }
  }
}
</script>
父组件:
<template>
  <div class="test">
    <span>自定义组件:</span>
    <CustomInput v-model="age" :name.sync="name"/>
    // 此处v-model相当于:value="age" @input="age=$event"
  </div>
</template>

<script>
import CustomInput from "./CustomInput";

export default {


  name: "Test",
  components: {


    CustomInput,
  },
  data() {


    return {


      name: 'yn',
      age: 20,
    }
  },
  methods: {


    // changeAge(value) {


    //   this.age = Number(value);
    // }
  }
}
</script>
是不是学着有点懵B,又是.sync 又是update:title的,vue3又删除了.sync,看下vue3的吧,更好用
vue3组件v-model
通过上面知道vue2.x中既然v-model的主要原因是由于value和input事件可能另有它用,那么我们可不可以直接使用另外的属性和方法,而不需要去通过model进行定义。
vue3中就实现了这个功能,v-model绑定的不再是value,而是modelValue,接收的方法也不再是input,而是update:modelValue。使用方法如下:
1、vue3中双向绑定单个值
v-model 在原生元素上的用法:
<input v-model="searchText" />
其实等价于下面这段:
<input :value="searchText" @input="searchText = $event.target.value"/>
而当使用在一个组件上时,v-model 会被展开为如下的形式:
<CustomInput
  :modelValue="searchText"
  @update:modelValue="newValue => searchText = newValue"
/>
在子组件中写法是:
export default defineComponent({


    name:"CustomInput",
    props:{


        modelValue:String,   // v-model绑定的属性值
    },
    setup(props, {

     emit}) {


        const updateValue = (e: KeyboardEvent) => {


          emit("update:modelValue",targetValue);   // 传递的方法
        }
    }
}
也就是说vue3中,value改成了modelValue,input方法了改成update:modelValue
再看个例子
子组件:
<template>
  <div class='CustomInput'>
    <input :value="modelValue" @input = "inputChange">
  </div>
</template>

<script>
export default {


  name: 'CustomInput',
  props: {


    modelValue: String,
  },
  setup(props, {

     emit}) {


    function inputChange(e) {


      emit('update:modelValue', e.target.value)
    };
    return {


      inputChange,
    }
  }
};
</script>
父组件:
<template>
  <div class='test'>
  <CustomInput v-model="name"/>
    {

    {

    name}}
  </div>
</template>

<script>
import CustomInput from './CustomInput';
import {

     defineComponent, ref} from 'vue';

export default defineComponent({


  name: 'test',
  components: {


    CustomInput
  },
  setup() {


    const name = ref('zm');
    return {


      name
    }
  }
});
</script>
2、vue3中双向绑定多个值
例子1:
<UserName
  v-model:first-name="first"
  v-model:last-name="last"
/>
<script setup>
defineProps({


  firstName: String,
  lastName: String
})

defineEmits(['update:firstName', 'update:lastName'])
</script>

<template>
  <input
    type="text"
    :value="firstName"
    @input="$emit('update:firstName', $event.target.value)"
  />
  <input
    type="text"
    :value="lastName"
    @input="$emit('update:lastName', $event.target.value)"
  />
</template>
例子2:
父组件:
<template>
  <div class='test'>
  <CustomInput v-model:name="name" v-model:age="age"/>
    {

    {

    name}} {

    {

    age}}
  </div>
</template>

<script>
import CustomInput from './CustomInput';
import {

     defineComponent, ref} from 'vue';

export default defineComponent({


  name: 'test',
  components: {


    CustomInput
  },
  setup() {


    const name = ref('zm');
    const age = ref(20);
    return {


      name,
      age
    }
  }
});
子组件:
<template>
  <div class='CustomInput'>
    <input :value="age" @input = "inputChange">
    <input :value="name" @input = "inputNameChange">
  </div>
</template>

<script>
export default {


  name: 'CustomInput',
  props: {


    name: String,
    age: Number,
  },
  setup(props, {

     emit}) {


    function inputChange(e) {


      emit('update:age', e.target.value)
    };
    function inputNameChange(e) {


      emit('update:name', e.target.value);
    }
    return {


      inputChange,
      inputNameChange,
    }
  }
};
</script>
3、v-model参数
默认情况下,v-model 在组件上都是使用 modelValue 作为 prop,并以 update:modelValue 作为对应的事件。我们可以通过给 v-model 指定一个参数来更改这些名字:
<MyComponent v-model:title="bookTitle" />
那么在子组件中,就可以使用title代替modelValue
<!-- MyComponent.vue -->
<script setup>
defineProps(['title'])
defineEmits(['update:title'])
</script>

<template>
  <input
    type="text"
    :value="title"
    @input="$emit('update:title', $event.target.value)"
  />
</template>
也就是说,我们最终的使用方法是:
<ChildComponent v-model:title="title"  />
// 或者
<ChildComponent :title="title" @update:title = "title = $event" />
再看个例子
父组件:
<template>
  <div id="app">
    <h1>Vue3中v-model的变化</h1>
    <input type="text" v-model="name"/>
    <p>{

    {

     name }}</p>
    <!-- Vue2的写法 -->
    <!-- v-model实际上就是:value和@input的语法糖 -->
    <!-- 双向绑定多个属性的时候可以使用.sync关键字 -->
    <CustomInput v-model="age" :name.sync="name"/>
    <!-- Vue3的写法 -->
    <CustomInput v-model:age="age" v-model:name="name"/>
  </div>
</template>

<script>
import CustomInput from "../components/CustomInput.vue";
export default {


  name: "App",
  components: {


  	CustomInput
  },
	data() {


    return {


    	name: "你好",
      age: 20,
    }
  },
}
</script>
子组件:
<template>
  <div class="custom-input">
    <h1>自定义的input</h1>
    <!-- Vue2的写法 -->
    <input type="text" :value="value" @input="onInput" />
    <input type="text" :value="name" @input="onNameInput" />
    <!-- Vue3的写法 -->
    <input type="text" :value="age" @input="onInput" />
    <input type="text" :value="name" @input="onNameInput" />
  </div>
</template>

<script>
import CustomInput from "../components/CustomInput.vue";
export default {


  // Vue2的写法
  props: ["value", "name"],
  // Vue3的写法,直接接收绑定的参数
  props: ["age", "name"],
  // Vue3双向绑定单个属性时,可以使用modelValue来接收参数并更新,对应的触发事件为update:modelValue
  props: ["modelValue"],
  methods: {


  	onInput(e) {


      // Vue2的写法
      // 触发的事件只能是input
      // e.target.value是字符串需要转换成数字
    	this.$emit("input", parseInt(e.target.value));
      // Vue3的写法
      this.$emit("update:age", e.target.value);
    },
    onNameInput(e) {


      // 只能用update
    	this.$emit("update:name", e.target.value);
    },
  },
}
</script>
好了,到目前为止,我们介绍了vue2中的v-model的使用以及问题,vue3中v-model的新的使用语法。赶快去体验vue3的使用吧。