IO,NIO简单分析
其实意味着:数据不停地搬入搬出缓冲区而已(使用了缓冲区)。比如,用户程序发起读操作,导致“ syscall read ”系统调用,就会把数据搬入到 一个buffer中;用户发起写操作,导致 “syscall write ”系统调用,将会把一个 buffer 中的数据 搬出去(发送到网络中 or 写入到磁盘文件)
上面的过程看似简单,但是底层操作系统具体如何实现以及实现的细节就非常复杂了。正是因为实现方式不同,有针对普通情况下的文件传输(暂且称普通IO吧),也有针对大文件传输或者批量大数据传输的实现方式,比如zerocopy技术

Io过程简单分析:
1)程序员写代码创建一个缓冲区(这个缓冲区是用户缓冲区):然后在一个while循环里面调用read()方法读数据(触发"syscall read"系统调用)
byte[] bys = new byte[1024];
int len = 0;
while((len=fis.read(bys))!=-1) {
	System.out.print(new String(bys,0,len));
}
2)当执行到read()方法时,其实底层是发生了很多操作的:
①内核给磁盘控制器发命令说:我要读磁盘上的某某块磁盘块上的数据
②在DMA的控制下,把磁盘上的数据读入到内核缓冲区。
③内核把数据从内核缓冲区复制到用户缓冲区
从上面的步骤中可以分析出什么?
ⓐ对于操作系统而言,JVM只是一个用户进程,处于用户态空间中。而处于用户态空间的进程是不能直接操作底层的硬件的。而IO操作就需要操作底层的硬件,比如磁盘。因此,IO操作必须得借助内核的帮助才能完成(中断,trap),即:会有用户态到内核态的切换。
ⓑ我们写代码 new byte[] 数组时,一般是都是“随意” 创建一个“任意大小”的数组。比如,new byte[128]、new byte[1024]、new byte[4096]....
但是,对于磁盘块的读取而言,每次访问磁盘读数据时,并不是读任意大小的数据的,而是:每次读一个磁盘块或者若干个磁盘块(这是因为访问磁盘操作代价是很大的,而且我们也相信局部性原理) 因此,就需要有一个“中间缓冲区”--即内核缓冲区。先把数据从磁盘读到内核缓冲区中,然后再把数据从内核缓冲区搬到用户缓冲区。
这也是为什么我们总感觉到第一次read操作很慢,而后续的read操作却很快的原因吧。因为,对于后续的read操作而言,它所需要读的数据很可能已经在内核缓冲区了,此时只需将内核缓冲区中的数据拷贝到用户缓冲区即可,并未涉及到底层的读取磁盘操作,当然就快了。
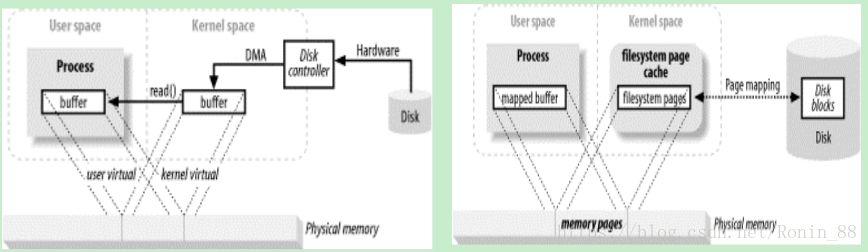
从上图可以看出:内核空间的 buffer 与 用户空间的 buffer 都映射到同一块 物理内存区域。
它的主要特点如下:
①对文件的操作不需要再发read 或者 write 系统调用了
②当用户进程访问“内存映射文件”地址时,自动产生缺页错误,然后由底层的OS负责将磁盘上的数据送到内存
这就是是JAVA NIO中提到的内存映射缓冲区(Memory-Mapped-Buffer)它类似于JAVA NIO中的直接缓冲区(Directed Buffer)。MemoryMappedBuffer可以通过java.nio.channels.FileChannel.java(通道)的 map方法创建。
使用内存映射缓冲区来操作文件,它比普通的IO操作读文件要快得多。甚至比使用文件通道(FileChannel)操作文件 还要快。因为,使用内存映射缓冲区操作文件时,没有显示的系统调用(read,write),而且OS还会自动缓存一些文件页(memory page)
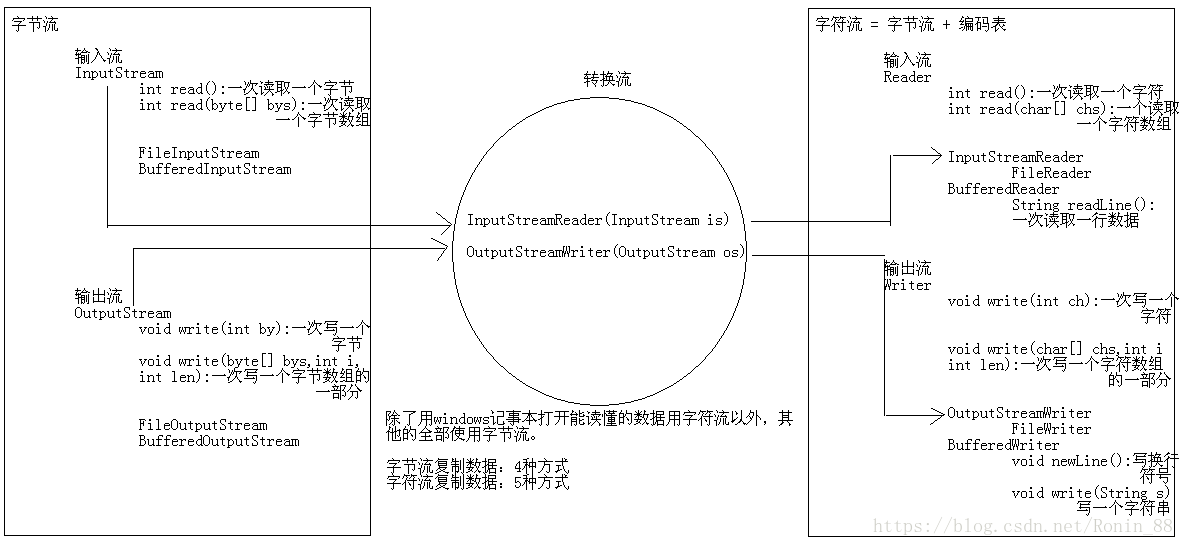
IO流分类:
字节流:
InputStream:FileInputStream,BufferedInputStream
OutputStream:FileOutputStream,BufferedOutputStream
字符流:
Reader:FileReader,BufferedReader
Writer:FileWriter,BufferedWriter
见下图
NIO :
Java NIO (New IO)是从Java 1.4版本开始引入的 一个新的IO API,可以替代标准的Java IO API 。 NIO与原来的IO有同样的作用和目的,但是使用 的方式完全不同,NIO支持面向缓冲区的、基于 通道的IO操作。NIO将以更加高效的方式进行文 件的读写操作。
IO和NIO的区别

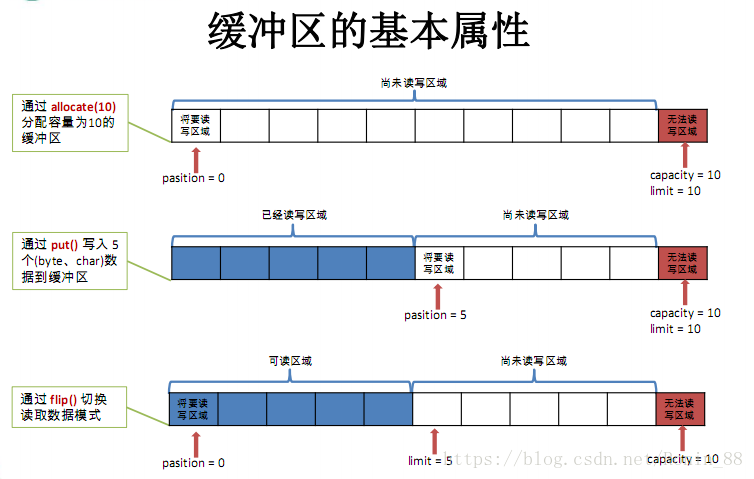
buffer缓冲区属性
案例:
/*
 * 一、缓冲区(Buffer):在 Java NIO 中负责数据的存取。缓冲区就是数组。用于存储不同数据类型的数据
 *
 * 根据数据类型不同(boolean 除外),提供了相应类型的缓冲区:
 * ByteBuffer
 * CharBuffer
 * ShortBuffer
 * IntBuffer
 * LongBuffer
 * FloatBuffer
 * DoubleBuffer
 *
 * 上述缓冲区的管理方式几乎一致,通过 allocate() 获取缓冲区
 *
 * 二、缓冲区存取数据的两个核心方法:
 * put() : 存入数据到缓冲区中
 * get() : 获取缓冲区中的数据
 *
 * 三、缓冲区中的四个核心属性:
 * capacity : 容量,表示缓冲区中最大存储数据的容量。一旦声明不能改变。
 * limit : 界限,表示缓冲区中可以操作数据的大小。(limit 后数据不能进行读写)
 * position : 位置,表示缓冲区中正在操作数据的位置。
 *
 * mark : 标记,表示记录当前 position 的位置。可以通过 reset() 恢复到 mark 的位置
 *
 * 0 <= mark <= position <= limit <= capacity
 *
 * 四、直接缓冲区与非直接缓冲区:
 * 非直接缓冲区:通过 allocate() 方法分配缓冲区,将缓冲区建立在 JVM 的内存中
 * 直接缓冲区:通过 allocateDirect() 方法分配直接缓冲区,将缓冲区建立在物理内存中。可以提高效率
 */
public class TestBuffer {

	@Test
	public void test3(){
		//分配直接缓冲区
		ByteBuffer buf = ByteBuffer.allocateDirect(1024);

		System.out.println(buf.isDirect());
	}

	@Test
	public void test2(){
		String str = "abcde";

		ByteBuffer buf = ByteBuffer.allocate(1024);
		buf.put(str.getBytes());
		buf.flip();

		byte[] dst = new byte[buf.limit()];
		buf.get(dst, 0, 2);
		System.out.println(new String(dst, 0, 2));
		System.out.println(buf.position());

		//mark() : 标记
		buf.mark();

		buf.get(dst, 2, 2);
		System.out.println(new String(dst, 2, 2));
		System.out.println(buf.position());

		//reset() : 恢复到 mark 的位置
		buf.reset();
		System.out.println(buf.position());

		//判断缓冲区中是否还有剩余数据
		if(buf.hasRemaining()){

			//获取缓冲区中可以操作的数量
			System.out.println(buf.remaining());
		}
	}

	@Test
	public void test1(){
		String str = "abcde";

		//1. 分配一个指定大小的缓冲区
		ByteBuffer buf = ByteBuffer.allocate(1024);

		System.out.println("-----------------allocate()----------------");
		System.out.println(buf.position());
		System.out.println(buf.limit());
		System.out.println(buf.capacity());

		//2. 利用 put() 存入数据到缓冲区中
		buf.put(str.getBytes());

		System.out.println("-----------------put()----------------");
		System.out.println(buf.position());
		System.out.println(buf.limit());
		System.out.println(buf.capacity());

		//3. 切换读取数据模式
		buf.flip();

		System.out.println("-----------------flip()----------------");
		System.out.println(buf.position());
		System.out.println(buf.limit());
		System.out.println(buf.capacity());

		//4. 利用 get() 读取缓冲区中的数据
		byte[] dst = new byte[buf.limit()];
		buf.get(dst);
		System.out.println(new String(dst, 0, dst.length));

		System.out.println("-----------------get()----------------");
		System.out.println(buf.position());
		System.out.println(buf.limit());
		System.out.println(buf.capacity());

		//5. rewind() : 可重复读
		buf.rewind();

		System.out.println("-----------------rewind()----------------");
		System.out.println(buf.position());
		System.out.println(buf.limit());
		System.out.println(buf.capacity());

		//6. clear() : 清空缓冲区. 但是缓冲区中的数据依然存在,但是处于“被遗忘”状态
		buf.clear();

		System.out.println("-----------------clear()----------------");
		System.out.println(buf.position());
		System.out.println(buf.limit());
		System.out.println(buf.capacity());

		System.out.println((char)buf.get());

	}

}
通道
/*
 * 一、通道(Channel):用于源节点与目标节点的连接。在 Java NIO 中负责缓冲区中数据的传输。Channel 本身不存储数据,因此需要配合缓冲区进行传输。
 *
 * 二、通道的主要实现类
 * 	java.nio.channels.Channel 接口:
 * 		|--FileChannel
 * 		|--SocketChannel
 * 		|--ServerSocketChannel
 * 		|--DatagramChannel
 *
 * 三、获取通道
 * 1. Java 针对支持通道的类提供了 getChannel() 方法
 * 		本地 IO:
 * 		FileInputStream/FileOutputStream
 * 		RandomAccessFile
 *
 * 		网络IO:
 * 		Socket
 * 		ServerSocket
 * 		DatagramSocket
 *
 * 2. 在 JDK 1.7 中的 NIO.2 针对各个通道提供了静态方法 open()
 * 3. 在 JDK 1.7 中的 NIO.2 的 Files 工具类的 newByteChannel()
 *
 * 四、通道之间的数据传输
 * transferFrom()
 * transferTo()
 *
 * 五、分散(Scatter)与聚集(Gather)
 * 分散读取(Scattering Reads):将通道中的数据分散到多个缓冲区中
 * 聚集写入(Gathering Writes):将多个缓冲区中的数据聚集到通道中
 *
 * 六、字符集:Charset
 * 编码:字符串 -> 字节数组
 * 解码:字节数组  -> 字符串
 *
 */
public class TestChannel {

	//字符集
	@Test
	public void test6() throws IOException{
		Charset cs1 = Charset.forName("GBK");

		//获取编码器
		CharsetEncoder ce = cs1.newEncoder();

		//获取解码器
		CharsetDecoder cd = cs1.newDecoder();

		CharBuffer cBuf = CharBuffer.allocate(1024);
		cBuf.put("哈哈哈哈");
		cBuf.flip();

		//编码
		ByteBuffer bBuf = ce.encode(cBuf);

		for (int i = 0; i < 12; i++) {
			System.out.println(bBuf.get());
		}

		//解码
		bBuf.flip();
		CharBuffer cBuf2 = cd.decode(bBuf);
		System.out.println(cBuf2.toString());

		System.out.println("------------------------------------------------------");

		Charset cs2 = Charset.forName("GBK");
		bBuf.flip();
		CharBuffer cBuf3 = cs2.decode(bBuf);
		System.out.println(cBuf3.toString());
	}

	@Test
	public void test5(){
		Map<String, Charset> map = Charset.availableCharsets();

		Set<Entry<String, Charset>> set = map.entrySet();

		for (Entry<String, Charset> entry : set) {
			System.out.println(entry.getKey() + "=" + entry.getValue());
		}
	}

	//分散和聚集
	@Test
	public void test4() throws IOException{
		RandomAccessFile raf1 = new RandomAccessFile("1.txt", "rw");

		//1. 获取通道
		FileChannel channel1 = raf1.getChannel();

		//2. 分配指定大小的缓冲区
		ByteBuffer buf1 = ByteBuffer.allocate(100);
		ByteBuffer buf2 = ByteBuffer.allocate(1024);

		//3. 分散读取
		ByteBuffer[] bufs = {buf1, buf2};
		channel1.read(bufs);

		for (ByteBuffer byteBuffer : bufs) {
			byteBuffer.flip();
		}

		System.out.println(new String(bufs[0].array(), 0, bufs[0].limit()));
		System.out.println("-----------------");
		System.out.println(new String(bufs[1].array(), 0, bufs[1].limit()));

		//4. 聚集写入
		RandomAccessFile raf2 = new RandomAccessFile("2.txt", "rw");
		FileChannel channel2 = raf2.getChannel();

		channel2.write(bufs);
	}

	//通道之间的数据传输(直接缓冲区)
	@Test
	public void test3() throws IOException{
		long start = System.currentTimeMillis();
		FileChannel inChannel = FileChannel.open(Paths.get("d:/1.avi"), StandardOpenOption.READ);
		FileChannel outChannel = FileChannel.open(Paths.get("d:/2.avi"), StandardOpenOption.WRITE, StandardOpenOption.READ, StandardOpenOption.CREATE);

//		inChannel.transferTo(0, inChannel.size(), outChannel);
		outChannel.transferFrom(inChannel, 0, inChannel.size());

		inChannel.close();
		outChannel.close();
		long end = System.currentTimeMillis();
		System.out.println("耗费时间为:" + (end - start));
	}

	//使用直接缓冲区完成文件的复制(内存映射文件)
	@Test
	public void test2() throws IOException{//2127-1902-1777
		long start = System.currentTimeMillis();

		FileChannel inChannel = FileChannel.open(Paths.get("d:/1.avi"), StandardOpenOption.READ);
		FileChannel outChannel = FileChannel.open(Paths.get("d:/2.avi"), StandardOpenOption.WRITE, StandardOpenOption.READ, StandardOpenOption.CREATE);

		//内存映射文件
		MappedByteBuffer inMappedBuf = inChannel.map(MapMode.READ_ONLY, 0, inChannel.size());
		MappedByteBuffer outMappedBuf = outChannel.map(MapMode.READ_WRITE, 0, inChannel.size());

		//直接对缓冲区进行数据的读写操作
		byte[] dst = new byte[inMappedBuf.limit()];
		inMappedBuf.get(dst);
		outMappedBuf.put(dst);

		inChannel.close();
		outChannel.close();

		long end = System.currentTimeMillis();
		System.out.println("耗费时间为:" + (end - start));
	}

	//利用通道完成文件的复制(非直接缓冲区)
	@Test
	public void test1(){//10874-10953
		long start = System.currentTimeMillis();

		FileInputStream fis = null;
		FileOutputStream fos = null;
		//①获取通道
		FileChannel inChannel = null;
		FileChannel outChannel = null;
		try {
			fis = new FileInputStream("d:/1.avi");
			fos = new FileOutputStream("d:/2.avi");

			inChannel = fis.getChannel();
			outChannel = fos.getChannel();

			//②分配指定大小的缓冲区
			ByteBuffer buf = ByteBuffer.allocate(1024);

			//③将通道中的数据存入缓冲区中
			while(inChannel.read(buf) != -1){
				buf.flip(); //切换读取数据的模式
				//④将缓冲区中的数据写入通道中
				outChannel.write(buf);
				buf.clear(); //清空缓冲区
			}
		} catch (IOException e) {
			e.printStackTrace();
		} finally {
			if(outChannel != null){
				try {
					outChannel.close();
				} catch (IOException e) {
					e.printStackTrace();
				}
			}

			if(inChannel != null){
				try {
					inChannel.close();
				} catch (IOException e) {
					e.printStackTrace();
				}
			}

			if(fos != null){
				try {
					fos.close();
				} catch (IOException e) {
					e.printStackTrace();
				}
			}

			if(fis != null){
				try {
					fis.close();
				} catch (IOException e) {
					e.printStackTrace();
				}
			}
		}

		long end = System.currentTimeMillis();
		System.out.println("耗费时间为:" + (end - start));

	}

}
应用:网络编程
传统的 IO 流都是阻塞式的。也就是说,当一个线程调用 read() 或write() 时,该线程被阻塞,直到有一些数据被读取或写入,该线程在此期间不 能执行其他任务。因此,在完成网络通信进行IO 操作时,由于线程会阻塞,所以服务器端必须为每个客户端都提供一个独立的线程进行处理, 当服务器端需要处理大量客户端时,性能急剧下降
Java NIO 是非阻塞模式的。当线程从某通道进行读写数据时,若没有数据可用时,该线程可以进行其他任务。线程通常将非阻塞 IO 的空闲时间用于在其他通道上执行IO 操作,所以单独的线程可以管理多个输入 和输出通道。因此,NIO 可以让服务器端使用一个或有限几个线程来同时处理连接到服务器端的所有客户端。
当调用register(Selector sel, int ops) 将通道注册选择器时,选择器对通道的监听事件,需要通过第二个参数ops 指定。
可以监听的事件类型(可使用SelectionKey 的四个常量表示):
读 : SelectionKey.OP_READ (1)
写 : SelectionKey.OP_WRITE (4 )
连接 : SelectionKey.OP_CONNECT (8)
接收 : SelectionKey.OP_ACCEPT (16)
若注册时不止监听一个事件,则可以使用“位或”操作符连接。

客户端:
import java.io.IOException;
import java.net.InetSocketAddress;
import java.nio.ByteBuffer;
import java.nio.channels.SelectionKey;
import java.nio.channels.Selector;
import java.nio.channels.SocketChannel;
/*
 * 一、使用 NIO 完成网络通信的三个核心:
 *
 * 1. 通道(Channel):负责连接
 *
 * 	   java.nio.channels.Channel 接口:
 * 			|--SelectableChannel
 * 				|--SocketChannel
 * 				|--ServerSocketChannel
 * 				|--DatagramChannel
 *
 * 				|--Pipe.SinkChannel
 * 				|--Pipe.SourceChannel
 *
 * 2. 缓冲区(Buffer):负责数据的存取
 *
 * 3. 选择器(Selector):是 SelectableChannel 的多路复用器。用于监控 SelectableChannel 的 IO 状况
 *
 */
public class SelectorClient {

	// 连接的主机
    private String host;
    // 主机的端口
    private int port;
    // 选择器
    private Selector selector;
    // 通道
    private SocketChannel socketChannel;

    public SelectorClient(String host,int port){
        this.host = host;
        this.port = port;
        try {
            init();
        } catch (IOException e) {
            e.printStackTrace();
        }
    }
    private void init() throws IOException {
        // 打开一个选择器
        selector = Selector.open();
        // 打开一个通道
        socketChannel = SocketChannel.open(new InetSocketAddress(host,port));
        // 要绑定的地址
        //SocketAddress remoteAddress = new InetSocketAddress(host,port);
        // 绑定到指定的地址
        //socketChannel.bind(remoteAddress);
        // 配置为非阻塞模式
        socketChannel.configureBlocking(false);
        // 注册到选择器上
        socketChannel.register(selector, SelectionKey.OP_READ);

        // 监听来自服务端的响应
        new SelectorThread(selector).start();
    }

    public void writeDataToServer(String message) throws IOException {
        ByteBuffer writeBuffer = ByteBuffer.wrap(message.getBytes("UTF-8"));
        socketChannel.write(writeBuffer);
    }

    public static void main(String[] args) throws IOException {
        SelectorClient client = new SelectorClient("localhost",6666);
        client.writeDataToServer("我是一个客户端");
    }

}
服务端
import java.io.IOException;
import java.net.InetSocketAddress;
import java.net.ServerSocket;
import java.net.SocketAddress;
import java.nio.ByteBuffer;
import java.nio.channels.SelectionKey;
import java.nio.channels.Selector;
import java.nio.channels.ServerSocketChannel;
import java.nio.channels.SocketChannel;
import java.nio.charset.Charset;
import java.util.Iterator;

public class SelectorServer {
	 // 服务器监听的端口
    private static final int PORT = 6666;
    // 处理数据的缓冲区
    private ByteBuffer buffer = ByteBuffer.allocate(1024);
    // 欢迎消息
    private static final String GREETING = "Welcome to here.";

    public static void main(String[] args) {
        new SelectorServer().start(args);
    }


    private void start(String[] args) {
        int port = PORT;
        if (args.length == 1){
            port = Integer.valueOf(args[0]);
        }
        System.out.println("listening on port " + port);
        Iterator<SelectionKey> iterator = null;
        try {
            //创建一个ServerChannel
            ServerSocketChannel serverChannel = ServerSocketChannel.open();
            //获取通道关联的Socket对象
            ServerSocket serverSocket = serverChannel.socket();
            //要绑定的地址
            SocketAddress address = new InetSocketAddress(port);
            //创建需要注册的选择器
            Selector selector = Selector.open();

            //把socket对象绑定到指定的地址
            serverSocket.bind(address);

            //配置为非阻塞模式
            serverChannel.configureBlocking(false);

            //注册通道到选择器
            //第二个参数表名serverChannel感兴趣的事件是OP_ACCEPT类型的事件
            serverChannel.register(selector, SelectionKey.OP_ACCEPT);

            // 选择器不断循环从选择器中选取已经准备好的通道进行操作
            // 选取之后,会对其感兴趣的事件进行处理。将感兴趣的事件
            // 处理完毕后将key从集合中删除,表示该通道的事件已经处
            // 理完毕

            while (true){
                // 这个操作可能会被阻塞,因为不知道注册在这个选择器上的通道是否准备好了
                int n = selector.select();
                if (n == 0){
                    continue;
                }

                // 获取SelectionKey的迭代器对象
                iterator  = selector.selectedKeys().iterator();

                while (iterator.hasNext()){
                    // 获取这个key关联的通道
                    SelectionKey key = iterator.next();
                    // 判断感兴趣的事件类型
                    if (key.isAcceptable()){
                        // 这里可以强制转换为ServerSocketChannel
                        // 因为在这个选择器上目前只注册了一个该类型的通道
                        ServerSocketChannel server = (ServerSocketChannel) key.channel();
                        // 调用accept方法可以得到连接到此地址的客户端连接
                        SocketChannel channel = server.accept();

                        // 注册客户端连接到选择器上,并把感兴趣的事件类型设为可读类型
                        registerChannel(selector,channel,SelectionKey.OP_READ);

                        // 给客户端发送响应消息
                        sayHello(channel);
                    }

                    // 如果是可读类型的事件,则获取传输过来的数据
                    if (key.isReadable()){
                        readDataFromClient(key);
                    }

                    // 将已经处理的key从集合中删除
                    iterator.remove();
                }
            }
        } catch (IOException e) {
            iterator.remove();
        }

    }

    /**
     *
     * @param key
     */
    private void readDataFromClient(SelectionKey key) throws IOException {
        // 获取key管理的Channel对象
        SocketChannel channel = (SocketChannel) key.channel();
        // 读取之前需要清空缓冲区
        buffer.clear();
        if (channel.read(buffer) < 0){
            channel.close();
        }else {
            buffer.flip();
            String receiveMsg = Charset.forName("UTF-8").newDecoder().decode(buffer).toString();
            System.out.println("receive client message: " + receiveMsg + " from " + channel.getRemoteAddress());
        }
    }

    /**
     * 向客户端发送响应消息
     * @param channel
     * @throws IOException
     */
    private void sayHello(SocketChannel channel) throws IOException {
        buffer.clear();
        buffer.put(GREETING.getBytes());
        buffer.flip();
        channel.write(buffer);
    }

    /**
     * 注册客户端连接到选择器上
     * @param selector
     * @param channel
     * @param opRead
     * @throws IOException
     */
    private void registerChannel(Selector selector, SocketChannel channel, int opRead) throws IOException {
        if (channel == null){
            return;
        }
        // 设为非阻塞模式
        channel.configureBlocking(false);
        // 注册该channel到选择器上
        channel.register(selector,opRead);
    }
}
监听服务端响应
import java.io.IOException;
import java.nio.ByteBuffer;
import java.nio.channels.SelectionKey;
import java.nio.channels.Selector;
import java.nio.channels.SocketChannel;
import java.nio.charset.Charset;
import java.util.Iterator;

public class SelectorThread extends Thread {
	private Selector selector;

	public SelectorThread(Selector selector) {
		this.selector = selector;
	}

	@Override
	public void run() {
		try {
			// 获取Selector注册的通道数
			int n = selector.select();
			while (n > 0) {
				// selector.selectedKeys()可以获取每个注册通道的key
				Iterator<SelectionKey> iterator = selector.selectedKeys().iterator();

				while (iterator.hasNext()) {
					SelectionKey key = iterator.next();
					if (key.isReadable()) {
						SocketChannel channel = (SocketChannel) key.channel();
						ByteBuffer buffer = ByteBuffer.allocate(1024);
						channel.read(buffer);
						buffer.flip();
						String receiveMsg = Charset.forName("UTF-8")
								.newDecoder().decode(buffer).toString();
						System.out.println("receive server message: "
								+ receiveMsg + " from "
								+ channel.getRemoteAddress());
						key.interestOps(SelectionKey.OP_READ);
					}
					// 处理下一个事件
					iterator.remove();
				}
			}
		} catch (IOException e) {
			e.printStackTrace();
		}
	}

}
管道
Java NIO 管道是2个线程之间的单向数据连接。Pipe有一个source通道和一个sink通道。数据会 被写到sink通道,从source通道读取。

案例:
import java.io.IOException;
import java.nio.ByteBuffer;
import java.nio.channels.Pipe;

import org.junit.Test;

public class TestPipe {

	@Test
	public void test1() throws IOException{
		//1. 获取管道
		Pipe pipe = Pipe.open();

		//2. 将缓冲区中的数据写入管道
		ByteBuffer buf = ByteBuffer.allocate(1024);

		Pipe.SinkChannel sinkChannel = pipe.sink();
		buf.put("通过单向管道发送数据".getBytes());
		buf.flip();
		sinkChannel.write(buf);

		//3. 读取缓冲区中的数据
		Pipe.SourceChannel sourceChannel = pipe.source();
		buf.flip();
		int len = sourceChannel.read(buf);
		System.out.println(new String(buf.array(), 0, len));

		sourceChannel.close();
		sinkChannel.close();
	}

}