安装:
环境要求:
win10
vs2019(使用2019及以上,否则可能会存在不支持等问题)
cuda11.1(版本一定要与下载的libtorch版本对应)
cuda10.2,cuda11.3,cuda11.6,cuda11.7等目前主流版本。
1.pytorch官网找到自己相应版本
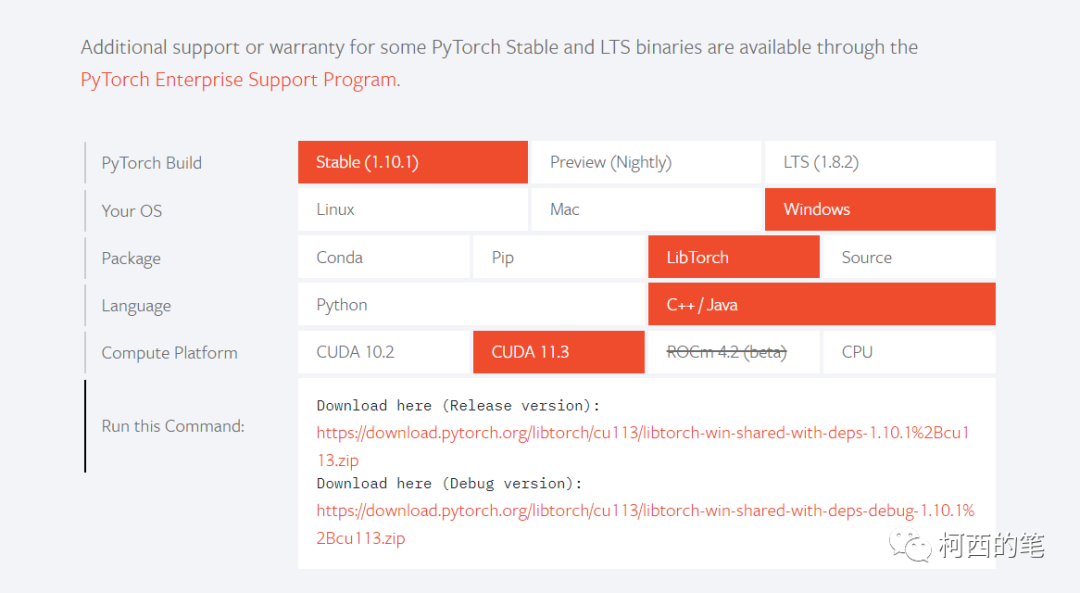
2.vs2019创建一个新项目并且调整到release,x64下

3.在VC++目录---包含目录中添加

4.在VC++目录---库目录中添加

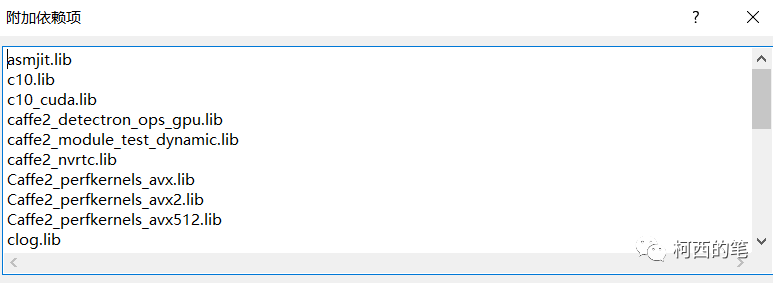
5.在链接器---输入---附加依赖项中添加lib依赖(D:\libtorch\libtorch-win-shared-with-deps-1.10.1+cu111\libtorch\lib 中的lib结尾全部添加)不同的版本有不同的lib。
6.在调试---环境中添加

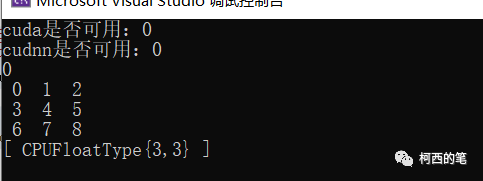
此时环境已经设置完成,可以检查下libtorch是否可以成功运行。(此时cpu版本已经可以使用,但是cuda还无法使用)。
#include <iostream>
#include <torch/torch.h>
#include<torch/script.h>
using namespace std;


int main()
{
  cout << "cuda是否可用:" << torch::cuda::is_available() << endl;
  cout << "cudnn是否可用:" << torch::cuda::cudnn_is_available() << endl;
  cout << torch::cuda::device_count() << endl;


  torch::Tensor tr = torch::arange(0, 9, torch::kFloat32).reshape({ 3,3 });
  cout << tr << endl;
  return 0;
}
结果:
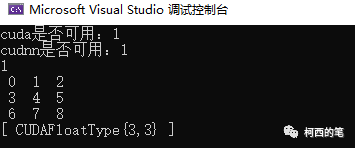
7.开启cuda功能
在链接器---命令行输入/INCLUDE:?warp_size@cuda@at@@YAHXZ
此处版本不同输入的命令也有所不同。
cuda10.2:/INCLUDE:?warp_size@cuda@at@@YAHXZ
cuda11.1:/INCLUDE:?warp_size@cuda@at@@YAHXZ /INCLUDE:?searchsorted_cuda@native@at@@YA?AVTensor@2@AEBV32@0_N1@Z
cuda11.3 cuda11.6 cuda11.7 :/INCLUDE:?warp_size@cuda@at@@YAHXZ /INCLUDE:?_torch_cuda_cu_linker_symbol_op_cuda@native@at@@YA?AVTensor@2@AEBV32@@Z
再次运行cuda版测试代码
#include <iostream>
#include <torch/torch.h>
#include<torch/script.h>
using namespace std;


int main()
{
  cout << "cuda是否可用:" << torch::cuda::is_available() << endl;
  cout << "cudnn是否可用:" << torch::cuda::cudnn_is_available() << endl;
  cout << torch::cuda::device_count() << endl;


  torch::Tensor tr = torch::arange(0, 9, torch::kFloat32).reshape({ 3,3 }).to(torch::kCUDA);
  cout << tr << endl;
  return 0;
}
结果:
模型部署:
1.通过pytorch自带torch.jit.trace或者torch.jit.script将模型转化为libtorch模型。
2.在利用libtorch去加载,推理模型。
#include <iostream>
#include <torch/torch.h>
#include<torch/script.h>
using namespace std;


int main()
{
  cout << "cuda是否可用:" << torch::cuda::is_available() << endl;
  cout << "cudnn是否可用:" << torch::cuda::cudnn_is_available() << endl;
  cout << torch::cuda::device_count() << endl;


  //1.加载模型
    torch::jit::script::Module SeedModule = torch::jit::load("./model/model.pt");
    SeedModule.to(torch::kCUDA);
    SeedModule.eval();


    //2.图像预处理
    //3.转化为tensor
    torch::Tensor tensor_img = torch::arange(0, 3*256*256).toType(torch::kFloat32).reshape({1,3,256,256}); //自己先造一个数据
    tensor_img = tensor_img.to(torch::kCUDA);   //[b,c,z,y,x]


    //4.网络前向计算
     auto seed_pred_501 = SeedModule.forward({ tensor_img }).toTensor().squeeze().to(torch::kCPU).detach();
  return 0;
}
libtorch常用操作
1.将tensor变为普通数据
torch::Tensor a = torch::rand({ 2,3 });
float bb = a[0][0].item().toFloat();  //将tensor变为普通数据  方式1
float bbb = a[0][0].item<float>();   //将tensor变为普通数据  方式2
2.vector变为tensor
vector<float> vvf;
for (int i = 0; i < 30; i++)
{
    vvf.push_back(i);
}
torch::Tensor ttt_v = torch::from_blob(vvf.data(), { 10,3 });
3.tensor变成vector
auto v1 = torch::arange(0, 15, torch::kInt32).reshape({ 5,3 });
vector<int> ggg(v1.data_ptr < int >(), v1.data_ptr < int >() + v1.numel());
4.指针变成tensor
float* fff = new float[10 * 3];
for (int i = 0; i < 30; i++)
{
    fff[i] = i*2.0;
}
torch::Tensor ttt_p = torch::from_blob(fff, { 10,3 });
5.切片操作
torch::Tensor aa = torch::arange(0, 125, 1).reshape({ 5,5,5 });
//获得aa[1:4,1:4,1:4]数据
auto bb =  aa.index({ torch::indexing::Slice(1,4,1),torch::indexing::Slice(1,4,1),
                    torch::indexing::Slice(1,4,1) });
解决libtorch内存泄漏
经试验发现libtorch在forward前向推理模型,如果使用不同的batchsize会发生内存泄漏。因此要保证每次推理的batchsize都必须是一样的。如果存在最后一次推理数据不够一次batchsize的,可以选择丢掉该数据,或者用0填充。