首先新建一个watermark.js文件存放水印功能核心代码,核心代码我会放在文章底部,也可以点击watermark.js直接下载。
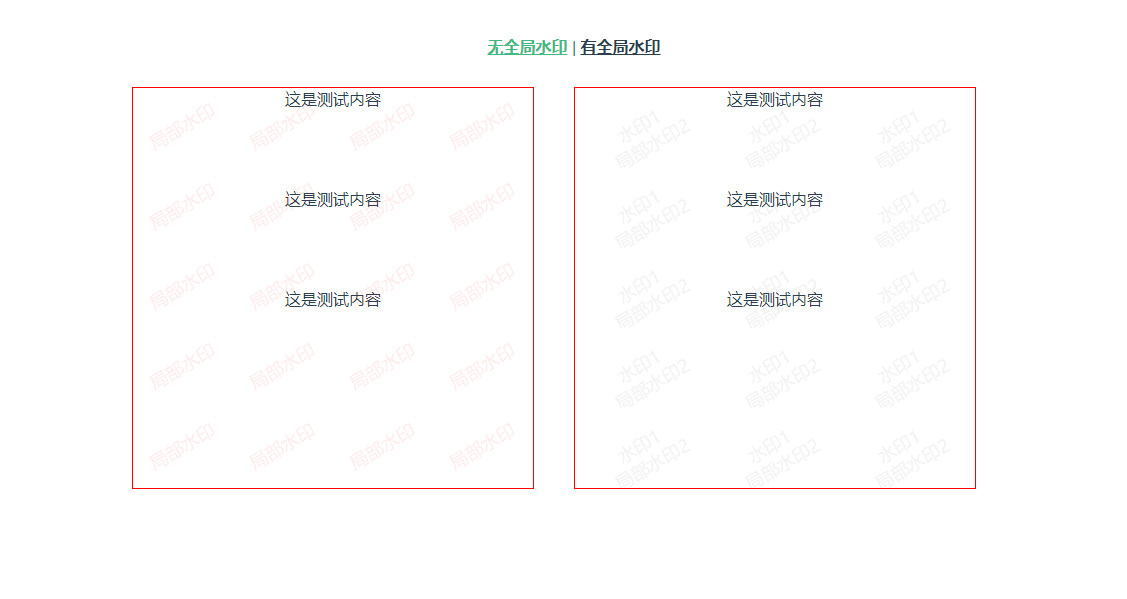
如何使用?这里以vue页面为例,先看效果,如下图。
全局水印实现:
1.首先在main.js引入watermark.js,并在vue原型上添加$watermark属性作为全局水印的实例,在实例化时如果不传targetNode参数,则会将水印节点添加到body下面,即为全局水印。
// main.js
import Vue from "vue";
import App from "./App.vue";
import router from "./router";
import store from "./store";
import { Watermark } from "@/utils/watermark"
Vue.prototype.$watermark = new Watermark({
  content: '全局',
  width: 100,
  height: 80,
  color: 'red',
});
new Vue({
  router,
  store,
  render: (h) => h(App),
}).$mount("#app");
2.在App.vue的生命周期created中调用$watermark的create方法创建全局水印,这样全局水印就能在页面展示了,如果要移除全局水印调用remove方法即可。
<template>
  <div id="app">
    <div id="nav">
      <router-link to="/">无全局水印</router-link> |
      <router-link to="/about">有全局水印</router-link>
    </div>
    <router-view />
  </div>
</template>
<script>
export default {
  name: "App",
  components: {},
  created() {
    // 创建全局水印
    this.$watermark.create();
  },
};
</script>局部水印实现:在所需页面引入watermark.js,具体用法如下:其中targetNode(需要添加水印的节点类名)参数是必传。唯一需要注意的是,使用局部水印的页面需要在加载时移除全局水印,在离开该页面时重新创建全局水印
<template>
  <div class="home">
    <div class="box">
      <div class="child">这是测试内容</div>
      <div class="child">这是测试内容</div>
      <div class="child">这是测试内容</div>
    </div>
    <div class="box box1">
      <div class="child">这是测试内容</div>
      <div class="child">这是测试内容</div>
      <div class="child">这是测试内容</div>
    </div>
  </div>
</template>

<script>
// @ is an alias to /src
import { Watermark } from "@/utils/watermark";
export default {
  name: "Home",
  components: {},
  data() {
    return {};
  },
  mounted() {
    // 移除全局水印
    this.$watermark.remove();
    // 退出当前路由前重新创建全局水印, 防止其它页面的水印消失
    this.$once("hook:beforeDestroy", () => {
      this.$watermark.create();
    });
    // 添加当前页面的自定义水印
    this.setWatermark("box", ["局部水印"], { color: "red" });
    this.setWatermark("box1", ["水印1", " 局部水印2"], { width: 130 });
  },
  methods: {
    setWatermark(targetNode, content, attrs) {
      let watermark = new Watermark({
        targetNode, // 需要添加水印的容器类名
        content, // 水印内容
        width: 100,
        height: 80,
        ...attrs, // 其他相关扩展属性看watermark.js文件
      });
      watermark.create();
    },
  },
};
</script>
<style lang="less" scoped>
.home {
  display: flex;
  justify-content: center;
  .box {
    width: 400px;
    height: 400px;
    overflow: auto;
    position: relative;
    border: 1px solid red;
    margin-right: 40px;
    .child {
      height: 100px;
    }
  }
}
</style>
以上就是实现页面水印的方法之一,其他方法自行摸索。以下是watermark.js的核心代码,每个属性的作用均有注释, constructor中的属性均可作为自定义属性在实例化时根据需要传入。
export class Watermark {
  #observeBody = null; // 观察者对象,监听body相关配置变化
  constructor(props = {}) {
    if (this.hasWatermark) return; // 防止重复创建水印
    this.targetNode = props.targetNode; // 要添加水印的目标节点,如果不存在则添加全局水印
    this.content = props.content || ""; // 水印文本
    this.fontWeight = props.fontWeight || "normal"; // 字体的粗细
    this.fontSize = props.fontSize || 18; // 字体大小 px
    this.fontFamily = props.fontFamily || "sans-serif"; // font-family
    this.font = `${this.fontWeight} ${this.fontSize}px ${this.fontFamily}`;
    this.color = props.color || "#666666"; // 水印文本颜色
    this.globalAlpha = props.alpha || 0.09; // 水印文本透明度 0~1 0 表示完全透明,1 表示完全不透明
    this.width = props.width || 300; // 单个水印宽度 px
    this.height = props.height || 170; // 单个水印高度 px
    this.zIndex = props.zIndex || 2147483647; // 水印节点层级(默认为最大层级)
    this.backgroundPosition = props.backgroundPosition || "0px 0px, 0px 0px"; // 水印节点的背景图片位置
    this.rotate = ((props.rotate || 330) * Math.PI) / 180; // 水印旋转角度,以左上角为原点旋转,注意旋转角度影响水印文本显示
    this.watermark = null; // 水印节点
    this.errCallback = props.errCallback || this.defaultErrCallback; // 水印创建失败的处理函数
  }
  // 生成水印节点
  create = () => {
    if (this.hasWatermark) return; // 防止重复创建水印
    try {
      let targetNode = document.getElementsByClassName(this.targetNode)[0] || document.body;
      this.watermark = document.createElement("div");
      this.watermark.className = "watermark";
      this.watermark.style.cssText = `
        z-index: ${this.zIndex} !important;
        position: absolute !important;
        pointer-events: none !important;
        height: ${targetNode.scrollHeight}px !important;
        min-height: 100%;
        width: 100% !important;
        top: 0px !important;
        left: 0px !important;
        background-image: url(${this.#getImage()}) !important;
        background-size: ${this.width}px ${this.height}px !important;
        background-repeat: repeat !important;
        background-position: ${this.backgroundPosition} !important;
      `;
      targetNode.appendChild(this.watermark);
      this.hasWatermark = true; // 防止重复创建水印
      this.#observeBody?.disconnect?.(); // 暂停对目标节点的观察,直到重新调用observe方法
      this.#observeWatermarkDom(); // 对目标节点的相关变动进行监听
    } catch {
      this.errCallback();
    }
  };
  // 移除水印节点
  remove = () => {
    this.#observeBody?.disconnect?.();
    this.watermark?.parentNode.removeChild(this.watermark);
    this.watermark = null;
    this.hasWatermark = false;
  };
  // 将canvas转换成image
  #getImage = () => {
    let image;
    try {
      const canvas = this.#draw();
      image = canvas.toDataURL("image/png", 1);
      canvas.remove();
    } catch {
      this.errCallback();
    }
    return image;
  };
  // canvas画水印内容
  #draw = () => {
    // 1.创建canvas元素
    const canvas = this.#createHDCanvas();
    // 2.获取上下文
    const context = canvas.getContext("2d");
    // 字体
    context.font = this.font;
    // 对齐方式
    context.textAlign = "center";
    // 底部对齐方式(top  bottom middle)
    context.textBaseline = "middle";
    // 字体颜色
    context.fillStyle = this.color;
    // 设置透明度
    context.globalAlpha = this.globalAlpha;
    // 平移转换,修改原点
    context.translate(this.width / 2, this.height / 2);
    // 旋转画布
    context.rotate(this.rotate);
    // 绘制填充文本(文字左下角的X坐标,文字左下角的Y坐标);
    const contentType = Object.prototype.toString.call(this.content);
    const temp = ["[object Array]", "[object Object]"]; // 数组或对象
    // 如果content是数组或对象时,当做多行处理
    if (temp.includes(contentType)) {
      let posY = 0;
      for (let key in this.content) {
        context.fillText(this.content[key], 0, posY);
        posY += this.fontSize + 4;
      }
    } else {
      context.fillText(this.content, 0, 0);
    }
    return canvas;
  };
  // 创建高清Canvas
  #createHDCanvas = () => {
    const ratio = window.devicePixelRatio || 1;
    const canvas = document.createElement("canvas");
    canvas.width = this.width * ratio; // 实际渲染像素
    canvas.height = this.height * ratio; // 实际渲染像素
    canvas.style.width = `${this.width}px`; // 控制显示大小
    canvas.style.height = `${this.height}px`; // 控制显示大小
    canvas.getContext("2d").setTransform(ratio, 0, 0, ratio, 0, 0);
    return canvas;
  };
  // 监听body里面水印节点的变化,重新渲染
  #observeWatermarkDom = () => {
    // 选择要监听的节点
    const targetNode = document.querySelector("body");
    // 选择要监听节点的哪些变化
    const config = {
      childList: true, // 监听子节点的增删
      attributes: true, // 监听自身属性的变化
      subtree: true, // 监听所有后代节点的变化(增删、属性变化、内容变化)
    };
    // 当监听到目标节点相关变化时执行的回调函数
    const callback = (mutationsList) => {
      // console.log('mutationsList', mutationsList);
      for (let item of mutationsList) {
        if (item.target === this.watermark) {
          item?.removedNodes?.[0]?.remove();
          item?.target?.remove();
          this.watermark = null;
          this.hasWatermark = false; // 防止重复创建水印
          this.create();
          return;
        }
        if (item.removedNodes[0] === this.watermark) {
          this.watermark = null;
          this.hasWatermark = false; // 防止重复创建水印
          this.create();
          return;
        }
      }
    };
    // 创建一个观察者对象
    const mutationObserver = MutationObserver;
    const observer = new mutationObserver(callback);
    // 注册需要观察的目标节点
    observer.observe(targetNode, config);
    this.#observeBody = observer;
  };

  // 水印消失或者创建失败后的默认回调
  defaultErrCallback = () => {
    window.alert("水印被未知操作篡改,请刷新页面重新加载水印");
  };
}