前言
接上文《JS中的字典和散列表》,我们来进一步了解散列表的应用。
处理散列表中的冲突
基于我们之前提到的loselose离散函数,不同的键经过离散函数的处理后会有相同的散列值。
比如:Jonathan和Jamie,使用loselose离散函数计算出来的hashCode都是5。那么这样的结果将导致不同的值在散列表中会对应相同的位置。也就是“散列表冲突”
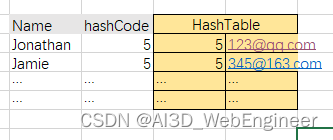
但是实际上,HashTable 并不会有两个Key为5的值。而是会由最后写入的名字为Jamie、HashCode为5的键值([email protected])覆盖掉之前HashCode为5的键值([email protected])
那么当我们查询Jonathan的邮箱时。将返回[email protected]。
这将让我们遗失掉hashCode一致的数据。
处理冲突的方法
处理冲突主要有几种方法:①分离链接 ②线性探查 ③双散列发
分离链接
为散列表的每一个位置创建一个链表并将元素存储在里面。它是解决冲突的最简单的方法。但是在HashTable实例外还需要额外的存储空间。

我们可以看到,原本HashCode为5的键值替换为普通链表
[JS与链表]普通链表![]() http://t.csdn.cn/zB873
http://t.csdn.cn/zB873
普通链表的构成元素Node有value和next两个自有属性。
这种分离链接的散列表,我们称之为HashTableSeparateChaining
声明一个HashTableSeparateChaining类
class HashTableSeparateChaining {
    constructor(toStrFn = defaultTotring) {
          this.toStrFn = toStrFn;
          this.table = {};
    }
}
put方法
 put(key, value) {
    if (key != null && value != null) {
      const position = this.hashCode(key);
      if (this.table[position] == null) {
        this.table[position] = new LinkedList();
      }
      this.table[position].push(new ValuePair(key, value));
      return true;
    }
    return false;
  }
get方法
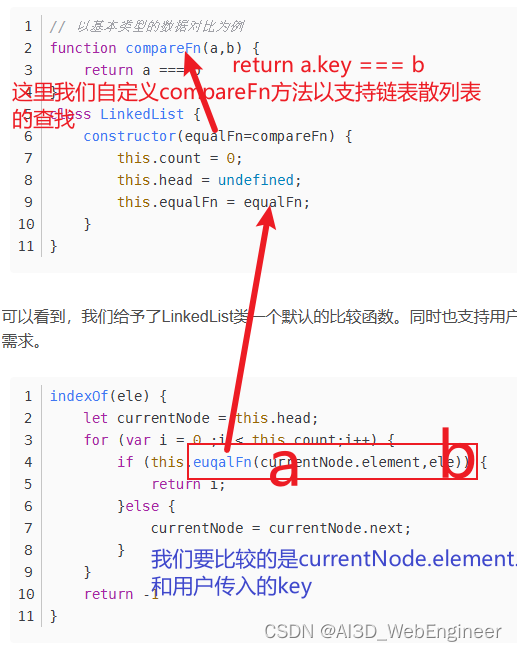
HashTableSeparateChaining的关键在于如何去拿源数据中相同hashCode不同键名的键值。
我们可以在链表中迭代,直到找到存储的源数据对象ValuePair的源数据键(key)与用户传入的key一致的数据即可。
 get(key) {
    const position = this.hashCode(key);
    const linkedList = this.table[position];
    if (linkedList != null && !linkedList.isEmpty()) {
      let current = linkedList.getHead();
      while (current != null) {
        if (current.element.key === key) {
          return current.element.value;
        }
        current = current.next;
      }
    }
    return undefined;
  }
也可以扩展LinkedList类的方法(getKey)。这样就不用在get里面写while循环了。
还有一种方法在LinkedList实例中查找我们需要的元素:
remove方法
 remove(key) {
    const position = this.hashCode(key);
    const linkedList = this.table[position];
    if (linkedList != null && !linkedList.isEmpty()) {
      let current = linkedList.getHead();
      while (current != null) {
        if (current.element.key === key) {
          linkedList.remove(current.element);
          if (linkedList.isEmpty()) {
            delete this.table[position];
          }
          return true;
        }
        current = current.next;
      }
    }
    return false;
  }
思路还是先找键值对,删除后如果链表为空,则删除散列表里的存储键值对。
线性探查
线性,是因为它处理冲突的方法是将元素直接存储在表中,而不是在另外的单独的数据结构中。
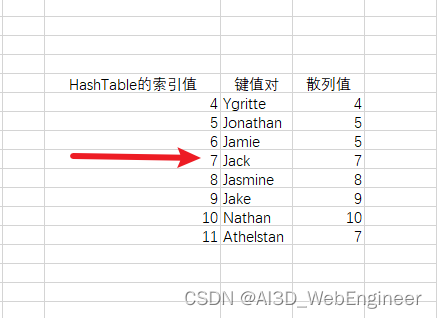
核心思路:当我们向散列表中某个位置添加一个新元素的时候,如果该hashCode键上已经存在值的话,就尝试hashCode+1的位置。如果hashCode+1的位置也被占据了,就尝试hashCode+2的位置,以此类推。直到在散列表中找到一个空闲的位置。
也就是说,我们检查要新建的hashCode键位置,如果为空就添加到该位置,如果不为空就迭代到下一个空闲位置
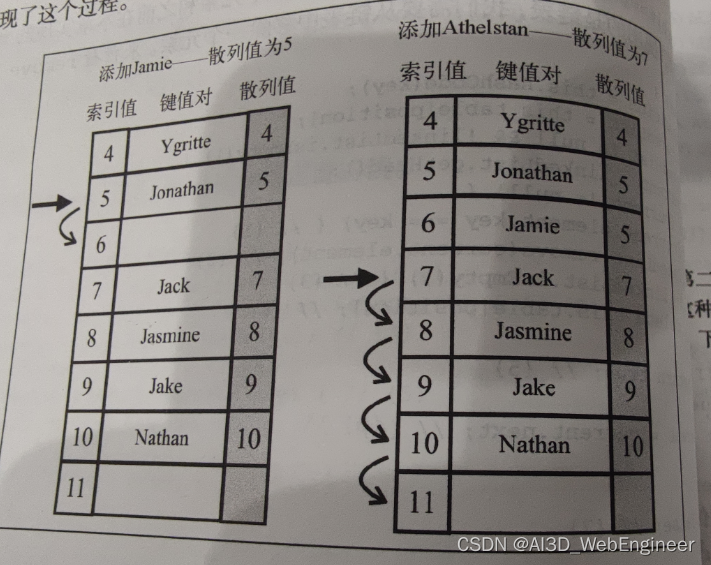
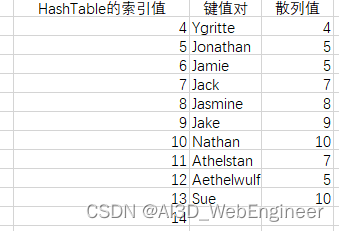
左边,往hashTable中插入Jamie(散列值为5)。结果会变成:

右边,紧接着插入散列值为7的Athelstan。此时表里已经存在散列值为7的Jack了。所以往下走去找散列值为8的位置,而散列值8已经存在值了,所以继续依次往下迭代到11的位置

惰性散列链表类 【为什么叫惰性,请看下面remove部分】
class HashTableLinearProbingLazy {
  constructor(toStrFn = defaultToString) {
    this.toStrFn = toStrFn;
    this.table = {};
  }
  loseloseHashCode(key) {
    if (typeof key === 'number') {
      return key;
    }
    const tableKey = this.toStrFn(key);
    let hash = 0;
    for (let i = 0; i < tableKey.length; i++) {
      hash += tableKey.charCodeAt(i);
    }
    return hash % 37;
  }
  hashCode(key) {
    return this.loseloseHashCode(key);
  }
  isEmpty() {
    return this.size() === 0;
  }
  size() {
    let count = 0;
    Object.values(this.table).forEach(valuePair => {
      count += valuePair.isDeleted === true ? 0 : 1;
    });
    return count;
  }
  clear() {
    this.table = {};
  }
  getTable() {
    return this.table;
  }
  toString() {
    if (this.isEmpty()) {
      return '';
    }
    const keys = Object.keys(this.table);
    let objString = `{${keys[0]} => ${this.table[keys[0]].toString()}}`;
    for (let i = 1; i < keys.length; i++) {
      objString = `${objString},{${keys[i]} => ${this.table[
        keys[i]
      ].toString()}}`;
    }
    return objString;
  }
}
再回头聊聊,移除元素。
如果我们从散列表中移除一个键值对的话,如果我们按照之前的方法去移除,那么当我们需要查找(get或delete)相同hashCode位置的值的时候,我们会找到一个空值。这会让算法出现问题。所以线性探查技术的删除方法,分别为:软删除/惰性删除和。
软删除/惰性删除:
使用一个特殊的值(标记)来表示键值对被删除了。而不是真的删除它。散列表经过多次删除操作后,会变成一个标记了若干删除位置的散列表。这样会逐渐降低散列表的效率,因为搜索键值会随着数据的增多而变得更慢。违背了我们为了快速访问并找到一个键而使用散列表的初衷。
了解了软删除和线性探查的逻辑思路后,我们来写一下put、get、delete方法
由于软删除是给键值添加特殊标识,所以我们需要写一个新的元素类:
export class ValuePairLazy extends ValuePair {
  constructor(key, value, isDeleted = false) {
    super(key, value);
    this.key = key;
    this.value = value;
    this.isDeleted = isDeleted;
  }
}
Put方法
判断当前添加键值对应的hashCode值是不是存在,如果它不存在或者它存在,但是已经被打上了被删除的记号,则将新的ValuePairLazy实例赋值为hashCode键值。
如果当前添加键值对应的hashCode值存在。则我们需要往下找。只要格子为空或者格子不为空但被打上已删除的标记则会填充存储值。
  put(key, value) {
    if (key != null && value != null) {
      const position = this.hashCode(key);
      if (
        this.table[position] == null ||
        (this.table[position] != null && this.table[position].isDeleted)
      ) {
        this.table[position] = new ValuePairLazy(key, value);
      } else {
        let index = position + 1;
        while (this.table[index] != null && !this.table[position].isDeleted) {
          index++;
        }
        this.table[index] = new ValuePairLazy(key, value);
      }
      return true;
    }
    return false;
  }
get方法
get(key) {
const position = this.hashCode(key);
if (this.table[position] != null) {
// 找到了
if (this.table[position].key === key && !this.table[position].isDeleted) {
return this.table[position].value;
}
// 往下找
let index = position + 1;
while (
this.table[index] != null &&
(this.table[index].key !== key || this.table[index].isDeleted)
) {
if (this.table[index].key === key && this.table[index].isDeleted) {
return undefined;
}
index++;
}
if (
this.table[index] != null &&
this.table[index].key === key &&
!this.table[index].isDeleted
) {
return this.table[position].value;
}
}
return undefined;
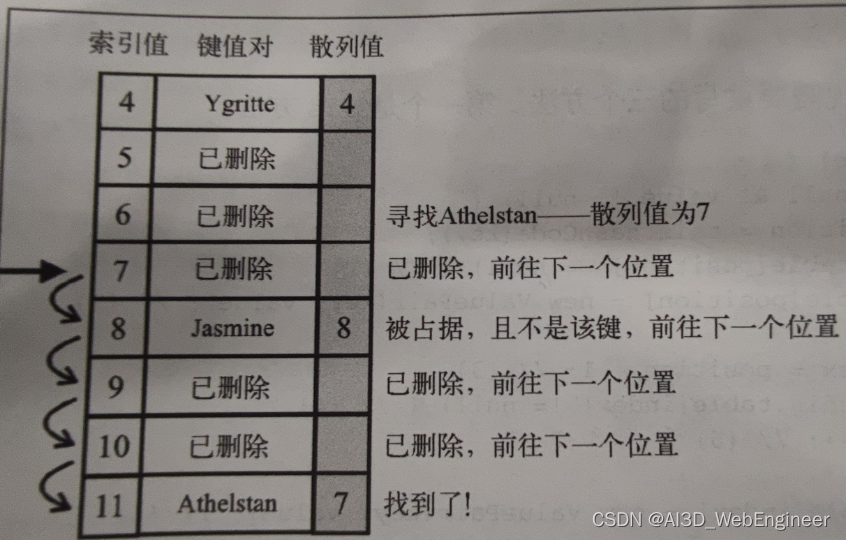
}这个方法比较难理解。我们来画图解析一下。
我们想要去找Athelstan这个key,我们根据散列函数,得到的HashCode为7,根据push方法的逻辑,key为 Athelstan的键值对在HashTable里的索引值不会小于7.我们从索引值为7的地方开始查找。
根据上面我们分析的remove方法。我们知道删除是索引值自上往下的查找删除。而push方法是会找空格子或者已经打上删除标记的非空格子填值。
先删掉Sargeras,此时索引12被打上删除标记

此时我们加入Aethelwulf。散列值也为5
再往回加入 Sargeras

第二种情况,我们删掉 Sargeras后,再删掉JAMIE,再加入Sargeras。此时Sargeras索引值为5.也就是说,当我们删掉Sargeras后,经过一段时间其他操作之后再加入Sargeras,它的索引值只有可能小于或等于当前在索引表里能找到的打上了删除标记的Sargeras索引值(也有可能没有了,被覆盖了,那么此时它的索引值为大于等于它的散列值的任意数值。)
也就是说,找到满足this.table[index].key === key的索引是get方法的关键。因为你想找的key对应的键值对,不会在该索引之后出现。
get(key) {
    const position = this.hashCode(key);
    if (this.table[position] != null) {
      if (this.table[position].key === key && !this.table[position].isDeleted) {
        return this.table[position].value;
      }
      let index = position + 1;
      while (
        this.table[index] != null &&
        this.table[index].key !== key
      ) {
        index++;
      }
      if (
        this.table[index] != null &&
        this.table[index].key === key &&
        !this.table[index].isDeleted
      ) {
        return this.table[position].value;
      }
    }
    return undefined;
  }
这样就完成了吗?不是的,以上逻辑,我们是默认散列表中含有我们想找的key的信息(被打上删除标记的也算)。那假如并没有,那么while循环将无限迭代下去,这肯定是错误的。
  get(key) {
    const position = this.hashCode(key);
    if (this.table[position] != null) {
      if (this.table[position].key === key && !this.table[position].isDeleted) {
        return this.table[position].value;
      }
      let index = position + 1;
      while (this.table[index] != null && this.table[index].key !== key) {
        if (index < this.size()) {
          index++;
        } else {
          break;
        }
      }
      if (
        this.table[index] != null &&
        this.table[index].key === key &&
        !this.table[index].isDeleted
      ) {
        return this.table[position].value;
      }
    }
    return undefined;
  }
remove方法
思路与get一样,找到之后修改标识符
  remove(key) {
    const position = this.hashCode(key);
    if (this.table[position] != null) {
      if (this.table[position].key === key && !this.table[position].isDeleted) {
        this.table[position].isDeleted = true;
        return true;
      }
      let index = position + 1;
      while (this.table[index] != null && this.table[index].key !== key) {
        if (index < this.size()) {
          index++;
        } else {
          break;
        }
      }
      if (
        this.table[index] != null &&
        this.table[index].key === key &&
        !this.table[index].isDeleted
      ) {
        this.table[index].isDeleted = true;
        return true;
      }
    }
    return false;
  }
创建更好的散列函数
lose lose散列函数并不是一个表现良好的散列函数。因为散列值极易重复而造成冲突。
好的散列函数需要满足:
①插入和检索元素的时间(性能)
②低冲突(重叠)
另一个可以实现的,比lose lose更好的散列函数是djb2
djb2HashCode(key) {
    const tableKey = this.toStrFn(key);
    let hash = 5381;
    for (let i = 0; i < tableKey.length; i++) {
      hash = (hash * 33) + tableKey.charCodeAt(i);
    }
    return hash % 1013;
}
为什么选择33和5301?

ES6 Map类
可以使用es6的Map类来开发我们的字典类。
弄清楚Map和set,还有WeekMap、WeekSet可以参考之前的推文