文章目录
kubesphere 3.3 流水线 部署java微服务项目
中间部署nacos:
1、将镜像上传至 仓库
注意 此步骤是 将镜像上传到自己的私有仓库 此步骤可以跳过
在可以访问 docker hub的服务器上拉取 镜像
docker pull --platform linux/arm64 nacos/nacos-server:v2.2.3-slim
登录 阿里云
docker login --username=aliyun4295435681 registry.cn-hangzhou.aliyuncs.com

标记镜像
docker tag 3218b38490ce registry.cn-hangzhou.aliyuncs.com/kubesphere-xu/kubesphere-xu:nacos-arm
上传镜像
docker push registry.cn-hangzhou.aliyuncs.com/kubesphere-xu/kubesphere-xu:nacos-arm
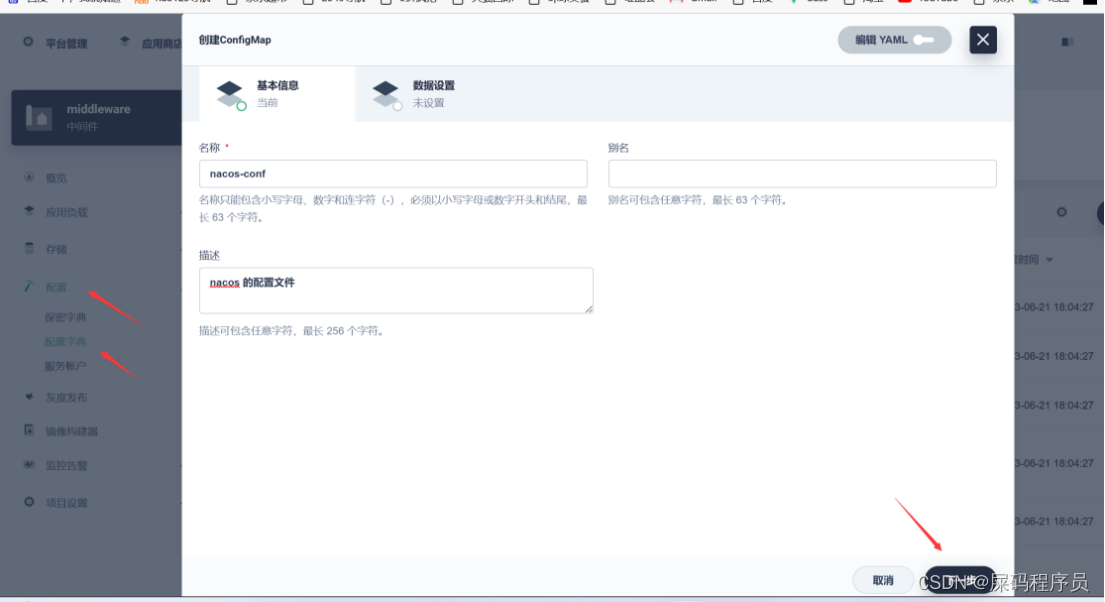
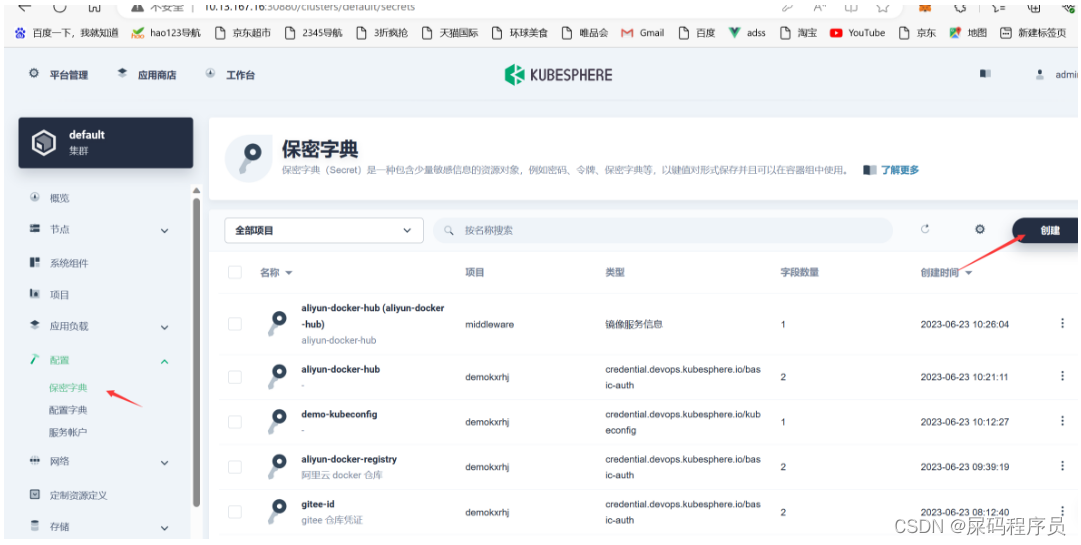
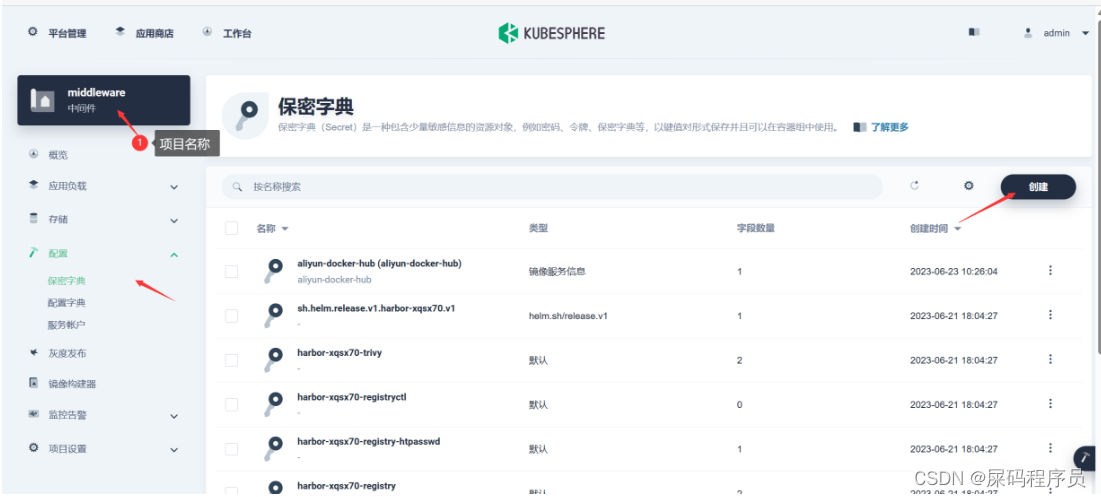
2、创建nacos的配置文件:
-
创建 nacos-conf
-
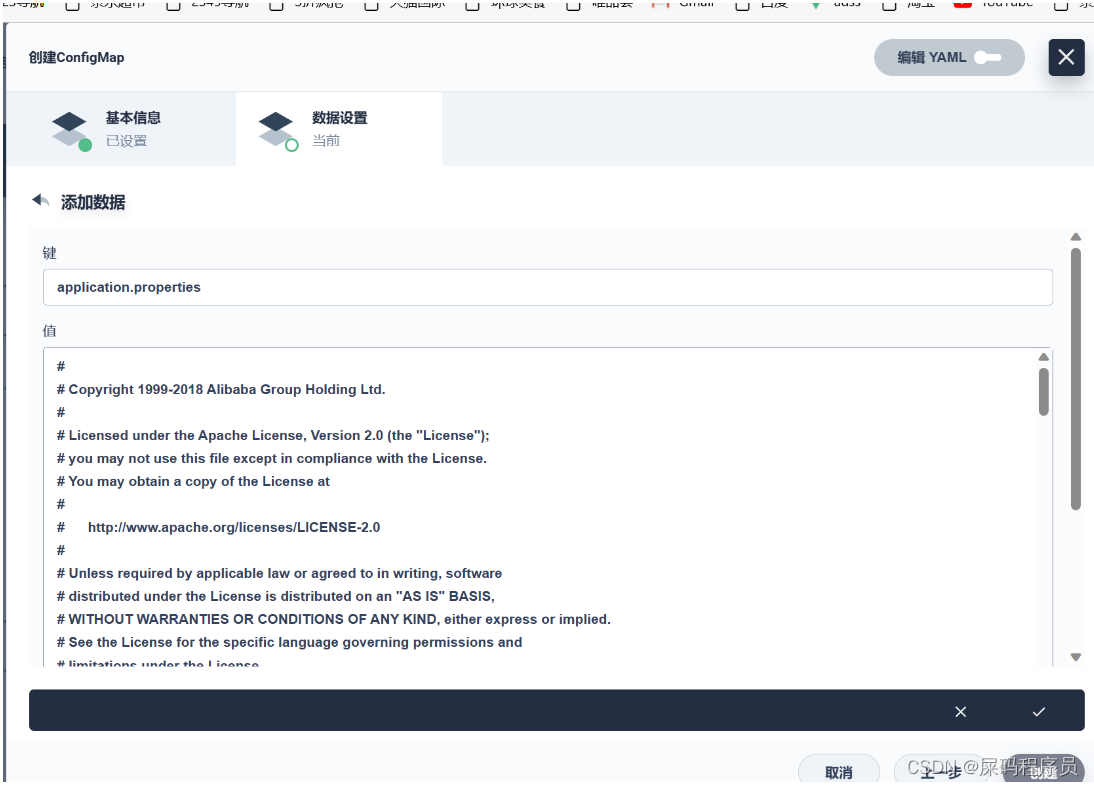
添加第一个配置文件
-
键:
扫描二维码关注公众号,回复: 16441279 查看本文章
application.properties -
value
#
# Copyright 1999-2018 Alibaba Group Holding Ltd.
#
# Licensed under the Apache License, Version 2.0 (the "License");
# you may not use this file except in compliance with the License.
# You may obtain a copy of the License at
#
#      http://www.apache.org/licenses/LICENSE-2.0
#
# Unless required by applicable law or agreed to in writing, software
# distributed under the License is distributed on an "AS IS" BASIS,
# WITHOUT WARRANTIES OR CONDITIONS OF ANY KIND, either express or implied.
# See the License for the specific language governing permissions and
# limitations under the License.
#

#*************** Spring Boot Related Configurations ***************#
### Default web context path:
server.servlet.contextPath=/nacos
### Default web server port:
server.port=8848

#*************** Network Related Configurations ***************#
### If prefer hostname over ip for Nacos server addresses in cluster.conf:
# nacos.inetutils.prefer-hostname-over-ip=false

### Specify local server's IP:
# nacos.inetutils.ip-address=


#*************** Config Module Related Configurations ***************#
### If use MySQL as datasource:
spring.datasource.platform=mysql

### Count of DB:
db.num=1

### Connect URL of DB:
db.url.0=jdbc:mysql://localhost:3306/nacos?characterEncoding=utf8&connectTimeout=1000&socketTimeout=3000&autoReconnect=true&useUnicode=true&useSSL=false&serverTimezone=GMT%2B8
db.user.0=root
db.password.0=123456

### Connection pool configuration: hikariCP
db.pool.config.connectionTimeout=30000
db.pool.config.validationTimeout=10000
db.pool.config.maximumPoolSize=20
db.pool.config.minimumIdle=2

#*************** Naming Module Related Configurations ***************#
### Data dispatch task execution period in milliseconds:
# nacos.naming.distro.taskDispatchPeriod=200

### Data count of batch sync task:
# nacos.naming.distro.batchSyncKeyCount=1000

### Retry delay in milliseconds if sync task failed:
# nacos.naming.distro.syncRetryDelay=5000

### If enable data warmup. If set to false, the server would accept request without local data preparation:
# nacos.naming.data.warmup=true

### If enable the instance auto expiration, kind like of health check of instance:
# nacos.naming.expireInstance=true

nacos.naming.empty-service.auto-clean=true
nacos.naming.empty-service.clean.initial-delay-ms=50000
nacos.naming.empty-service.clean.period-time-ms=30000


#*************** CMDB Module Related Configurations ***************#
### The interval to dump external CMDB in seconds:
# nacos.cmdb.dumpTaskInterval=3600

### The interval of polling data change event in seconds:
# nacos.cmdb.eventTaskInterval=10

### The interval of loading labels in seconds:
# nacos.cmdb.labelTaskInterval=300

### If turn on data loading task:
# nacos.cmdb.loadDataAtStart=false


#*************** Metrics Related Configurations ***************#
### Metrics for prometheus
#management.endpoints.web.exposure.include=*

### Metrics for elastic search
management.metrics.export.elastic.enabled=false
#management.metrics.export.elastic.host=http://localhost:9200

### Metrics for influx
management.metrics.export.influx.enabled=false
#management.metrics.export.influx.db=springboot
#management.metrics.export.influx.uri=http://localhost:8086
#management.metrics.export.influx.auto-create-db=true
#management.metrics.export.influx.consistency=one
#management.metrics.export.influx.compressed=true


#*************** Access Log Related Configurations ***************#
### If turn on the access log:
server.tomcat.accesslog.enabled=true

### The access log pattern:
server.tomcat.accesslog.pattern=%h %l %u %t "%r" %s %b %D %{

        User-Agent}i %{

        Request-Source}i

### The directory of access log:
server.tomcat.basedir=file:.


#*************** Access Control Related Configurations ***************#
### If enable spring security, this option is deprecated in 1.2.0:
#spring.security.enabled=false

### The ignore urls of auth, is deprecated in 1.2.0:
nacos.security.ignore.urls=/,/error,/**/*.css,/**/*.js,/**/*.html,/**/*.map,/**/*.svg,/**/*.png,/**/*.ico,/console-ui/public/**,/v1/auth/**,/v1/console/health/**,/actuator/**,/v1/console/server/**

### The auth system to use, currently only 'nacos' is supported:
nacos.core.auth.system.type=nacos

### If turn on auth system:
nacos.core.auth.enabled=false

### The token expiration in seconds:
nacos.core.auth.default.token.expire.seconds=18000

### The default token:
nacos.core.auth.default.token.secret.key=SecretKey012345678901234567890123456789012345678901234567890123456789

### Turn on/off caching of auth information. By turning on this switch, the update of auth information would have a 15 seconds delay.
nacos.core.auth.caching.enabled=true

### Since 1.4.1, Turn on/off white auth for user-agent: nacos-server, only for upgrade from old version.
nacos.core.auth.enable.userAgentAuthWhite=true

### Since 1.4.1, worked when nacos.core.auth.enabled=true and nacos.core.auth.enable.userAgentAuthWhite=false.
### The two properties is the white list for auth and used by identity the request from other server.
nacos.core.auth.server.identity.key=
nacos.core.auth.server.identity.value=

#*************** Istio Related Configurations ***************#
### If turn on the MCP server:
nacos.istio.mcp.server.enabled=false


###*************** Add from 1.3.0 ***************###


#*************** Core Related Configurations ***************#

### set the WorkerID manually
# nacos.core.snowflake.worker-id=

### Member-MetaData
# nacos.core.member.meta.site=
# nacos.core.member.meta.adweight=
# nacos.core.member.meta.weight=

### MemberLookup
### Addressing pattern category, If set, the priority is highest
# nacos.core.member.lookup.type=[file,address-server]
## Set the cluster list with a configuration file or command-line argument
# nacos.member.list=192.168.16.101:8847?raft_port=8807,192.168.16.101?raft_port=8808,192.168.16.101:8849?raft_port=8809
## for AddressServerMemberLookup
# Maximum number of retries to query the address server upon initialization
# nacos.core.address-server.retry=5
## Server domain name address of [address-server] mode
# address.server.domain=jmenv.tbsite.net
## Server port of [address-server] mode
# address.server.port=8080
## Request address of [address-server] mode
# address.server.url=/nacos/serverlist

#*************** JRaft Related Configurations ***************#

### Sets the Raft cluster election timeout, default value is 5 second
# nacos.core.protocol.raft.data.election_timeout_ms=5000
### Sets the amount of time the Raft snapshot will execute periodically, default is 30 minute
# nacos.core.protocol.raft.data.snapshot_interval_secs=30
### raft internal worker threads
# nacos.core.protocol.raft.data.core_thread_num=8
### Number of threads required for raft business request processing
# nacos.core.protocol.raft.data.cli_service_thread_num=4
### raft linear read strategy. Safe linear reads are used by default, that is, the Leader tenure is confirmed by heartbeat
# nacos.core.protocol.raft.data.read_index_type=ReadOnlySafe
### rpc request timeout, default 5 seconds
# nacos.core.protocol.raft.data.rpc_request_timeout_ms=5000
-
-
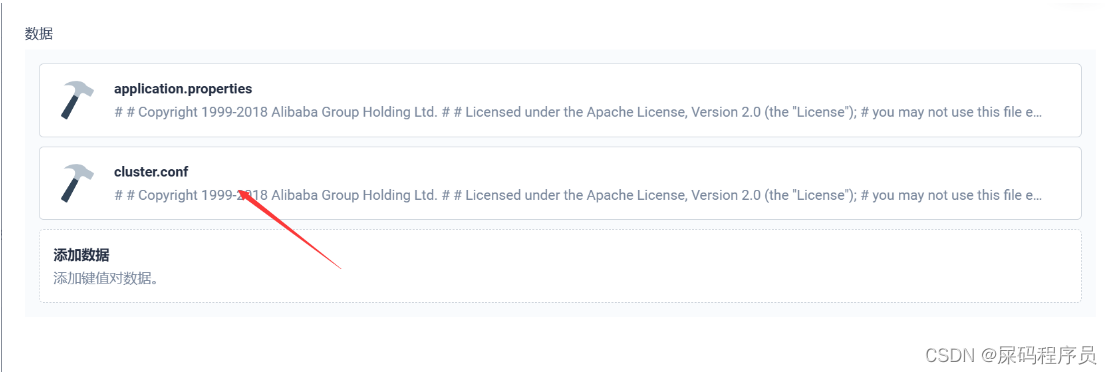
配置第二个键值
-
键
cluster.conf -
值
#
# Copyright 1999-2018 Alibaba Group Holding Ltd.
#
# Licensed under the Apache License, Version 2.0 (the "License");
# you may not use this file except in compliance with the License.
# You may obtain a copy of the License at
#
#      http://www.apache.org/licenses/LICENSE-2.0
#
# Unless required by applicable law or agreed to in writing, software
# distributed under the License is distributed on an "AS IS" BASIS,
# WITHOUT WARRANTIES OR CONDITIONS OF ANY KIND, either express or implied.
# See the License for the specific language governing permissions and
# limitations under the License.
#

#it is ip
#example
nacos-v1-0.nacos.middleware.svc.cluster.local:8848
nacos-v1-1.nacos.middleware.svc.cluster.local:8848
nacos-v1-2.nacos.middleware.svc.cluster.local:8848
-
-
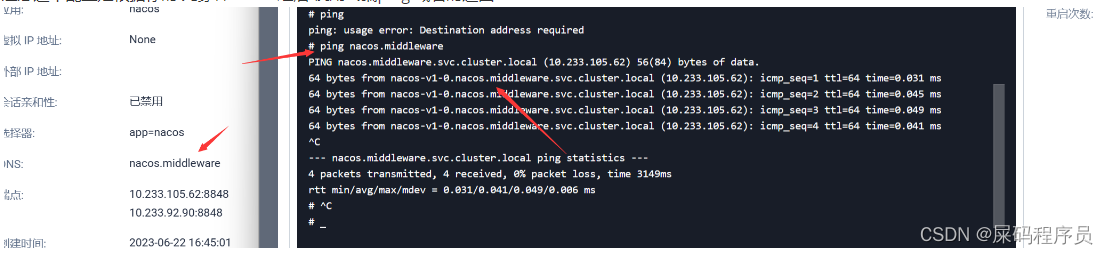
注意这个配置是根据你的 先穿件nacos 之后 使用终端ping 域名的返回
3、部署nacos
-
使用默认端口 这里使用的镜像是从 我自己的私有仓库拉取
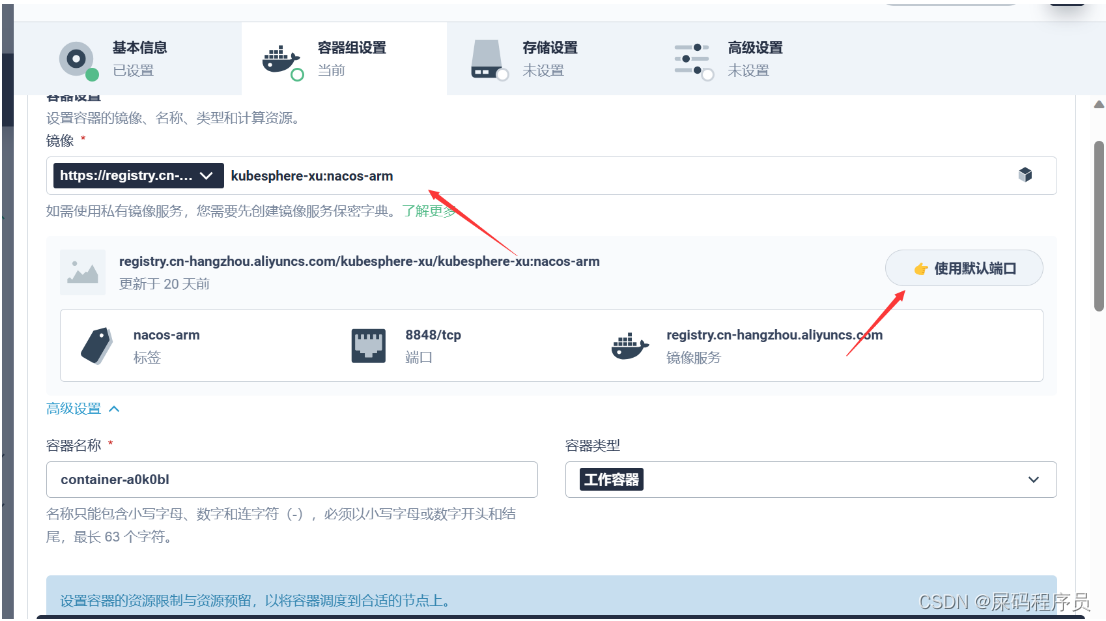
-
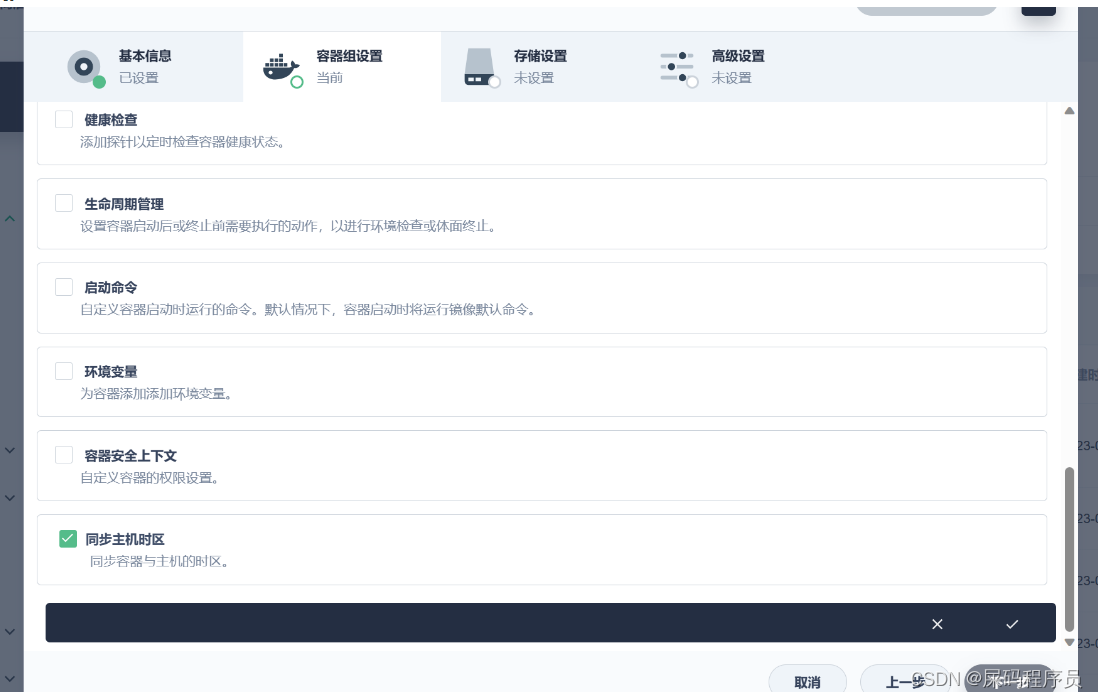
同步主机时区
-
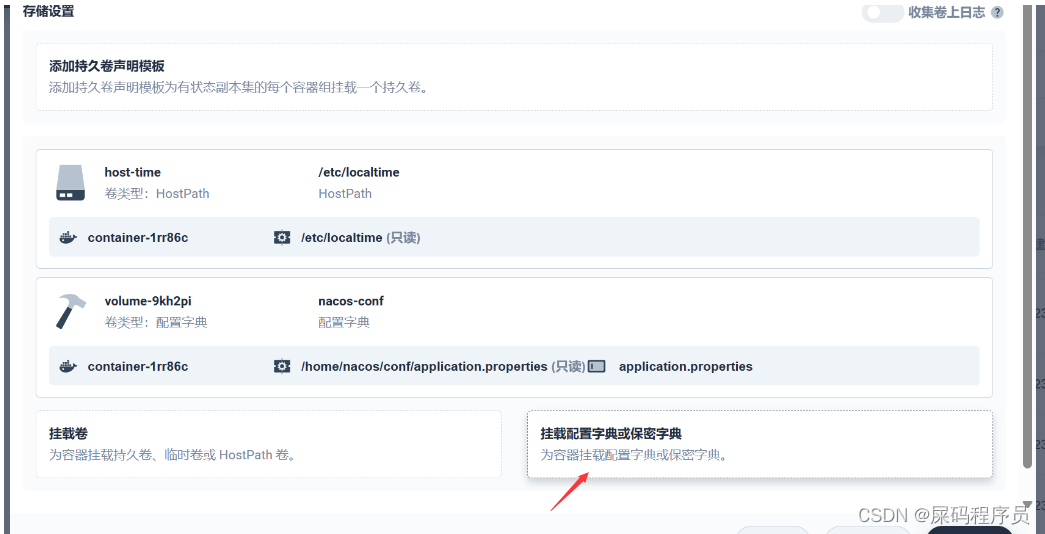
没有挂载存储 配置挂载配置
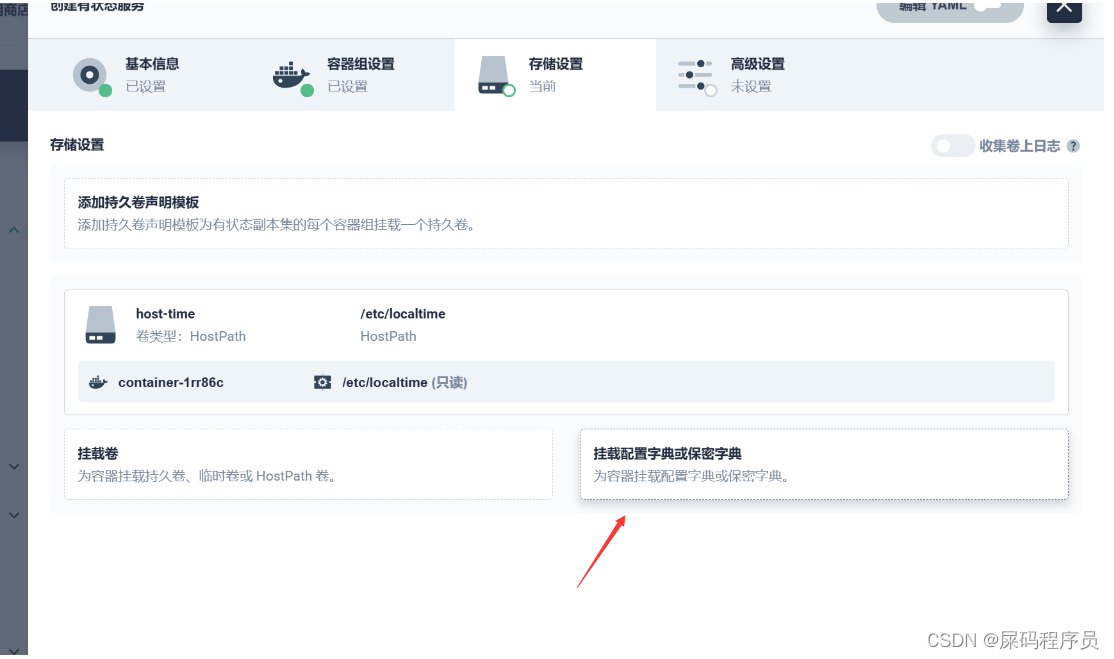
-
挂载第一个配置文件
1.

/home/nacos/conf/application.properties- 指定特定键
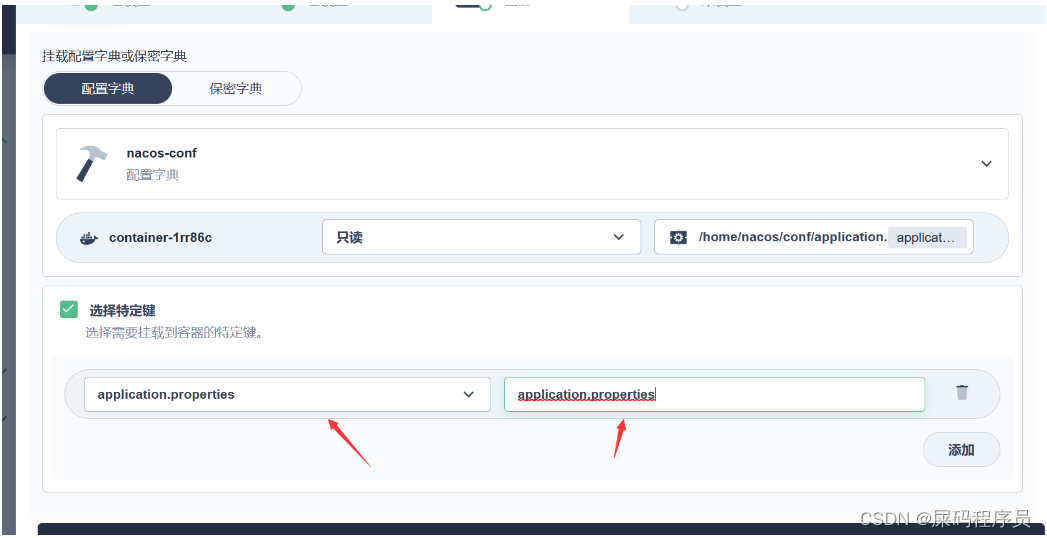
- 指定特定键
-
挂载第二个配置文件
1.
2.
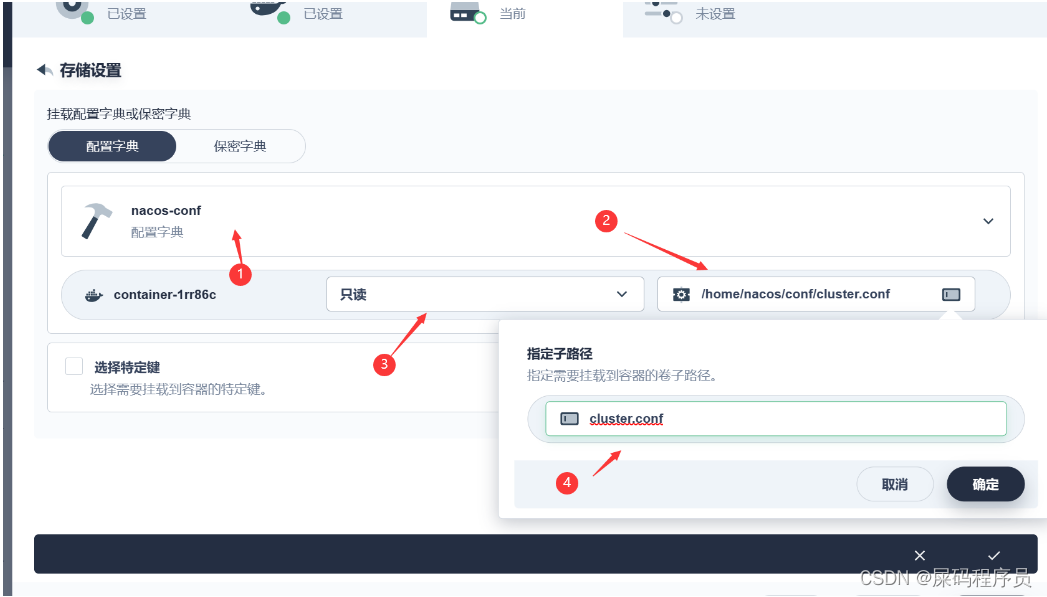
/home/nacos/conf/cluster.conf- 指定特定键

- 指定特定键
-
指定外网访问 哦 最后
部署项目
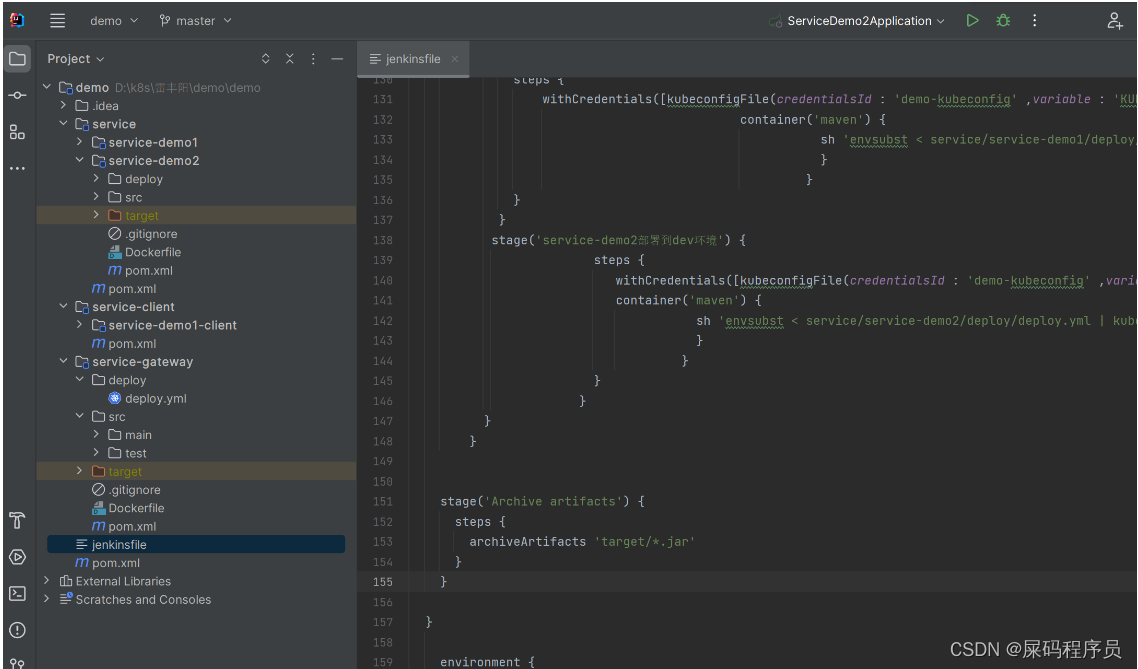
注意在附录中有 jenkinsfile 文件 可以直接导入便是一条完美的流水线
1、项目准备:
项目地址: demo-deployment-kubesphere: demo-deployment-kubesphere (gitee.com)
本项目为 一个测试部署的 微服务demo
- 包含了两个服务 和 一个 网关
- 中间件 nacos
1.1、需要更改位置 :
1.1.1 项目的yml 文件
- 主要修改 的就是 nacos 的地址 (注意这里有三个服务 demo1、demo2、gateway)
- 当然 你也可以修改为内部访问域名
spring:
  application:
    name: service-demo1
  cloud:
    nacos:
      discovery:
        server-addr: 10.13.167.16:32518
#        server-addr: localhost:8848

server:
  port: 8081
1.1.2 DockerFile
- 可以自行更改jdk
- 端口可自行更改 (每个服务的容器都是映射为 8080)
- nacos 地址 这里就是使用的就是内部DNS 可自定义 不实用可以替换为IP地址
FROM openjdk:8-jdk
LABEL maintainer=yszhdhy


#启动自行加载   服务名-prod.yml配置
ENV PARAMS="--server.port=8080 --spring.profiles.active=prod --spring.cloud.nacos.server-addr=nacos.middleware:8848 --spring.cloud.nacos.config.file-extension=yml"
RUN /bin/cp /usr/share/zoneinfo/Asia/Shanghai /etc/localtime && echo 'Asia/Shanghai' >/etc/timezone

COPY target/*.jar /app.jar
EXPOSE 8080


#
ENTRYPOINT ["/bin/sh","-c","java -Dfile.encoding=utf8 -Djava.security.egd=file:/dev/./urandom -jar /app.jar ${PARAMS}"]
1.1.3 部署文件
- 服务名称 需要更改为对应的项目名称
- 命名空间全部替换为 你自己kubesphere 中创建的项目的名称
apiVersion: apps/v1
kind: Deployment
metadata:
  labels:
    app: service-demo1
  name: service-demo1
  namespace: middleware   #一定要写名称空间o
spec:
  progressDeadlineSeconds: 600
  replicas: 1
  selector:
    matchLabels:
      app: service-demo1
  strategy:
    rollingUpdate:
      maxSurge: 50%
      maxUnavailable: 50%
    type: RollingUpdate
  template:
    metadata:
      labels:
        app: service-demo1
    spec:
      imagePullSecrets:
        - name: aliyun-docker-hub  #提前在项目下配置访问阿里云的账号密码
      containers:
        - image: $REGISTRY/$ALIYUNHUB_NAMESPACE/service-demo1:SNAPSHOT-$BUILD_NUMBER
 #         readinessProbe:
 #           httpGet:
 #             path: /actuator/health
 #             port: 8080
 #           timeoutSeconds: 10
 #           failureThreshold: 30
 #           periodSeconds: 5
          imagePullPolicy: Always
          name: app
          ports:
            - containerPort: 8080
              protocol: TCP
          resources:
            limits:
              cpu: 300m
              memory: 600Mi
          terminationMessagePath: /dev/termination-log
          terminationMessagePolicy: File
      dnsPolicy: ClusterFirst
      restartPolicy: Always
      terminationGracePeriodSeconds: 30
---
apiVersion: v1
kind: Service
metadata:
  labels:
    app: service-demo1
  name: service-demo1
  namespace: middleware
spec:
  ports:
    - name: http
      port: 8080
      protocol: TCP
      targetPort: 8080
  selector:
    app: service-demo1
  sessionAffinity: None
  type: ClusterIP
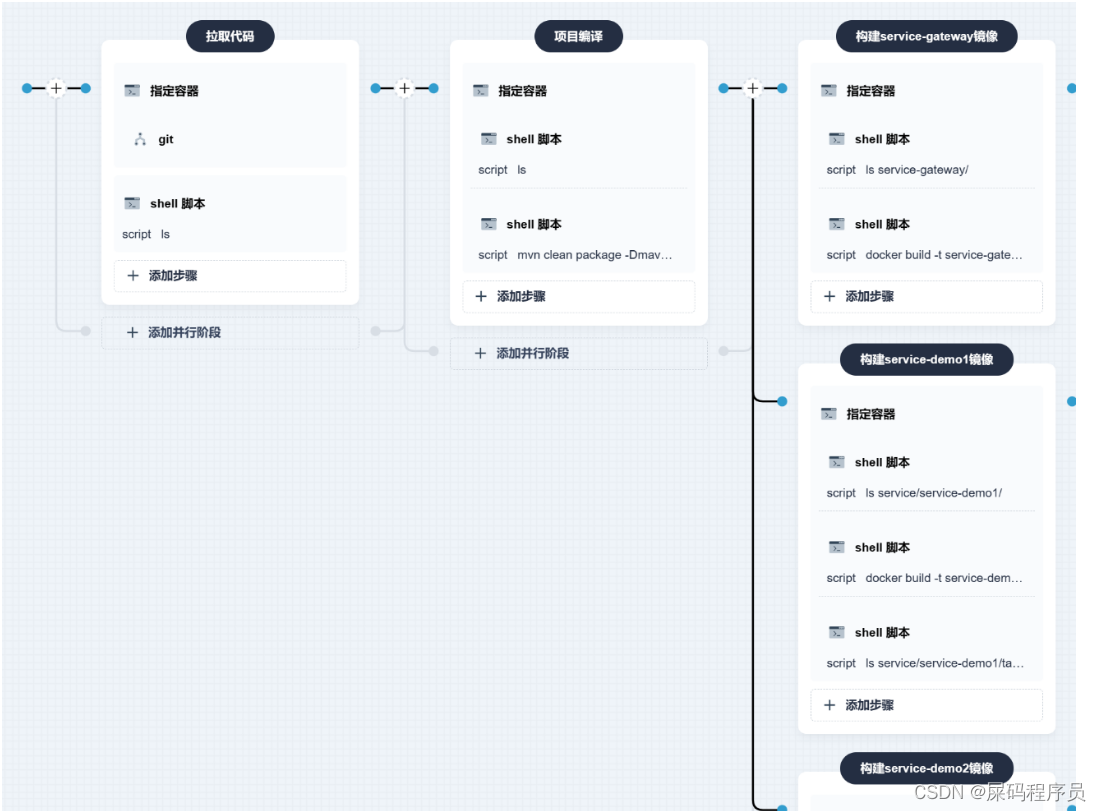
2、编辑流水线:
2.1 选择流水线大结构

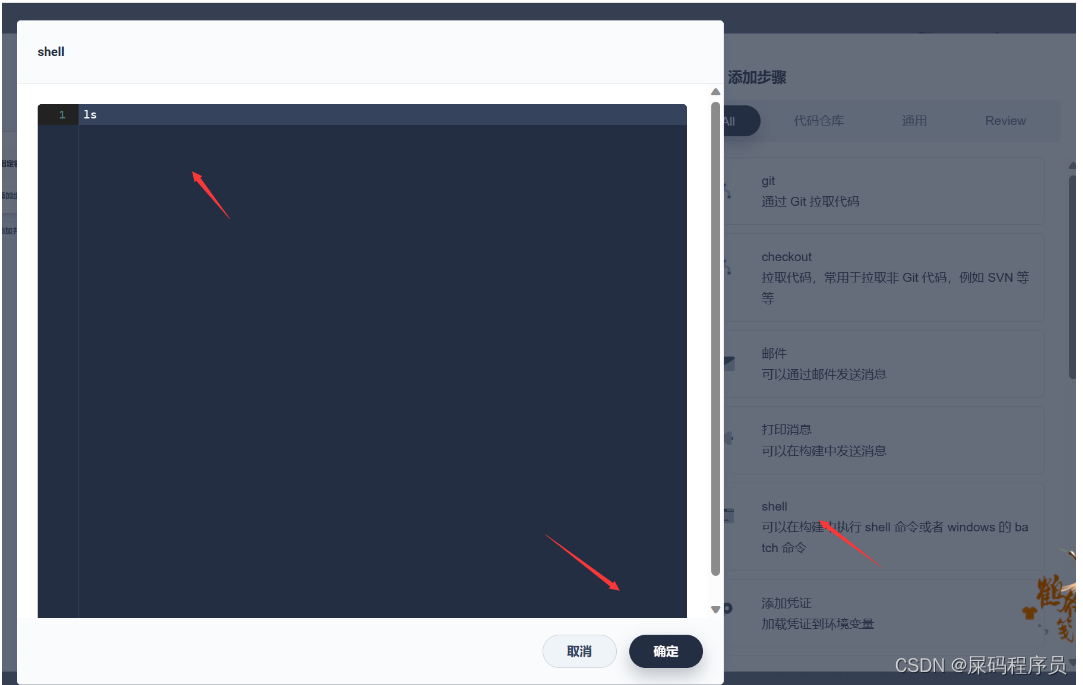
2.2 第一步拉取代码
1.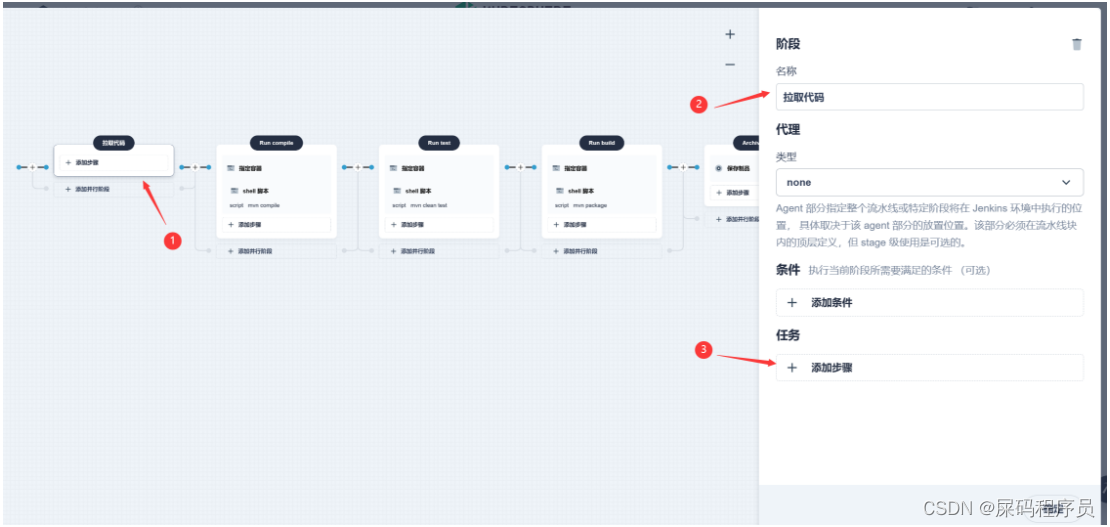
-
指定容器
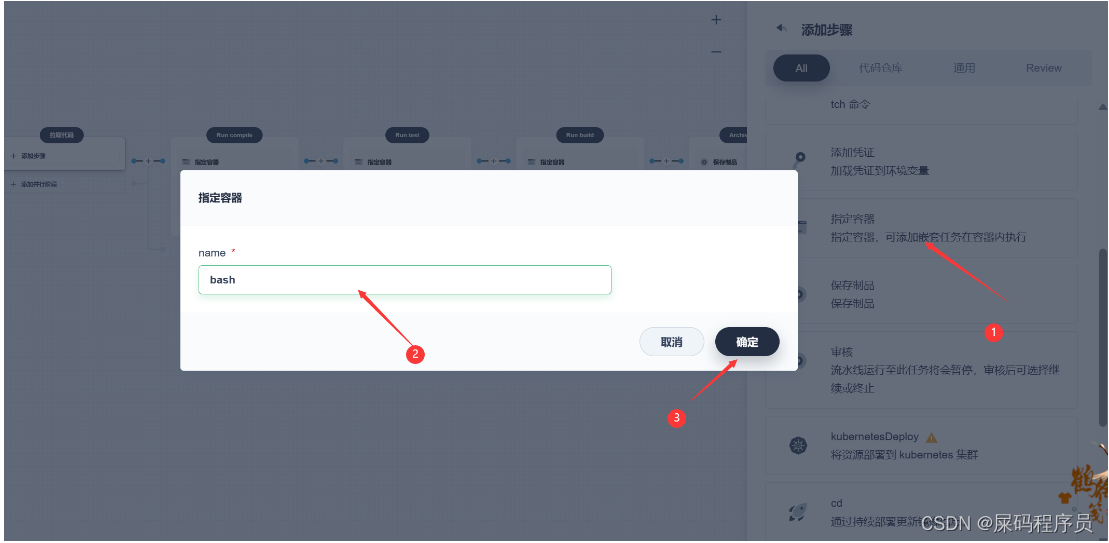
-
添加嵌套步骤
-
选择 仓库
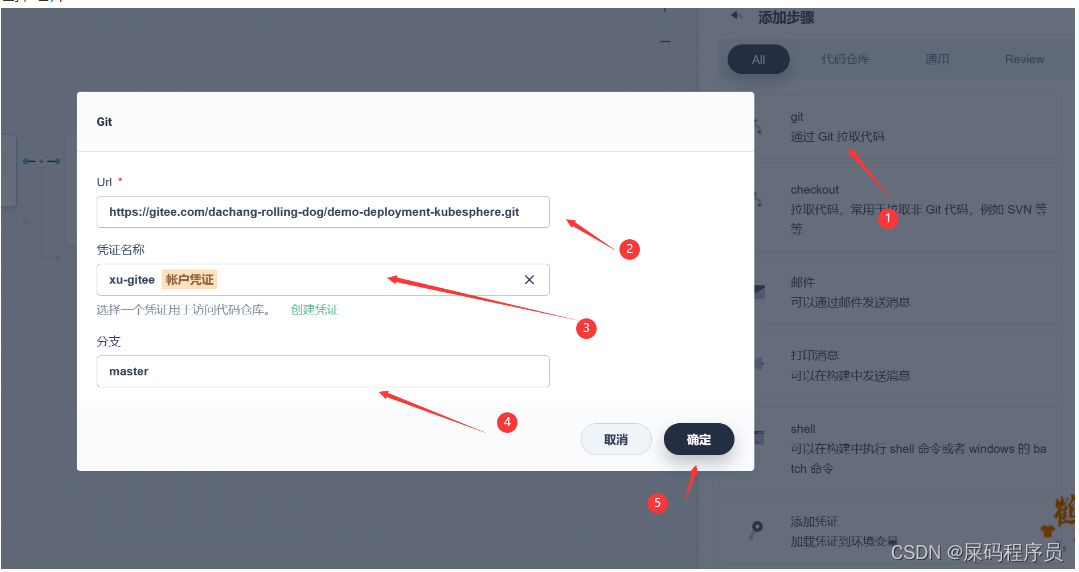
-
查看 拉下来的项目

-
-
之后先运行流水线
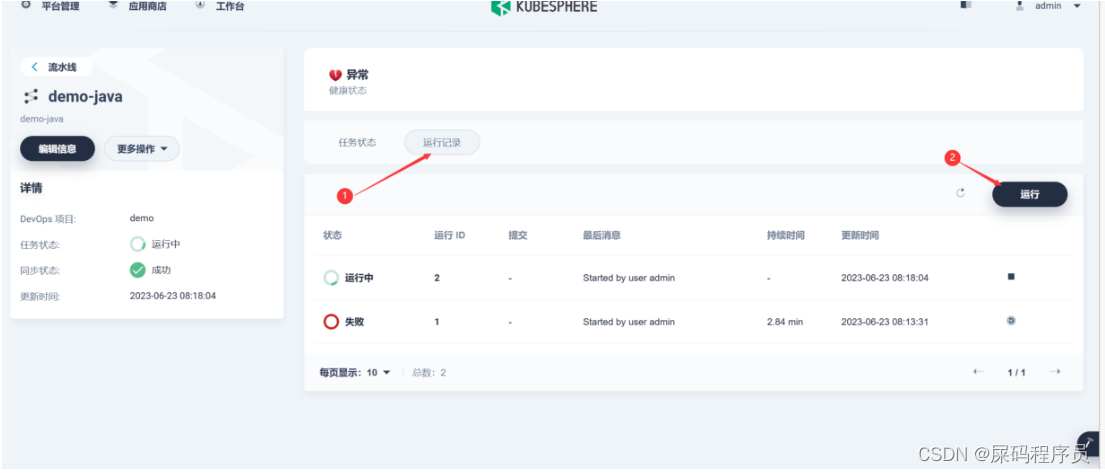
-
成功结果

2.3 配置maven 镜像加速
1、修改maven让他从阿里云下载镜像
-
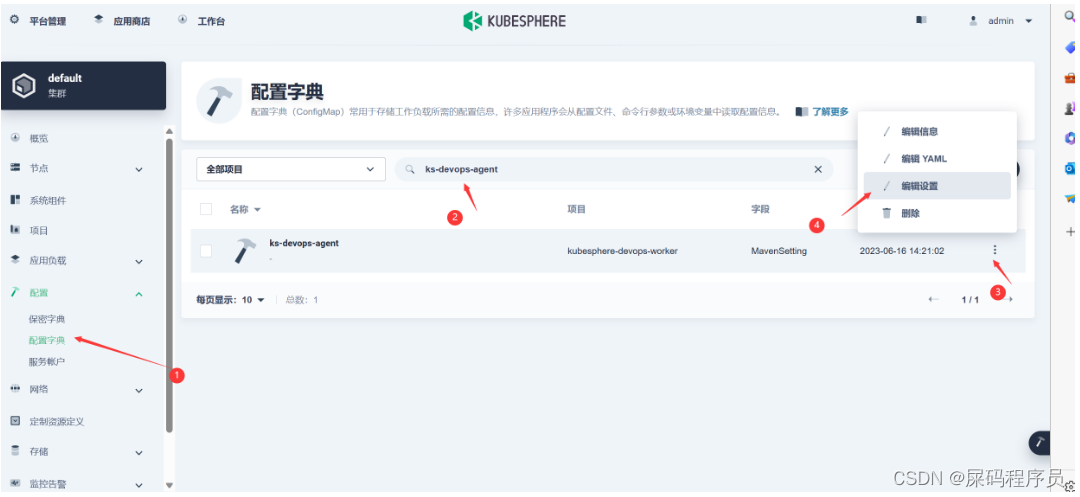
使用admin登陆ks
-
进入集群管理
-
进入配置中心
-
找到配置
-
-
编辑配置

-
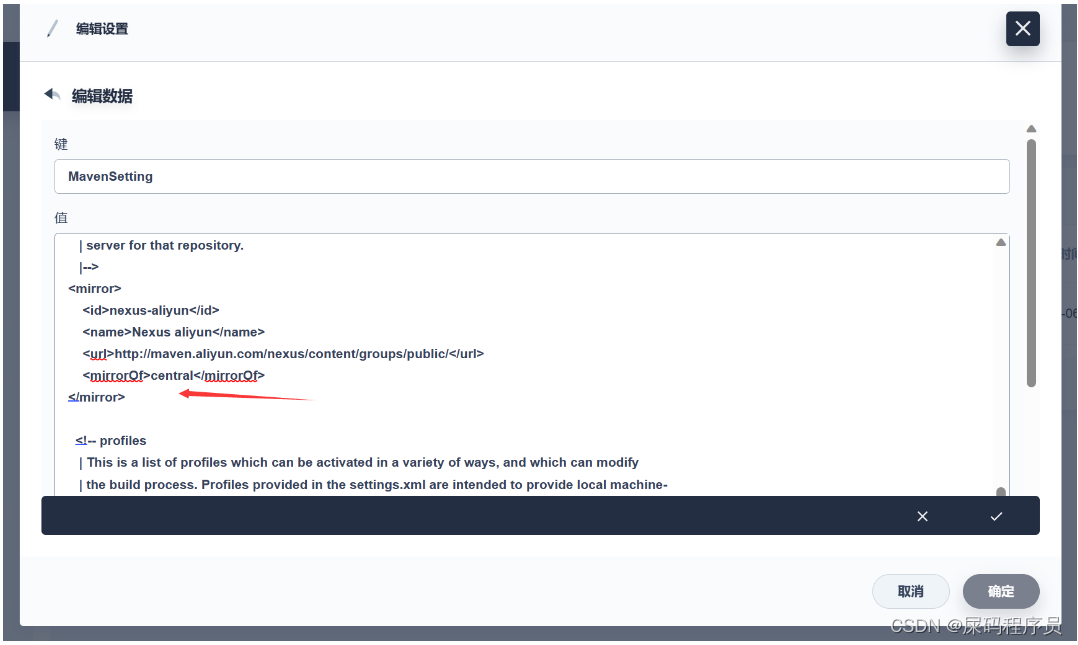
修改这个配置。加入maven阿里云镜像加速地址
-
<mirror>
    <id>nexus-aliyun</id>
    <name>Nexus aliyun</name>
    <url>http://maven.aliyun.com/nexus/content/groups/public/</url>
    <mirrorOf>central</mirrorOf>
</mirror>
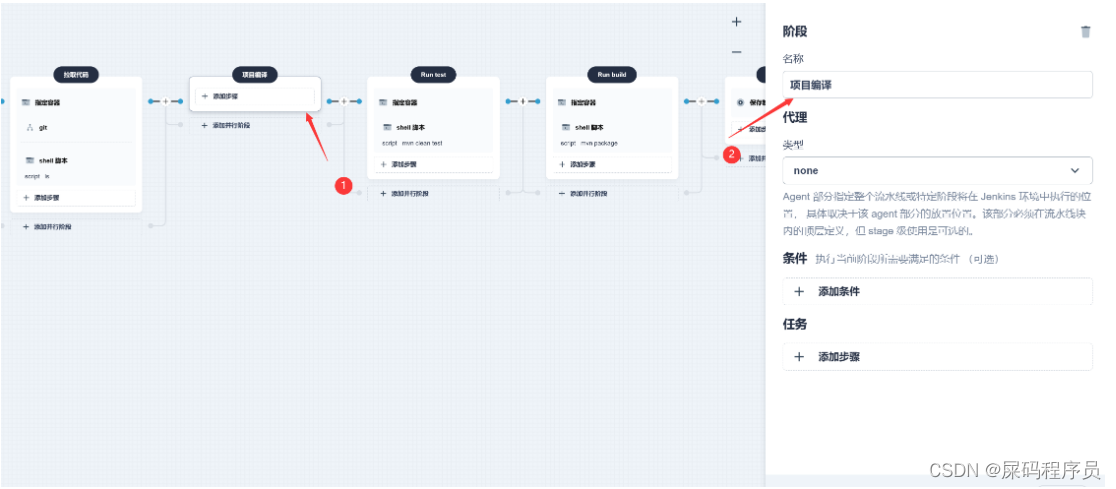
2.3 项目编译
-
更改第二步
-
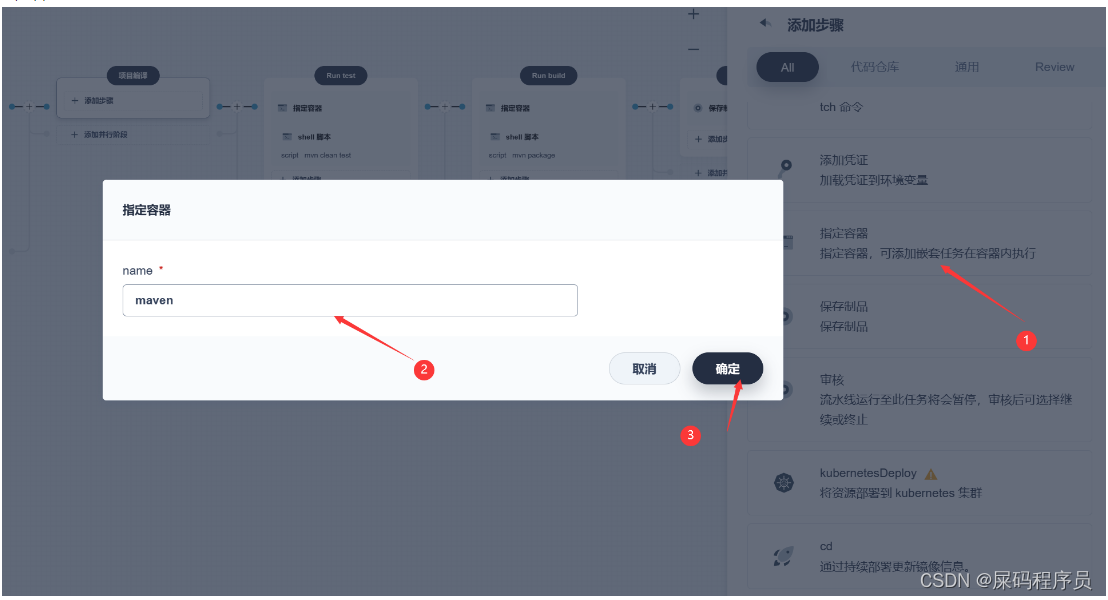
指定容器 maven
-
嵌套步骤:
-
查看我们的代码
-
再次嵌套一个步骤
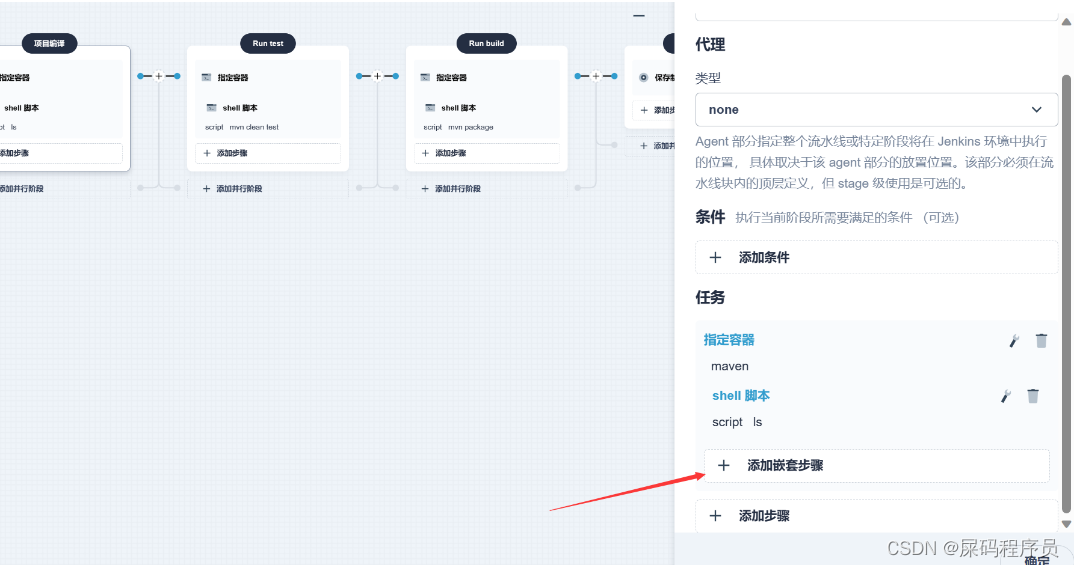
-
编译项目命令
mavne打包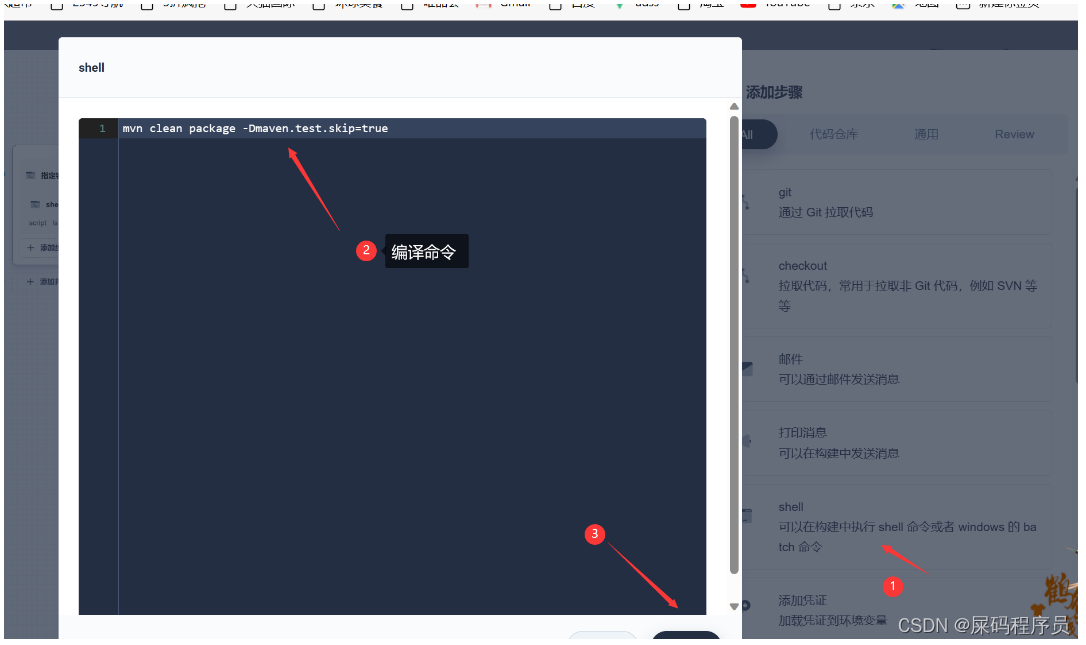
mvn clean package -Dmaven.test.skip=true
-
-
运行流水线
-
运行
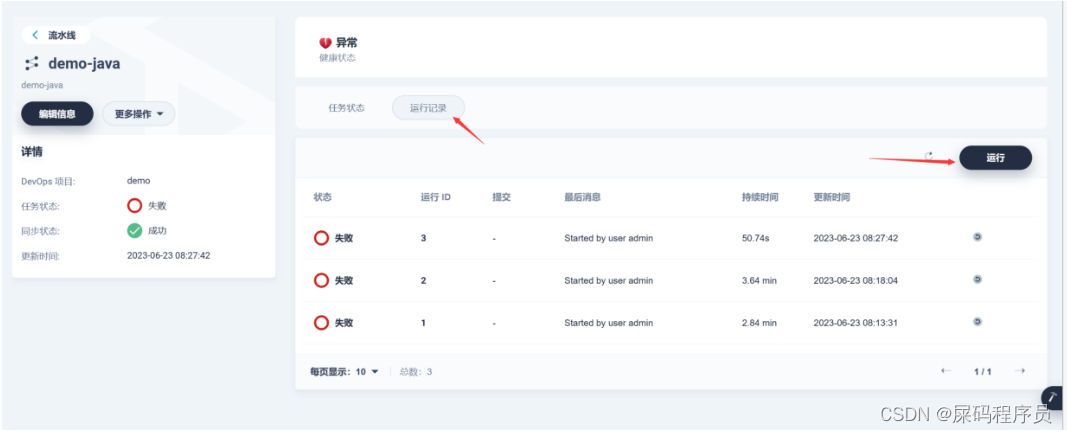
-
查看日志 成功结果
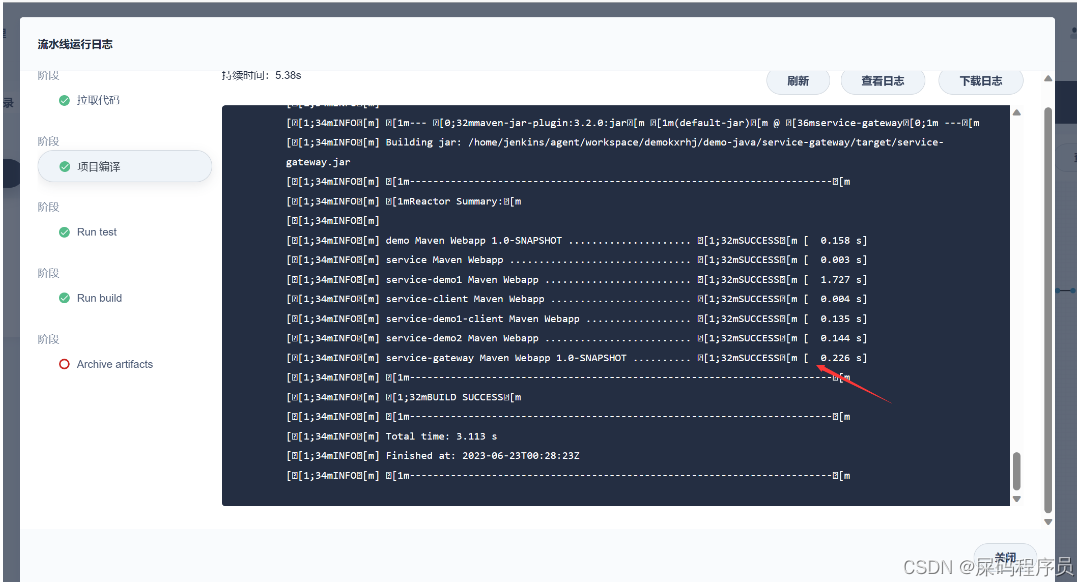
-
2.4 构建镜像
-
编辑第三步
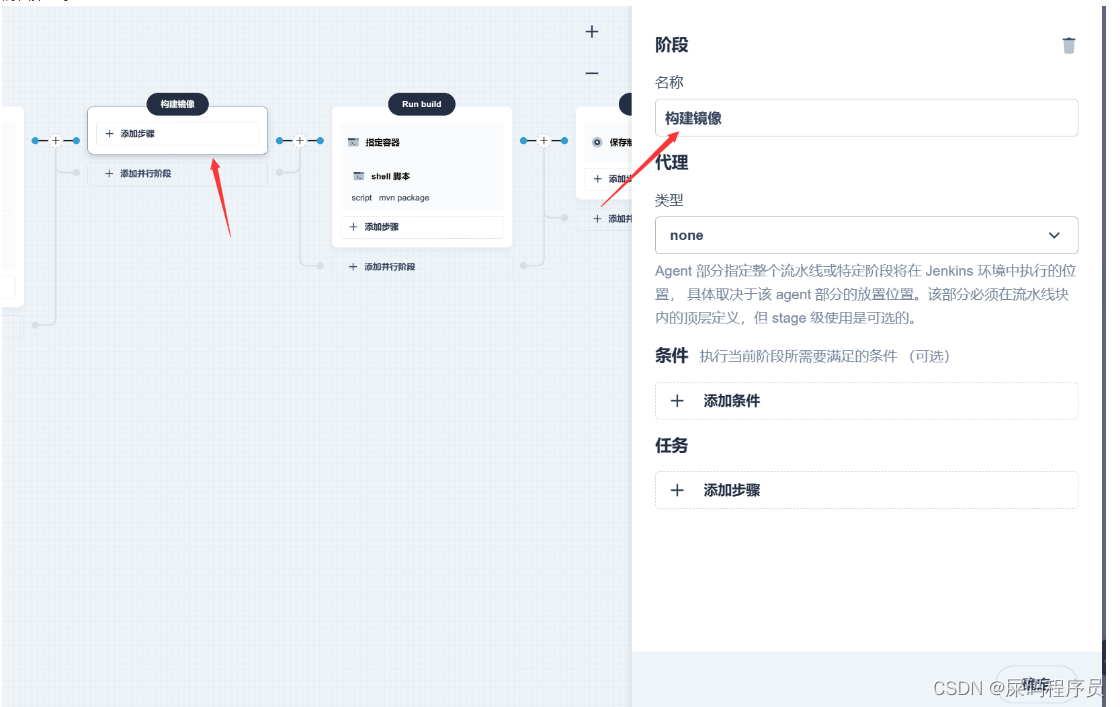
-
指定容器
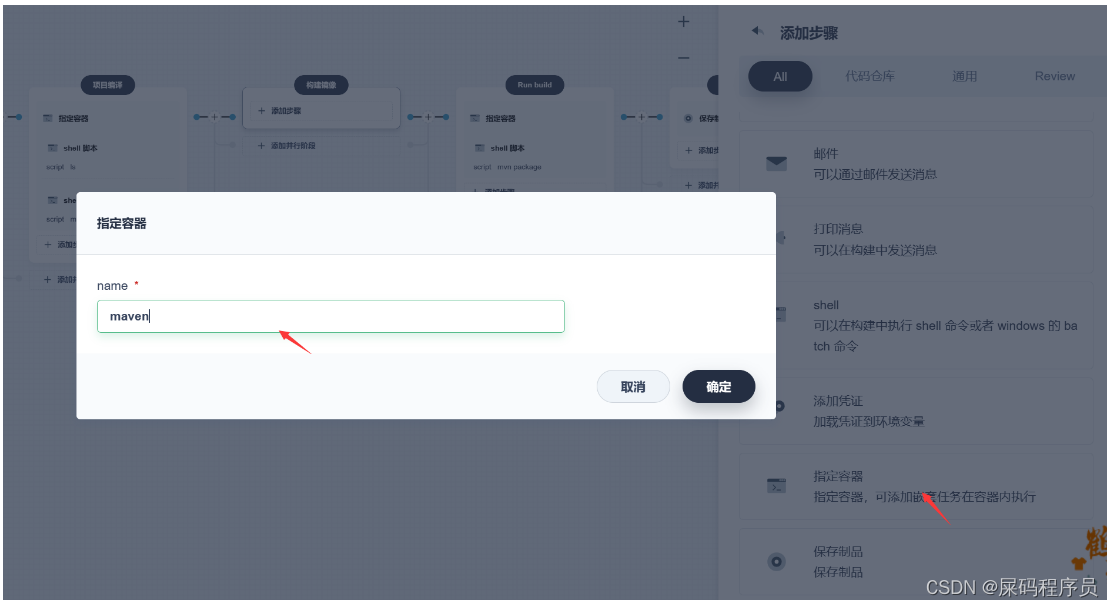
-
查看是否打包
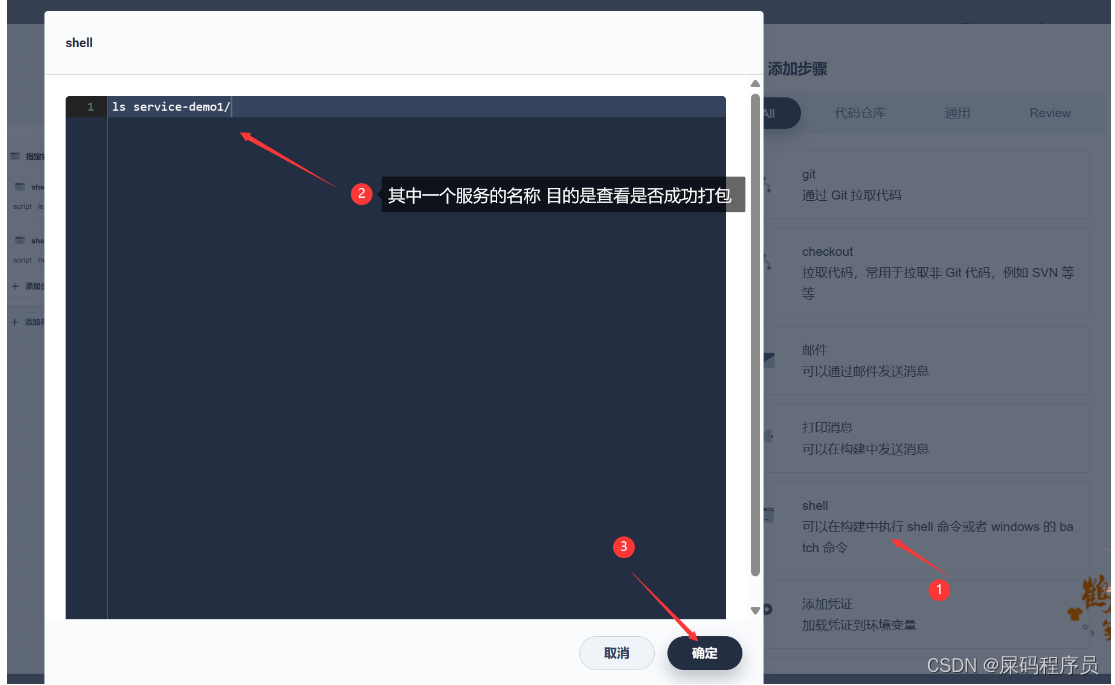
-
进行打包
-
编写打包命令 (注意我们的项目中有编写好的 DockerFile)

docker build -t service-gateway:latest -f service-gateway/Dockerfile service-gateway -
如果是微服务 可以指定并行执行 (也就是重复上面的动作 之后 指定其他的服务即可)
-
-
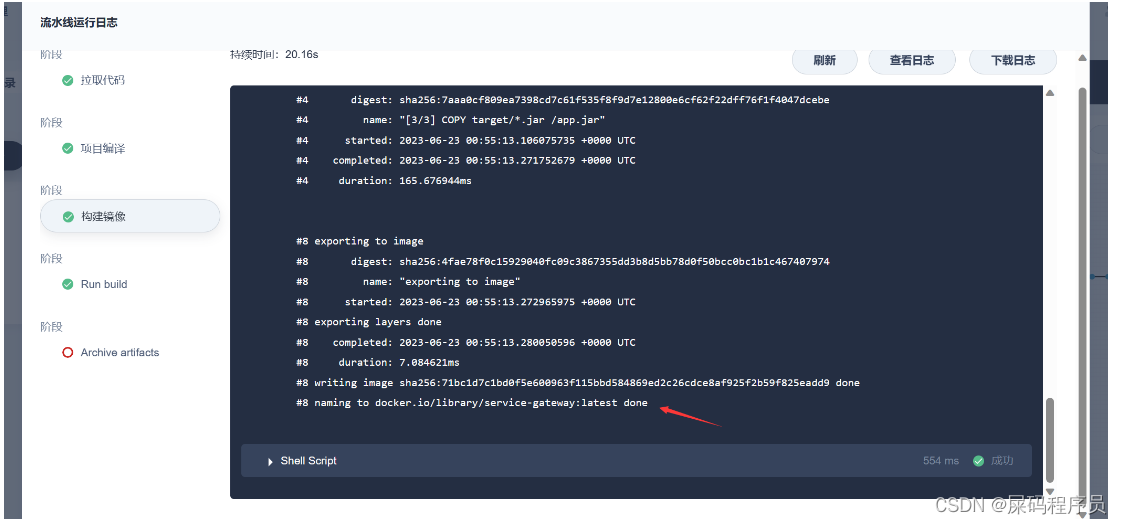
运行流水线 测试第三步
-
打包成功结果
2.5 推送镜像到私有仓库
-
编辑
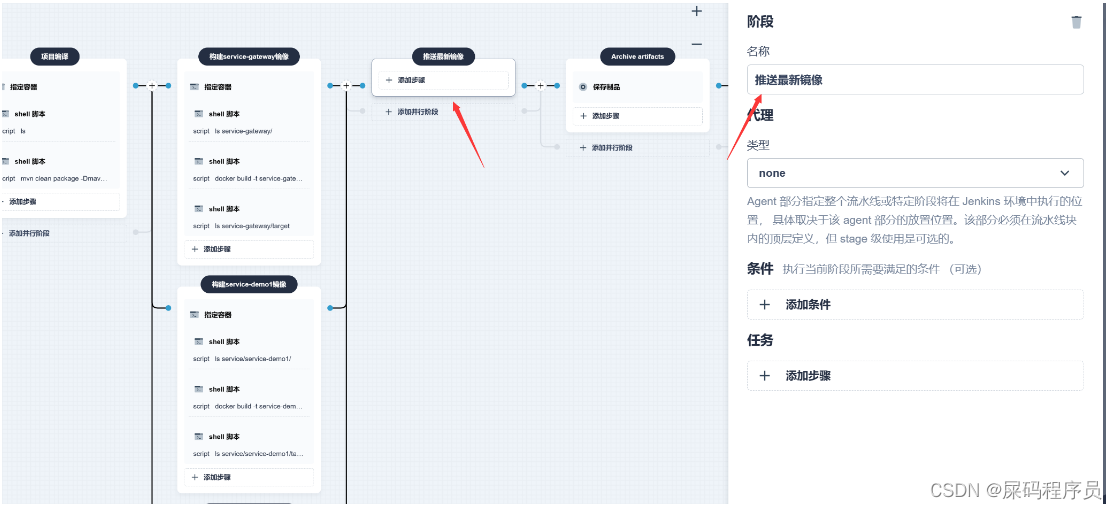
-
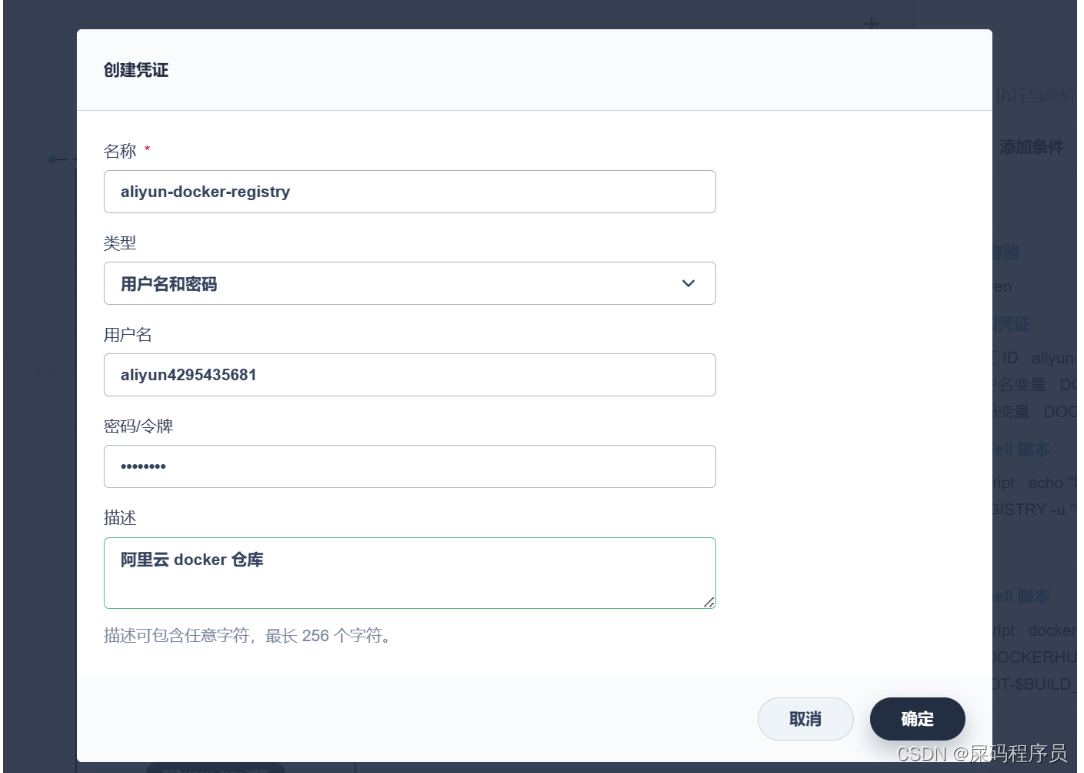
在阿里云创建自己的仓库

-
指定容器 还是 maven
-
添加嵌套配置 配置阿里云 仓库凭证
-
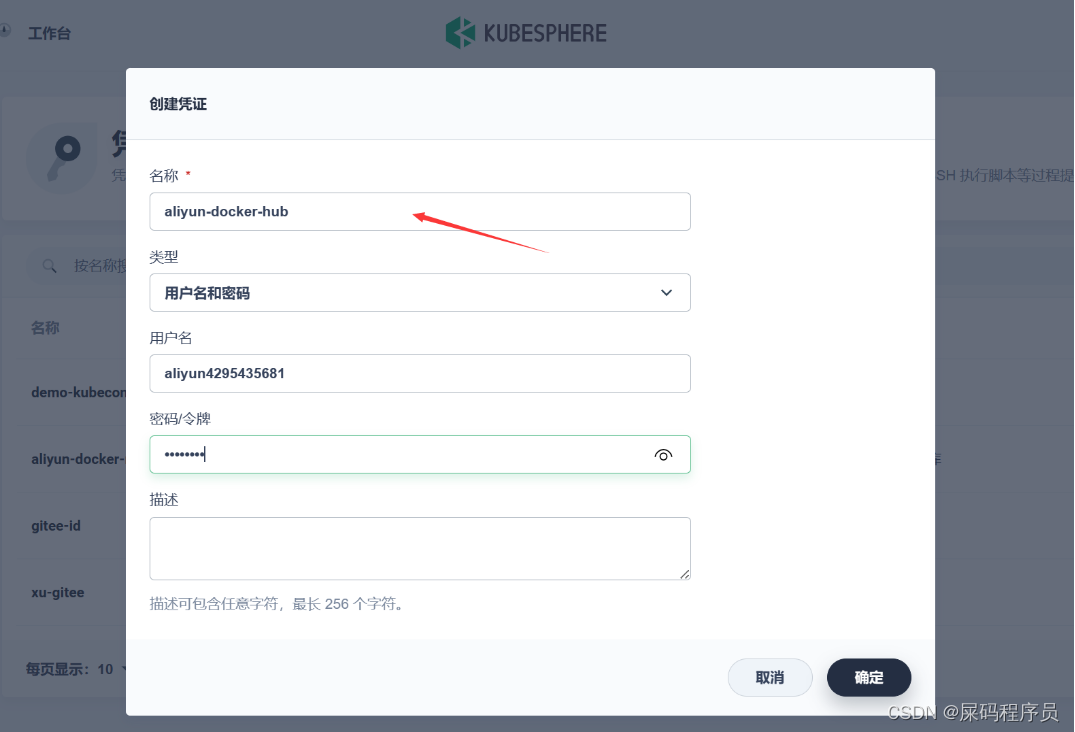
嵌套配置凭证
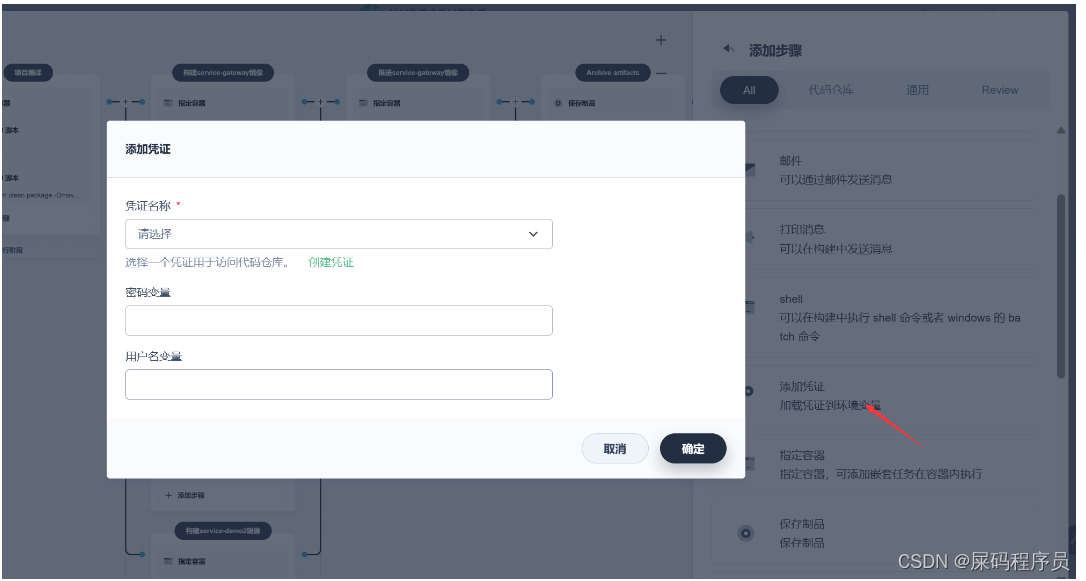
-
创建凭证 注意这里我们的凭证名称要和 jenkinsfile中的环境配置相同哦
-
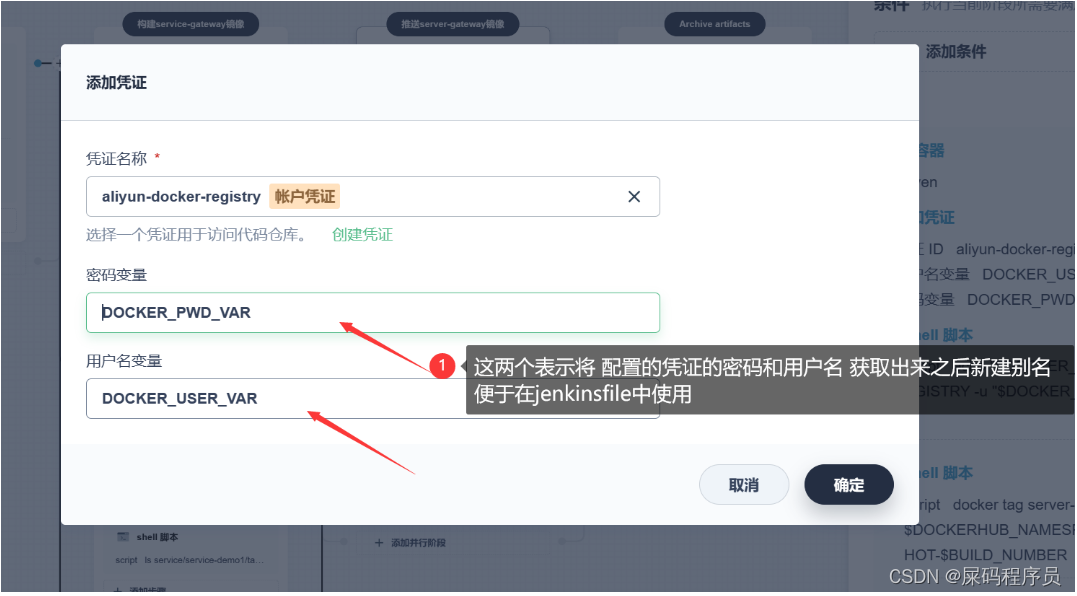
配置变量 进行上传 docker镜像时会使用到
-
-
执行推送镜像三部曲 (也就是嵌套添加三个shell脚本)
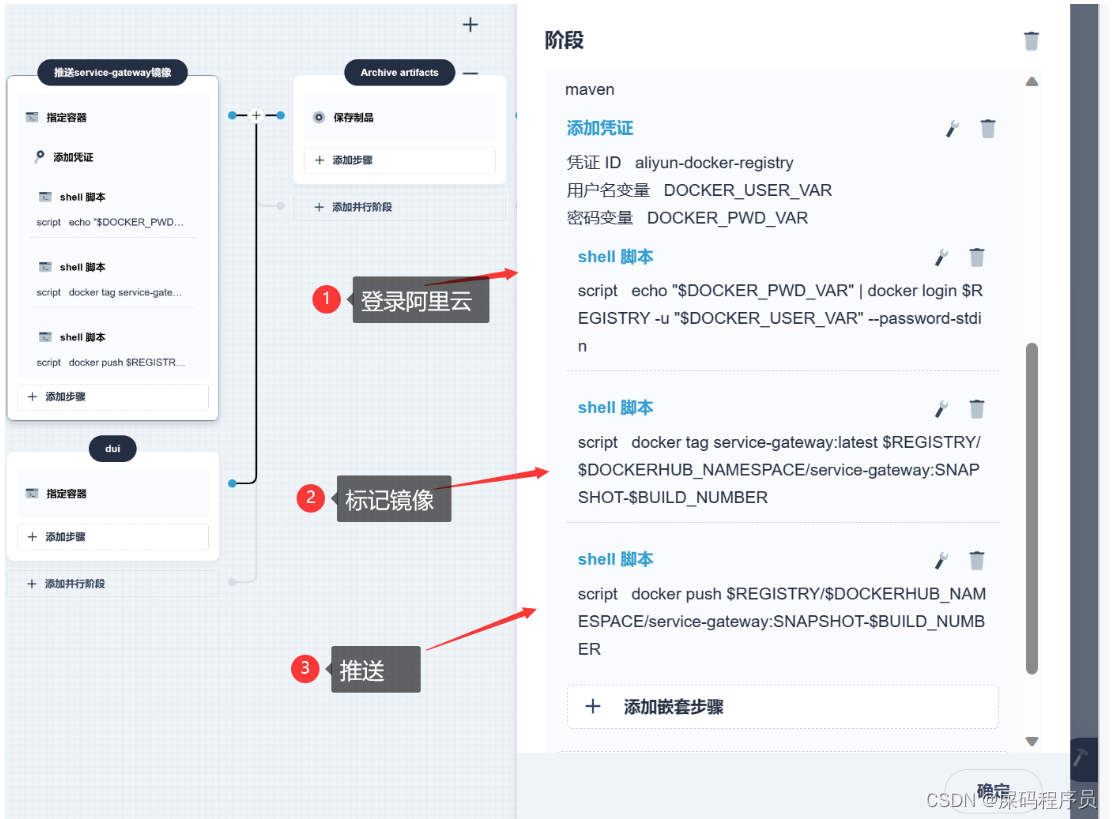
             // 以下是三条命令

script echo "$DOCKER_PWD_VAR" | docker login $REGISTRY -u "$DOCKER_USER_VAR" --password-stdin


              script docker tag service-gateway:latest $REGISTRY/$DOCKERHUB_NAMESPACE/service-gateway:SNAPSHOT-$BUILD_NUMBER


              script  docker push  $REGISTRY/$DOCKERHUB_NAMESPACE/service-gateway:SNAPSHOT-$BUILD_NUMBER
以上还有诸多配置 需要自己编写下Jenkins file 以上散步需要配置 仓库地址那些 需要在jenkinsfile中进行配置
主要是增加 :
 // 环境配置
  environment {


    DOCKER_CREDENTIAL_ID = 'dockerhub-id'
    GITHUB_CREDENTIAL_ID = 'github-id'
    KUBECONFIG_CREDENTIAL_ID = 'demo-kubeconfig'
    REGISTRY = 'registry.cn-hangzhou.aliyuncs.com' //阿里云地址
    DOCKERHUB_NAMESPACE = 'xu-hello' // 命名空间
    GITHUB_ACCOUNT = 'kubesphere'
    APP_NAME = 'devops-java-sample'
    ALIYUNHUB_NAMESPACE = 'xu-hello'
  }
  parameters {


    string(name: 'TAG_NAME', defaultValue: '', description: '')
  }
以下是执行到这步 的完整jenkinsfile
pipeline {


  agent {


    node {


      label 'maven'
    }

  }
  stages {


    stage('拉取代码') {


      agent none
      steps {


        container('maven') {


          git(url: 'https://gitee.com/dachang-rolling-dog/demo-deployment-kubesphere.git', credentialsId: 'gitee-id', branch: 'master', changelog: true, poll: false)
          sh 'ls'
        }

      }
    }

    stage('项目编译') {


      agent none
      steps {


        container('maven') {


          sh 'ls'
          sh 'mvn clean package -Dmaven.test.skip=true'
        }

      }
    }

    stage('构建镜像') {


      parallel {


        stage('构建service-gateway镜像') {


          agent none
          steps {


            container('maven') {


              sh 'ls service-gateway/'
              sh 'docker build -t service-gateway:latest -f service-gateway/Dockerfile service-gateway'
              sh 'ls service-gateway/target'
            }

          }
        }

        stage('构建service-demo1镜像') {


          agent none
          steps {


            container('maven') {


              sh 'ls service/service-demo1/'
              sh 'docker build -t service-demo1:latest -f service/service-demo1/Dockerfile ./service/service-demo1'
              sh 'ls service/service-demo1/target'
            }

          }
        }

        stage('构建service-demo2镜像') {


          agent none
          steps {


            container('maven') {


              sh 'ls service/service-demo2/'
              sh 'docker build -t service-demo2:latest -f service/service-demo2/Dockerfile ./service/service-demo2'
              sh 'ls service/service-demo2/target'
            }

          }
        }

      }
    }

    stage('推送最新镜像') {


      parallel {


        stage('推送service-gateway镜像') {


          agent none
          steps {


            container('maven') {


              withCredentials([usernamePassword(credentialsId : 'aliyun-docker-registry' ,usernameVariable : 'DOCKER_USER_VAR' ,passwordVariable : 'DOCKER_PWD_VAR' ,)]) {


                sh 'echo "$DOCKER_PWD_VAR" | docker login $REGISTRY -u "$DOCKER_USER_VAR" --password-stdin'
                sh 'docker tag service-gateway:latest $REGISTRY/$DOCKERHUB_NAMESPACE/service-gateway:SNAPSHOT-$BUILD_NUMBER'
                sh 'docker push  $REGISTRY/$DOCKERHUB_NAMESPACE/service-gateway:SNAPSHOT-$BUILD_NUMBER'
              }

            }

          }
        }

        stage('dui ') {


          agent none
          steps {


            container('maven') {


              sh 'ls'
            }

          }
        }

      }
    }

    stage('Archive artifacts') {


      steps {


        archiveArtifacts 'target/*.jar'
      }
    }

  }
  // 环境配置
  environment {


    DOCKER_CREDENTIAL_ID = 'dockerhub-id'
    GITHUB_CREDENTIAL_ID = 'github-id'
    KUBECONFIG_CREDENTIAL_ID = 'demo-kubeconfig'
    REGISTRY = 'registry.cn-hangzhou.aliyuncs.com' //阿里云地址
    DOCKERHUB_NAMESPACE = 'xu-hello' // 命名空间
    GITHUB_ACCOUNT = 'kubesphere'
    APP_NAME = 'devops-java-sample'
    ALIYUNHUB_NAMESPACE = 'xu-hello'
  }
  parameters {


    string(name: 'TAG_NAME', defaultValue: '', description: '')
  }
}
2.6 部署服务:
-
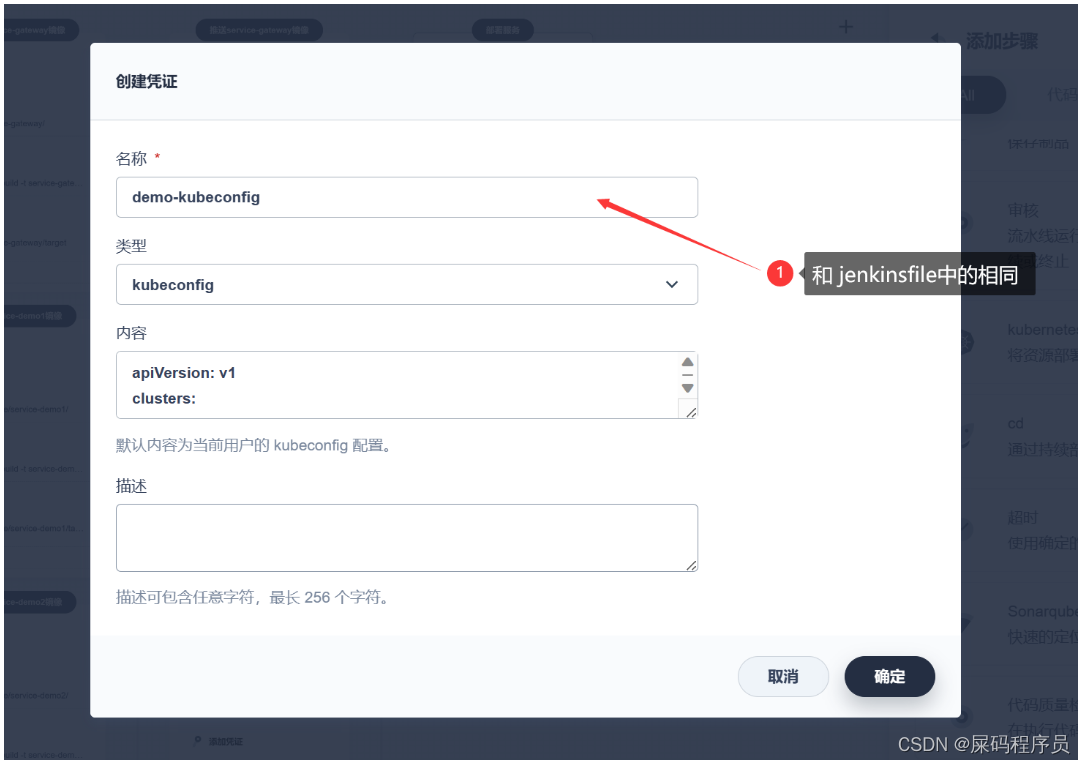
配置凭证
-
编辑凭证
-
指定
KubeconfigFile Variable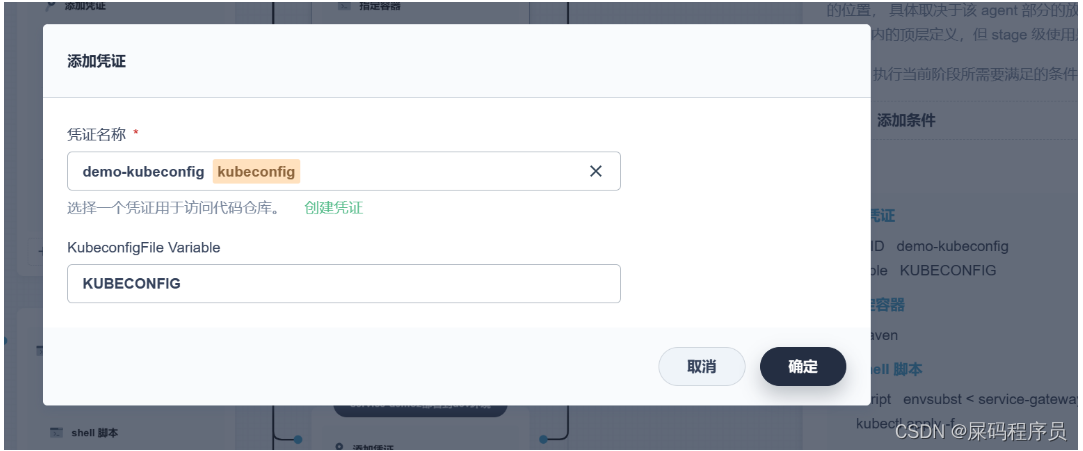
-
-
添加嵌套步骤
-
指定容器 还是maven
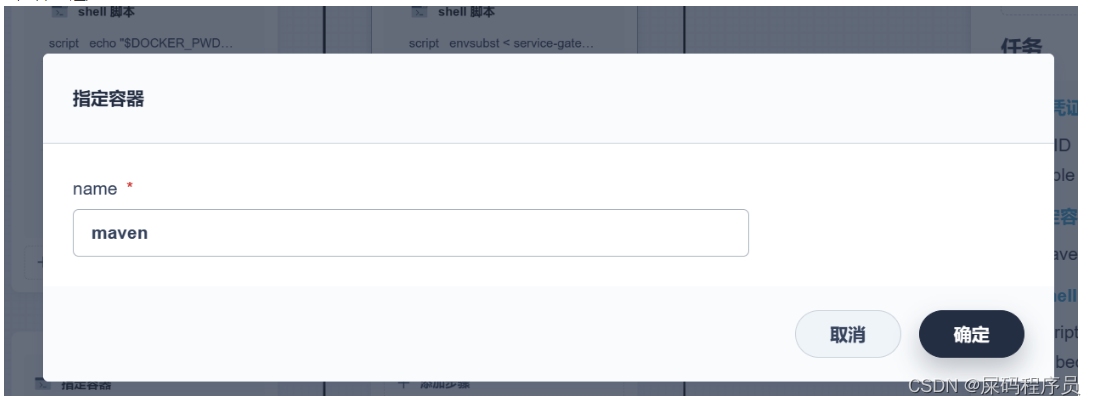
-
部署命令
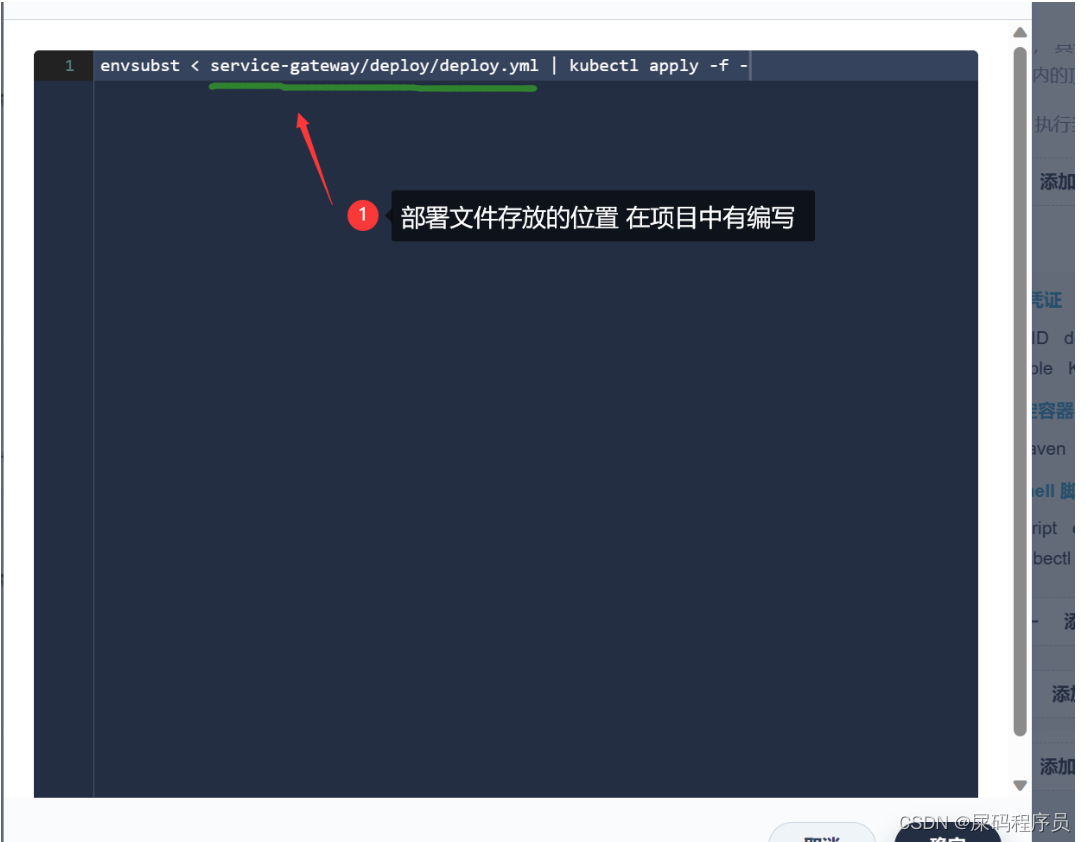
-
-
还要再配置 阿里云的账户凭证 名称为 我们的项目中 deploy 文件中
imagePullSecrets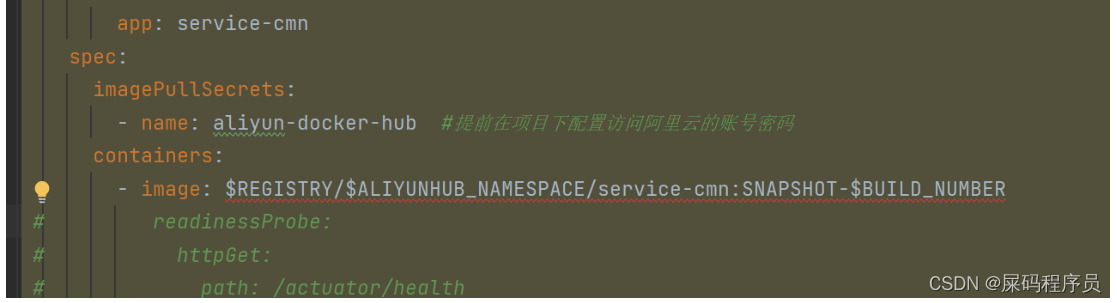
-
编辑配置文件
- 使用admin登陆ks
- 进入集群管理
- 进入配置中心
4.
-
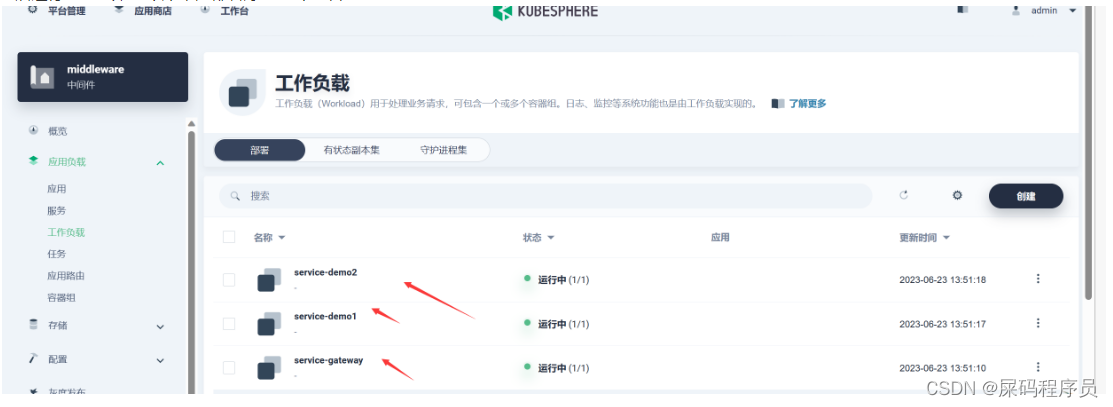
之后在部署服务的项目中还要配置 一样的操作 (也就是在项目中再配置一遍)
-
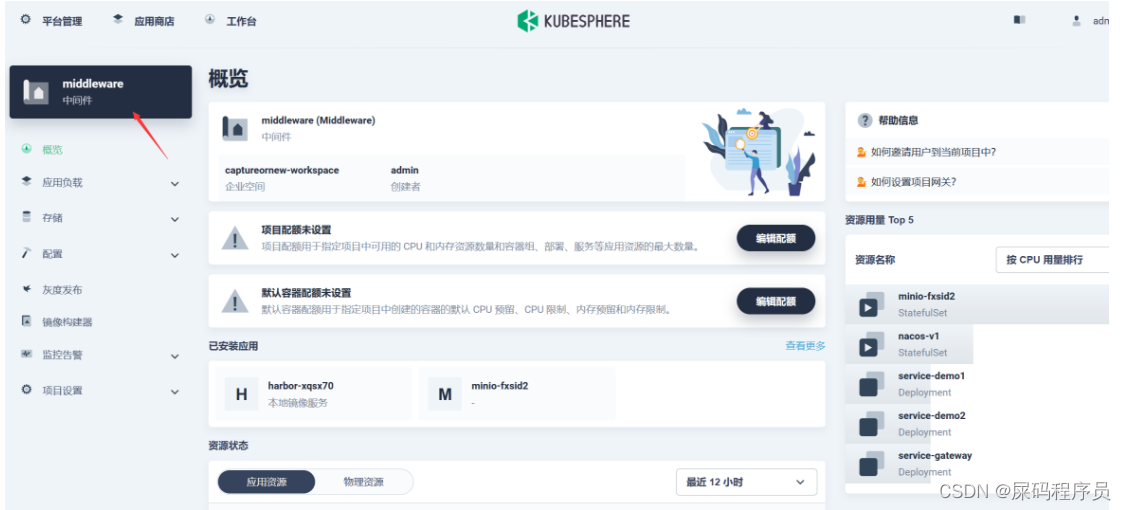
之后运行流水线即可 以下就是部署好的 三个项目
以上就是一个 后端微服务 或者 单服务的流水线部署流程 还是十分简单的 :
当然如果你有编译好的jenkinsFile 可以直接拿来使用 哦
-
点击编辑JenkinsFile
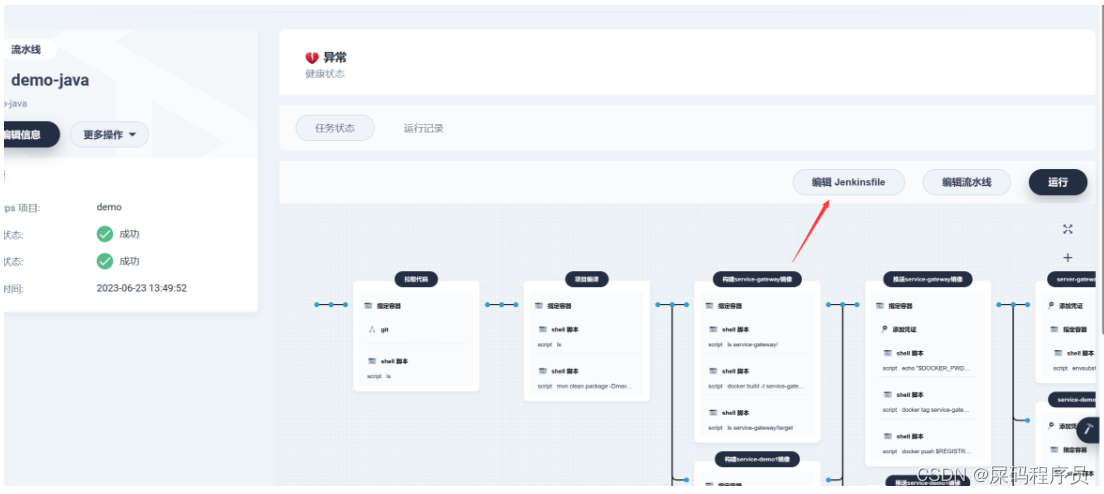
-
之后将你的 文件复制进去即可 运行了。
附录:
-
以下是本次部署项目的 jenkinsfile 文件
pipeline {


  agent {


    node {


      label 'maven'
    }

  }
  stages {


    stage('拉取代码') {


      agent none
      steps {


        container('maven') {


          git(url: 'https://gitee.com/dachang-rolling-dog/demo-deployment-kubesphere.git', credentialsId: 'gitee-id', branch: 'master', changelog: true, poll: false)
          sh 'ls'
        }

      }
    }

    stage('项目编译') {


      agent none
      steps {


        container('maven') {


          sh 'ls'
          sh 'mvn clean package -Dmaven.test.skip=true'
        }

      }
    }

    stage('构建镜像') {


      parallel {


        stage('构建service-gateway镜像') {


          agent none
          steps {


            container('maven') {


              sh 'ls service-gateway/'
              sh 'docker build -t service-gateway:latest -f service-gateway/Dockerfile service-gateway'
              sh 'ls service-gateway/target'
            }

          }
        }

        stage('构建service-demo1镜像') {


          agent none
          steps {


            container('maven') {


              sh 'ls service/service-demo1/'
              sh 'docker build -t service-demo1:latest -f service/service-demo1/Dockerfile ./service/service-demo1'
              sh 'ls service/service-demo1/target'
            }

          }
        }

        stage('构建service-demo2镜像') {


          agent none
          steps {


            container('maven') {


              sh 'ls service/service-demo2/'
              sh 'docker build -t service-demo2:latest -f service/service-demo2/Dockerfile ./service/service-demo2'
              sh 'ls service/service-demo2/target'
            }

          }
        }

      }
    }

    stage('推送最新镜像') {


      parallel {


        stage('推送service-gateway镜像') {


          agent none
          steps {


            container('maven') {


              withCredentials([usernamePassword(credentialsId : 'aliyun-docker-registry' ,usernameVariable : 'DOCKER_USER_VAR' ,passwordVariable : 'DOCKER_PWD_VAR' ,)]) {


                sh 'echo "$DOCKER_PWD_VAR" | docker login $REGISTRY -u "$DOCKER_USER_VAR" --password-stdin'
                sh 'docker tag service-gateway:latest $REGISTRY/$DOCKERHUB_NAMESPACE/service-gateway:SNAPSHOT-$BUILD_NUMBER'
                sh 'docker push  $REGISTRY/$DOCKERHUB_NAMESPACE/service-gateway:SNAPSHOT-$BUILD_NUMBER'
              }

            }

          }
        }

        stage('推送service-demo1镜像') {


          agent none
          steps {


            container('maven') {


              withCredentials([usernamePassword(credentialsId : 'aliyun-docker-registry' ,usernameVariable : 'DOCKER_USER_VAR' ,passwordVariable : 'DOCKER_PWD_VAR' ,)]) {


                sh 'echo "$DOCKER_PWD_VAR" | docker login $REGISTRY -u "$DOCKER_USER_VAR" --password-stdin'
                sh 'docker tag service-demo1:latest $REGISTRY/$DOCKERHUB_NAMESPACE/service-demo1:SNAPSHOT-$BUILD_NUMBER'
                sh 'docker push  $REGISTRY/$DOCKERHUB_NAMESPACE/service-demo1:SNAPSHOT-$BUILD_NUMBER'
              }

            }

          }
        }

        stage('推送service-demo2镜像') {


          agent none
          steps {


            container('maven') {


              withCredentials([usernamePassword(credentialsId : 'aliyun-docker-registry' ,usernameVariable : 'DOCKER_USER_VAR' ,passwordVariable : 'DOCKER_PWD_VAR' ,)]) {


                sh 'echo "$DOCKER_PWD_VAR" | docker login $REGISTRY -u "$DOCKER_USER_VAR" --password-stdin'
                sh 'docker tag service-demo2:latest $REGISTRY/$DOCKERHUB_NAMESPACE/service-demo2:SNAPSHOT-$BUILD_NUMBER'
                sh 'docker push  $REGISTRY/$DOCKERHUB_NAMESPACE/service-demo2:SNAPSHOT-$BUILD_NUMBER'
              }

            }

          }
        }

      }
    }

    stage('部署到dev环境') {


      parallel {


        stage('server-gateway部署到dev环境') {


          steps {


            withCredentials([kubeconfigFile(credentialsId : 'demo-kubeconfig' ,variable : 'KUBECONFIG' )]) {


              container('maven') {


                sh 'envsubst < service-gateway/deploy/deploy.yml | kubectl apply -f -'
              }

            }

          }
        }

        stage('service-demo1部署到dev环境') {


          steps {


            withCredentials([kubeconfigFile(credentialsId : 'demo-kubeconfig' ,variable : 'KUBECONFIG' )]) {


              container('maven') {


                sh 'envsubst < service/service-demo1/deploy/deploy.yml | kubectl apply -f -'
              }

            }

          }
        }

        stage('service-demo2部署到dev环境') {


          steps {


            withCredentials([kubeconfigFile(credentialsId : 'demo-kubeconfig' ,variable : 'KUBECONFIG' )]) {


              container('maven') {


                sh 'envsubst < service/service-demo2/deploy/deploy.yml | kubectl apply -f -'
              }

            }

          }
        }

      }
    }

  }

    // 以下打了注释的 地方需要自定义配置 其余地方不变
  environment {


    DOCKER_CREDENTIAL_ID = 'dockerhub-id'
    GITHUB_CREDENTIAL_ID = 'github-id'

    KUBECONFIG_CREDENTIAL_ID = 'demo-kubeconfig'  // 这里是我们在 部署环节中所配置 环境变量 等信息  关于 .kube 的  (这里没有使用到 因为kubesphere:3.2 之后就被弃用了部署的命令 所以这里换了部署的命令也就自然没有用到)
    REGISTRY = 'registry.cn-hangzhou.aliyuncs.com' // 阿里云仓库地址
    DOCKERHUB_NAMESPACE = 'xu-hello'  // 我的阿里云 命名空间的名称
    GITHUB_ACCOUNT = 'kubesphere'
    APP_NAME = 'devops-java-sample'
    ALIYUNHUB_NAMESPACE = 'xu-hello'   // 我的阿里云 命名空间的名称
  }
  parameters {


    string(name: 'TAG_NAME', defaultValue: '', description: '')
  }
}